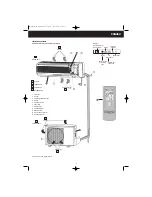
background image

9

ENGLISH

INSTALLATION

Select installation location for indoor and outdoor unit BEFORE INSTALLATION

WARNING

1. Install the air conditioner securely in as place which can bear the weight of the
indoor and outdoor unit. 
When installed in an insufficient strong place, the unit
could fall and cause injury.

2. Perform the installation securely referring to this manual. Incomplete
installation could cause personal injury.

3. CAUTION
Do not install the air conditioner in a place where an flammable gas leaks.  
If gas
leaks and accumulates in the area surrounding the outdoor unit, it could cause an
explosion.

4. Carefully read and follow the Important Safety Instructions.

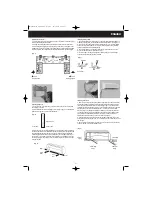
SELECTING THE INSTALLATION LOCATION

1. Be sure to check the indoor and outdoor unit dimensions, checking if there is
enough space to position it, before installing the unit.

2. Be sure to select a place there is no risk of damaging water and gas pipes or
electrical wires when drilling the wall.

Where it is not exposed to strong wind.

Where airflow is good and dustless.

Where it is not exposed to rain and direct sunshine.

Where neighbours are not annoyed by operation sound or hot air.

Where rigid wall or support is available to prevent the increase of operation sound
or vibration.

Do not pile up obstructions near the air outlet vent of outdoor unit to prevent noise
from spreading.

Where it is away from heat sources, steam and flammable gas.

When installing the unit at a high level, be sure to securely fix the unit feet.

Where it is at least 3 m away from the antenna of TV set or radio (otherwise images
would be disturbed or noise would be generated).

Do not use near a bath tub, shower or swimming pool.

Where it is easy to drain condensed water from indoor and outdoor unit.

Install the air conditioner in a place away from flammable items such as curtain or
clothes.

Install the unit horizontally.

Make sure the air outlet vents are not blocked.

Do not install the outdoor unit in a closed room, it is to be installed in a place with
good ventilation.

Ensure that the installation of the outdoor and indoor unit meets the requirements of
following installing dimensions.

CAUTION

Avoid the following places for installation where air conditioner trouble is liable to
occur.

Where flammable gas could leak.

Where there is much machine oil.

Salty places.

Where sulphide gas is generated such as a hot spring.

Where there is high-frequency or wireless equipment.
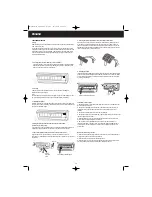
ELECTRIC CONNECTION

All the electric installations must be done according to the local law, regulation and
this instruction.

Make sure that the electrical installation is suitable to supply continuously current
necessary for the air conditioner in addition to that already used by other electric
appliances (white goods, lighting). 

See the max electric input indicated on the name plate positioned on the air
conditioner. 

Make sure that circuit breakers, fuses, etc. are of sufficient capacity to handle a
start-up current of 20 A (generally less than 1 second).

Make sure to earth the unit by connecting the plug to an earthed power socket.

Tighten the screws of cable clamp when installing the cable clamp at the outdoor
unit. If these screws are broken, these need to be changed and must not be used for
the electric connection.

Both the indoor and outdoor electric connection should be strain-relieved and not be
affected by stretch and twist stress.

After completing the electric installation, fix the power cord with clamps and make
sure that the cables between the connection and the clamp are strain-relieved and
not stretched.

Check that all electric cables and connections are correctly and firmly installed, with
a load capacity of 0.5 kg. Do not start the air conditioner if the electric cables have
not been installed correctly or firmly.

HW-QUICK12E_GB_OM.qxd  4/2/07  12:04 PM  Page 9

Содержание HW-QUICK12E

Страница 1: ...ase of low temperatures Sleep mode Suitable for rooms up to approx 125 m 1 Optimal air circulation due to an adjustable air outflow grid Infrared remote control for easy handling Timer function Pilot light Environmentally friendly refrigerant R410a CFC free 1 To calculate the optimal cooling capacity the following rule can be taken as basis Usually the air conditioning of 1 m requires 60 to 100 Wa...

Страница 2: ...ruksanvisning KLIMAAPPARAT TIL SELVMONTAGE Betjeningsvejledning ITSEASENNETTAVA ILMASTOINTILAITE Käyttöohje KEND KEND N ZE MONTE EDEB LECE N Z KL MA C HAZI Kullan m Talimatlar KLIMATIZAČNÍ PŘÍSTROJ PRO VLASTNÍ MONTÁŽ Návod k použití KLIMATIZACIJSKI URE AJ ZA SAMOMONTAŽU Upute za uporabu KLIMATSKA NAPRAVA ZA SAMOSTOJNO MONTAŽO Navodilo za uporabo SI HR CZ TR FI DK SE ES FR DE GB HW QUICK12E HW QUIC...

Страница 3: ... and no responsibility is accepted by the manufacturer for damages or injury s caused by this air conditioner as a result of incorrect usage or installation CONTENT Construction and Usage Installation Maintenance Construction of the wall mounted split air conditioner 3 Precautionary and safety measures 4 Specification model and technical parameter 5 Remote control function keys 6 Operation guide 9...

Страница 4: ...re may vary from original product Air Inflow 1 Front Panel 2 Air Filter 3 Emergency Operation switch 4 Display 5 Oscillating Louvers 6 Power Plug 7 Drainage Hose 8 Air Discharge Grid 9 Remote Control 10 Cover of Quick Connector 11 Active Carbon Filter 9 11 8 10 Operating Indicator Set Temperature Standby light glows green DeHumidifing Air Inflow INDOOR UNIT Air Discharge OUTDOOR UNIT D C B A A B C...

Страница 5: ...en slightly for ventilation if the indoor air is too turbid when the unit is running draw curtain or cover window to prevent leakage of cool air or heat that may impact the air conditioning effect While using the Cooling Heating or Drying mode make sure that all windows are closed 7 If the power cord of the air conditioner is damaged it must be replaced by the manufacturer at a manufacturer approv...

Страница 6: ...anteed operating range HWQUICK12E SPECIFICATIONS AND TECHNICAL PARAMETERS Model Function Cooling capacity W Heating capacity W Voltage frequency V Hz Rated current of cooling heating A Max input current A Rated power of cooling heating W Air flow m3 h Refrigerant type and standard charge volume kg Water proof level Noise indoor outdoor dB A Climate type Anti electric shock protect type Weight indo...

Страница 7: ...al display It shows all selected functions B 2 SLEEP key Press this key to select SLEEP Mode C 3 TIMER OFF key During operation press this key to select OFF TIME between 0 and 24 hours to stop the unit automatically after selected delay D 4 TIMER ON key During no operation press this key to select ON TIME between 0 and 24 hours to start the unit automatically after selected delay E 5 ON OFF key Pr...

Страница 8: ...range of 16 C to 30 C DRY Mode If the room temperature is within 2 C of the set temperature on the remote con trol the air conditioner operates in DRY Mode only If the room temperature rises outside of this range the unit will change to the COOL Mode until the room tem perature is within the range of 2 C again The room temperature can be set between the range of 16 C to 30 C AUTO Mode In AUTO Mode...

Страница 9: ...n at low speed When the unit is off press TIMER ON key and set ON TIME in a range of 0 to 24 hours to start the unit automatically When the unit is operating press TIMER OFF key and set OFF TIME in range of 0 to 24 hours to stop the unit auto matically 2 Press MODE key to set and mode to ensure comfortable effect 6 Press SLEEP key to set SLEEP Mode 1 Plug in press ON OFF key then the air condition...

Страница 10: ...tems such as curtain or clothes Install the unit horizontally Make sure the air outlet vents are not blocked Do not install the outdoor unit in a closed room it is to be installed in a place with good ventilation Ensure that the installation of the outdoor and indoor unit meets the requirements of following installing dimensions CAUTION Avoid the following places for installation where air conditi...

Страница 11: ...alling dimensions leaving enough space for maintenance It should be positioned so that the air can circulate freely 2 Place the unit where air filters and active carbon filters can be taken out easily Above 15 cm Above 300 cm Wall pipe Abo ve 200 cm Above 15 cm Above 15 cm Distance between unit and wall Distance between unit and ceiling Distance between unit and floor Air discharge Distance betwee...

Страница 12: ...routed both Methods 1 2 3 and 4 are recommended NOTE In order not to damage the piping we recommend to only bend them once very gently Furthermore it is essential when you extend the pipes liquid and gas pipe that you fill in additional coolant into the system in order to achieve an effective and correct functioning of the air conditioner 150g 2m 2 Hang the suspension slot positioned on the rear s...

Страница 13: ...or unit After disassembling the cover of the quick connector of the outdoor unit you are able to see the female part of the quick connector The male part of the quick connector is at the end of the pipes that are assembled at the indoor unit The pipes are pre filled with refrigerant gas Follow the instructions to connect the quick connector In order to minimise the potential for fluid losses alway...

Страница 14: ...e male part of the quick connector to install the quick connector correctly Orientating Pin Tightening lever 5 Pull the tightening sleeve on at the female part of the quick connector back and hold it back Tightening sleeve 3 Remove the metal protection cap off the quick connector end of the outdoor unit by pulling back the tightening sleeve of that quick connector end and by pulling out the metal ...

Страница 15: ... the female part of the power clamp on the Terminal Board Connect these two parts by sliding the male part of the power clamp into the female part of the power clamp After you checked that the two parts of the power clamp are firmly fixed and connected fix the power cord of the female part by assembling the fixation clamp at the outdoor unit Ensure that the black insulated power cord part has been...

Страница 16: ...ck if there is an abnormal noise vibration or water leakage at the indoor unit and outdoor unit as well as at the quick connector If everything is ok with the complete unit and you do not have to disassemble the unit to correct mistakes produced during installation use the delivered gum type sealer to close vents around the connection piping and wiring within the hole of the wall Bottom of Outdoor...

Страница 17: ...stic anti dust air filters and active carbon filters Clean the plastic anti dust air filters and active carbon filters by shaking or vacuu ming them Use lukewarm water to wash the filters Do not use water with more than 45 C for cleaning to avoid fading or deformation of the filters Do not use the dishwasher to clean the filters Afterwards dry the filters thoroughly Do not expose them to direct su...

Страница 18: ...ing or heating effect Is the temperature set correctly on the remote control Are the inlet or outlet vents of outdoor unit blocked Is there too much dust on the air filters Are windows and doors closed Is the airflow set too low Is there any heat source in the room Remote control does not control If batteries of the remote control are changed it is necessary to press key ACL after removing the cov...

Страница 19: ...collection service or in the store at which you bought the product This regulation is valid only in EU member states CONDITION OF PURCHASE As condition of sale the purchaser assumes responsibility for the correct use and care of this KAZ product according to these user instructions The purchaser or user must himself or herself decide when and for how long this KAZ product is in use ATTENTION IF PR...

Страница 20: ...tdoor unit l x w x h Dimensions single box approx cm 98 x 37 x 36 5 Indoor unit l x w x h Weight of single box indoor unit approx kg 20 Weight of single box outdoor unit approx kg 34 1 To calculate the optimal cooling capacity the following rule can be taken as basis Usually the air conditioning of 1 m requires 60 to 100 Watt Slants of a roof large glass window surfaces humidity and additional fac...

Отзывы: