


COMPONENT MAINTENANCE MANUAL
00001059
CODE
REFERENCE
DESIGNATION
M38B
LOCTITE 243
ADHESIVE MATERIAL
M81B
DP110
ADHESIVE MATERIAL
M82B
DP490
ADHESIVE MATERIAL
MXXC
GREASE ASONIC 240 GLY32
LUBRICATING MATERIAL
MXXD
VARNISH SCC3
VARNISH MATERIAL
M60X
SOLDER B.SN60PB40
SOLDER MATERIAL
(3)
Referenced Information
REFERENCE
PAGE
BLOCK
DESIGNATION
GRAPHIC-21-22-91-991-022-A01
10000
IPL FIGURE 1
GRAPHIC-21-22-91-991-013-A01
7000
FIGURE 7001
GRAPHIC-21-22-91-991-014-A01
7000
FIGURE 7002
GRAPHIC-21-22-91-991-015-A01
7000
FIGURE 7003
GRAPHIC-21-22-91-991-016-A01
7000
FIGURE 7004
GRAPHIC-21-22-91-991-017-A01
7000
FIGURE 7005
GRAPHIC-21-22-91-991-018-A01
7000
FIGURE 7006
GRAPHIC-21-22-91-991-019-A01
7000
FIGURE 7007
TASK-21-22-91-200-801-A01
5000
INSPECTION/CHECK
TASK-21-22-91-820-802-A01
8000
TIGHTENING TORQUES
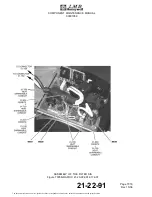
C.
Job Set-up
Do the checking procedures (Ref. TASK 21-22-91-200-801-A01) before assembly.
D.
Procedure
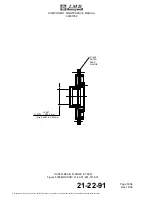
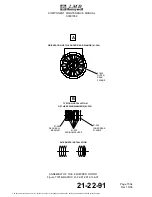
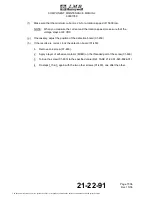
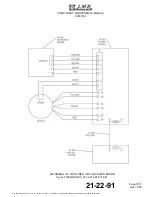
SUBTASK 21-22-91-410-001-A01
(1)
Assembly of the Equipped Rotor
(Ref. IPL Fig. 01)
(Ref. Fig. 7001)
(a)
Install the inner front flange (01-600) on the rotor (01-630).
(b)
Apply a layer of lubricating material (MXXC) on the bearings seats of the rotor (01-630).
(c)
Install the bearings (01-590) on the rotor (01-630) with the press punch adaptor (T03) and
the press punch socket (T04).
(d)
Set the O-ring (01-580) in the outer rear flange (01-560).
(e)
Apply a layer of lubricating material (MXXC) in the bores of the equipped housing (01-640)
and of the outer rear flange (01-560).
21-22-91
Page 7002
Dec 15/06
The document reference is online, please check the correspondence between the online documentation and the printed version.