


COMPONENT MAINTENANCE MANUAL
00001059
SUBTASK 21-22-91-410-004-A01
(8)
Installation of the cover (01-040)
(Ref. IPL Fig. 01)
(Ref. Fig. 7007)
(a)
Attach the screw (01-070) on the cover (01-040) with one nut (01-080).
(b)
Torque the nut (01-080) to the specified value (Ref. TASK 21-22-91-820-802-A01).
(c)
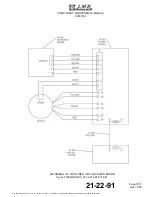
Put the wires and the power cables through the connectors holes in the cover (01-040).
(d)
Put the cover (01-040) in position on the equipped housing (01-640).
(e)
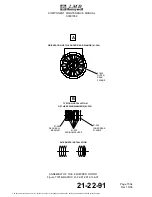
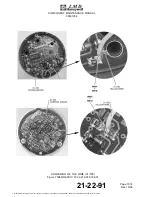
Insert the contacts of the power cables in their housings of the connector (01-100) with
the contacts insertion tool M81969/14-02 (Ref. Fig. 7007).
NOTE:
If the cables are new, cut them at 80 mm (3.15 in) of the ferrite, strip them on 4
mm (0.157 in) and crimp a size 12 contact (01-800).
(f)
Insert the contacts of the wires in their housings of the connector (01-130) with the
contacts insertion tool M81969/14-04 (Ref. Fig. 7007).
NOTE:
If the wires are new, cut them at 80 mm (3.15 in) of the ferrite, strip them on 4
mm (0.157 in) and crimp a size 20 contact (01-810).
(g)
Apply a layer of adhesive material (M38B) on the thread of the six screws (01-050).
(h)
Attach the cover with six screws (01-050) and six washers (01-060).
(i)
Torque the screws (01-050) to the specified value (Ref. TASK 21-22-91-820-802-A01).
(j)
Apply a layer of adhesive material (M38B) on the thread of the four screws (01-110).
(k)
Attach the connector (01-100) to the cover (01-040) with the four screws (01-110) and the
four washers (01-120).
(l)
Apply a layer of adhesive material (M38B) on the thread of the four screws (01-140).
(m)
Attach the connector (01-130) to the cover (01-040) with the four screws (01-140) and the
four washers (01-150).
(n)
Torque the screws (01-110) and (01-140) to the specified value (Ref. TASK
21-22-91-820-802-A01).
21-20-99
Page 7018
Dec 15/06
The document reference is online, please check the correspondence between the online documentation and the printed version.