background image

'61HN252' by American Honda Motor Co. - Page 240 of 540

http://services.honda.com/ServiceManual/SVC_MNL/61HN253/61HN2...

1 of 1

3/9/2008 10:58 PM

[2005-2008] [TRX500 FA/FGA]

SUB-TRANSMISSION/GEARSHIFT LINKAGE

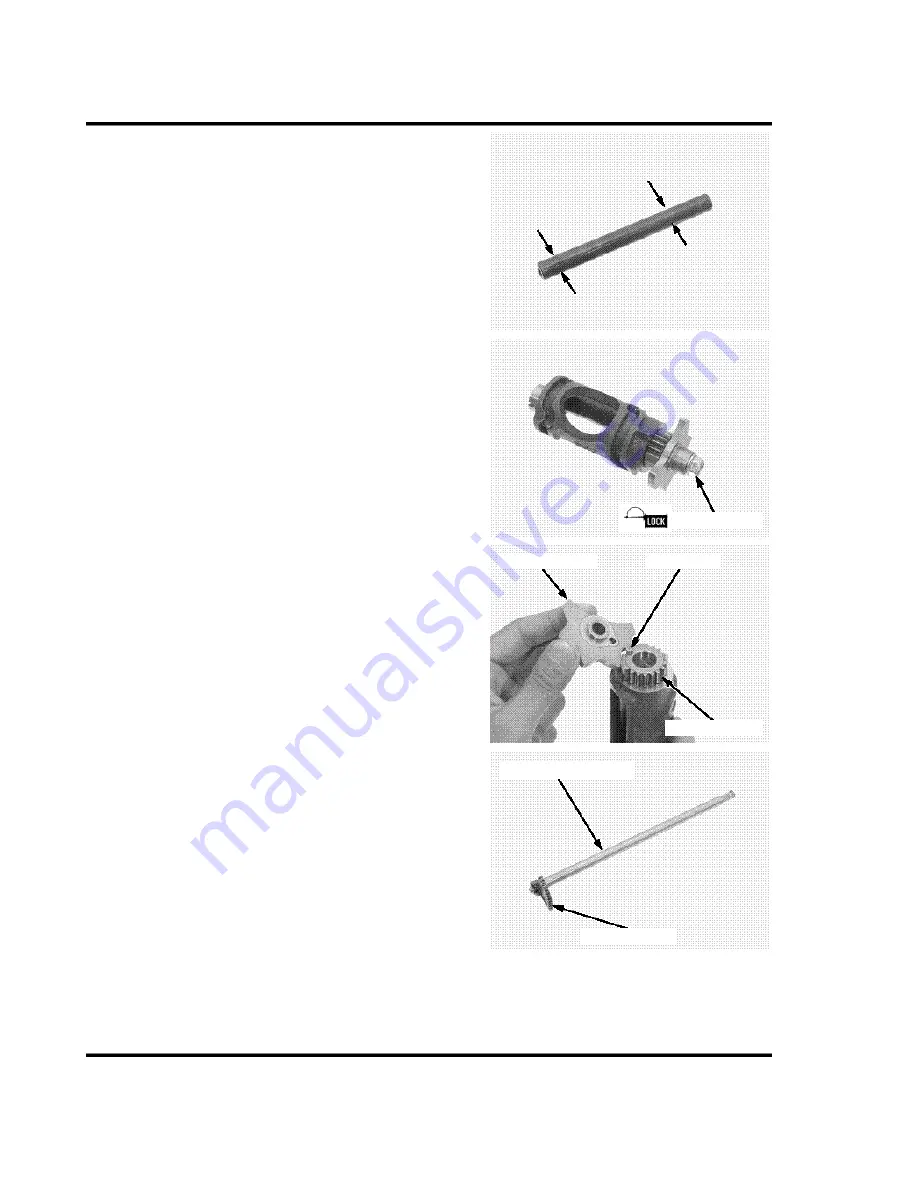
Measure the shift fork shaft O.D.

SERVICE LIMIT: 10.96 mm (0.431 in)

Check the shift drum guide grooves for abnormal

wear or damage.

Check the shift drum center plate and shifter gear

for abnormal wear or damage.

Remove the bolt, center plate, shifter gear and

dowel pin if necessary.

CENTER BOLT

Install the dowel pin, drum shifter gear and center

CENTER PLATE

DOWEL PIN

plate.

Apply locking agent to the drum center bolt threads.

Install and tighten the bolt.

TORQUE: 27 N·m (2.8 kgf·m, 20 lbf·ft)

SHIFTER GEAR

Check the gearshift spindle for bending or damage.

Check the spindle shifter gear for abnormal wear or

GEARSHIFT SPINDLE

damage.

SHIFTER GEAR

12-10

Содержание 2005-2008 RX500 FA

Страница 1: ...ant general service safety precautions are given Follow the procedures and precautions in this below However we cannot warn you of every conceivable hazard that can manual carefully arise in performing service and repair procedures Only you can decide whether or not you should perform a given task Important Safety Precautions Make sure you have a clear understanding of all basic shop safety practi...

Страница 2: ... and other information throughout this manual Of course it is not 12 SUB TRANSMISSION GEARSHIFT LINKAGE practical or possible to warn you about all the hazards associated with servicing this vehicle You must use your own good judgement 13 CRANKSHAFT AUTOMATICTRANSMISSION You will find important safety information in a variety of forms including 14 FRONT WHEEL SUSPENSION STEERING Safety Labels on t...

Страница 3: ...ulti purpose grease lithium based multi purpose grease NLGI 2 or equivalent Use molybdenum disulfide grease containing more than 3 molybdenum disulfide NLGI 2 or equivalent Example Molykote BR 2 plus manufactured by Dow Corning U S A Multi purpose M 2 manufactured by Mitsubishi Oil Japan Use molybdenum disulfide paste containing more than 40 molybdenum disulfide NLGI 2 or equivalent Example Molyko...

Страница 4: ... 61HN252 by American Honda Motor Co Page 4 of 540 http services honda com ServiceManual SVC_MNL 61HN253 61HN2 1 of 1 3 9 2008 10 23 PM 2005 2008 TRX500 FA FGA 1 4 ...

Страница 5: ... 61HN252 by American Honda Motor Co Page 5 of 540 http services honda com ServiceManual SVC_MNL 61HN253 61HN2 1 of 1 3 9 2008 10 23 PM 2005 2008 TRX500 FA FGA 1 5 ...

Страница 6: ... 61HN252 by American Honda Motor Co Page 6 of 540 http services honda com ServiceManual SVC_MNL 61HN253 61HN2 1 of 1 3 9 2008 10 23 PM 2005 2008 TRX500 FA FGA 1 6 ...

Страница 7: ...PECIFICATIONS 1 7 BATTERY CHARGING SYSTEM COOLING SYSTEM SPECIFICATIONS 1 7 SPECIFICATIONS 1 11 CYLINDER HEAD VALVE CAMSHAFT IGNITION SYSTEM SPECIFICATIONS 1 11 SPECIFICATIONS 1 8 ELECTRIC STARTER SPECIFICATIONS 1 11 CYLINDER PISTON SPECIFICATIONS 1 8 LIGHTS METERS SWITCHES CENTRIFUGAL CLUTCH SPECIFICATIONS 1 12 SPECIFICATIONS 1 8 STANDARD TORQUE VALUES 1 13 ALTERNATOR STARTER CLUTCH SPECIFICATION...

Страница 8: ...eable with English fasteners 4 Install new gaskets O rings cotter pins and lock plates when reassembling 5 When tightening bolts or nuts begin with the larger diameter or inner bolt first Then tighten to the specified torque diagonally in incremental steps unless a particular sequence is specified 6 Clean parts in cleaning solvent upon disassembly Lubricate any sliding surfaces before reassembly 7...

Страница 9: ...Number VIN is stamped on the front side of VEHICLE IDENTIFICATION NUMBER the frame The engine serial number is stamped on the right side of the crank case ENGINE SERIAL NUMBER The name plate is attached on the front frame pipe U S A and U type U S A and U type NAME PLATE The vehicle safety certification label is attached on the right side of the Canada only frame Canada only SAFETY CERTIFICATION L...

Страница 10: ...entification number is stamped on the left side of the carburetor body CARBURETOR IDENTIFICATION NUMBER The vehicle emission control information label is attached on the right U S A only side of the frame U S A only EMISSION CONTROL INFORMATION LABEL The color label is attached on the front side of the frame When order COLOR LABEL ing color coded parts always specify the designated color code 1 4 ...

Страница 11: ...ouble tube Front tire size AT25 x 8 12 Rear tire size AT25 x 10 12 Front rim size 12 x 6 0 AT Rear rim size 12 x 7 5 AT Front tire brand KT181 DUNLOP Rear tire brand KT185 DUNLOP Front brake Hydraulic disc brake Rear brake Mechanical drum brake Leading trailing 2 Caster angle Trail length 8 mm 0 3 in 0 Camber angle Fuel tank capacity 15 8 liters 4 2 US gal 3 5 lmp gal Fuel tank reserve capacity 3 ...

Страница 12: ...uction 2 000 40 20 Final reduction Front 3 231 42 13 Rear 3 154 41 13 Automatic transmission ratio 0 933 47 Sub transmission Drive 1 583 38 24 ratio Low 2 500 45 18 Reverse 3 222 29 18 x 28 14 Gearshift pattern D N R L Sub transmission D 3 mode Automatic 2 pattern D1 D2 and Manual ESP 5 speeds L 2 mode Automatic and manual ESP 5 speeds R 1 mode fixed low ratio ELECTRICAL Ignition system DCCDI Dire...

Страница 13: ... clearance 0 15 0 006 0 20 0 008 Body clearance 0 12 0 22 0 005 0 009 0 25 0 010 Side clearance 0 02 0 09 0 001 0 004 0 11 0 004 FUEL SYSTEM SPECIFICATIONS ITEM SPECIFICATIONS Carburetor identification number A CM type VE6AE U type VE6AF Main jet 162 Slow jet 45 Pilot screw opening See page 5 19 Float level 15 9 mm 0 63 in 1 400 100 rpm min 1 Idle speed Throttle lever free play 3 8 mm 1 8 5 16 in ...

Страница 14: ... 0 8845 0 8851 22 46 0 884 Follower bore I D IN EX 22 510 22 526 0 8862 0 8868 22 54 0 887 Follower to bore clear IN EX 0 028 0 059 0 0011 0 0023 0 07 0 003 ance Cylinder head warpage 0 10 0 004 CYLINDER PISTON SPECIFICATIONS Unit mm in ITEM STANDARD SERVICE LIMIT Cylinder I D 92 000 92 010 3 6220 3 6224 92 10 3 626 Out of round 0 10 0 004 Taper 0 10 0 004 Warpage 0 10 0 004 Piston Piston O D at 1...

Страница 15: ...mission Gear I D D R L 28 020 28 041 1 1031 1 1040 28 07 1 105 Reverse idle 14 000 14 018 0 5512 0 5519 14 04 0 553 Gear bushing O D D R 27 979 28 000 1 1015 1 1024 27 93 1 100 L 27 984 28 005 1 1017 1 1026 27 93 1 100 Gear to bushing D R 0 020 0 062 0 0008 0 0024 0 10 0 004 clearance L 0 015 0 057 0 0006 0 0022 0 10 0 004 Gear bushing I D D R 25 000 25 013 0 9843 0 9848 25 04 0 986 Reverse idle s...

Страница 16: ...ead depth 4 0 mm 0 16 in 25 kPa 0 25 kgf cm2 3 6 psi Cold tire pressure Standard 22 kPa 0 22 kgf cm2 3 2 psi Minimum 28 kPa 0 28 kgf cm2 4 0 psi Maximum 25 kPa 0 25 kgf cm2 3 6 psi With cargo Suspension spring pre load adjuster standard position Position 2 CM type only BRAKE SYSTEM SPECIFICATIONS Unit mm in ITEM STANDARD SERVICE LIMIT Front brake Recommended brake fluid DOT 4 brake fluid Master cy...

Страница 17: ...city After draining 75 cm 2 5 US oz 2 6 Imp oz 100 cm3 3 4 US oz 3 5 Imp oz drive After disassembly Recommended oil Hypoid gear oil SAE 80 Gear backlash 0 05 0 25 0 002 0 010 0 4 0 02 Backlash difference 0 2 0 01 Ring gear to stop pin clearance 0 3 0 6 0 01 0 02 BATTERY CHARGING SYSTEM SPECIFICATIONS ITEM SPECIFICATIONS Battery Capacity 12V 12 Ah Current leakage 1 mA max Voltage Fully charged 13 0...

Страница 18: ...FORMATION LIGHTS METERS SWITCHES SPECIFICATIONS ITEM SPECIFICATIONS Bulb Headlight high low beam 12V 30 30 W x 2 Assist headlight 12V 45 W Brake taillight 05 06 12V 21 5 W x 2 After 06 LED Neutral indicator LED Reverse indicator LED Coolant oil temperature indicator LED 4WD indicator LED Fuse Main fuse 30 A Transmission control motor 30 A Sub fuse 15 A x 2 10 A x 2 1 12 ...

Страница 19: ...locking agent to the threads 2 Apply engine oil to the threads and seating surface 3 Apply grease to the threads and seating surface 4 ALOC bolt screw replace with a new one 5 Lock nut replace with a new one 6 Castle nut tighten to the specified torque and further tighten until its grooves aligns with the cotter pin hole 7 Special bolt replace with a new one 8 Stake ENGINE MAINTENANCE THREAD TORQU...

Страница 20: ...ey bolt 1 12 108 11 0 80 NOTE 2 Alternator stator bolt 3 6 10 1 0 7 Ignition pulse generator bolt 2 5 6 0 6 4 3 NOTE 1 SUB TRANSMISSION THREAD TORQUE ITEM Q TY DIA mm N m kgf m lbf ft REMARKS Gearshift drum center bolt 1 8 27 2 8 20 NOTE 1 Gearshift drum stopper arm pivot bolt 1 6 12 1 2 9 NOTE 1 CRANKSHAFT AUTOMATICTRANSMISSION THREAD TORQUE ITEM Q TY DIA mm N m kgf m lbf ft REMARKS Primary drive...

Страница 21: ...ces honda com ServiceManual SVC_MNL 61HN253 61HN2 1 of 1 3 9 2008 10 25 PM 2005 2008 TRX500 FA FGA GENERAL INFORMATION Cylinder stud bolt 236 0 8 mm 9 29 0 03 in Exhaust pipe stud bolt 23 0 5 mm 0 9 0 02 in 50 mm 2 0 in Insulator band 1 5 3 0 mm 0 06 0 12 in 1 15 ...

Страница 22: ...ferential oil drain bolt 1 8 12 1 2 9 Rear final gear case oil filler cap 1 30 12 1 2 9 Rear final gear case oil check bolt 1 8 12 1 2 9 Rear final gear case oil drain bolt 1 8 12 1 2 9 Tie rod lock nut Steering shaft side is left handed 4 12 54 5 5 40 thread Spark arrester 3 6 12 1 2 9 FUEL SYSTEM THREAD TORQUE ITEM Q TY DIA mm N m kgf m lbf ft REMARKS Starting enrichment SE valve nut 1 14 2 3 0 ...

Страница 23: ...ngarm right pivot lock nut 1 30 112 11 4 82 BRAKE SYSTEM THREAD TORQUE ITEM Q TY DIA mm N m kgf m lbf ft REMARKS Brake hose oil bolt 3 10 34 3 5 25 Wheel cylinder bleed valve 2 8 5 4 0 6 4 0 Front master cylinder reservoir cap screw 2 4 2 0 2 1 4 Front brake lever pivot bolt 1 6 1 0 0 1 0 7 Front brake lever pivot nut 1 6 5 9 0 6 4 4 Front brake switch screw 1 4 1 2 0 1 0 9 NOTE 1 Front master cyl...

Страница 24: ... DRIVING MECHANISM THREAD TORQUE ITEM Q TY DIA mm N m kgf m lbf ft REMARKS Final gear case pinion bearing lock nut 1 64 98 10 0 72 NOTE 5 8 Final gear case cover bolt 2 10 49 5 0 36 NOTE 1 6 8 25 2 6 19 Final gear case mounting nut 4 10 54 5 5 40 NOTE 5 Left and right axle housing nut 12 10 44 4 5 33 NOTE 5 Skid plate bolt 3 8 32 3 3 24 Rear brake panel nut 4 10 44 4 5 33 NOTE 5 1 18 ...

Страница 25: ...and seating surface Automatic transmission control motor reduction gear teeth driven gear teeth and shaft Recoil starter driven pulley bolt threads and seating surface Starter sprag clutch whole surface Sub transmission gear teeth Sub transmission mainshaft and countershaft journals Shift fork shaft Shift drum grooves Primary driven gear bolt threads and seating surface Primary driven gear bolt th...

Страница 26: ...ake pedal pivot Rear brake pedal pivot dust seal lips Rear brake pedal dust seal and O ring Rear brake cable pedal and lever ends Rear brake panel O ring Front differential case oil seal lips and O rings Left rear axle housing dust seal lips and O ring final gear case Rear final gear case oil seal lips ring gear and pinion joint and O ring pinion gear filler cap and swingarm Swingarm pivot bearing...

Страница 27: ...ubricant Choke cable outer inside Rear brake cable pedal and lever outer inside Master cylinder piston and cups DOT4 brake fluid Front brake caliper piston seal Front brake caliper piston Handlebar grip rubber inside Honda bond A or Honda Hand Grip Air cleaner case to connecting hose carburetor and air Cement U S A intake duct mating surface only or equiva lent Front differential case cover mating...

Страница 28: ...00 FA FGA GENERAL INFORMATION CABLE HARNESS ROUTING 05 06 THROTTLE CABLE GPS CONNECTOR GPS model only ASSIST HEADLIGHT CONNECTOR HAND BRAKE CABLE FRONT BRAKE HOSE STARTING ENRICHMENT SE VALVE CABLE After 06 GPS CONNECTOR GPS model only THROTTLE CABLE ASSIST HEADLIGHT CONNECTOR HAND BRAKE CABLE STARTING ENRICHMENT SE VALVE CABLE FRONT BRAKE HOSE 1 22 ...

Страница 29: ... GENERAL INFORMATION 05 06 HAND BRAKE CABLE THROTTLE CABLE REAR FINAL GEAR CASE BREATHER HOSE FRONT FINAL GEAR CASE BREATHER HOSE FRONT BRAKE HOSE REAR BRAKE FAN MOTOR BREATHER HOSE BREATHER HOSE After 06 HAND BRAKE CABLE REAR FINAL GEAR CASE BREATHER HOSE THROTTLE CABLE FRONT FINAL GEAR CASE BREATHER HOSE REAR BRAKE FAN MOTOR BREATHER HOSE BREATHER HOSE 1 23 ...

Страница 30: ... 2008 10 26 PM 2005 2008 TRX500 FA FGA GENERAL INFORMATION 05 06 THROTTLE CABLE FRONT BRAKE HOSE 2WD 4WD SELECT SWITCH WIRE RIGHT HANDLEBAR SWITCH WIRE STARTING ENRICHMENT SE VALVE CABLE After 06 THROTTLE CABLE FRONT BRAKE HOSE RIGHT HANDLEBAR SWITCH WIRE 2WD 4WD SELECT SWITCH WIRE STARTING ENRICHMENT SE VALVE CABLE 1 24 ...

Страница 31: ...1HN253 61HN2 1 of 1 3 9 2008 10 27 PM 2005 2008 TRX500 FA FGA GENERAL INFORMATION 05 06 HAND BRAKE CABLE HORN SWITCH U type only MODE SELECT SWITCH LEFT HANDLEBAR SWITCH WIRE MODE SELECT SWITCH WIRE After 06 HAND BRAKE CABLE MODE SELECT SWITCH LEFT HANDLEBAR SWITCH WIRE MODE SELECT SWITCH WIRE 1 25 ...

Страница 32: ...05 06 ECM 5P BLACK CONNECTOR ECM 21P BLACK CONNECTOR ASSIST HEADLIGHT 2P ECM 21P GRAY MAIN WIRE HARNESS HANDLE SWITCH 10P BLACK CONNECTOR GREEN CONNECTOR CONNECTOR COMBINATION METER 14P MODE SELECT SWITCH GRAY CONNECTOR 4P BLACK CONNECTOR 4WD SWITCH 2P GRAY COMBINATION METER 4P CONNECTOR YELLOW CONNECTOR HORN SWITCH FRONT STOP SWITCH 4P CONNECTOR GREEN CONNECTOR U type only 1 26 ...

Страница 33: ...TRX500 FA FGA GENERAL INFORMATION After 06 ECM 5P BLACK CONNECTOR ECM 21P BLACK CONNECTOR ECM 21P GRAY MAIN WIRE HARNESS HANDLE SWITCH 14P CONNECTOR GREEN CONNECTOR COMBINATION METER 14P MODE SELECT SWITCH GRAY CONNECTOR 4P BLACK CONNECTOR 4WD SWITCH 2P GRAY COMBINATION METER 4P CONNECTOR YELLOW CONNECTOR IGNITION SWITCH 4P NATURAL CONNECTOR 1 27 ...

Страница 34: ... WIRE HARNESS REAR FINAL GEAR CASE BREATHER HOSE FAN MOTOR WIRE BAND Accessory socket wire Headlight wire FRONT FINAL GEAR CASE REVERSE SWITCH WIRE Thermo switch wire BREATHER HOSE Fan motor wire After 06 MAIN WIRE HARNESS REAR FINAL GEAR CASE BREATHER HOSE FAN MOTOR WIRE BAND Accessory socket wire Headlight wire FRONT FINAL GEAR CASE Carburetor heater switch wire REVERSE SWITCH WIRE BREATHER HOSE...

Страница 35: ...FA FGA GENERAL INFORMATION FRONT BRAKE HOSE STARTING ENRICHMENT SE VALVE CABLE REAR FINAL GEAR HAND BRAKE CABLE CASE BREATHER HOSE REAR BRAKE BREATHER HOSE FAN MOTOR THROTTLE CABLE BREATHER HOSE REAR BRAKE BREATHER HOSE SIPHON HOSE CLIP Rear final gear case breather hose Rear brake breather hose FAN MOTOR Siphon hose BREATHER HOSE Hand brake cable 1 29 ...

Страница 36: ... WIRE REVERSE SWITCH WIRE IGNITION COIL IGNITION SWITCH WIRE CONTROL MOTOR 2P CARBURETOR HEATER NATURAL CONNECTOR SWITCH WIRE BAND Front speed sensor wire Front final clutch wire ANGLE SENSOR WIRE Rear speed sensor wire REAR SPEED SENSOR 3P FRONT SPEED SENSOR 3P YELLOW CONNECTOR BLACK CONNECTOR LEFT FRONT BRAKE HOSE IGNITION SWITCH 4P FRONT FINAL CLUTCH 2P NATURAL CONNECTOR GREEN CONNECTOR 1 30 ...

Страница 37: ...GENERAL INFORMATION After 06 CARBURETOR HEATER SWITCH WIRE REVERSE SWITCH WIRE IGNITION COIL CONTROL MOTOR 2P NATURAL CONNECTOR BAND Front speed sensor wire Front final clutch wire Rear speed sensor wire ANGLE SENSOR WIRE LEFT FRONT BRAKE HOSE FRONT SPEED SENSOR 3P REAR SPEED SENSOR 3P BLACK CONNECTOR YELLOW CONNECTOR FRONT FINAL CLUTCH 2P GREEN CONNECTOR 1 31 ...

Страница 38: ...HN253 61HN2 1 of 1 3 9 2008 10 28 PM 2005 2008 TRX500 FA FGA GENERAL INFORMATION CLIP Rear final gear case breather hose MAIN WIRE HARNESS Rear brake breather hose Radiator breather hose Hand brake cable RIGHT FRONT BRAKE HOSE EOT SENSOR WIRE ENGINE OIL HOSE RIGHT FRONT BRAKE HOSE INSERTING AREA 1 32 ...

Страница 39: ...8 10 28 PM 2005 2008 TRX500 FA FGA GENERAL INFORMATION 05 06 SPARK PLUG WIRE THROTTLE POSITION SENSOR CRANKCASE BREATHER PIPE IGNITION COIL CARBURETOR HEATER WIRE ANGLE SENSOR CONTROL MOTOR WIRE CONTROL MOTOR 2P NATURAL CONNECTOR ANGLE SENSOR WIRE CONTROL MOTOR WIRE ANGLE SENSOR WIRE AUTOMATIC TRANSMISSION CONTROL MOTOR 1 33 ...

Страница 40: ... 10 28 PM 2005 2008 TRX500 FA FGA GENERAL INFORMATION After 06 SPARK PLUG WIRE THROTTLE POSITION SENSOR CRANKCASE BREATHER PIPE IGNITION COIL CARBURETOR HEATER WIRE ANGLE SENSOR CONTROL MOTOR WIRE CONTROL MOTOR 2P NATURAL CONNECTOR ANGLE SENSOR WIRE CONTROL MOTOR WIRE ANGLE SENSOR WIRE AUTOMATIC TRANSMISSION CONTROL MOTOR 1 34 ...

Страница 41: ... GENERAL INFORMATION STARTING ENRICHMENT SE VALVE CABLE THROTTLE CABLE AIR VENT HOSES FUEL HOSE THROTTLE POSITION SENSOR CRANKCASE BREATHER PIPE SPARK PLUG WIRE CARBURETOR HEATER WIRE THROTTLE POSITION SENSOR 3P STARTING ENRICHMENT BLACK CONNECTOR THROTTLE POSITION SE VALVE CABLE SENSOR WIRE FUEL HOSE THROTTLE CABLE ECT SENSOR WIRE CARBURETOR HEATER WIRE 1 35 ...

Страница 42: ...005 2008 TRX500 FA FGA GENERAL INFORMATION STARTING ENRICHMENT SE VALVE CABLE CLIP Main wire harness THROTTLE CABLE FUEL HOSE Hand brake cable Rear brake breather hose CRANKCASE Rear final gear case breather hose BREATHER HOSE Siphon hose GROUND CABLE HAND BRAKE CABLE 15 30 EOT SENSOR WIRE WATER PUMP BYPASS HOSE STARTER MOTOR CABLE 1 36 ...

Страница 43: ...L GEAR CASE BREATHER HOSE MAIN WIRE HARNESS GEAR POSITION SWITCH 4P TAILLIGHT 3P NATURAL CONNECTOR SIPHON HOSE NATURAL CONNECTOR CARBURETOR HEATER 2P NATURAL CONNECTOR GROUND CABLE Engine to frame GROUND CABLE From HARNESS HAND BRAKE CABLE PEDAL BRAKE CABLE GROUND CABLE GROUND CABLE From HARNESS Engine to frame CLIP REAR BRAKE LIGHT Rear brake breather hose SWITCH WIRE Rear final gear case breathe...

Страница 44: ... 10 28 PM 2005 2008 TRX500 FA FGA GENERAL INFORMATION GROUND CABLE GEAR POSITION SWITCH WIRE Engine to frame CARBURETOR DRAIN HOSE ALTERNATOR WIRE CLIP Alternator wire SIPHON HOSE Gear position switch wire HAND BRAKE CABLE REAR BRAKE BREATHER HOSE Carburetor drain hose PEDAL BRAKE CABLE REAR FINAL GEAR CASE BREATHER HOSE 1 38 ...

Страница 45: ...ear case breather hose FRONT FINAL GEAR CASE BREATHER HOSE BAND Front speed sensor wire Front final clutch wire Rear speed sensor wire LEFT FRONT BRAKE HOSE RIGHT FRONT BRAKE HOSE U type CLIPS Horn wire BRAKE HOSE Front speed sensor wire Front final clutch wire Rear speed sensor wire Front final gear case breather hose FRONT FINAL GEAR CASE BREATHER HOSE BAND Front speed sensor wire Front final cl...

Страница 46: ...honda com ServiceManual SVC_MNL 61HN253 61HN2 1 of 1 3 9 2008 10 29 PM 2005 2008 TRX500 FA FGA GENERAL INFORMATION Reverse side of the front fender HEAD LIGHT WIRE ACCESSORY SOCKET ACCESSORY SOCKET WIRE 05 06 Reverse side of the rear fender TAIL BRAKE LIGHT WIRE 1 40 ...

Страница 47: ...1HN2 1 of 1 3 9 2008 10 29 PM 2005 2008 TRX500 FA FGA GENERAL INFORMATION After 06 TAIL BRAKE LIGHT TAIL BRAKE LIGHT WIRE FUSE BOX BATTERY 2P NATURAL STARTER RELAY SWITCH 2P CONNECTOR NATURAL CONNECTOR BATTERY STARTER MOTOR CABLE STARTER RELAY SWITCH BATTERY POSITIVE BATTERY NEGATIVE TERMINAL TERMINAL 1 41 ...

Страница 48: ...react to form photochemical smog when subjected to sunlight Carbon monoxide does not react in the same way but it is toxic Honda Motor Co Ltd utilizes lean carburetor settings as well as other systems to reduce oxides of nitrogen carbon mon oxide and hydrocarbons EXHAUST EMISSION CONTROL SYSTEM The exhaust emission control system is composed of a lean carburetor setting and no adjustments should b...

Страница 49: ...endered inoperative by any person AMONG THOSE ACTS PRESUMED TO CONSTITUTE TAMPERING ARE THE FOLLOWING ACTS 1 Removal of or puncturing the muffler baffles header pipes or any other component which conducts exhaust gases 2 Removal of or puncturing of any part of the intake system 3 Lack of proper maintenance 4 Replacing any moving parts of the vehicle or parts of the exhaust or intake system with pa...

Страница 50: ... 61HN252 by American Honda Motor Co Page 50 of 540 http services honda com ServiceManual SVC_MNL 61HN253 61HN2 1 of 1 3 9 2008 10 29 PM 2005 2008 TRX500 FA FGA MEMO ...

Страница 51: ...ER 2 7 SERVICE INFORMATION 2 2 FRONT MUD GUARD 2 8 TROUBLESHOOTING 2 2 INNER FENDER 2 9 BODY PANEL LOCATIONS 2 3 FRONT CARRIER 2 9 TRIM CLIP 2 4 FRONT CARRY PIPE 2 10 SEAT 2 4 FRONT FENDER 2 11 RECOIL STARTER COVER 2 4 REAR CARRIER 2 11 ENGINE GUARD 2 5 REAR FENDER 2 12 GEARSHIFT LEVER KNOB 2 5 TOOL BOX 2 12 SIDE COVER 2 5 OUTER FENDER 2 13 FUEL TANK COVER 2 6 EXHAUST SYSTEM 2 14 CENTER MUD GUARD ...

Страница 52: ...fasteners first the exhaust pipe may not seat properly Always replace the gaskets after removing the exhaust system Always inspect the exhaust system for leaks after installation TORQUE VALUES Front carrier carry pipe bolt 37 N m 3 8 kgf m 27 lbf ft Gearshift lever knob screw 2 N m 0 2 kgf m 1 4 lbf ft Apply locking agent to the threads Rear carrier bolt 37 N m 3 8 kgf m 27 lbf ft Muffler band bol...

Страница 53: ...Pipe Guard page 2 10 4 Gearshift Lever Knob page 2 5 17 Front Skid Plate page 2 10 5 Right Side Cover page 2 5 18 Carry Pipe page 2 10 6 Left Side Cover page 2 6 19 Front Fender page 2 11 7 Fuel Tank Cover page 2 6 20 Rear Carrier page 2 11 8 Right Center Mud Guard page 2 7 21 Rear Fender page 2 12 9 Left Center Mud Guard page 2 7 22 Tool Box page 2 12 10 Right Inner Cover page 2 7 23 Headlight Gr...

Страница 54: ...y align the clip hole to avoid damaging the Lock clip Release CENTER PIN SEAT Unlock the seat by turning the release lever upward BOSSES SEAT PRONGS Pull the seat back and remove it Install the seat by inserting the prongs into the seat retainer on the frame Push the seat forward and align the mounting bosses with the mounting rubbers then press down to lock it RETAINERS LEVER RECOIL STARTER COVER...

Страница 55: ... is in the reverse order of removal BOLTS GEARSHIFT LEVER KNOB Remove the two screws and gearshift lever knob GEARSHIFT LEVER KNOB Installation is in the reverse order of removal Replace the gearshift lever knob screws with new TORQUE Knob screw 2 N m 0 2 kgf m 1 4 lbf ft ones SCREWS SIDE COVER RIGHT SIDE COVER Remove the screw and right side cover by releasing RIGHT SIDE COVER the hook from the r...

Страница 56: ...Remove the following FUEL FILL CAP TRIM CLIPS seat page 2 4 recoil starter cover page 2 4 gearshift lever knob page 2 5 left side cover page 2 6 fuel fill cap eight trim clips fuel tank cover assembly release two tabs of cover by sliding the cover forward Installation is in the reverse order of removal BOLTS DISASSEMBLY ASSEMBLY Remove the following LEFT TANK LEFT TANK COVER A two screws COVER B f...

Страница 57: ...trim clips right center mud guard Installation is in the reverse order of removal RIGHT CENTER MUD GUARD TRIM CLIPS LEFT CENTER MUD GUARD Remove the following SOCKET BOLT BOLTS FOOTPEG left side cover page 2 6 two bolts and footpeg screw socket bolt eight trim clips left center mud guard Installation is in the reverse order of removal LEFT CENTER TRIM CLIPS MUD GUARD SCREW INNER COVER RIGHT INNER ...

Страница 58: ...ner cover by releasing the hooks COVER Installation is in the reverse order of removal FRONT MUD GUARD RIGHT FRONT MUD GUARD Remove the right side cover page 2 5 TRIM CLIPS Remove the nine trim clips and right front mud guard Installation is in the reverse order of removal RIGHT FRONT MUD GUARD LEFT FRONT MUD GUARD Remove the left side cover page 2 6 TRIM CLIPS Remove the eight trim clips and left...

Страница 59: ... Installation is in the reverse order of removal BOLTS TRIM CLIPS LEFT INNER FENDER Remove the following LEFT INNER TAPPING two stay bolts FENDER BOLTS two trim clips two tapping bolts left inner fender Installation is in the reverse order of removal TRIM CLIPS BOLTS FRONT CARRIER Remove the following FRONT CARRIER 8 mm BOLTS two 6 mm bolts and two collars four 8 mm bolts front carrier Be careful ...

Страница 60: ...rder of removal BOLTS TRIM CLIPS FRONT SKID PLATE Remove the following FRONT SKID PLATE 6 mm BOLTS four 6 mm bolts four 8 mm bolts front skid plate Installation is in the reverse order of removal 6 mm BOLTS 8 mm BOLTS CARRY PIPE Remove the following CARRY PIPE 6 mm BOLTS front carrier page 2 9 carry pipe guard page 2 10 front skid plate page 2 10 two 6 mm bolts four 8 mm bolts carry pipe Be carefu...

Страница 61: ...accessory socket connector front fender Installation is in the reverse order of removal FRONT FENDER TRIM CLIPS REAR CARRIER Remove the seat page 2 4 TRIM CLIPS Remove the two trim clips and rear fender lid REAR FENDER LID Remove the following 05 06 model REAR CARRIER 8 mm BOLTS shown fuel tank cover page 2 6 tail light grilles page 2 13 or rear corner outer fender page 2 14 four 6 mm bolts and fo...

Страница 62: ...2P connectors starter relay switch STARTER MOTOR CABLE BATTERY Remove the following 05 06 model CONNECTOR REAR FENDER BOLT shown fuel tank cover page 2 6 rear carrier page 2 11 bolt two socket bolts six trim clips tail light connector 05 06 only Remove the starter motor and battery cables out of the rear fender and remove the rear fender Installation is in the reverse order of removal Route the wi...

Страница 63: ... four trim clips headlight grille Installation is in the reverse order of removal TRIM CLIPS HEADLIGHT GRILLE FRONT OUTER FENDER Remove the following WASHERS TRIM CLIPS seven trim clips three washers front outer fender Installation is in the reverse order of removal FRONT OUTER FENDER TAIL LIGHT GRILLE 05 06 Remove the following SCREWS two screws six trim clips tail light grille Installation is in...

Страница 64: ... CLIP TRIM CLIPS REAR CORNER OUTER FENDER REAR OUTER FENDER Remove the following WASHERS BOLT bolt and collar COLLAR seven trim clips three washers rear outer fender Installation is in the reverse order of removal REAR OUTER FENDER TRIM CLIPS EXHAUST SYSTEM REMOVAL Remove the three bolt socket bolts collars and left LEFT ENGINE SIDE COVER COLLARS engine side cover Loosen the muffler band bolts BOL...

Страница 65: ... 2008 TRX500 FA FGA FRAME BODY PANELS EXHAUST SYSTEM Release the crankcase breather pipe clips from the stay on the muffler Remove the mounting bolt washers seat rubbers and collar then remove the muffler from the frame CLIP JOINT GASKET COLLAR SEAT RUBBERS MUFFLER JOINT NUTS MUFFLER EXHAUST PIPE GASKET BAND BOLTS MOUNTING BOLT WASHERS 2 15 ...

Страница 66: ... PANELS EXHAUST SYSTEM DISASSEMBLY ASSEMBLY 3 2 N m 0 3 kgf m 2 4 lbf ft 3 2 N m 0 3 kgf m 2 4 lbf ft 45 A B BAND B A BAND FRONT EXHAUST PIPE COVER 5 4 N m 0 6 kgf m 4 0 lbf ft Install against the mounting stay REAR EXHAUST PIPE COVER 5 4 N m 0 6 kgf m 4 0 lbf ft END BAND END BAND BANDS CENTER BAND 60 5 4 N m 0 6 kgf m 4 0 lbf ft SCREW 3 2 N m 0 3 kgf m 2 4 lbf ft 2 16 ...

Страница 67: ...WASHERS Install the new joint gasket and muffler gasket LEFT ENGINE SIDE COVER COLLARS Install the muffler and exhaust pipe in the reverse order of removal by loosely tightening all fasteners BOLT Tighten the joint nuts first then tighten the mount ing bolt and band bolts Set the breather pipe onto the stay and install the clip TORQUE Muffler band bolt 23 N m 2 3 kgf m 17 lbf ft After installation...

Страница 68: ... 61HN252 by American Honda Motor Co Page 68 of 540 http services honda com ServiceManual SVC_MNL 61HN253 61HN2 1 of 1 3 9 2008 10 37 PM 2005 2008 TRX500 FA FGA MEMO ...

Страница 69: ... 3 5 BRAKE FLUID 3 20 THROTTLE OPERATION 3 5 BRAKE SHOES WEAR 3 21 CARBURETOR CHOKE 3 6 BRAKE PADS WEAR 3 21 AIR CLEANER 3 6 BRAKE LIGHT SWITCH 3 21 AIR CLEANER HOUSING DRAIN HOSE 3 8 BRAKE SYSTEM 3 22 SPARK PLUG 3 9 SKID PLATE ENGINE GUARD 3 23 VALVE CLEARANCE 3 10 SUSPENSION 3 23 ENGINE OIL 3 12 SPARK ARRESTER 3 24 ENGINE OIL FILTER 3 15 NUTS BOLTS FASTENERS 3 25 ENGINE IDLE SPEED 3 15 WHEELS TI...

Страница 70: ...After draining filter change 4 6 liter 4 9 US qt 4 0 Imp qt After disassembly 5 2 liter 5 5 US qt 4 6 Imp qt 1 400 100 rpm min 1 Engine idle speed Recommended final gear case oil Hypoid gear oil SAE 80 185 cm3 6 3 US oz 6 5 Imp oz Front differen At draining 230 cm3 7 8 US oz 8 1 Imp oz tial oil capacity At disassembly Recommended differential oil Hypoid gear oil SAE 80 75 cm3 2 5 US oz 2 6 Imp oz ...

Страница 71: ... 7 lbf ft Engine oil drain bolt 25 N m 2 5 kgf m 18 lbf ft Engine oil filter center bolt 18 N m 1 8 kgf m 13 lbf ft Front differential oil filler cap 12 N m 1 2 kgf m 9 lbf ft Front differential oil drain bolt 12 N m 1 2 kgf m 9 lbf ft Rear final gear case oil check bolt 12 N m 1 2 kgf m 9 lbf ft Rear final gear case oil filler cap 12 N m 1 2 kgf m 9 lbf ft Rear final gear case oil drain bolt 12 N...

Страница 72: ... mi 1 000 km 100 operating hours or 12 months R ENGINE OIL FILTER R R R 3 15 ENGINE IDLE SPEED I I I 3 15 RADIATOR COOLANT NOTE 3 I I 3 16 COOLING SYSTEM NOTE 2 I I 3 16 DRIVE SHAFT BOOTS I I 3 17 REAR FINAL GEAR CASE OIL R Every I 3 18 AND DIFFERENTIAL OIL 2 years BRAKE FLUID NOTE 3 I I 3 20 BRAKE SHOES WEAR NOTE 1 I 3 21 BRAKE PADS WEAR NOTE 1 2 I 3 21 BRAKE LIGHT SWITCH I I I 3 21 BRAKE SYSTEM ...

Страница 73: ...cable and its pivot point with a commercially available cable lubricant or a light weight oil 3 8 mm 1 8 5 16 in If the throttle lever still does not return properly THROTTLE LEVER replace the throttle cable With the engine idling turn the handlebar all the way to the right and left to ensure that the idle speed does not change If idle speed increases check the throttle lever free play and the thr...

Страница 74: ...able if required Check the choke cable for fraying kinking or other damage AIR CLEANER Remove the seat page 2 4 RETAINING CLIPS COVER If the vehicle is Release the retaining clips from the air cleaner used in dusty areas housing cover and remove the cover sand or snow more frequent inspections are required RETAINING CLIPS Remove the air cleaner element retainer ELEMENT BAND Loosen the air cleaner ...

Страница 75: ...er to dry Wash Squeeze out Apply approximately 20 g 0 7 oz of Pro Honda PRO HONDA FOAM FILTER OIL Foam Filter Oil or equivalent oil from the inside of the element Place the element into a plastic bag and spread the oil evenly by hand PLASTIC BAG Install the clip and sub air cleaner filter ELEMENT Install the element core into the air cleaner element CLIP properly Install the element band onto the ...

Страница 76: ...ver while aligning The FRONT mark TAB COVER its tab with the air cleaner element end of the cover should be faced to forward FRONT MARK Secure the air cleaner housing cover with the retain RETAINING CLIPS COVER ing clips Install the seat page 2 4 RETAINING CLIPS AIR CLEANER HOUSING DRAIN HOSE Remove the drain hose from the bottom of the air cleaner housing to empty any deposits If the vehicle is I...

Страница 77: ...fore described in the maintenance schedule page 3 4 removing and be sure that no debris is allowed to enter the combustion chamber SPARK PLUG INSPECTION Check the following and replace if necessary rec ELECTRODE ommended spark plug page 3 2 Insulator for damage Electrodes for wear Burning condition coloration If the electrodes is contaminated with accumulated This motorcycle s objects or dirt repl...

Страница 78: ... a new one spark plug gap If the gap is out of specification replace it with a new one INSTALLATION Install the spark plug in the cylinder head and hand To prevent damage SPARK PLUG CAP tighten then torque to specification to the cylinder head hand tighten TORQUE 22 N m 2 2 kgf m 16 lbf ft the spark plug before using a Install the removed parts in the reverse order of wrench to tighten removal to ...

Страница 79: ... turn and match up the T mark again INDEX MARK Check the clearance of each valve by inserting a When checking the feeler gauge between the adjusting screw and valve clearance slide the stem feeler gauge from the center toward the outside VALVE CLEARANCES IN 0 15 mm 0 006 in EX 0 23 mm 0 009 in FEELER GAUGE Adjust by loosening the lock nut and turning the adjusting screw until there is a slight dra...

Страница 80: ...ver page 2 4 TIMING HOLE CAP ENGINE OIL LEVEL CHECK Check the oil level after starting the engine and allowing the oil to circulate through the engine thoroughly It is especially important on a dry sump engine due to the comparatively large vol ume of oil Do not snap the throttle while idling or the oil level reading will be inaccurate Place the vehicle on a level ground DIPSTICK Start the engine ...

Страница 81: ...sification SG or higher JASO T 903 standard MA Viscosity SAE 10W 30 Other viscosities shown in the chart may be used when the average temperature in your riding area is OIL VISCOSITY within the indicated range Reinstall the oil filler cap and dipstick Oil level check when engine is running The oil pump adjusts the oil level so that the oil tank is always kept at the proper level If this check show...

Страница 82: ...n the engine oil After draining the oil completely install the drain bolt with a new sealing washer and tighten it TORQUE 25 N m 2 5 kgf m 18 lbf ft DRAIN BOLT SEALING WASHER Pour the recommended engine oil page 3 13 into OIL FILLER CAP the oil tank up to the upper level mark on the dip stick ENGINE OIL CAPACITY 4 4 liters 4 7 US qt 3 9 Imp qt after draining 4 6 liters 4 9 US qt 4 0 Imp qt after d...

Страница 83: ... bolt while holding the oil filter cover by hand TORQUE 18 N m 1 8 kgf m 13 lbf ft Fill the oil tank with the recommended engine oil page 3 14 SPRING CENTER BOLT COVER ENGINE IDLE SPEED Inspect and adjust idle speed after all other engine maintenance items have been performed and are within specifications The engine must be warm for accurate adjust ment Ten minutes of stop and go riding is suffi c...

Страница 84: ...alent high qual ity ethylene glycol antifreeze containing silicate free corrosion inhibitors RESERVE TANK LOWER LEVEL LINE Using coolant with silicate corrosion inhibitors may cause premature wear of water pump seals or blockage of radiator passages Using tap water may cause engine damage Check to see if there are any coolant leaks when the coolant level decreases very rapidly If reserve tank beco...

Страница 85: ...iator air passage for clogging or dam age Straighten bent fins with a small flat blade screw driver and remove insects mud or other obstruc tions with compressed air or low pressure water Replace the radiator if the air flow is restricted over more than 20 of the radiating surface Installation is in the reverse order of removal Install the front fender page 2 11 DRIVE SHAFT BOOTS Check the drive s...

Страница 86: ...he check bolt hole Check for leakage if there is no oil flow OIL CHECK BOLT Remove the oil filler cap and pour the oil slowly OIL FILLER CAP through the filler hole until the oil starts to flow out of the check bolt hole RECOMMENDED OIL Hypoid gear oil SAE 80 Install the check bolt with a new sealing washer and tighten it to the specified torque TORQUE 12 N m 1 2 kgf m 9 lbf ft Coat a new O ring w...

Страница 87: ...ge 3 18 OIL CAPACITY 75 cm3 2 5 US oz 2 6 Imp oz at draining 100 cm3 3 4 US oz 3 5 Imp oz at disassembly DRAIN BOLT Install the oil filler cap with a new O ring page 3 18 DIFFERENTIAL OIL LEVEL CHECK Place the vehicle on a level surface Remove the oil filler cap OIL FILLER CAP Check that the oil level is up to the lower edge of the oil filler hole O RING Check for leaks if the oil level is low Pou...

Страница 88: ...d as they are not compatible with each other Do not allow foreign material to enter the system when filling the reservoir Spilled fluid can damage painted plastic or rubber parts Place a rag over these parts whenever the system is serviced FRONT BRAKE Turn the handlebar to the left side so that the reser BRAKE RESERVOIR voir is level and check the brake fluid level through the sight glass If the l...

Страница 89: ...ds for wear REFERENCE MARK Replace the brake pads if the indicator aligns with reference mark Refer to page 16 13 for brake pads replacement INDICATOR BRAKE LIGHT SWITCH INSPECTION Adjust the rear brake light switch after adjusting the brake pedal free play The front brake light switch can not be adjusted Check that the brake light comes on just prior to the ADJUSTING NUT brake actually being enga...

Страница 90: ...able brake lever and brake pedal for loose connections excessive play or other damage 15 20 mm Replace or repair if necessary 9 16 13 16 in For cable lubrication Disconnect the brake cables at the brake lever or pedal ends Thoroughly lubricate the cables and their pivot points with commercially available cable lubricant Measure the rear parking brake lever free play at the end of the brake lever F...

Страница 91: ...r adjusting nut at the rear brake arm out in the adjusting nut is seated on the brake arm joint LOWER ADJUSTING NUT SKID PLATE ENGINE GUARD Check the skid plates and engine guard for cracks damage or looseness Tighten any loose fasteners Replace the skid plates and engine guard as required ENGINE GUARD SKID PLATE SKID PLATE SUSPENSION FRONT SUSPENSION INSPECTION Check the action of the front and r...

Страница 92: ...Check for worn swingarm pivot bearings by grab bing the rear axle housings and attempting to move the swingarm side to side Replace the pivot bearings if any looseness is noted page 15 9 SPARK ARRESTER Remove the three bolts and the spark arrester with the gasket GASKET SPARK ARRESTER BOLTS Use a brush to remove carbon deposits from the screen mesh being careful not to damage the screen mesh The s...

Страница 93: ...28 kPa 0 28 kg cm2 4 0 psi With cargo 25 kPa 0 25 kg cm2 3 6 psi Rear Standard 25 kPa 0 25 kg cm2 3 6 psi Minimum 22 kPa 0 22 kg cm2 3 2 psi Maximum 28 kPa 0 28 kg cm2 4 0 psi With cargo 25 kPa 0 25 kg cm2 3 6 psi Check the tires for cuts embedded nails or other damage Measure the tread depth at the center of the tires Replace the tires when the tread depth reaches the following limit MINIMUM TREA...

Страница 94: ... on the rear part of the tires at the same points with no load on the vehicle Toe out 30 15 mm 1 3 16 9 16 in Toe out means the front measurement is greater than the rear measurement REAR When the toe is out of specification adjust it by TIE ROD changing the length of the tie rods equally by loos ening the lock nuts and turning the tie rods while holding the ball joints After adjusting each tie ro...

Страница 95: ... honda com ServiceManual SVC_MNL 61HN253 61HN2 1 of 1 3 9 2008 10 42 PM 2005 2008 TRX500 FA FGA 4 LUBRICATION SYSTEM 4 OIL COOLER 4 7 LUBRICATION SYSTEM DIAGRAM 4 2 OIL STRAINER 4 8 SERVICE INFORMATION 4 3 OIL PUMP 4 12 TROUBLESHOOTING 4 5 OIL PRESSURE CHECK 4 6 4 1 ...

Страница 96: ... 1 of 1 3 9 2008 10 42 PM 2005 2008 TRX500 FA FGA LUBRICATION SYSTEM LUBRICATION SYSTEM DIAGRAM LUBRICATIONSYSTEM ROCKER ARMS CAMSHAFT CENTRIFUGAL OIL PRESSURE CLUTCH CHECK VALVE FLYWHEEL STARTER CLUTCH OIL COOLER COUNTERSHAFT OIL PRESSURE RELIEF VALVE EOT SENSOR OIL STRAINER SCREEN OIL FILTER OIL STRAINER 4 2 ...

Страница 97: ...rt to enter the engine If any portion of the oil pump is worn beyond the specified service limits replace the oil pump as an assembly After oil pump oil cooler and or oil hoses have been installed check that there are no oil leaks and that oil pressure is correct SPECIFICATIONS Unit mm in ITEM STANDARD SERVICE LIMIT Engine oil capacity After draining 4 4 liters 4 7 US qt 3 9 lmp qt After draining ...

Страница 98: ...5 2008 TRX500 FA FGA LUBRICATION SYSTEM TOOLS Oil pressure gauge Oil pressure gauge Pressure gauge hose 07YAJ 0010300 07FPJ 7520100 07YAJ 0010100 Not available in U S A Not available in U S A Not available in U S A Oil pressure gauge 0 160 psi Pressure gauge attachment 07KPJ VD60100 07ZMJ HN2A100 or 07KPJ VD6010A U S A only U S A only 4 4 ...

Страница 99: ... low Oil pressure relief valve wear Clogged oil strainer or filter Faulty oil pump Internal oil leak Incorrect oil being used No oil pressure Oil level too low Oil pressure relief valve stuck open Broken oil pump drive chain Broken oil pump drive or driven sprocket Damaged oil pump Internal oil leak High oil pressure Oil pressure relief valve stuck closed Clogged oil gallery or orifice Incorrect o...

Страница 100: ...ect an oil pressure gauge attachment and PRESSURE GAUGE gauge to the oil gallery hole TOOLS Pressure gauge for 1 400 rpm min 1 07YAJ 0010100 Pressure gauge for 5 000 rpm min 1 07YAJ 0010300 Gauge hose 07FPJ 7520110 Pressure gauge attachment 07KPJ VD60100 U S A only Pressure gauge 0 160 psi 07ZMJ HN2A100 Adapter 10 x 1 25 mm 07KPJ VD6010A HOSE ATTACHMENT Start the engine and check the oil pressure ...

Страница 101: ... sealing bolt threads and install it with a new sealing washer TORQUE 34 N m 3 5 kgf m 25 lbf ft CHECK SEALING BOLT VALVE WASHER OIL COOLER INSPECTION Remove the radiator grille plate page 3 16 Check the oil cooler pipe joints and seams for leaks Check the oil cooler air passage for clogging or damage Straighten bent fins with a small flat blade screw driver and remove insects mud or other obstruc...

Страница 102: ... COOLER Coat new O rings with engine oil and install them onto the oil cooler pipe joints O RING Install the pipe joints onto the oil cooler Install the removed parts in the reverse order of removal Check the oil level and add the recommended engine oil if the level is low page 3 12 OIL STRAINER CLEANING FOR FEED PUMP Remove the front mud guard page 2 8 and inner CONNECTOR BOLTS fender page 2 9 Di...

Страница 103: ...EM Remove the five bolts and oil tank BOLTS Remove the O rings and collar OIL TANK Remove the five bolts from the front oil tank FRONT OIL TANK BOLTS Remove the seven bolts and remove the rear oil REAR OIL TANK tank from the front oil tank BOLTS Remove the oil strainer screen from the front oil OIL STRAINER SCREEN tank Clean the strainer screen thoroughly and reinstall it 4 9 ...

Страница 104: ...ank Coat a new O ring with engine oil and install it onto the plate on the rear oil tank O RING Install the rear oil tank onto the front oil tank and REAR OIL TANK tighten the seven bolts securely BOLTS Install the five bolts and tighten them securely FRONT OIL TANK BOLTS Install the joint collar into the front crankcase cover Coat new O rings with oil and install them onto the collar and into the...

Страница 105: ... them onto the O RINGS BOLT oil pipes Install the oil pipes into the oil tank and tighten the bolts securely OIL PIPE BOLT Install the engine oil temperature EOT sensor with a new sealing washer and tighten it SEALING WASHER TORQUE 18 N m 1 8 kgf m 13 lbf ft Connect the EOT sensor connector Install the inner fender page 2 9 and front mud guard page 2 8 EOT SENSOR FOR SCAVENGE PUMPS Remove the rear...

Страница 106: ...nge pump OIL STRAINER SCREEN MAIN SCAVENGE Clean the oil strainer and screen thoroughly Install the oil strainer screen and tighten the bolt securely OIL STRAINER SCREEN MAIN SCAVENGE Coat a new O ring with oil and install it onto the oil strainer Install the oil strainer and tighten the bolt securely O RING OIL PUMP REMOVAL Separate the crankcases page 13 8 OIL PUMP BOLTS Remove the five bolts go...

Страница 107: ... Oil pump body C BOLTS may pop out by the spring force OIL PUMP BODY C Remove the spring seat spring and relief valve SPRING SEAT SPRING Check the valve for wear sticking or other damage Check the spring for fatigue or damage Remove outer inner rotors C and drive pin Remove the oil pump spacer SPACER RELIEF VALVE INNER AND OUTER ROTORS C Remove outer inner rotors B and drive pin DOWEL PIN DRIVE PI...

Страница 108: ...A drive pin and pump shaft PUMP SHAFT Clean the all disassembled parts thoroughly PUMP BODY B INNER AND OUTER ROTORS A INSPECTION Temporarily assemble each inner rotor outer rotor and drive pin onto the pump shaft and install them into each pump body individually Measure the rotor tip clearance SERVICE LIMIT 0 20 mm 0 008 in Measure the pump body clearance SERVICE LIMIT 0 25 mm 0 010 in Measure th...

Страница 109: ... ROTORS C OUTER ROTORS C Install the pump shaft into pump body A with the PUMP BODY A threaded hole end facing toward pump body A Install inner rotor A onto the shaft with the drive pin grooves facing out PUMP SHAFT Install outer rotor A Install the drive pin into the pump shaft hole and set the drive pin in the inner rotor grooves PUMP BODY B Install pump body B INNER AND OUTER ROTORS A DRIVER PI...

Страница 110: ...VE PIN INNER ROTOR C Install the drive pin and inner rotor C aligning the pin grooves with the drive pin SPACER Install outer rotor C SPRING SEAT SPRING Install the relief valve spring and spring seat OUTER ROTORS C RELIEF VALVE Install the pump body C and tighten the three bolts BOLTS OIL PUMP BODY C INSTALLATION Coat new O rings with oil and install it into the grooves in the front crankcase O R...

Страница 111: ...services honda com ServiceManual SVC_MNL 61HN253 61HN2 1 of 1 3 9 2008 10 43 PM 2005 2008 TRX500 FA FGA LUBRICATION SYSTEM Install the oil pump onto the front crankcase and OIL PUMP BOLTS tighten the five bolts securely Assemble the crankcases page 13 16 4 17 ...

Страница 112: ... 61HN252 by American Honda Motor Co Page 112 of 540 http services honda com ServiceManual SVC_MNL 61HN253 61HN2 1 of 1 3 9 2008 10 43 PM 2005 2008 TRX500 FA FGA MEMO ...

Страница 113: ...M 2005 2008 TRX500 FA FGA 5 FUEL SYSTEM 5 CARBURETOR ASSEMBLY 5 13 SYSTEM COMPONENTS 5 2 CARBURETOR INSTALLATION 5 18 SERVICE INFORMATION 5 3 PILOT SCREW ADJUSTMENT 5 19 TROUBLESHOOTING 5 4 HIGH ALTITUDE ADJUSTMENT AIR CLEANER HOUSING 5 5 except U type 5 20 CARBURETOR REMOVAL 5 6 FUEL TANK 5 21 CARBURETOR DISASSEMBLY INSPECTION 5 8 5 1 ...

Страница 114: ... of 540 http services honda com ServiceManual SVC_MNL 61HN253 61HN2 1 of 1 3 9 2008 10 43 PM 2005 2008 TRX500 FA FGA FUEL SYSTEM SYSTEM COMPONENTS FUELSYSTEM 1 5 N m 0 2 kgf m 1 1 lbf ft 4 N m 0 4 kgf m 2 9 lbf ft 2 3 N m 0 2 kgf m 1 7 lbf ft 5 2 ...

Страница 115: ... O rings Replace them with new ones on reassem bly If the throttle cable was disconnected perform the initial setting page 24 6 after all carburetor adjustments have been completed If the vehicle is to be stored for more than one month drain the float chamber Fuel left in the float chamber may cause clogged jets resulting in hard starting or poor drive ability See page 22 11 for carburetor heater ...

Страница 116: ...uel line Clogged carburetor air vent hose Restricted fuel tank breather hose Intake air leak Faulty vacuum piston Faulty throttle valve Rich mixture SE valve open ON Clogged air jets Faulty float valve Float level too high Dirty air cleaner Clogged slow circuit Clogged SE valve circuit Worn jet needle or needle jet Faulty vacuum piston Engine stalls hard to start rough idling Restricted fuel line ...

Страница 117: ...ver page 2 6 two trim clips Release the breather pipe clip from the stay on the muffler Disconnect the crankcase breather pipe from the air cleaner housing CLIP BREATHER PIPE Disconnect the air cleaner hose from the carburetor AIR CLEANER HOSE hose joint Loosen the band screw and remove the air intake duct from the air cleaner housing Be careful not to Loosen the air cleaner connecting hose band s...

Страница 118: ...he air cleaner housing page 5 5 Release the carburetor heater wire from the wire clip and disconnect the heater 2P connector Remove the carburetor drain hose from the clamp CARBURETOR HEATER 2P CONNECTOR Disconnect the throttle position sensor 3P connec Do not loosen the tor throttle position sensor attaching screws unless the throttle position sensor requires replacement THROTTLE POSITION SENSOR ...

Страница 119: ...drum cover SCREW THROTTLE DRUM COVER Slide the rubber cap off the throttle cable adjuster ADJUSTER THROTTLE CABLE Loosen the throttle cable lock nut and remove the adjuster from the carburetor body and disconnect the cable from the throttle drum RUBBER CAP THROTTLE DRUM LOCK NUT Loosen the carburetor insulator band screw and remove the carburetor from the insulator CARBURETOR INSULATOR BAND SCREWS...

Страница 120: ...LY INSPECTION STARTING ENRICHMENT SE VALVE INSPECTION Check the SE valve face for scores scratches or wear Check the SE valve seat at the tip of the valve for stepped wear Check the seal ring for wear or damage SE VALVE SEAL RING HOSES Remove the following air vent hoses drain hose AIR VENT DRAIN HOSE HOSES CARBURETOR HEATER Remove the carburetor heater and spacer CARBURETOR HEATER SPACER 5 8 ...

Страница 121: ...lvent and blow open with compressed air O RINGS SCREW AIR CUT OFF VALVE VACUUM CHAMBER Remove the four screws and clamps while holding WIRE CLAMP SMALL HOSE CLAMP the vacuum chamber cover SCREWS LARGE HOSE CLAMP Remove the vacuum chamber cover compression VACUUM CHAMBER COVER spring and diaphragm vacuum piston from the car buretor body SPRING DIAPHRAGM PISTON Turn the needle holder counterclockwis...

Страница 122: ...n hole deterioration or damage Check the vacuum piston for smooth operation up JET NEEDLE and down in the carburetor body Air will leak out of the vacuum chamber if the dia phragm is damaged in any way even with just a pin hole WASHER SPRING NEEDLE HOLDER Remove the screw set plate air joint and O ring SET PLATE O RING SCREW PRIMER KNOB Remove the two screws while holding the primer SCREWS knob bo...

Страница 123: ... Check the diaphragm for holes deterioration or damage DIAPHRAGM FLOAT CHAMBER Remove the four screws and the float chamber SCREWS FLOAT CHAMBER Remove the baffle plate BAFFLE PLATE Drive out the float pin from the throttle stop screw FLOAT PIN DRIVER side using a pin driver Remove the float and float valve Check the float for damage or fuel in the float FLOAT VALVE 5 11 ...

Страница 124: ...r plug Turn the pilot screw in and carefully count the num Damage to the pilot ber of turns until it seats lightly Make a note of this screw seat will to use as a reference when reinstalling the pilot occur if the pilot RUBBER PLUG screw screw is tightened NEEDLE JET HOLDER against the seat STARTER JET Remove the pilot screw spring washer and O rings WASHER Check each jet for wear or damage Check ...

Страница 125: ...RUBBER HEATER JET PLUG AIR JOINT SLOW JET NEEDLE JET THROTTLE STOP THROTTLE SCREW CABLE POSITION SENSOR NEEDLE JET PILOT SCREW HOLDER ONE WAY VALVE DRAIN HOSE BAFFLE PLATE MAIN JET FLOAT AND JETS Install the pilot screw with the spring washer and Damage to the pilot PILOT SCREW SLOW JET MAIN JET new O rings and return it to its original position as screw seat will noted during removal occur if the...

Страница 126: ...g the float FLOAT LEVEL GAUGE valve valve seat and float With the float valve seated and the float arm just Set the float level touching the valve measure the float level with the gauge so that it is float level gauge perpendicular to the float chamber face TOOL at the highest point Carburetor float level gauge 07401 0010000 of the float FLOAT LEVEL 15 9 mm 0 63 in The float cannot be adjusted BAF...

Страница 127: ...ir joint groove Install the air joint into the carburetor body aligning O RING the set plate groove with the lug on the carburetor body and tighten the screw AIR JOINT GROOVE AND LUG Install the needle clip onto the jet needle DIAPHRAGM PISTON STANDARD CLIP POSITION 2nd groove from top Install the washer onto the jet needle and insert the JET NEEDLE jet needle into the vacuum piston Install the sp...

Страница 128: ...AGE Install the compression spring and vacuum cham Be careful not to VACUUM CHAMBER COVER ber cover while lifting the piston in place Align the pinch the tab of the cover with the air passage and secure the diaphragm under cover with at least two screws before releasing the the chamber cover vacuum piston and to keep the spring straight when compressing the spring TAB AND AIR PASSAGE SPRING Instal...

Страница 129: ...etor body with its small end facing the air cut off Install and tighten the screw valve O RINGS SCREW AIR CUT OFF VALVE CARBURETOR HEATER Install the collar and carburetor heater with the CARBURETOR HEATER stepped side of the collar facing the carburetor and tighten carburetor heater SPACER HOSES Connect the carburetor drain hose so that the UP mark on the one way valve is facing toward the car bu...

Страница 130: ...djuster into the carburetor body and temporarily tighten the lock nut RUBBER CAP THROTTLE DRUM LOCK NUT Install the throttle drum cover and tighten the SCREW screw TORQUE 1 5 N m 0 2 kgf m 1 1 lbf ft THROTTLE DRUM COVER Install the starting enrichment SE valve and RUBBER BOOT CLAMP tighten the SE valve nut TORQUE 2 3 N m 0 2 kgf m 1 7 lbf ft Slide the rubber boot over the SE valve nut Connect the ...

Страница 131: ...t Turn the pilot screw clockwise until it seats screw seat will lightly then back it out to the specification given occur if the pilot This is an initial setting prior to the final pilot screw is tightened screw adjustment against the seat TOOL Pilot screw wrench 07KMA MN90101 or 07KMA MN9A100 U S A only INITIAL OPENING A CM type 2 turns out U type 1 3 4 turns out 2 Warm up the engine to operating...

Страница 132: ...itude with the carburetor modifications for high altitude use will meet each emission standard throughout its useful life The high altitude carburetor adjustment is per formed as follows Remove the carburetor page 5 6 and the float chamber Replace the standard main jet with the high altitude O RING PILOT SCREW MAIN JET type HIGH ALTITUDE MAIN JET 158 Check that the O ring on the float chamber is i...

Страница 133: ...r of turns from the high altitude setting STANDARD MAIN JET 162 TOOL Pilot screw wrench 07KMA MN90101 or 07KMA MN9A100 U S A only LOW ALTITUDE PILOT SCREW OPENING 1 4 turn out from the high altitude setting Warm up the engine and adjust the idle speed at low altitude with the throttle stop screw IDLE SPEED 1 400 100 rpm min 1 FUEL TANK REMOVAL INSTALLATION Remove the fuel tank cover page 2 6 RUBBE...

Страница 134: ...the fuel tank FUEL TANK FUEL LEVEL and remove the two bolts SENSOR 2P Slide the tank to the backward and disconnect the CONNECTOR fuel level sensor 2P Red connector Remove the fuel tank Install the fuel tank in the reverse order of removal After connecting the fuel hose turn the fuel valve ON and check that there is no fuel leak HOLDER BANDS BOLTS FUEL STRAINER SCREEN CLEANING Remove the fuel tank...

Страница 135: ... FA FGA FUEL SYSTEM Remove the O ring Clean the fuel strainer screen with non flammable or high flash point solvent O RING Dry the strainer screen thoroughly Install a new O ring onto the fuel valve Install the fuel valve into the fuel tank with the two collars and bolts and tighten the bolts securely Install the fuel tank page 5 21 STRAINER SCREEN 5 23 ...

Страница 136: ... 61HN252 by American Honda Motor Co Page 136 of 540 http services honda com ServiceManual SVC_MNL 61HN253 61HN2 1 of 1 3 9 2008 10 46 PM 2005 2008 TRX500 FA FGA MEMO ...

Страница 137: ...l SVC_MNL 61HN253 61HN2 1 of 1 3 9 2008 10 46 PM 2005 2008 TRX500 FA FGA 6 COOLING SYSTEM 6 RADIATOR RESERVE TANK 6 7 SYSTEM FLOW PATTERN 6 2 RADIATOR COOLING FAN 6 7 SERVICE INFORMATION 6 3 THERMOSTAT 6 10 TROUBLESHOOTING 6 3 WATER PUMP 6 12 SYSTEM TESTING 6 4 COOLANT REPLACEMENT 6 5 6 1 ...

Страница 138: ...otor Co Page 138 of 540 http services honda com ServiceManual SVC_MNL 61HN253 61HN2 1 of 1 3 9 2008 10 46 PM 2005 2008 TRX500 FA FGA COOLING SYSTEM SYSTEM FLOW PATTERN COOLINGSYSTEM RADIATOR RESERVE TANK WATER PUMP THERMOSTAT 6 2 ...

Страница 139: ...ng coolant on painted surfaces After servicing the system check for leaks with a cooling system tester Refer to 22 21 for engine coolant temperature sensor information SPECIFICATIONS ITEM SPECIFICATIONS Coolant capacity Radiator and engine 1 7 liters 1 8 US qt 1 5 lmp qt Reserve tank 0 40 liter 0 42 US qt 0 35 lmp qt 108 137 kPa 1 1 1 4 Kgf cm2 16 20 psi Radiator cap relief pressure 80 84 C 176 18...

Страница 140: ...1 007 1 006 1 005 1 003 1 001 0 999 0 997 10 1 018 1 017 1 017 1 016 1 015 1 014 1 013 1 011 1 009 1 007 1 005 15 1 028 1 027 1 026 1 025 1 024 1 022 1 020 1 018 1 016 1 014 1 012 20 1 036 1 035 1 034 1 033 1 031 1 029 1 027 1 025 1 023 1 021 1 019 25 1 045 1 044 1 043 1 042 1 040 1 038 1 036 1 034 1 031 1 028 1 025 30 1 053 1 052 1 051 1 049 1 047 1 045 1 043 1 041 1 038 1 035 1 032 35 1 063 1 06...

Страница 141: ...e the cooling system components Do not exceed 137 kPa 1 4 kgf cm2 20 psi Repair or replace components if the system will not hold specified pressure for at least 6 seconds Remove the tester and install the radiator cap Install the radiator cap lid and tighten the screw COOLANT REPLACEMENT PREPARATION The effectiveness of coolant decreases with the accumulation of rust or if there is a change in th...

Страница 142: ...SHER Remove the drain bolt and drain the coolant from the engine Install the drain bolt with a new sealing washer Install the fuel tank cover page 2 6 Disconnect the siphon hose and drain the coolant from the radiator reserve tank Connect the siphon hose to the reserve tank SIPHON HOSE Fill the system with recommended coolant up to the RADIATOR CAP FILLER NECK filler neck with the motorcycle on it...

Страница 143: ... Remove the reserve tank cap TANK CAP BOLT Remove the trim clip mounting bolt and reserve tank Disconnect the siphon hose from the reserve tank and drain the coolant Install the reserve tank in the reverse order of removal Fill the reserve tank to the upper level line TRIM CLIP SIPHON HOSE RESERVE TANK RADIATOR COOLING FAN RADIATOR REMOVAL Remove the oil cooler page 4 7 SIPHON HOSE Drain the coola...

Страница 144: ...ove the two mounting bolts and radiator assembly from the frame BREATHER HOSE RADIATOR ASSEMBLY LOWER RADIATOR HOSE COOLING FAN DISASSEMBLY Remove the radiator BOLTS Free the fan motor wire and breather hose from the clamp and disconnect the breather hose from the motor Remove the three bolts and fan shroud motor assembly from the radiator SHROUD MOTOR ASSEMBLY Remove the nut and cooling fan from ...

Страница 145: ...TRX500 FA FGA COOLING SYSTEM COOLING FAN ASSEMBLY FAN MOTOR SHROUD RADIATOR COOLING FAN Install the fan motor onto the shroud and tighten NUTS FAN MOTOR the three nuts securely Install the cooling fan onto the motor shaft aligning the flat surfaces NUT Apply locking agent to the motor shaft threads Install and tighten the nut Align COOLING FAN 6 9 ...

Страница 146: ...lts BREATHER Connect the upper and lower radiator hoses and HOSE tighten the hose band screws Connect the fan motor breather hose BOSSES LOWER RADIATOR HOSE Route the fan motor wire and breather hose prop SIPHON HOSE erly page 1 22 Connect the fan motor 2P connector Install the accessory socket 2P connector onto the stay of the fan motor shroud Connect the siphon hose to the radiator Install the o...

Страница 147: ... at room temperature or the rubber seal is damaged Heat the water with an electric heating element to Keep flammable operating temperature for 5 minutes materials away Suspend the thermostat in heated water to check its from the electric operation heating element THERMOMETER Do not let the THERMOSTAT BEGINS TO OPEN thermometer or 80 84 C 176 183 F thermostat touch the pan or you will VALVE LIFT ge...

Страница 148: ...and screw Install the fuel tank cover page 2 6 Fill and bleed the cooling system page 6 5 INTAKE DUCT BAND SCREW WATER PUMP MECHANICAL SEAL INSPECTION Check the inspection hole for signs of coolant leak age If there is leakage the water pump mechanical seal is defective and the water pump assembly should be replaced INSPECTION HOLE REMOVAL Drain the coolant from the engine page 6 5 LOWER RADIATOR ...

Страница 149: ... separate the water pump WATER PUMP BODY O RING cover and water pump body Remove the O ring Install a new O ring and assemble the water pump cover and water pump body Install and tighten the two bolts WATER PUMP COVER BOLTS INSTALLATION Install a new O ring onto the pump side of the water Do not apply oil to Align joint pipe the O rings O RINGS Install a new O ring onto the engine side of the O RI...

Страница 150: ...FA FGA COOLING SYSTEM Install the three bolts and tighten them securely WATER PUMP Connect the bypass hoses to the water pump BYPASS AIR BLEED HOSE BOLTS Connect the lower radiator hose to the water pump LOWER RADIATOR HOSE and tighten the band screw securely Install the fuel tank cover page 2 6 Fill and bleed the cooling system page 6 5 BAND SCREW 6 14 ...

Страница 151: ...51 of 540 http services honda com ServiceManual SVC_MNL 61HN253 61HN2 1 of 1 3 9 2008 10 48 PM 2005 2008 TRX500 FA FGA 7 ENGINE REMOVAL INSTALLATION 7 SYSTEM COMPONENTS 7 2 ENGINE REMOVAL 7 4 SERVICE INFORMATION 7 3 ENGINE INSTALLATION 7 8 7 1 ...

Страница 152: ...1HN253 61HN2 1 of 1 3 9 2008 10 48 PM 2005 2008 TRX500 FA FGA ENGINE REMOVAL INSTALLATION SYSTEM COMPONENTS ENGINEREMOVAL INSTALLATION 54 N m 5 5 kgf m 40 lbf ft 32 N m 3 3 kgf m 54 N m 5 5 kgf m 40 lbf ft 24 lbf ft 32 N m 3 3 kgf m 24 lbf ft 18 N m 1 8 kgf m 13 lbf ft 54 N m 5 5 kgf m 40 lbf ft 7 2 ...

Страница 153: ...ng filter 4 6 liters 4 9 US qt 4 0 lmp qt change After disassembly 5 2 liters 5 5 US qt 4 6 lmp qt TORQUE VALUES Left lower engine hanger bracket 32 N m 3 3 kgf m 24 lbf ft bolt Lower engine hanger nut left and right 54 N m 5 5 kgf m 40 lbf ft Upper engine hanger bracket bolt frame side 54 N m 5 5 kgf m 40 lbf ft engine side 32 N m 3 3 kgf m 24 lbf ft Engine oil temperature EOT sensor 18 N m 1 8 k...

Страница 154: ...e 2 14 carburetor page 5 6 heat guard page 8 6 bolt and ground cable terminal BOLT Remove the rubber cap terminal nut and starter BREATHER HOSE RUBBER BOOT motor cable Remove the bolt and ground cable GROUND CABLE Disconnect the crankcase breather hose from the cylinder STARTER MOTOR CABLE NUT BOLT Free the control motor and angle sensor wires from CONTROL MOTOR the wire band and clip and disconne...

Страница 155: ...r shaft PINION JOINT PROPELLER SHAFT JOINT PROPELLER SHAFT Make sure that the sub transmission is into neutral TIE ROD GEARSHIFT ARM Remove the pivot bolt washer pinch bolt and the gearshift arm from the gearshift spindle Pivot the tie rod up out of the way WASHER PIVOT BOLT PINCH BOLT Remove the following from the stays and discon GEAR POSITION nect them SWITCH CONNECTOR alternator ignition pulse...

Страница 156: ...nect the engine coolant temperature ECT sensor connector ECT SENSOR CONNECTOR Remove the bolts and oil pipes from the oil tank BOLTS OIL PIPES Disconnect the engine oil temperature EOT sensor CONNECTOR SEALING WASHER connector and remove the EOT sensor and sealing washer EOT SENSOR Remove the screw and universal joint boot band UNIVERSAL JOINT BOOT BAND Remove the boot from the engine SCREW 7 6 ...

Страница 157: ...eft lower engine hanger nut and bolt mounting rubbers bolts and hanger bracket BRACKET MOUNTING RUBBERS BOLTS right lower engine hanger nut and bolt HANGER BOLT HANGER NUT spacer and mounting rubbers Move the engine forward and disconnect the output shaft from the universal joint Remove the engine from the frame toward the left side SPACER MOUNTING RUBBERS Remove the engine hanger bushings and dus...

Страница 158: ...ide grease to the output shaft splines OUTPUT SHAFT Install the engine in the frame from the left side Engage the output shaft with the universal joint Install the mounting rubbers on the right lower HANGER BOLT HANGER NUT hanger bushing with the large I D side facing in Install the spacer right lower engine hanger bolt and nut SPACER MOUNTING RUBBERS Install the mounting rubbers on the left lower...

Страница 159: ...t Tighten the left lower hanger bracket bolts TORQUE 32 N m 3 3 kgf m 24 lbf ft Tighten the engine side upper hanger bolts MOUNTING RUBBERS BOLTS TORQUE 32 N m 3 3 kgf m 24 lbf ft Tighten the frame side upper hanger bolt TORQUE 54 N m 5 5 kgf m 40 lbf ft Install the universal joint boot onto the engine UNIVERSAL JOINT BOOT BAND Install the boot band and tighten the screw securely SCREW Install the...

Страница 160: ...water pump Tighten the hose band screws securely Install the spark plug cap onto the plug SPARK PLUG CAP Connect the following GEAR POSITION SWITCH CONNECTOR alternator ignition pulse generator connector gear position switch connector Install the connectors onto the stays and clamp the wires and hoses properly page 1 22 ALTERNATOR IGNITION PULSE GENERATOR CONNECTOR Install the gearshift arm onto t...

Страница 161: ...il the stopper ring seats in the groove Make sure that the stopper ring is seated properly by pulling on the propeller shaft lightly Install the boot over the pinion joint securely and the boot bands into the boot groove PINION JOINT 5 8g PROPELLER SHAFT Install a new O ring onto the output shaft groove Apply molybdenum disulfide grease to the output OUTPUT SHAFT shaft splines Install the propelle...

Страница 162: ...erminal and tighten the nut GROUND CABLE Install the ground cable and tighten the bolt Install the rubber cap over the terminal properly STARTER MOTOR CABLE NUT BOLT Install the ground cable terminal onto the engine GROUND CABLE TERMINAL and tighten the bolt Adjust the tie rod length of the gearshift lever link age page 12 18 Install the following heat guard page 8 6 carburetor page 5 18 exhaust s...

Страница 163: ...REPLACEMENT 8 12 SYSTEM COMPONENTS 8 2 8 VALVE SEAT INSPECTION REFACING 8 13 SERVICE INFORMATION 8 3 CAMSHAFT REMOVAL 8 15 TROUBLESHOOTING 8 5 CAMSHAFT INSTALLATION 8 17 CYLINDER COMPRESSION 8 6 CYLINDER HEAD ASSEMBLY 8 19 CYLINDER HEAD COVER REMOVAL DISASSEMBLY 8 6 CYLINDER HEAD INSTALLATION 8 20 CYLINDER HEAD REMOVAL 8 8 CYLINDER HEAD COVER ASSEMBLY INSTALLATION 8 22 CYLINDER HEAD DISASSEMBLY 8 ...

Страница 164: ...com ServiceManual SVC_MNL 61HN253 61HN2 1 of 1 3 9 2008 10 49 PM 2005 2008 TRX500 FA FGA CYLINDER HEAD VALVE CAMSHAFT SYSTEM COMPONENTS CYLINDERHEAD VALVE CAMSHAFT 53 N m 5 4 kgf m 39 lbf ft 32 N m 3 3 kgf m 24 lbf ft 10 N m 1 0 kgf m 7 lbf ft 22 N m 2 2 kgf m 16 lbf ft 8 2 ...

Страница 165: ...0 2148 0 2154 5 43 0 214 Valve guide I D IN EX 5 500 5 512 0 2165 0 2170 5 53 0 218 Stem to guide clearance IN 0 010 0 037 0 0004 0 0015 0 12 0 005 EX 0 030 0 057 0 0012 0 0022 0 14 0 006 Valve guide projection IN 15 8 16 2 0 62 0 64 above cylinder head EX 18 8 19 2 0 74 0 76 Valve seat width IN EX 1 0 1 1 0 039 0 043 1 4 0 06 Valve spring Free length Inner 38 82 1 528 37 8 1 49 Outer 51 17 2 015 ...

Страница 166: ...5 mm 07781 0010101 07780 0013500 07780 0012900 or equivalent commercially avail or equivalent commercially avail or equivalent commercially avail able in U S A able in U S A able in U S A Seat cutter 35 mm IN 45 Seat cutter 33 mm EX 45 Interior cutter 34 mm IN 60 07780 0010400 07780 0010800 07780 0014700 or equivalent commercially avail or equivalent commercially avail or equivalent commercially a...

Страница 167: ...correct valve timing Broken valve spring Uneven valve seating Valve stuck open Cylinder head Leaking or damaged cylinder head gasket Loose spark plug Warped or cracked cylinder head Cylinder piston problem page 9 5 Compression too high overheating or knocking Excessive carbon build up on piston head or combustion chamber Worn or damaged decompressor system Excessive smoke Worn valve stem or valve ...

Страница 168: ...ng is usually reached within 4 7 seconds COMPRESSION PRESSURE 608 902 kPa 6 2 9 2 kgf cm2 88 131 psi at 450 rpm min 1 Check that there is no leakage at the gauge connec tion Low compression can be caused by blown cylinder head gasket improper valve adjustment valve leakage worn piston ring or cylinder High compression can be caused by carbon deposits in combustion chamber or on piston head CYLINDE...

Страница 169: ...ad cover SPARK PLUG CAP BOLTS SEALING WASHERS Remove the push rods gasket and dowel pins Mark the push rods PUSH RODS GASKET so that they can be placed back in their original locations DOWEL PINS DISASSEMBLY Remove the two setting bolts and sealing washers BOLTS SEALING WASHERS Push the rocker arm shaft with the small screw driver through the bolt hole until the O ring on the shaft is removed from...

Страница 170: ...e corre sponding rocker arm I D to obtain the rocker arm to shaft clearance SERVICE LIMITS 0 08 mm 0 003 in PUSH ROD Check the push rods for wear or damage If the push rod is worn or damaged check the cam follower and camshaft CYLINDER HEAD REMOVAL Remove the following CAM FOLLOWERS exhaust pipe page 2 14 carburetor page 5 6 cylinder head cover page 8 6 cam followers The cam followers thermostat p...

Страница 171: ...move the engine coolant temperature ECT sen sor if necessary INSULATOR ECT SENSOR Remove the four bolts and the cylinder head Do not strike the BOLTS cylinder head too hard CYLINDER HEAD Remove the gasket and dowel pins DOWEL PINS GASKET CYLINDER HEAD DISASSEMBLY Remove the valve spring cotters using the valve To prevent loss of SPRING COMPRESSOR spring compressor tension do not compress the valve...

Страница 172: ...tem seal OUTER SPRING valve spring seat COTTERS STEM SEAL RETAINER INNER SPRING INSPECTION CYLINDER HEAD Remove the carbon deposits from the combustion COMBUSTION CHAMBER chamber being careful not to damage the gasket surface Check the spark plug hole and valve areas for cracks Check the cylinder head for warpage with a straight edge and feeler gauge SERVICE LIMIT 0 10 mm 0 004 in CAM FOLLOWER Che...

Страница 173: ...RING Measure the valve spring free length SERVICE LIMITS Inner 37 8 mm 1 49 in Outer 49 0 mm 1 93 in VALVE VALVE GUIDE Check that the valve moves smoothly in the guide Check the valve for bending burning or abnormal wear Measure each valve stem O D and record it SERVICE LIMITS IN 5 45 mm 0 215 in EX 5 43 mm 0 214 in Ream the valve guide to remove any carbon build Always rotate the REAMER up before...

Страница 174: ...d 150 C 300 F Use temperature indica avoid burns when tor sticks available from welding supply stores to handling the heated be sure the cylinder head is heated to the proper cylinder head temperature Using a torch to heat the cylinder Support the cylinder head and drive the valve head may cause guides out of the cylinder head from the combus warpage tion chamber side TOOL Valve guide driver 5 5 m...

Страница 175: ...t Remove the valve and inspect the valve seat face The valve cannot be The valve seat contact should be within the speci ground If the valve fied width and even all around the circumference face is burned or badly worn or if it STANDARD 1 0 1 1 mm 0 039 0 043 in contacts the seat SERVICE LIMIT 1 4 mm 0 06 in unevenly replace the valve If the valve seat width is not within specification reface the ...

Страница 176: ...tter If the contact area is too low on the valve the seat must be raised using a 60 interior cutter 32 CONTACT TOO LOW 60 Using a 45 seat cutter remove any roughness or irregularities from the seat ROUGHNESS TOOLS Valve seat cutter 35 mm IN 07780 0010400 Valve seat cutter 33 mm EX 07780 0010800 Cutter holder 5 5 mm 07781 0010101 or equivalent commercially available in U S A Using a 32 flat cutter ...

Страница 177: ...he proper width SEAT WIDTH VALVE SEAT WIDTH 1 0 1 1 mm 0 039 0 043 in Make sure that all pitting and irregularities are removed 45 After cutting the seat apply lapping compound to Excessive lapping HAND LAPPING TOOL the valve face and lap the valve using light pres pressure may sure deform or damage Change the angle of lapping tool frequently to pre the seat vent uneven seat wear After lapping was...

Страница 178: ...ted in the camshaft holders are removed from the cylinder Remove the cam chain from the cam sprocket and suspend the cam chain with a piece of wire to pre vent it from falling into the crankcase Remove the camshaft assembly and holder plate HOLDER PLATE CAM CHAIN Remove the dowel pins from the camshaft holders Do not forcibly DOWEL PINS Remove camshaft holder B from the camshaft remove the dowel a...

Страница 179: ... of the exhaust cam lobe Push DECOMPRESSOR CAM CAMSHAFT INSTALLATION Install camshaft holder B onto the camshaft assem DOWEL PINS bly Install the dowel pins if they were removed CAMSHAFT HOLDER B Remove the timing hole cap page 3 10 INDEX MARK Rotate the crankshaft using the recoil starter knob and align the T mark on the flywheel with the index mark on the rear crankcase cover T MARK Lubricate th...

Страница 180: ...008 TRX500 FA FGA CYLINDER HEAD VALVE CAMSHAFT Install and tighten the four camshaft holder bolts Apply molybdenum oil solution to the cam lobes CAM LOBES BOLTS Remove the stopper tool from the cam chain ten sioner lifter and install the sealing bolt with a new SEALING WASHER sealing washer Install the cylinder head page 8 20 SEALING BOLT 8 18 ...

Страница 181: ...low through the oil passage stud bolt hole in the cylinder head with compressed air VALVE Install the valve spring seats Install new stem seals SPRING SEAT Lubricate the valve stem sliding surface with molyb denum oil solution OUTER SPRING Insert the valve into the guide while turning it slowly to avoid damage to the stem seal COTTERS STEM SEAL RETAINER INNER SPRING Install the inner and outer val...

Страница 182: ...ring compressor 07757 0010000 springs more than necessary to install the cotters Support the cylinder head so that the valve heads will not contact anything that cause damage Tap the valve stems gently with two plastic ham mers as shown to seat the cotters firmly CYLINDER HEAD INSTALLATION Clean the mating surface of the cylinder and head Install the dowel pins and a new gasket DOWEL PINS GASKET I...

Страница 183: ...ug TORQUE 22 N m 2 2 kgf m 16 lbf ft GROOVE AND LUG Connect the ECT sensor connector HANGER MOUNTING RUBBERS Install the mounting rubbers on the upper engine BRACKET hanger bushing with the large I D side facing in BYPASS Install the upper engine hanger bracket and bolts HOSES Tighten the engine side hanger bolts TORQUE 32 N m 3 3 kgf m 24 lbf ft Tighten the upper engine hanger nut BOLT TORQUE 54 ...

Страница 184: ...ROCKER ARM O RING EXHAUST ROCKER ARM Coat new O rings with oil and install them onto the rocker arm shaft grooves O RINGS Apply molybdenum oil solution to the rocker arm shaft sliding surface Install the rocker arms and shafts into the cylinder head cover ROCKER ARMS AND SHAFTS Align the bolt holes in the cylinder head cover and BOLTS rocker arm shaft by turning the shaft Install the setting bolts...

Страница 185: ...ollowers on the push engine damage SPARK PLUG rods properly by turning the crankshaft slowly with Do not tighten the CAP the recoil starter cap nuts when the Apply oil to the cap nut threads and seating sur rocker arms are not faces aligned with the Install the four washers cap nuts three new sealing push rod ends washers and seven bolts Tighten the nuts and bolts in a crisscross pattern in 2 or 3...

Страница 186: ...05 2008 TRX500 FA FGA CYLINDER HEAD VALVE CAMSHAFT Install the wire clamp to the fuel tank heat guard THROTTLE CABLE HEAT Install the fuel tank heat guard GUARD Install the upper radiator hose choke and throttle SE VALVE CABLE cables onto the fuel tank heat guard properly Install the fuel tank page 5 21 WIRE CLAMP RADIATOR UPPER HOSE 8 24 ...

Страница 187: ...p services honda com ServiceManual SVC_MNL 61HN253 61HN2 1 of 1 3 9 2008 10 51 PM 2005 2008 TRX500 FA FGA 9 CYLINDER PISTON CYLINDER PISTON REMOVAL 9 5 SYSTEM COMPONENTS 9 2 CYLINDER PISTON INSTALLATION 9 9 SERVICE INFORMATION 9 3 9 TROUBLESHOOTING 9 4 9 1 ...

Страница 188: ...52 by American Honda Motor Co Page 188 of 540 http services honda com ServiceManual SVC_MNL 61HN253 61HN2 1 of 1 3 9 2008 10 52 PM 2005 2008 TRX500 FA FGA CYLINDER PISTON SYSTEM COMPONENTS CYLINDER PISTON 9 2 ...

Страница 189: ... ITEM STANDARD SERVICE LIMIT Cylinder I D 92 000 92 010 3 6220 3 6224 92 10 3 626 Out of round 0 10 0 004 Taper 0 10 0 004 Warpage 0 10 0 004 Piston Piston O D at 15 0 6 from bottom 91 965 91 985 3 6207 3 6214 91 90 3 618 piston pin Piston pin hole I D 20 002 20 008 0 7875 0 7877 20 04 0 789 piston ring Piston pin O D 19 994 20 000 0 7872 0 7874 19 96 0 786 Piston to piston pin clearance 0 002 0 0...

Страница 190: ...Leaking cylinder head gasket Worn stuck or broken piston ring Worn or damaged cylinder and piston Compression too high overheating or knocking Excessive carbon built up on piston head or combustion chamber Excessive smoke Worn cylinder piston or piston rings Improper installation of piston rings Scored or scratched piston or cylinder wall Abnormal noise Worn piston pin or piston pin bore Worn conn...

Страница 191: ...nsioner shaft clockwise with the stopper tool to retract the tensioner then insert the stopper fully to hold the tensioner in the fully retracted posi tion TOOL Cam chain tensioner stopper 07NMG MY90101 or 07ZMG MCAA400 U S A only Remove the two bolts BOLTS STOPPER TOOL Remove the cam chain tensioner lifter from the cyl TENSIONER LIFTER inder Remove the gasket Remove the camshaft page 8 15 GASKET ...

Страница 192: ...towel over the crankcase to pre PISTON vent the clip from falling into the crankcase PISTON PIN Remove the piston pin clips with the pliers Push the piston pin out of the piston and connecting rod and remove the piston PISTON PIN CLIP Spread each piston ring and remove it by lifting up Do not damage the at a point opposite the gap piston ring by spreading the ends too far Clean carbon deposits fro...

Страница 193: ...t of round SERVICE LIMITS Taper 0 10 mm 0 004 in TOP Out of round 0 10 mm 0 004 in The cylinder must be rebored and an oversize pis MIDDLE ton fitted if the service limits are exceeded The 0 25 mm 0 010 in and 0 50 mm 0 020 in over size pistons are available BOTTOM The cylinder must be rebored so that the clearance for an oversize piston is 0 015 0 045 mm 0 0006 0 0018 in Check the top of the cyli...

Страница 194: ...bottom of the piston skirt SERVICE LIMIT 91 90 mm 3 618 in Compare this measurement against the maximum cylinder I D measurement and calculate the piston 15 mm 0 6 in to cylinder clearance page 9 7 Measure piston pin hole Take the maximum read ing to determine the I D SERVICE LIMIT 20 04 mm 0 789 in Measure the piston pin O D at three points SERVICE LIMIT 19 96 mm 0 786 in Calculate the piston to ...

Страница 195: ...h other Stagger the side rail end gaps as shown 120 TOP RING 120 120 SECOND RING OIL RING 20 mm or more SIDE RAILS SPACER PISTON INSTALLATION Place a clean shop towel over the crankcase to pre PISTON vent the piston pin clip from falling into the crank case PISTON PIN Apply molybdenum oil solution to the piston pin outer surface Apply engine oil to the piston pin hole and connect ing rod inner sur...

Страница 196: ...kcase so that its end rests in the groove properly as shown Install the dowel pins and a new gasket DOWEL PINS GASKET Apply engine oil to the cylinder wall piston outer CAM CHAIN GUIDE surface and piston rings CYLINDER Install the cylinder over the piston while compress Be careful not to ing the piston rings with your fingers damage the piston Align the cam chain guide bosses with the grooves ring...

Страница 197: ...r shaft clockwise fully to retract the tensioner lifter and secure it with a stopper tool TOOL Cam chain tensioner stopper 07NMG MY90101 or 07ZMG MCAA400 U S A only Install the cam chain tensioner lifter into the cylin TENSIONER LIFTER der with a new gasket GASKET Install the camshaft page 8 17 BOLTS Install and tighten the two bolts SEALING WASHER Remove the stopper tool and install the sealing b...

Страница 198: ... 61HN252 by American Honda Motor Co Page 198 of 540 http services honda com ServiceManual SVC_MNL 61HN253 61HN2 1 of 1 3 9 2008 10 53 PM 2005 2008 TRX500 FA FGA MEMO ...

Страница 199: ...p services honda com ServiceManual SVC_MNL 61HN253 61HN2 1 of 1 3 9 2008 10 53 PM 2005 2008 TRX500 FA FGA 10 CENTRIFUGAL CLUTCH FRONT CRANKCASE COVER 10 5 COMPONENT LOCATION 10 2 CENTRIFUGAL CLUTCH 10 9 SERVICE INFORMATION 10 3 TROUBLESHOOTING 10 4 10 10 1 ...

Страница 200: ...ge 200 of 540 http services honda com ServiceManual SVC_MNL 61HN253 61HN2 1 of 1 3 9 2008 10 53 PM 2005 2008 TRX500 FA FGA CENTRIFUGAL CLUTCH COMPONENT LOCATION CENTRIFUGALCLUTCH 118 N m 12 0 kgf m 87 lbf ft 18 N m 1 8 kgf m 13 lbf ft 10 2 ...

Страница 201: ...disengage or the vehicle creeps with the clutch disengaged inspect the engine oil viscosity and level before servicing the clutch system SPECIFICATIONS Unit mm in ITEM STANDARD SERVICE LIMIT Clutch Drum I D 150 0 150 2 5 906 5 913 150 4 5 92 Weight lining thickness 3 0 0 12 2 0 0 08 Clutch spring height 3 72 0 146 3 6 0 14 Clutch weight spring free length 23 2 0 91 24 1 0 95 Clutch drum boss I D 2...

Страница 202: ...t Driver Attachment 42 x 47 mm 07741 0010201 07749 0010000 07746 0010300 or 07936 3710200 or 07936 371020A U S A only Pilot 17 mm Pilot 22 mm Hub bearing driver 07746 0040400 07746 0041000 07HAD SG00100 TROUBLESHOOTING Clutch slips when accelerating Worn clutch weight linings Worn clutch drum Improper oil additive used The vehicle creeps with clutch disengaged Weak clutch weight springs 10 4 ...

Страница 203: ...e side cover Remove the two bolts and left engine side cover stay LEFT ENGINE SIDE COVER SOCKET BOLTS Remove the setting cap and oil feed pipe from the OIL FEED PIPE O RING front crankcase cover Remove the O rings from the setting cap and feed pipe O RING SETTING CAP Remove the fourteen crankcase cover bolts CONTROL MOTOR BOLTS Remove the two bolts and control motor from the front crankcase cover ...

Страница 204: ...uld turn smoothly and quietly BEARING Also check that the outer race of the bearing fits TRANSMISSION BEARINGS tightly in the front crankcase cover Replace the bearing if the inner race does not turn smoothly quietly or if the outer race fits loosely in the front crankcase cover CRANKSHAFT BEARING Remove the crankshaft bearing using special tools CRANKSHAFT BEARING TOOLS Bearing remover 17 mm 0793...

Страница 205: ...nit bearings from the cover avoid burns when handling the heated Drive new transmission bearings in using the spe cover cial tools HUB BEARING DRIVER TOOLS Inner bearing Driver 07749 0010000 Attachment 42 x 47 mm 07746 0010300 Pilot 22 mm 07746 0041000 Outer bearing Driver 07749 0010000 Hub bearing driver 07HAD SG00100 INSTALLATION Blow through the oil passages in the front crankcase GEARSHIFT SPI...

Страница 206: ...OWEL PINS the crankcase groove Install the dowel pins O RING Clean the crankcase and cover mating surfaces CONTROL MOTOR BOLTS Apply liquid sealant to the mating surface of the front crankcase cover Install the front crankcase cover and tighten the fourteen bolt in a crisscross pattern in 2 or 3 steps Install the control motor page 24 43 FRONT CRANKCASE COVER Coat a new O ring with engine oil and ...

Страница 207: ...tighten the bolt and socket bolts BOLTS Install the following oil tank page 4 8 gearshift linkage page 7 10 inner fenders page 2 9 front mud guards page 2 8 Adjust the tie rod length of the gearshift lever link LEFT ENGINE age page 12 18 SIDE COVER SOCKET BOLTS CENTRIFUGAL CLUTCH DISASSEMBLY Remove the front crankcase cover page 10 2 Unstake WASHER Unstake the centrifugal clutch lock nut Be carefu...

Страница 208: ...LUTCH DRUM The drive plate should turn counterclockwise smoothly and should not turn clockwise Remove the drive plate assembly from the clutch drum by turning it counterclockwise DRIVE PLATE CLUTCH DRUM Check the one way clutch sprag for abnormal wear SPRAG CLUTCH damage or irregular movement Remove the sprag clutch from the clutch outer Check the clutch lining and sprag clutch contacting surfaces...

Страница 209: ...D SERVICE LIMIT 28 93 mm 1 139 in DRIVE PLATE ASSEMBLY Measure the clutch lining thickness of the weight Replace the clutch weights as a set SERVICE LIMIT 2 0 mm 0 08 in Check the sprag clutch contacting surface of the CONE SPRING E CLIPS drive plate boss for abnormal wear or damage Compress the clutch cone spring and remove the E clips Remove the outer plate cone spring and inner plate OUTER PLAT...

Страница 210: ...008 TRX500 FA FGA CENTRIFUGAL CLUTCH Remove the clutch weights and springs from the WEIGHTS drive plate SPRINGS Measure the clutch weight spring free length Replace the clutch weight springs as a SERVICE LIMIT 24 1 mm 0 95 in set ASSEMBLY CLUTCH DRUM E CLIP WEIGHT SPRING WEIGHT SPRAG CLUTCH DRIVE PLATE OUTER PLATE CONE SPRING INNER PLATE 10 12 ...

Страница 211: ...r plate with dished side facing up INNER PLATE clutch spring with concaved side facing down outer plate with locating pins facing up OUTER PLATE LOCATING PINS Install the E clips into the pin grooves of the drive E CLIPS plate with their gaps facing towards the locating pins while compressing the cone spring with pliers LOCATING PINS Apply oil to the sprag clutch whole surface and the sprag clutch...

Страница 212: ...gal clutch assembly onto the CENTRIFUGAL CLUTCH ASSEMBLY crankshaft while aligning the splines of the drive plate boss and crankshaft Engage the primary drive gear of the clutch drum Keep the clutch with the driven gear of the automatic transmission drum and drive unit plate as an assembly Install the washer WASHER Apply engine oil to the threads and seating surface of a new clutch lock nut and in...

Страница 213: ...com ServiceManual SVC_MNL 61HN253 61HN2 1 of 1 3 9 2008 10 55 PM 2005 2008 TRX500 FA FGA CENTRIFUGAL CLUTCH Stake the clutch lock nut into the crankshaft groove Be careful not to Stake damage the Install the front crankcase cover page 10 7 crankshaft threads LOCK NUT 10 15 ...

Страница 214: ... 61HN252 by American Honda Motor Co Page 214 of 540 http services honda com ServiceManual SVC_MNL 61HN253 61HN2 1 of 1 3 9 2008 10 55 PM 2005 2008 TRX500 FA FGA MEMO ...

Страница 215: ...da com ServiceManual SVC_MNL 61HN253 61HN2 1 of 1 3 9 2008 10 55 PM 2005 2008 TRX500 FA FGA 11 ALTERNATOR STARTER CLUTCH RECOIL STARTER 11 5 SYSTEM COMPONENTS 11 2 ALTERNATOR STATOR 11 8 SERVICE INFORMATION 11 3 FLYWHEEL STARTER CLUTCH 11 12 TROUBLESHOOTING 11 4 11 11 1 ...

Страница 216: ...r Co Page 216 of 540 http services honda com ServiceManual SVC_MNL 61HN253 61HN2 1 of 1 3 9 2008 10 55 PM 2005 2008 TRX500 FA FGA ALTERNATOR STARTER CLUTCH SYSTEM COMPONENTS ALTERNATOR STARTERCLUTCH 108 N m 11 0 kgf m 80 lbf ft 11 2 ...

Страница 217: ...ervicing Refer to 19 9 for alternator stator inspection Refer to 21 7 for starter motor servicing SPECIFICATIONS Unit mm in ITEM STANDARD SERVICE LIMIT Starter driven gear boss O D 51 705 51 718 2 0356 2 0361 51 705 2 0356 TORQUE VALUES Starter clutch outer bolt 30 N m 3 1 kgf m 22 lbf ft Apply locking agent to the threads Recoil starter driven pulley bolt 108 N m 11 0 kgf m 80 lbf ft Apply engine...

Страница 218: ...55 PM 2005 2008 TRX500 FA FGA ALTERNATOR STARTER CLUTCH Remover weight Bearing remover shaft 10 mm Bearing remover head 10 mm 07741 0010201 07936 GE00100 07936 GE00200 or 07936 3710200 or 07936 371020A U S A only TROUBLESHOOTING Starter motor turns but engine does not turn Faulty starter clutch Damaged reduction gear or shaft 11 4 ...

Страница 219: ... four mounting bolts and the recoil starter assembly RECOIL STARTER DISASSEMBLY Remove the bolt and ratchet cover BOLT RATCHET COVER Remove the ratchet and spring RATCHET SPRING Untie the starter rope and remove the starter grip ROPE Release the starter rope slowly DRIVE PULLEY Wear eye Remove the starter drive pulley protection and use care when removing the drive pulley and starter spring The sp...

Страница 220: ... or damage ROPE DRIVE PULLEY Check the recoil starter spring and replace it with a new one if it is damaged or broken SPRING HOOK ASSEMBLY Install the spring by hooking the outer end onto the starter housing hook as shown SPRING HOOK Install the starter rope into the drive pulley and tie the rope end in a square knot SQUARE KNOT ROPE Wrap the rope around the drive pulley in a counter clockwise dir...

Страница 221: ...ley hook Hook Preload the starter spring by turning the pulley 2 1 2 turns counterclockwise Route the starter rope end through the starter hous SQUARE KNOT ing and grip holes while the pulley remains held in place Tie the starter rope end in a square knot GRIP Install the ratchet return spring onto the drive pul RATCHET ley inserting the end into the hole in the pulley GROOVE Apply grease to the s...

Страница 222: ...the ratchet pawl LOOP RATCHET PAWL Install and tighten the bolt BOLT Check that the recoil starter for smooth operation by pulling the grip INSTALLATION Install the recoil starter assembly and tighten the BOLTS four bolts WIRE CLIP Install the air cleaner housing page 5 5 RECOIL STARTER ALTERNATOR STATOR ALTERNATOR COVER REMOVAL Remove the following ALTERNATOR 5P CONNECTOR air cleaner housing page...

Страница 223: ...der 07SMB HM70100 Remove the bolt O ring and the driven pulley DRIVEN PULLEY O RING BOLT Remove the nine bolts three sealing washer and The cover stator is alternator cover magnetically BOLTS attracted to the Remove the dowel pins and O ring flywheel be careful during removal BOLTS SEALING WASHERS ALTERNATOR COVER IGNITION PULSE GENERATOR STATOR REMOVAL INSTALLATION Disconnect the ignition pulse g...

Страница 224: ...nerator connector BOLTS IGNITION PULSE GENERATOR ALTERNATOR COVER INSTALLATION Install the dowel pins and a new O ring REDUCTION GEARS Check that the starter reduction gears are installed in position Apply molybdenum oil solution to the starter reduc O RING tion shaft journals DOWEL PINS Blow through the oil passage in the alternator cover with compressed air BOLTS OIL SEAL Apply sealant to the wi...

Страница 225: ...ly oil to the driven pulley bolt threads and seat O RING ing surface and install the bolt BOLT Hold the starter driven pulley using the special tool and tighten the bolt RECOIL PULLEY HOLDER TOOL Recoil pulley holder 07SMB HM70100 TORQUE 108 N m 11 0 kgf m 80 lbf ft Install the recoil starter page 11 5 ALTERNATOR Route the wires and hoses properly page 1 22 5P CONNECTOR Connect the alternator 5P c...

Страница 226: ...nd shaft washer and starter reduction gear C starter reduction shaft WASHER REDUCTION GEAR C REDUCTION SHAFT Remove the flywheel and starter driven gear using the special tool TOOL Flywheel puller 07933 3950000 FLYWHEEL PULLER Remove the needle bearing washer and woodruff WASHER NEEDLE BEARING key WOODRUFF KEY STARTER CLUTCH DISASSEMBLY INSPECTION Make sure that the starter driven gear turns clock...

Страница 227: ... S A Remove the starter clutch assembly from the fly wheel FLYWHEEL HOLDER Remove the sprag clutch from the starter clutch CLUTCH OUTER SPRAG CLUTCH outer Check the starter clutch outer and sprag clutch for abnormal wear or damage Check the starter driven gear teeth and needle bear ing for wear or damage Measure the starter driven gear boss O D SERVICE LIMIT 51 705 mm 2 0356 in STARTER CLUTCH ASSE...

Страница 228: ...le turning it clock DRIVEN GEAR wise INSTALLATION Lubricate the needle bearing with molybdenum oil WASHER solution NEEDLE BEARING Install the washer and needle bearing onto the crankshaft Clean any oil from the tapered portions of the crank shaft and flywheel Install the woodruff key into the crankshaft key groove WOODRUFF KEY Install the flywheel starter driven gear aligning the key way in the fl...

Страница 229: ...move the bearing using the special tools TOOLS Bearing remover shaft 10 mm 07936 GE00100 Bearing remover head 10 mm 07936 GE00200 Remover weight 07741 0010201 or 07936 371020A or 07936 3710200 U S A only Drive a new bearing in the cover using the special Be sure to press tools the bearing in evenly and flush with the surface TOOLS Driver 07749 0010000 Attachment 24 x 26 mm 07746 0010700 Pilot 10 m...

Страница 230: ... 61HN252 by American Honda Motor Co Page 230 of 540 http services honda com ServiceManual SVC_MNL 61HN253 61HN2 1 of 1 3 9 2008 10 56 PM 2005 2008 TRX500 FA FGA MEMO ...

Страница 231: ...l SVC_MNL 61HN253 61HN2 1 of 1 3 9 2008 10 56 PM 2005 2008 TRX500 FA FGA 12 SUB TRANSMISSION GEARSHIFT LINKAGE GEARSHIFT LINKAGE 12 8 SYSTEM COMPONENTS 12 2 SUB TRANSMISSION 12 12 SERVICE INFORMATION 12 3 GEARSHIFT LEVER LINKAGE 12 15 TROUBLESHOOTING 12 5 REAR CRANKCASE COVER 12 6 12 12 1 ...

Страница 232: ...ge 232 of 540 http services honda com ServiceManual SVC_MNL 61HN253 61HN2 1 of 1 3 9 2008 10 57 PM 2005 2008 TRX500 FA FGA SUB TRANSMISSION GEARSHIFT LINKAGE SYSTEM COMPONENTS SUB TRANSMISSION GEARSHIFTLINKAGE 12 N m 1 2 kgf m 9 lbf ft 12 2 ...

Страница 233: ...0 18 Shaft O D 10 966 10 984 0 4317 0 4324 10 96 0 431 Transmission Gear I D D R L 28 020 28 041 1 1031 1 1040 28 07 1 105 Reverse idle 14 000 14 018 0 5512 0 5519 14 04 0 553 Gear bushing O D D R 27 979 28 000 1 1015 1 1024 27 93 1 100 L 27 984 28 005 1 1017 1 1026 27 93 1 100 Gear to bushing D R 0 020 0 062 0 0008 0 0024 0 10 0 004 clearance L 0 015 0 057 0 0006 0 0022 0 10 0 004 Gear bushing I ...

Страница 234: ...ARSHIFT LINKAGE TOOLS Bearing remover 17 mm Bearing remover 20 mm Remover handle 07936 3710300 07936 3710600 07936 3710100 Remover weight Driver Attachment 37 x 40 mm 07741 0010201 07749 0010000 07746 0010200 or 07936 371020A U S A only or 07936 3710200 Attachment 52 x 55 mm Pilot 17 mm Attachment 42 x 47 mm 07746 0010300 07746 0010400 07746 0040400 Pilot 25 mm 07746 0040600 12 4 ...

Страница 235: ... shift forks Bent shift fork shaft Bent shift fork shaft Damaged shift drum cam grooves Improperly adjusted tie rod length of gearshift lever linkage Bent tie rod of gearshift lever linkage Improperly installed gearshift spindle and drum Transmission jumps out of gear Worn gear dogs Worn gear shifter groove Bent shift fork shaft Broken shift drum stopper arm Weak or broken stopper arm spring Damag...

Страница 236: ... 11 8 starter reduction gears and shafts page 11 12 starter motor page 21 7 vehicle speed sensor page 23 11 gear position switch page 24 39 engine side cover stay page 10 5 eleven bolts and rear crankcase cover REAR CRANKCASE COVER dowel pins JOINT COLLAR O RING oil joint collar and O ring DOWEL PINS BEARING REPLACEMENT Remove the stopper ring and output shaft oil seal OIL SEAL STOPPER RING Drive ...

Страница 237: ...710100 Remover weight 07741 0010201 or 07936 371020A or 07936 3710200 U S A only Drive new mainshaft and countershaft bearings in DRIVER with the sealed side facing down using the special tools TOOLS ATTACHMENT Mainshaft bearing PILOT Driver 07749 0010000 Attachment 37 x 40 mm 07746 0010200 Pilot 17 mm 07746 0040400 Countershaft bearing Driver 07749 0010000 Attachment 42 x 47 mm 07746 0010300 COUN...

Страница 238: ... through the oil passages in the rear crankcase cover with compressed air BOLTS Clean the crankcase and cover mating surfaces Apply liquid sealant to the mating surface of the rear crankcase cover Install the rear crankcase cover and tighten the eleven bolts in a crisscross pattern in 2 or 3 steps Install the following engine side cover stay page 10 9 gear position switch page 24 39 vehicle speed ...

Страница 239: ...SHIFT DRUM INDEX LINE GEARSHIFT SPINDLE Remove the following SHIFT DRUM shift drum while lowering the stopper arm with a screwdriver STOPPER ARM bolt and setting plate GEARSHIFT STOPPER ARM BOLT gearshift spindle SPINDLE WASHER pivot bolt stopper arm washer and spring SPRING SETTING PLATE INSPECTION Check the shift fork guide pins for abnormal wear or damage Measure the shift fork I D SERVICE LIMI...

Страница 240: ...amage Check the shift drum center plate and shifter gear for abnormal wear or damage Remove the bolt center plate shifter gear and dowel pin if necessary CENTER BOLT Install the dowel pin drum shifter gear and center CENTER PLATE DOWEL PIN plate Apply locking agent to the drum center bolt threads Install and tighten the bolt TORQUE 27 N m 2 8 kgf m 20 lbf ft SHIFTER GEAR Check the gearshift spindl...

Страница 241: ...dle into the crankcase GEARSHIFT SPINDLE Install the setting plate and tighten the bolt SETTING PLATE BOLT Apply oil to the shift drum guide grooves SHIFT DRUM INDEX LUG Lower the stopper arm and installing the shift drum by aligning the index lug of the shift drum with the index line on the gearshift spindle INDEX LINE Turn the shift drum clockwise and set it in neutral MARK SHIFT FORKS position ...

Страница 242: ...12 6 OUTPUT SHAFT SUB TRANSMISSION DISASSEMBLY Remove the shift fork shaft and shift forks page 12 WASHERS 8 Remove the washers from the countershaft and reverse idle shaft Pull out the mainshaft from the automatic transmis sion unit MAINSHAFT Remove the countershaft assembly and reverse idle gear as a set REVERSE IDLE GEAR COUNTERSHAFT ASSEMBLY Remove the reverse idle gear shaft and washer WASHER...

Страница 243: ...VICE LIMIT D R L 27 93 mm 1 100 in Calculate the gear to bushing clearance SERVICE LIMIT D R L 0 10 mm 0 004 in Measure the gear bushing I D SERVICE LIMIT D R 25 04 mm 0 986 in Check the countershaft for abnormal wear or dam age COUNTERSHAFT Check the gear shifter for smooth operation Check the shifter groove and gear dogs for abnor mal wear or damage REVERSE IDLE GEAR Check the reverse idle gear ...

Страница 244: ...FTER OUTPUT DRIVE GEAR Apply molybdenum oil solution to the gear sliding COUNTERSHAFT ASSEMBLY surface shifter grooves and bushings Assemble the countershaft Do not forget to install the washer onto the crankcase end of the shaft Coat a new O ring with oil and install it into the WASHER groove in the automatic transmission unit O RING Coat the reverse idle gear shaft with molybdenum oil solution a...

Страница 245: ...FT ASSEMBLY Install the mainshaft onto the automatic transmis WASHERS sion unit and into the crankcase Install the washers onto the reverse idle gear shaft and countershaft Install the shift forks and shaft page 12 8 MAINSHAFT GEARSHIFT LEVER LINKAGE GEARSHIFT LEVER BOX DRAINING Remove the fuel tank cover page 2 6 Remove the screw and reverse switch REVERSE SWITCH SCREW Check if there is water in ...

Страница 246: ...uard page 2 8 front fender page 2 11 pivot bolt O ring and washer pinch bolt and gearshift arm from the spindle PIVOT BOLT SPINDLE screw and reverse switch SCREW REVERSE SWITCH shift lever boot two mounting bolts and gearshift lever assem bly BOOT GEARSHIFT LEVER ASSEMBLY BOLTS Loosen the lock nuts and remove the tie rods from the gearshift arm linkage arm and lever assembly TIE RODS LEVER ASSEMBL...

Страница 247: ...CK PIN OIL SEALS ASSEMBLY Apply molybdenum disulfide grease to the plunger BASE BRACKET lock pin sliding area lever box pivot and both mat ing surfaces of lever box and dust seal lips Assemble the base bracket gearshift lever box return spring and cover and tighten the two bolts TORQUE 5 N m 0 5 kgf m 3 6 lbf ft Apply molybdenum disulfide grease to the slide shaft pivot Install the spring guide on...

Страница 248: ...earshift lever assembly onto the frame SCREW REVERSE SWITCH and tighten the two bolts Install the shift lever boot Install the reverse switch onto the base bracket and tighten the screw BOOT GEARSHIFT LEVER ASSEMBLY BOLTS Put the gearshift lever in the neutral position Install the gearshift arm onto the gearshift spindle GEARSHIFT ARM by aligning the groove in the arm with the wide tooth on the sp...

Страница 249: ... SHAFT the slide shaft of the spring guide slot when the COTTER PIN gear position is in neutral If it is not centered loosen the lock nuts on the tie rod B and adjust the slide shaft position by turning the tie rod B Install the washer and secure the slide shaft with a new cotter pin Tighten all the tie rod lock nuts SLOT TORQUE 10 N m 1 0 kgf m 7 lbf ft Install the following front fender page 2 1...

Страница 250: ... 61HN252 by American Honda Motor Co Page 250 of 540 http services honda com ServiceManual SVC_MNL 61HN253 61HN2 1 of 1 3 9 2008 10 59 PM 2005 2008 TRX500 FA FGA MEMO ...

Страница 251: ...3 61HN2 1 of 1 3 9 2008 10 59 PM 2005 2008 TRX500 FA FGA 13 CRANKSHAFT AUTOMATIC TRANSMISSION AUTOMATIC TRANSMISSION UNIT AND SYSTEM COMPONENTS 13 2 CRANKSHAFT 13 10 SERVICE INFORMATION 13 3 CRANKCASE BEARING REPLACEMENT13 13 TROUBLESHOOTING 13 6 CRANKCASE ASSEMBLY 13 16 CRANKCASE SEPARATION 13 8 13 13 1 ...

Страница 252: ... http services honda com ServiceManual SVC_MNL 61HN253 61HN2 1 of 1 3 9 2008 10 59 PM 2005 2008 TRX500 FA FGA CRANKSHAFT AUTOMATIC TRANSMISSION SYSTEM COMPONENTS CRANKSHAFT AUTOMATICTRANSMISSION 17 N m 1 7 kgf m 12 lbf ft 12 N m 1 2 kgf m 9 lbf ft 13 2 ...

Страница 253: ...careful not to damage the crankcase mating surfaces when servicing Cylinder head section lubricating oil is fed through the oil passage in the crankcase Clean the oil passages before assembling the crankcase halves Do not disassemble the automatic transmission unit Replace the automatic transmission unit as an assembly when it is faulty SPECIFICATIONS Unit mm in ITEM STANDARD SERVICE LIMIT Cranksh...

Страница 254: ...mover 17 mm Remover handle Remover weight 07936 3710300 07936 3710100 07741 0010201 or 07936 3710200 or 07936 371020A U S A only Bearing remover 20 mm Driver Attachment 37 x 40 mm 07936 3710600 07749 0010000 07746 0010200 Attachment 52 x 55 mm Attachment 78 x 90 mm Attachment 42 x 47 mm 07746 0010300 07746 0010400 07GAD SD40101 Pilot 15 mm Pilot 17 mm Pilot 20 mm 07746 0040300 07746 0040400 07746 ...

Страница 255: ... mm Pilot 32 mm 07746 0040600 07746 0040700 07MAD PR90200 Pilot 40 mm Assembly collar Thread shaft 07746 0040900 07965 VM00100 07965 VM00200 or Puller shaft 07931 ME4010B and Special nut 07931 HB3020A U S A only Universal bearing puller Gear holder 2 5 Thread adapter 07724 0010100 07631 0010000 07965 VM00300 or equivalent commercially avail or 07724 001A100 U S A only or 07931 KF00200 U S A only a...

Страница 256: ... is the likely cause Perform sensor inspection page 24 41 Check the engine oil pressure page 4 6 Is the oil pressure correct NO Faulty lubrication system page 4 5 YES GO TO STEP 3 3 Centrifugal clutch inspection 1 Test drive the vehicle to check the engine speed and vehicle speed condition Does vehicle engine speed rise but vehicle speed does not rise YES GO TO STEP 4 NO GO TO STEP 5 4 Centrifugal...

Страница 257: ...ntrifugal clutch page 10 9 Is the centrifugal clutch normal condition NO Correct the faulty part YES GO TO STEP 7 5 Sub transmission inspection 2 Check the operating condition in each sub transmission range Does the engine speed rise and stop both ranges YES GO TO STEP 6 NO Faulty sub transmission 6 Automatic transmission bearing inspection Remove the front crankcase cover page 10 5 and check the ...

Страница 258: ... angle sensor page 24 41 angle sensor joint two bolts and oil separate plate CAM CHAIN DRIVE CHAIN sprocket bolt oil pump driven sprocket and drive chain cam chain BOLTS OIL SEPARATE PLATE SPROCKET pivot bolt and cam chain tensioner washer and collar TENSIONER WASHER COLLAR BOLT Temporarily install the clutch drum onto the crank GEAR HOLDER DOWEL PIN shaft and the gear holder as shown Loosen the f...

Страница 259: ...RANKCASE cross pattern in several steps and remove them Place the crankcase assembly with the rear crank case down BOLTS The dowel pin hole in the automatic transmission Be careful not to DOWEL PINS INNER RACE unit face to the left interfere the front Remove the front crankcase from the rear crankcase crankcase with the while tapping them at several locations with a soft DOWEL automatic hammer tra...

Страница 260: ...owel pin AUTOMATIC TRANSMISSION UNIT CRANKSHAFT AND BALANCER REMOVAL Remove the crankshaft and balancer from the rear Be careful not to CRANKSHAFT crankcase using a hydraulic press Be sure to hold damage the the crankshaft and balancer while pressing them crankcase mating out of the crankcase surface and crankshaft assembly BALANCER If the rear crankshaft bearing is left on the crank shaft remove ...

Страница 261: ... the crankshaft as shown and measure the runout using a dial indicator SERVICE LIMIT 0 15 mm 0 006 in 6 mm 6 mm HOLD HOLD Measure the side clearance between the connecting rod big end and crank weight with a feeler gauge SERVICE LIMIT 0 8 mm 0 03 in Measure the radial clearance at the connecting rod big end in an X and Y directions SERVICE LIMIT 0 05 mm 0 002 in BALANCER Check the balancer gear fo...

Страница 262: ...aligning the BALANCER Align index lines on the side surfaces of the balancer drive and driven gears and install the crankshaft and balancer together into the rear crankcase CRANKSHAFT Assemble the special tools onto the crankshaft CONNECTING ROD Draw the crankshaft into the bearing inner race Be careful not to let the connecting rod CRANKSHAFT press against the TOOLS crankcase mating Assembly coll...

Страница 263: ...the pump swash plate assembly rotation of the pump motor shaft movement of the motor swash plate assembly and ball nut MOTOR SWASH BALL NUT PLATE ASSEMBLY Install the dowel pin into the rear crankcase DOWEL PIN BOLTS Install the automatic transmission unit and tighten the five mounting bolts Assemble the crankcase halves page 13 16 AUTOMATIC TRANSMISSION UNIT CRANKCASE BEARING REPLACEMENT REAR CRA...

Страница 264: ...1 0010201 or 07936 3710200 or 07936 371020A U S A only Apply engine oil to new bearings DRIVER Drive the following bearings in with the marking side facing up using the special tools TOOLS ATTACHMENT Mainshaft bearing Driver 07749 0010000 Attachment 52 x 55 mm 07746 0010400 Pilot 30 mm 07746 0040700 Countershaft bearing Driver 07749 0010000 Attachment 42 x 47 mm 07746 0010300 PILOT Pilot 20 mm 077...

Страница 265: ...or 07936 3710200 BEARING REMOVER Apply engine oil to new bearings DRIVER Drive the following bearings in with the marking side facing up using the special tools TOOLS ATTACHMENT Crankshaft bearing Driver 07749 0010000 Attachment 78 x 90 mm 07GAD SD40101 Pilot 40 mm 07746 0040900 Balancer bearing Driver 07749 0010000 Attachment 37 x 40 mm 07746 0010200 PILOT Pilot 17 mm 07746 0040400 Output shaft b...

Страница 266: ...two dowel pins DOWEL PINS O RINGS Install the front crankcase over the rear crankcase Be careful not to FRONT CRANKCASE interfere the front Install the twelve front crankcase bolts and tighten crankcase with the 6 mm BOLT them in a crisscross pattern in 2 or 3 steps automatic transmission unit 6 mm BOLTS Small head Install the five rear crankcase bolts and tighten them REAR CRANKCASE in a crisscro...

Страница 267: ...h the rolled edge of the sprocket facing to the crankcase and by aligning the flats of the sprocket and pump shaft SPROCKET driven sprocket bolt apply locking agent to the CAM CHAIN threads TORQUE 12 N m 1 2 kgf m 9 lbf ft BOLTS oil separate plate with two bolts BOLT OIL SEPARATE PLATE new oil seal do not apply oil ANGLE SENSOR JOINT angle sensor joint Install the removed parts angle sensor page 2...

Страница 268: ... 61HN252 by American Honda Motor Co Page 268 of 540 http services honda com ServiceManual SVC_MNL 61HN253 61HN2 1 of 1 3 9 2008 11 01 PM 2005 2008 TRX500 FA FGA MEMO ...

Страница 269: ... 2008 11 01 PM 2005 2008 TRX500 FA FGA 14 FRONT WHEEL SUSPENSION STEERING TIRES 14 13 SYSTEM COMPONENTS 14 2 FRONT WHEEL HUB 14 16 SERVICE INFORMATION 14 3 SUSPENSION ARM 14 17 TROUBLESHOOTING 14 5 STEERING SHAFT 14 25 HANDLEBAR 14 6 TIE ROD 14 31 THROTTLE HOUSING 14 11 FRONT SHOCK ABSORBER 14 33 FRONT WHEEL 14 12 14 14 1 ...

Страница 270: ...STEERING SYSTEM COMPONENTS FRONTWHEEL SUSPENSION STEERING 44 N m 4 5 kgf m 33 lbf ft 39 N m 2 6 kgf m 19 lbf ft 44 N m 4 5 kgf m 33 lbf ft 25 N m 2 6 kgf m 19 lbf ft 44 N m 4 5 kgf m 33 lbf ft 12 N m 1 2 kgf m 32 N m 3 3 kgf m 24 lbf ft 9 lbf ft 54 N m 3 0 kgf m 22 lbf ft 108 N m 1 1 kgf m 80 lbf ft 54 N m 3 0 kgf m 22 lbf ft 78 N m 8 0 kgf m 58 lbf ft 64 N m 6 5 kgf m 47 lbf ft 14 2 ...

Страница 271: ...een the ball joints 387 mm 15 2 in Toe out 30 15 mm 1 3 16 9 16 in Toe Suspension spring pre load adjuster standard position Position 2 CM type only TORQUE VALUES Handlebar lower holder nut 39 N m 4 0 kgf m 29 lbf ft Lock nut replace with a new one Front wheel nut 64 N m 6 5 kgf m 47 lbf ft Front wheel hub nut 78 N m 8 0 kgf m 58 lbf ft Castle nut Front brake disc bolt 42 N m 4 3 kgf m 31 lbf ft A...

Страница 272: ...int remover installer Oil seal driver 07MAC SL00201 07WMF HN00100 07JAD PH80101 07MAC SL0202 U S A only or 07MAC SL00200 and 07MAC SL0A300 U S A only Driver Attachment 28 x 30 mm Attachment 42 x 47 mm 07749 0010000 07946 1870100 07746 0010300 Attachment 52 x 55 mm Attachment 22 x 24 mm Attachment 15 mm I D 07746 0010400 07746 0010800 07746 0020200 Pilot 30 mm Pilot 22 mm Pilot 16 mm 07746 0040700 ...

Страница 273: ...rs one side or does not track straight Incorrect wheel alignment Unequal tire pressure Bent tie rod suspension arm or frame Worn or damaged knuckle bearing Weak shock absorber Front wheel wobbling Bent rim Worn or damaged knuckle bearing Faulty tire Wheel hub nut not tightened properly Soft suspension Weak shock absorber spring Faulty shock absorber damper Hard suspension Bent shock absorber dampe...

Страница 274: ...se BREATHER HOSE two screws MASTER CYLINDER THROTTLE HOUSING throttle housing holder throttle housing BOLTS brake light switch connectors two bolts master cylinder holder front brake master cylinder Keep the brake master cylinder upright to prevent air from entering the hydraulic system SCREWS HOLDER HOLDER CONNECTORS two screws BRAKE LEVER BRACKET bracket holder rear parking brake lever bracket H...

Страница 275: ...HN253 61HN2 1 of 1 3 9 2008 11 02 PM 2005 2008 TRX500 FA FGA FRONT WHEEL SUSPENSION STEERING nut CHOKE KNOB choke knob NUT bolts HANDLEBAR GRIP BOLT grip ends handlebar grips GRIP END screw HANDLEBAR UPPER COVER handlebar upper cover SCREW two nuts HANDLEBAR FRONT COVER handlebar front cover NUTS 14 7 ...

Страница 276: ...TS handlebar upper holders handlebar HANDLEBAR UPPER HOLDERS INSTALLATION Place the handlebar onto the lower holders and BOLTS HANDLEBAR align the punch mark on the handlebar with the top of the lower holder Install the upper holders with the bolt holes facing forward Install the four bolts and tighten the front bolts first then tighten the rear bolts BOLT HOLES PUNCH MARK Install the handlebar re...

Страница 277: ...andlebar upper cover and tighten the HANDLEBAR UPPER COVER screw SCREW Apply Honda Bond A or Honda Hand Grip Cement HANDLEBAR GRIP BOLT U S A only to the inside surfaces of the handlebar grips and to the clean surfaces of the handlebar Wait 3 5 minutes and install the grip Rotate the Allow the adhesive grip for even application of the adhesive to dry for an hour before using Install the grip ends ...

Страница 278: ...he handlebar and tighten the upper bracket screw first then tighten the lower screw Tighten the upper handlebar switch screw first then tighten the lower screws PIN AND HOLE PUNCH MARK Install the front brake master cylinder and holder PUNCH MARK MASTER CYLINDER with the UP mark facing up Align the edge of the master cylinder with the BOLTS punch mark on the handlebar and tighten the upper bolt fi...

Страница 279: ...g throttle lever and washer Disconnect the throttle cable from the throttle arm Remove the dust seal from the housing bottom THROTTLE ARM LOCK WASHER RETURN DUST SEAL SPRING ASSEMBLY Coat a new dust seal lip with grease and install it THROTTLE THROTTLE into the throttle housing until it is fully seated LEVER CABLE Apply grease to the throttle lever pivot NUT Apply grease to the throttle cable end ...

Страница 280: ...ever free play page 3 5 If the throttle cable was replaced perform the initial setting page 24 6 after adjustment the free play SCREWS FRONT WHEEL REMOVAL Loosen the wheel nuts Place the support block under the frame to raise the front wheel off the ground Remove the nuts and wheel WHEEL NUTS INSTALLATION Install the wheel with the arrow mark facing in the Do not interchange normal rotating direct...

Страница 281: ...e indicator Use only water as a Lube the bead area of the tire with water pressing lubricant when down on the tire sidewall bead area in several removing or places to allow the water to run into and around the mounting tires bead Soap or some mounting lubricants may leave a slipperly residue which can cause the tire to shift on the rim and lose tire pressure during riding Place the wheel assembly ...

Страница 282: ... procedures Remove the tire from the rim using a tire changing machine or tire irons and rim protectors SHOE TIRE REPAIR Use the manufacturer s instructions for the tire repair kit you are using If your kit does not have instructions use the procedures provided hear Check the tire for puncturing objects Chalk mark the punctured area and remove the puncturing objects Inspect and measure the injury ...

Страница 283: ... with a tire buffer or a wire brush Clean the rubber dust from the buffed area Apply cement over the area marked and allow it to dry until tacky Do not touch the cement with dirty or greasy hands Remove the lining from the patch and center over the injury Press the patch against the injury using a special roller ASSEMBLY Install the tire onto the rim where the rim shoulder width is the narrowest t...

Страница 284: ...WHEEL SUSPENSION STEERING FRONT WHEEL HUB REMOVAL Remove the front wheel page 14 12 HUB Remove the front brake caliper page 16 14 Remove the cotter pin nut and front wheel hub COTTER PIN NUT DISASSEMBLY Remove the bolts and brake disc BOLTS BRAKE DISC Remove the dust seal DUST SEAL ASSEMBLY Apply grease to a new dust seal lip and install it to the hub DUST SEAL 14 16 ...

Страница 285: ...stall the wheel hub hub nut and tighten the nut to HUB the specified torque TORQUE 59 78 N m 6 0 8 0 kgf m 43 58 lbf ft Install a new cotter pin Install the front brake caliper page 16 14 Install the front wheel page 14 12 COTTER PIN NUT SUSPENSION ARM REMOVAL Remove the wheel hub page 14 16 BOLTS Remove the brake disc guard bolts and brake disc guard DISC GUARD Remove the cotter pin TIE ROD Remov...

Страница 286: ...200 and 07MAC SL0A300 U S A only BALL JOINT REMOVER Apply grease to the ball joint remover at the point PRESSURE BOLT shown Apply grease here This will ease installation of the tool and prevent damage to the pressure bolt threads Insert the jaws carefully making sure that you do not damage the ball joint boot Adjust the jaw spacing by turning the pressure bolt If necessary apply penetrating type l...

Страница 287: ...hand tighten the pressure bolt and recheck the jaws to make sure they are still parallel Tighten the pressure bolt with a wrench until the ball joint stud pops loose ADJUSTING BOLT Remove the two brake hose clamp bolts BOLTS Remove the bolts and lower arm guard if necessary LOWER ARM GUARD BOLTS Remove the following UPPER BOLT NUT SHOCK ABSORBER front shock absorber lower mounting nut and LOWER MO...

Страница 288: ...nt boot for tears or other damage BALL JOINT BOOT by moving the ball joint stud It should move freely and smoothly Check the pivot bushings of the lower arm for wear or damage PIVOT BUSHING KNUCKLE Turn the inner race of the bearing in the knuckle BEARING with your finger The bearing should turn smoothly and quietly Also check that the bearing outer race fits tightly in the knuckle Inspect the knu...

Страница 289: ... Ball joint remover installer 07WMF HN00100 Attachment 28 x 30 mm 07946 1870100 A MARK REMOVER INSTALLER Set the upper arm and special tools with B mark ATTACHMENT side of the remover installer facing to the ball joint as shown Press the ball joint into the upper arm until it is fully seated TOOLS Ball joint remover installer 07WMF HN00100 Attachment 15 mm I D 07746 0020200 If you feel strong resi...

Страница 290: ...aller 07WMF HN00100 Attachment 28 x 30 mm 07946 1870100 A MARK ATTACHMENT Set the knuckle and special tools with B mark side REMOVER INSTALLER of the remover installer facing to the ball joint in a vise as shown Press the ball joint into the knuckle until it is fully seated TOOLS Ball joint remover installer 07WMF HN00100 Attachment 15 mm I D 07746 0020200 If you feel strong resistance when loweri...

Страница 291: ... bearing out of SNAP RING the knuckle BEARING Pack the cavities of a new bearing with grease DRIVER Drive in the bearing squarely with the marked side facing up until it is fully seated TOOLS Driver 07749 0010000 Attachment 52 x 55 mm 07746 0010400 Pilot 30 mm 07746 0040700 Install the snap ring into the knuckle groove with the chamfered edge facing PILOT ATTACHMENT Apply grease to a new outer dus...

Страница 292: ... BUSHINGS upper arm Apply grease to the new dust seal cap lips and PIVOT COLLAR install them onto the upper arm DUST SEAL CAPS Install the upper arm into the frame with the pivot UPPER NUT BOLT bolt and a new nut and tighten the nut SHOCK ABSORBER TORQUE 44 N m 4 5 kgf m 33 lbf ft LOWER MOUNTING Connect the shock absorber to the upper arm with NUT BOLT the lower mounting bolt and a new nut and tig...

Страница 293: ...bf ft Install the new cotter pins COTTER PINS Install the tie rod ball joint onto the knuckle with a TIE ROD new nut and tighten the nut while holding the joint stud flats with an open end wrench TORQUE 54 N m 5 5 kgf m 40 lbf ft Install a new cotter pin NUT COTTER PIN Install the brake disc guard and tighten the brake BOLTS disc guard bolts Install the wheel hub page 14 16 DISC GUARD STEERING SHA...

Страница 294: ...er holder nuts and washers HANDLEBAR Keep the master handlebar assembly from the steering shaft cylinder reservoir upright LOWER HOLDER NUTS WASHERS Remove the cotter pins COTTER PINS Remove the tie rod ball joint nuts while holding the joint stud flats with an open end wrench Remove the tie rods from the steering shaft arm NUTS TIE RODS Remove the cotter pin steering shaft end nut NUT WASHER COTT...

Страница 295: ... FA FGA FRONT WHEEL SUSPENSION STEERING Remove the two bolts and steering shaft holder A BOLTS STEERING SHAFT HOLDER A Remove the steering shaft SHAFT BUSHING Remove the steering shaft bushing holder B and shaft STEERING SHAFT HOLDER B INSPECTION Check the steering shaft bushing for wear or dam age Check the steering shaft for distortion or damage 14 27 ...

Страница 296: ...aring should turn smoothly and quietly Also check that the bearing outer race fits tightly in the frame BEARING REPLACEMENT Remove the upper and lower dust seals DUST SEALS Remove the snap ring SNAP RING BEARING Drive the steering shaft bearing out of the frame Drive in a new bearing squarely with the marked DRIVER side facing up until it is fully seated TOOLS Driver 07749 0010000 Attachment 42 x ...

Страница 297: ...DUST SEALS the upper seal is flush with the frame edge and the lower seal is fully seated onto the bearing INSTALLATION Apply grease to the shaft bushing inner surface BUSHING STEERING SHAFT Install the shaft bushing onto the steering shaft with the arrow mark facing up Install steering shaft holder B onto the frame Install the steering shaft into the shaft bearing ARROW STEERING SHAFT HOLDER B MA...

Страница 298: ...d tighten the nut TORQUE 108 N m 11 0 kgf m 80 lbf ft Install a new cotter pin STEERING SHAFT ARM Install the tie rods into the steering shaft arm COTTER PINS Install the new nuts and tighten them by holding the ball joint stud flats with an open end wrench TORQUE 54 N m 5 5 kgf m 40 lbf ft Install new cotter pins NUTS TIE RODS Install the handlebar assembly onto the steering HANDLEBAR shaft with ...

Страница 299: ...rs page 2 9 SCREW TIE ROD REMOVAL Remove the inner fenders page 2 9 COTTER PINS Remove the front wheel page 14 12 Remove the cotter pins Remove the tie rod ball joint nuts while holding the joint stud flats with an open end wrench Remove the tie rod from the knuckle and steering shaft NUTS INSPECTION Inspect the tie rod for distortion or damage BALL JOINT BOOTS Inspect the ball joint boots for tea...

Страница 300: ...hten the lock nuts and measure the dis The ball joint positions are 180 tance between the lock nut and thread end from each other TIE ROD DISTANCE 387 mm 15 24 in Tighten these nuts after installing the The difference between distances A and B should be tie rod 3 mm 0 12 in or less Install the tie rod onto the knuckle and steering arm and adjust the toe page 3 26 A B 387 mm 15 24 in INSTALLATION I...

Страница 301: ...LOWER MOUNTING BOLT NUT INSPECTION Check the upper pivot bushing for wear or damage UPPER PIVOT BUSHING Check the damper unit for leakage or other damage Replace the shock absorber assembly if necessary Remove the lower pivot collar DUST SEALS 05 06 shown Remove the dust seals Check the lower pivot bearing for wear or damage 05 06 Check the lower pivot bushing for wear or damage After 06 BEARING B...

Страница 302: ...facing up 5 4 5 5 mm 0 21 0 22 in using the special tools ATTACHMENT TOOLS Driver 07749 0010000 Attachment 22 x 24 mm 07746 0010800 DRIVER Pilot 16 mm 07746 0041300 PILOT Apply grease to the new dust seal lips and install DUST SEALS them into the lower pivot Install the lower pivot collar LOWER PIVOT COLLAR BUSHING REPLACEMENT After 06 Press the bushing out of the lower pivot using side A of the s...

Страница 303: ... new dust seal lips and install the DUST SEALS dust seals into the lower pivot until they are flush with the pivot surfaces Install the pivot collar COLLAR INSTALLATION Install the front shock absorber in the frame and UPPER MOUNTING insert the upper and lower mounting bolts from the NUT BOLT front side Install and tighten the new mounting nuts TORQUE 44 N m 4 5 kgf m 33 lbf ft LOWER MOUNTING NUT ...

Страница 304: ... 61HN252 by American Honda Motor Co Page 304 of 540 http services honda com ServiceManual SVC_MNL 61HN253 61HN2 1 of 1 3 9 2008 11 07 PM 2005 2008 TRX500 FA FGA MEMO ...

Страница 305: ...ervices honda com ServiceManual SVC_MNL 61HN253 61HN2 1 of 1 3 9 2008 11 07 PM 2005 2008 TRX500 FA FGA 15 REAR WHEEL SUSPENSION REAR WHEEL 15 6 SYSTEM COMPONENTS 15 2 REAR SHOCK ABSORBER 15 6 SERVICE INFORMATION 15 3 SWINGARM 15 9 TROUBLESHOOTING 15 5 15 15 1 ...

Страница 306: ...1 3 9 2008 11 07 PM 2005 2008 TRX500 FA FGA REAR WHEEL SUSPENSION SYSTEM COMPONENTS REARWHEEL SUSPENSION 34 N m 3 5 kgf m 25 lbf ft 64 N m 6 5 kgf m 47 lbf ft 44 N m 4 5 kgf m 32 lbf ft 112 N m 11 4 kgf m 83 lbf ft 05 06 10 N m 1 0 kgf m 7 lbf ft After 06 3 9 N m 0 4 kgf m 0 9 lbf ft 112 N m 11 4 kgf m 83 lbf ft 15 2 ...

Страница 307: ...ly applied to the lock nut The specification given is the actual torque applied to the lock nut not the reading on the torque wrench Do not overtighten the lock nut The specification later in the text gives both actual and indicated SPECIFICATIONS ITEM STANDARD SERVICE LIMIT Minimum tire tread depth 4 0 mm 0 16 in 25 kPa 0 25 kgf cm2 3 6 psi Cold tire pressure Standard 22 kPa 0 22 kgf cm2 3 2 psi ...

Страница 308: ... Attachment 37 x 40 mm Attachment 22 x 24 mm 07749 0010000 07746 0010200 07746 0010800 Pilot 16 mm Lock nut wrench Adjustable bearing remover 20 x 40 mm 07JAC PH80100 07746 0041300 07908 4690003 or 07736 A01000B or 07736 A01000A U S A only with commercially available 3 8 x 16 slide hammer Adjustable bearing remover shaft Driver shaft Remover weight 07JAC PH80200 07949 3710001 07741 0010201 15 4 ...

Страница 309: ...rim Faulty tire Wheel hub nut not tightened properly Faulty bearings Steers to one side or does not track straight Unequal tire pressure Bent swingarm or frame Weak shock absorber Soft suspension Weak shock absorber spring Faulty shock absorber damper Hard suspension Bent shock absorber damper rod Faulty suspension bushings or bearings Rear suspension noise Loose rear suspension fasteners Damaged ...

Страница 310: ...or tire removal installation and repair refer to page 14 13 WHEEL NUTS INSTALLATION Install the wheel with the arrow mark facing in the Do not interchange normal rotating direction the left and right tires Install the wheel nuts and tighten them TORQUE 64 N m 6 5 kgf m 47 lbf ft WHEEL NUTS REAR SHOCK ABSORBER REMOVAL Support the vehicle with a support block to raise the UPPER MOUNTING NUT WASHER r...

Страница 311: ...r assembly if necessary Remove the lower pivot collar DUST SEALS 05 06 shown Check the lower pivot bearing and lower pivot collar 05 06 for wear or damage Check the lower pivot bushing for wear or damage After 06 BEARING BUSHING PIVOT COLLAR BEARING REPLACEMENT 05 06 Remove the lower pivot collar DUST SEALS Remove the dust seals PIVOT COLLAR Press the needle bearing out of the lower pivot using th...

Страница 312: ... using the special tools TOOLS ATTACHMENT Driver shaft 07949 3710001 DRIVER Attachment 22 x 24 mm 07746 0010800 Pilot 16 mm 07746 0041300 PILOT Apply grease to new dust seal lips and install them into the lower pivot Install the lower pivot collar DUST SEALS BEARING PIVOT COLLAR BUSHING REPLACEMENT After 06 Press the bushing out of the lower pivot using side A of the special tool TOOLS DRIVER Bush...

Страница 313: ...ivot collar COLLAR INSTALLATION Install the rear shock absorber onto upper mounting UPPER MOUNTING NUT WASHER stud of the frame Install the lower mounting bolt and tighten it TORQUE 44 N m 4 5 kgf m 33 lbf ft Install the washer and upper mounting nut and tighten the nut TORQUE 34 N m 3 5 kgf m 25 lbf ft LOWER MOUNTING BOLT SWINGARM REMOVAL Remove the final drive assembly page 18 9 CLAMPS Remove th...

Страница 314: ...ke light switch guard and brake light switch Remove the left and right swingarm pivot caps LEFT PIVOT CAP RIGHT PIVOT CAP Remove the right pivot lock nut using the special tool TOOL Lock nut wrench 07908 4690003 LOCK NUT LOCK NUT WRENCH Remove the left and right pivot bolts Remove the universal joint boot from the swingarm then remove the swingarm from the frame RIGHT PIVOT BOLT LEFT PIVOT BOLT 15...

Страница 315: ... Both bearings for wear or damage outer races and grease holders must be replaced as a set if any part is damaged or worn BEARINGS Drive the grease holder into the swingarm to SWINGARM remove it TOOLS Driver 07749 0010000 Attachment 22 x 24 mm 07746 0010800 GREASE HOLDER Remove the outer race from the swingarm using the WEIGHT ATTACHMENT special tools TOOLS Adjustable bearing remover 20 x 40 mm 07...

Страница 316: ...ng rollers and dust seal lips and install the bearings into the swingarm pivots BEARINGS INSTALLATION Apply molybdenum disulfide grease to the output shaft spline and install the universal joint onto the BOOT output shaft UNIVERSAL JOINT Set the swingarm into the frame and install the left and right pivot bolts Install the universal joint boot onto the swingarm Tighten the left pivot bolt TORQUE 1...

Страница 317: ...ue LOCK NUT TORQUE Actual 112 N m 11 4 kgf m 82 lbf ft wrench reading Indicated 102 N m 10 4 kgf m 75 lbf ft information on page 15 3 Service Information LOCK NUT WRENCH Install the left and right pivot caps securely PIVOT CAP Install the universal joint boot band and screw so BOOT BAND SCREW that the screw is positioned top and facing left side Tighten the band screw Route the breather hoses prop...

Страница 318: ... 61HN252 by American Honda Motor Co Page 318 of 540 http services honda com ServiceManual SVC_MNL 61HN253 61HN2 1 of 1 3 9 2008 11 09 PM 2005 2008 TRX500 FA FGA MEMO ...

Страница 319: ...253 61HN2 1 of 1 3 9 2008 11 09 PM 2005 2008 TRX500 FA FGA 16 BRAKE SYSTEM FRONT MASTER CYLINDER 16 8 COMPONENT LOCATION 16 2 BRAKE PAD DISC 16 13 SERVICE INFORMATION 16 3 FRONT BRAKE CALIPER 16 14 TROUBLESHOOTING 16 5 REAR BRAKE 16 19 BRAKE FLUID REPLACEMENT AIR BLEEDING 16 6 BRAKE PEDAL 16 27 16 16 1 ...

Страница 320: ...com ServiceManual SVC_MNL 61HN253 61HN2 1 of 1 3 9 2008 11 09 PM 2005 2008 TRX500 FA FGA BRAKE SYSTEM COMPONENT LOCATION BRAKESYSTEM 44 N m 4 5 kgf m 33 lbf ft 20 N m 2 0 kgf m 14 lbf ft 137 N m 14 0 kgf m 101 lbf ft 11 N m 1 1 kgf m 8 lbf ft 34 N m 3 5 kgf m 25 lbf ft 16 2 ...

Страница 321: ...luid as they may not be compatible Always check brake operation before riding the vehicle SPECIFICATIONS Unit mm in ITEM STANDARD SERVICE LIMIT Front brake Recommended brake fluid DOT 4 brake fluid Master cylinder I D 14 000 14 043 0 5512 0 5529 14 055 0 5533 Master cylinder piston O D 13 957 13 984 0 5495 0 5506 13 945 0 5490 Caliper cylinder I D 33 96 34 01 1 337 1 339 34 020 1 340 Caliper cylin...

Страница 322: ...da com ServiceManual SVC_MNL 61HN253 61HN2 1 of 1 3 9 2008 11 09 PM 2005 2008 TRX500 FA FGA BRAKE SYSTEM TOOLS Snap ring pliers Driver Attachment 78 x 80 mm 07914 SA50001 07749 0010000 07NAD PX40100 Pilot 28 mm Oil seal driver attachment 07746 0041100 07JAD PH80101 16 4 ...

Страница 323: ... worn master piston Sticking worn caliper piston Contaminated master cylinder Improperly adjusted brake Worn brake shoe drum Contaminated brake shoe drum Warped deformed brake drum Bent brake lever pedal Front brake lever hard Clogged restricted hydraulic system Sticking worn caliper piston Clogged fluid passage Worn caliper piston seal Sticking worn master piston Bent brake lever pedal Brake drag...

Страница 324: ...brake fluid from a sealed container Do not mix different types of fluid They are not compatible BRAKE FLUID DRAINING With the fluid reservoir parallel to the ground SCREWS remove the reservoir cover diaphragm plate and diaphragm COVER PLATE DIAPHRAGM Connect a bleed hose to the bleed valve BLEED HOSE Loosen the bleed valve and pump the brake lever Stop pumping the lever when no more fluid flows ou...

Страница 325: ...lastic hose If air is entering the bleeder from around the bleed valve threads seal the threads with Teflon tape If a brake bleeder is not available fill the master cylinder and operate the brake lever to fill the system Close the bleed valve Next perform the available BLEEDING procedure see below BRAKE BLEEDING Connect a clear bleed hose to the bleed valve BLEED HOSE Pump up the system pressure w...

Страница 326: ...TER CYLINDER REMOVAL Remove the reservoir cover diaphragm plate dia Avoid spilling fluid SEALING WASHERS phragm and float and soak up the brake fluid from on painted plastic or rubber parts the reservoir page 16 6 Place a rag over these parts Disconnect the brake switch connectors whenever the Disconnect the brake hose from the master cylinder system is serviced by removing the oil bolt and two se...

Страница 327: ...he brake lever boot PIVOT BOLT BOOT Remove the front brake lever nut pivot bolt and brake lever BRAKE LEVER PIVOT NUT Remove the screw brake switch bracket and brake BRAKE SWITCH SCREW light switch BRACKET BRAKE LIGHT SWITCH Remove the master piston boot BOOT Remove the snap ring from the master cylinder SNAP RING PLIERS using the special tool TOOL Snap ring pliers 07914 SA50001 SNAP RING 16 9 ...

Страница 328: ...ERVICE LIMIT 13 945 mm 0 5490 in ASSEMBLY Keep the piston cups spring snap ring and boot OIL SEAL as a set do not substitute individual parts SPRING PISTON Coat all parts with clean brake fluid before assem bly Install the secondary cup into the master piston When installing the groove cups do not allow the lips to turn Install the primary cup onto the tip of the spring inside out Install the spri...

Страница 329: ...all the brake light switch by aligning the hole of BRAKE LIGHT SWITCH the master cylinder and boss of the brake light switch Align Install the bracket onto the brake light switch BRAKE SWITCH Install the brake light switch by aligning the hole of the bracket and boss of the brake switch Align BRACKET Apply locking agent to the threads of the screw Install and tighten the screw to the specified tor...

Страница 330: ...ot bolt to the specified torque TORQUE 1 0 N m 0 1 kgf m 0 7 lbf ft Hold the pivot bolt and tighten the pivot nut to the specified torque TORQUE 5 9 N m 0 6 kgf m 4 4 lbf ft Install the brake lever boot BRAKE LEVER PIVOT NUT Place the master cylinder on the handlebar MASTER CYLINDER Install the master cylinder holder with the UP mark facing up UP MARK Install the bolts but do not tighten yet HOLDE...

Страница 331: ...IL BOLT BRAKE PAD DISC BRAKE PAD REPLACEMENT A contaminated brake disc or pad reduces stop ping power Discard contaminated pads and clean a contaminated disc with a high quality brake degreasing agent Be careful that the master cylinder does not over flow when the caliper pistons are compressed Brake fluid can cause damage to painted plastic or rubber parts Always replace the brake pads in pairs t...

Страница 332: ... cracks Measure the brake disc thickness at several points SERVICE LIMIT 3 0 mm 0 12 in Replace the brake disc if the smallest measurement is less than the service limit page 14 16 Check the brake disc for warpage SERVICE LIMIT 0 30 mm 0 012 in Check the front wheel hub bearings for excessive play if the warpage exceeds the service limit Replace the brake disc if the bearings are normal FRONT BRAK...

Страница 333: ... FA FGA BRAKE SYSTEM Remove the oil bolt sealing washers and brake BRAKE HOSE hose from the brake caliper OIL BOLT SEALING WASHERS Remove the mounting bolts and brake caliper MOUNTING BOLTS DISASSEMBLY Remove the brake caliper bolts CALIPER BOLTS Remove the caliper bracket pad spring and boots CALIPER BRACKET PAD SPRING Remove the pad spring BOOTS 16 15 ...

Страница 334: ...Do not bring the air nozzle too close to the inlet or the pistons may be forced out with excessive force that could cause injury Use the air in short spurts Be careful not to damage the piston sliding surface Push the piston seal in and lift it out Clean the seal grooves caliper piston and caliper piston sliding surfaces with clean brake fluid PISTON SEAL INSPECTION Check the caliper cylinder and ...

Страница 335: ...r dirt before reassembly Coat a new piston seal with clean brake fluid Coat a new dust seal with silicone grease DUST SEAL Install the piston seal and dust seal into the groove of the caliper body Coat the caliper piston with clean brake fluid and install it into the caliper cylinder with its closed ends facing the caliper PISTON Install the pad spring onto the caliper bracket Note the installatio...

Страница 336: ...G BOLTS Tighten the mounting bolts to the specified torque TORQUE 44 N m 4 5 kgf m 33 lbf ft Install the brake hose eyelet to the caliper body with BRAKE HOSE SEALING new sealing washers and oil bolts WASHERS Push the brake hose eyelet to the stopper on the cal iper then tighten the oil bolts to the specified torque TORQUE 34 N m 3 5 kgf m 25 lbf ft STOPPER OIL BOLT Install the brake splash guard ...

Страница 337: ...VAL Remove the rear wheel page 15 6 COTTER PIN Remove the cotter pin Remove the right rear hub nut and wheel hub WHEEL HUB HUB NUT Remove the bolts and brake drum cover BOLTS BRAKE DRUM COVER Remove the brake drum cover O ring O RING Remove the brake drum BRAKE DRUM INSPECTION Measure the brake drum I D SERVICE LIMIT 181 mm 7 1 in Inspect the brake drum for scoring cracks and out of roundness 16 1...

Страница 338: ...damage Drive it out of the drum cover if necessary DUST SEAL REPLACEMENT Remove the dust seal from the wheel hub DUST SEAL Apply molybdenum disulfide grease to a new seal lips and install it into the wheel hub with the flat side facing in until it is fully seated Install a new dust seal into the drum cover using the special tool as shown DRIVER TOOL Driver 07749 0010000 Attachment 78 x 80 mm 07NAD...

Страница 339: ...hoes Mark the brake SPRINGS COTTER PINS and shoe springs shoes to indicate their original positions before removing them BRAKE SHOES SETTING PLATE Remove the adjusting nuts brake cables springs SPRINGS and joint pins from the brake arm JOINT PINS ADJUSTING NUTS BRAKE CABLES Remove the brake arm pinch bolt nut and brake BRAKE ARM arm BOLT NUT Remove the indicator plate return spring and felt RETURN...

Страница 340: ...L Remove the brake panel nuts and discard them Remove the brake panel Remove the O ring from the brake panel groove NUTS BRAKE PANEL BEARING REPLACEMENT Turn the inner race of the bearing with your finger The bearing should turn smoothly and quietly Also check that the outer race of the bearing fits tightly in the brake panel Replace it if necessary Check the dust seal for wear or damage Remove th...

Страница 341: ...IVER sealed side facing out facing the axle housing using the special tools as shown TOOLS Driver 07749 0010000 Oil seal driver attachment 07JAD PH80101 Pilot 28 mm 07746 0041100 BEARING ATTACHMENT PILOT Install the snap ring into the groove SNAP RING BEARING Pack a new dust seal lips with grease AXLE DUST SEAL Install the dust seal into the brake panel until it flush with the brake panel Apply gr...

Страница 342: ...CATOR PLATE DRUM COVER WHEEL HUB FELT SEAL 137 N m 14 0 kgf m 101 lbf ft RETURN SPRING DUST SEAL BRAKE PANEL COTTER PIN BRAKE CAM O RING SHOES BRAKE DRUM COTTER PIN Coat a new O ring with grease and install it in the BRAKE PANEL brake panel groove Install the brake panel onto the axle housing O RING Install and tighten the new nuts Do not reuse the BREATHER HOSE BRAKE PANEL nuts Connect the breath...

Страница 343: ... Install the indicator plate aligning the wide tooth on the plate with the wide groove on the brake cam INDICATOR PLATE Align Install the brake arm aligning the punch marks on RETURN SPRING BRAKE ARM the brake arm and cam Hook the return spring end onto the brake arm Tighten the brake arm pinch bolt nut to the specified torque TORQUE 20 N m 2 0 kgf m 14 lbf ft PUNCH MARKS BOLT NUT Install the brak...

Страница 344: ...own SETTING PLATE Install the joint pins into the brake arm then install SPRINGS the brake cables and springs Install the adjusting nuts JOINT PINS ADJUSTING NUTS BRAKE CABLES BRAKE DRUM INSTALLATION Apply molybdenum disulfide grease to the axle O RING splines and install the brake drum Apply grease to a new O ring and install it onto the brake panel groove BRAKE DRUM Install the brake drum cover ...

Страница 345: ...orque TORQUE 137 N m 14 0 kgf m 101 lbf ft Further tighten the hub nut until its grooves align with the cotter pin hole in the axle shaft Install a new cotter pin and secure the hub nut Install the rear wheel page 15 6 Adjust the rear brake lever and pedal free play page 3 22 WHEEL HUB HUB NUT BRAKE PEDAL REMOVAL Remove the brake cables from the brake arm page BOLT 16 21 Remove the bolt and brake ...

Страница 346: ...turn spring BRAKE CABLE Remove the cotter pin and washer from the pedal WASHER BRAKE PEDAL pivot shaft then remove the brake pedal from the shaft Remove the dust seals COTTER PIN DUST SEALS INSTALLATION Apply grease to the brake pedal pivot shaft sliding surface and dust seal lips Install the brake pedal onto the pivot shaft DUST SEALS BRAKE PEDAL Install the washer and secure the brake pedal with...

Страница 347: ...TRX500 FA FGA BRAKE SYSTEM Install and connect the brake cable RETURN SPRING Hook the return spring BRAKE CABLE Install the brake light switch BRAKE LIGHT SWITCH SPRING Hook the brake light switch spring BRAKE LIGHT SWITCH Install the brake light switch guard and tighten the BOLT bolt Adjust the rear brake page 3 23 BRAKE LIGHT SWITCH GUARD 16 29 ...

Страница 348: ... 61HN252 by American Honda Motor Co Page 348 of 540 http services honda com ServiceManual SVC_MNL 61HN253 61HN2 1 of 1 3 9 2008 11 12 PM 2005 2008 TRX500 FA FGA MEMO ...

Страница 349: ...2008 11 12 PM 2005 2008 TRX500 FA FGA 17 FRONT DRIVING MECHANISM DIFFERENTIAL DISASSEMBLY SYSTEM COMPONENTS 17 2 INSPECTION 17 17 SERVICE INFORMATION 17 3 CASE BEARING REPLACEMENT 17 24 TROUBLESHOOTING 17 6 DIFFERENTIAL ASSEMBLY 17 27 FRONT DRIVE SHAFT 17 7 DIFFERENTIAL INSTALLATION 17 32 DIFFERENTIAL REMOVAL 17 14 17 17 1 ...

Страница 350: ...PM 2005 2008 TRX500 FA FGA FRONT DRIVING MECHANISM SYSTEM COMPONENTS FRONTDRIVINGMECHANISM 44 N m 4 5 kgf m 33 lbf ft 44 N m 4 5 kgf m 33 lbf ft 54 N m 5 5 kgf m 40 lbf ft 7 N m 0 7 kgf m 5 1 lbf ft 10 N m 1 0 kgf m 7 lbf ft 10 N m 1 0 kgf m 78 N m 8 0 kgf m 58 lbf ft 7 lbf ft 22 N m 2 2 kgf m 16 lbf ft 22 N m 2 2 kgf m 16 lbf ft 17 2 ...

Страница 351: ... 0 002 0 010 0 4 0 02 Backlash difference 0 2 0 01 Slip torque 14 17 N m 1 45 1 75 kgf m 12 N m 1 2 10 13 lbf ft kgf m 9 lbf ft Face cam to housing distance 3 3 3 7 0 13 0 15 3 3 0 13 Differential ring gear depth 6 55 6 65 0 258 0 262 6 6 0 26 Cone spring height 2 8 0 11 2 6 0 10 TORQUE VALUES Upper and lower arm ball joint nut 54 N m 5 5 kgf m 40 lbf ft Castle nut Front wheel hub nut 78 N m 8 0 k...

Страница 352: ...0010000 07746 0010800 07746 0010400 Attachment 20 mm I D Pilot 15 mm Pilot 28 mm 07746 0020400 07746 0040300 07746 0041100 Bearing remover head 15 mm Remover shaft Remover weight 07936 KC10200 07936 KC10100 07741 0010201 or 07936 3710200 or 07936 371020A U S A only Ball joint remover 28 mm Remover handle Bearing remover head 30 mm 07MAC SL00201 07936 8890300 07936 3710100 07MAC SL0202 U S A only o...

Страница 353: ...2008 TRX500 FA FGA FRONT DRIVING MECHANISM Differential inspection tool Driver 40 mm I D Attachment 30 mm I D 07KMK HC50101 07746 0030100 07746 0030300 or 07KMK HC5010A U S A only Differential bearing clip compressor Driver shaft Universal bearing puller 07YME HN4010A U S A only 07949 3710001 07631 0010000 Press attachment 07LME GE20100 17 5 ...

Страница 354: ...o low Foreign matter contaminating gear oil Chipped or damaged gears Improper tooth contact between ring gear and pinion gear Gear noise while coasting Chipped or damaged gears Abnormal noises when turning Worn or damaged ring gear bearing Worn or damaged face cams and cam followers Worn or damaged differential housing grooves Worn cone spring or shim Abnormal noises at start or during acceleratio...

Страница 355: ... 12 AXLE NUT Remove the cotter pin and loosen the axle nut COTTER PIN Remove the cotter pin TIE ROD Remove the tie rod ball joint nut while holding the joint stud flats with an open end wrench Remove the tie rod from the knuckle BALL JOINT NUT COTTER PIN Remove the two bolts and splash guard BOLTS SPLASH GUARD Remove the cotter pins and loosen the castle nuts of NUT the suspension arm ball joints ...

Страница 356: ...se brake hose OUTBOARD JOINT Hold the inboard joint of the drive shaft and tug To prevent damage INBOARD JOINT firmly to force the stopper ring in the drive shaft end the differential oil past the groove while prying with a screwdriver seal hold the inboard joint Remove the stopper ring from the inboard joint horizontal until the drive shaft is clear of the differential DISASSEMBLY INSPECTION Chec...

Страница 357: ... END loosen the boot bands on the inboard side with new ones Remove the boot band B whenever Remove the boot from the inboard joint removing them BAND C TABS TABS BAND B Remove the following INBOARD stopper ring JOINT inboard joint STOPPER RING snap ring BEARING bearing inboard boot boot band C SNAP RING BOOT Check the following for wear or damage Replace the components as an bearing cage assembly...

Страница 358: ...nd ends to BAND A loosen the boot bands on the outboard side Remove boot band A BAND C Remove the boot from the outboard joint TABS TABS OUTBOARD BOOT OUTBOARD JOINT ASSEMBLY DRIVE SHAFT INBOARD JOINT BAND C OUTBOARD BOOT OUTBOARD JOINT STOPPER RING SNAP RING BEARING STOPPER RING BEARING RACE BAND B INBOARD BOOT BEARING CAGE BAND C BAND A The outboard boots is larger than the inboard boots INBOARD...

Страница 359: ...UTBOARD BOOT INBOARD BOOT num disulfide grease BAND C Install the following outboard boot new boot band C inboard boot Do not tighten the bands at this time BAND C Install the bearing with the small O D facing the BEARING drive shaft Install the snap ring with the chamfered side facing the bearing SNAP RING Pack the inboard joint with 30 50 g of molybde num disulfide grease Install the inboard joi...

Страница 360: ... C and a new boot band B See page 17 11 for BAND END onto the inboard joint boot band installation Bend down the band end and secure it with the lock direction tabs Tap the lock tabs with a plastic hammer BAND C TABS BAND B Install a new boot band C and a new outboard boot TAB BAND A TAB band onto the outboard boot Bend down the band end and secure it with the lock tabs Tap the lock tabs with a pl...

Страница 361: ...the wheel hub knuckle assembly over the Do not get grease WHEEL HUB KNUCKLE ASSEMBLY drive shaft and onto the suspension arms onto the shoe Install hub nut and temporarily tighten the nut linings Install and tighten each joint nut to the specified torque and further tighten until its grooves align with the cotter pin holes OUTBOARD JOINT Install and tighten each joint nut to the specified Do not g...

Страница 362: ...tall a new cotter pin COTTER PIN BALL JOINT NUT Tighten the axle nut to the specified torque and fur AXLE NUT ther tighten until its grooves align with the cotter pin hole TORQUE 78 N m 8 0 kgf m 58 lbf ft Install a new cotter pin Install the front wheel page 14 12 COTTER PIN DIFFERENTIAL REMOVAL Drain the differential oil page 3 18 GUARD PLATE BOLTS Remove the following front fender inner fender ...

Страница 363: ...mp COVER STAY Remove the three bolts front clutch cover stay and rear vehicle speed sensor REAR SPEED Disconnect the front final clutch 2P Green connec SENSOR tor CLAMP BOLTS Disconnect the front differential case breather hose BREATHER HOSE Remove the differential case mounting 8 mm bolt 8 mm BOLT NUT MOUNTING BRACKET and nut Remove the bolts and differential case mounting bracket BOLTS Remove th...

Страница 364: ...HAFT JOINT O RING ance between the propeller shaft joint and engine Pull the propeller shaft joint out of the output shaft of the engine Remove the O ring OUTPUT SHAFT Remove the boot band and propeller shaft boot BOOT BAND from the pinion joint PINION JOINT PROPELLER SHAFT BOOT Pull the propeller shaft to force the stopper ring past STOPPER RING the groove in the pinion joint and remove the pro p...

Страница 365: ...ON PROPELLER SHAFT INSPECTION Remove the boot band and boot from the propeller PROPELLER SHAFT BOOT BAND shaft joint and remove the propeller shaft joint and spring BOOT PROPELLER SHAFT JOINT Check the splines of the propeller shaft and joint for SEAL RUBBERS wear or damage If damaged check the output shaft and the pinion joint also Check the seal rubbers for fatigue or damage Check the boots for ...

Страница 366: ...D 0 05 0 25 mm 0 002 0 010 in SERVICE LIMIT 0 4 mm 0 02 in Remove the dial indicator Turn the ring gear 120 and measure backlash Repeat this procedure once more Compare the difference of the three measure ments SERVICE LIMIT 0 2 mm 0 01 in If the difference in measurements exceeds the ser vice limit it indicates that the bearing is not installed squarely or the case is deformed Inspect the bearing...

Страница 367: ...8 mm 8 mm BOLTS PRYING POINT cover bolts in a crisscross pattern in several steps and remove them Pry the case cover at the points as shown by using a screwdriver and remove the cover 10 mm BOLTS PRYING POINT CASE COVER Remove the differential assembly and shims SHIMS DIFFERENTIAL ASSEMBLY Remove the O ring O RING BEARING INSPECTION Turn the inner race of each bearing in the gear case BEARING and ...

Страница 368: ...l It is important to BOLTS steps until the cover evenly touches the gear case turn the pinion gear Then while rotating the pinion gear tighten the while tightening the bolts to the specified torque in a crisscross pattern bolts If the ring in several steps gear shim is too thick the gears will TORQUE 10 mm bolt 49 N m 5 0 kgf m 36 lbf ft lock after only light 8 mm bolt 25 N m 2 6 kgf m 19 lbf ft t...

Страница 369: ...nnest 1 64 mm 0 064 in 2 18 mm shim in G standard 2 00 mm 0 079 in increments of 0 06 O thickest 2 48 mm 0 098 in mm See page 17 28 for pinion shim replacement FLANK FLANK Drive side Coast side DIFFERENTIAL INSPECTION Install the inspection tools into both sides of the dif ferential TOOL INSPECTION TOOLS 07KMK HC50101 or Slip torque inspection tool 07KMK HC5010A U S A only Hold the flat surface of...

Страница 370: ...SIDE CONE SPRING ring gear side cone spring shim RING GEAR SHIM left face cam LEFT FACE CAM six cam followers A and six cam followers B RIGHT CAM FOLLOWERS A AND B right face cam FACE CAM DIFFERENTIAL COMPONENTS INSPECTION RING GEAR Check the sliding surface of the ring gear for dam age or discoloration Measure the depth of the ring gear from the mating surface as shown SERVICE LIMIT 6 6 mm 0 26 i...

Страница 371: ...am Replace the cam FACE CAM age followers as a set 12 pieces CAM FOLLOWERS Temporarily assemble the differential housing face 1 47 kN 150 kgf cams and cam followers page 17 29 Measure the height of the face cam from the hous ing mating surface as shown while applying a load of 1 47 kN 150 kgf to the face cam boss using a hydraulic press SERVICE LIMIT 3 3 mm 0 13 in If the height is smaller than th...

Страница 372: ...m 07746 0040300 Heat the final clutch to about 100 C 212 F Be sure to wear BEARING REMOVER heavy gloves to Remove the pinion gear bearing from the final avoid burns when clutch using the special tools handling the heated REMOVER HANDLE final clutch TOOLS Using a torch to heat the final clutch Bearing remover 30 mm 07936 8890300 may damage the Remover handle 07936 3710100 clutch Remover weight 0774...

Страница 373: ...pper ring until the end of the stopper STOPPER RING ring appears in the access hole Strike gently near the end of the ring with a punch to bent the end upward Grasp the end of the ring with needle nosed pliers and pull the stopper ring out through the access hole Heat the gear case to about 80 C 176 F and Be sure to wear remove the needle bearing by using the special heavy gloves to tools avoid bu...

Страница 374: ...river 07949 3710001 Attachment 22 x 24 mm 07746 0010800 Pilot 15 mm 07746 0040300 Place the bearing and tool assembly into a freezer NEEDLE BEARING COMPRESSOR for at least 30 minutes Heat the gear case to 80 C 176 F Take out the bearing and tool assembly from the freezer and drive the bearing into the gear case DRIVER using the special tools Only strike the driver once If you strike it more than C...

Страница 375: ...N BEARING PINION SHIM CONE SPRING PINION GEAR RING GEAR DIFFERENTIAL SHIM 10 mm BOLT STOPPER RING RING GEAR SHIM 49 N m 5 0 kgf m 36 lbf ft DIFFERENTIAL BEARING GEAR CASE O RING OIL SEAL 49 N m 5 0 kgf m 36 lbf ft 8 mm BOLT 25 N m 2 6 kgf m 19 lbf ft OIL SEAL O RING GEAR CASE COVER NEEDLE BEARING DIFFERENTIAL BEARING RING GEAR SHIM FRONT FINAL CLUTCH DIFFERENTIAL CASE LEFT FACE CAM RIGHT FACE CAM ...

Страница 376: ...er 40 mm I D 07746 0030100 Attachment 30 mm I D 07746 0030300 ATTACHMENT BEARING PINION GEAR Press the pinion gear bearing assembly into the Be careful not to ATTACHMENT front final clutch using the special tools damage the oil seal lips in the final TOOLS clutch Universal bearing puller 07631 0010000 UNIVERSAL Press attachment 07LME GE20100 BEARING PULLER U S A only Be sure to wear Heat the final...

Страница 377: ... into the specified grooves in the housing by two and two as shown HOUSING Install the face cam onto the cam followers FACE CAM Measure the depth of the ring gear page 17 22 and the height of the housing to cam page 17 23 and record them Calculate the shim thickness using the equation below The correct shim is nearly this dimension A B C 1 6 mm A New shim thickness B Recorded ring gear depth C Rec...

Страница 378: ...ntial assembly when the replacement shim is changed by 0 3 mm or more from the selected shim page 17 29 RING GEAR DIFFERENTIAL CASE ASSEMBLY When the gear set bearing differential housing and or gear case has been replaced check the tooth contact pattern page 17 20 and gear back lash page 17 18 Keep dust and dirt Clean the mating surface of the gear case and cover out of the case and being careful...

Страница 379: ...sev thick the gears will eral steps lock after only light tightening TORQUE 10 mm bolt 49 N m 5 0 kgf m 36 lbf ft 8 mm bolt 25 N m 2 6 kgf m 19 lbf ft Make sure that the gear assembly rotates smoothly without binding 10 mm BOLTS PRYING POINT CASE COVER PROPELLER SHAFT ASSEMBLY PINION JOINT SEAL RUBBER SEAL RUBBER PROPELLER SHAFT JOINT 5 8 g 5 8 g Apply molybdenum disulfide grease to the seal rub S...

Страница 380: ...er shaft assembly into the differen tial until the stopper ring seats in the pinion joint groove Make sure that the stopper ring is seated properly by pulling on the pinion joint lightly PINION JOINT PROPELLER SHAFT Install the propeller shaft boot over the pinion joint BOOT BAND securely and the boot band into the boot groove PINION JOINT PROPELLER SHAFT BOOT Coat a new O ring with molybdenum dis...

Страница 381: ...ance collar 10 mm upper mounting BOLT NUT bolt and nut DISTANCE COLLAR Install the mounting bracket 8 mm bolts 8 mm 8 mm BOLT NUT MOUNTING BRACKET mounting bolt and nut First tighten the differential case mounting bracket bolts to the specified torque TORQUE 22 N m 2 2 kgf m 16 lbf ft Tighten the differential case mounting bolt and nuts to the specified torque TORQUE 10 mm 44 N m 4 5 kgf m 33 lbf ...

Страница 382: ...e specified torque TORQUE 10 N m 1 0 kgf m 7 lbf ft Clamp the rear speed sensor wire and front final clutch wire CLAMP BOLTS Install the clutch cover while hooking it on the boss HOOK CLUTCH COVER on the case and install and tighten the two bolts to the specified torque TORQUE 7 N m 0 7 kgf m 5 1 lbf ft BOLTS Install the front speed sensor guard plate and two GUARD PLATE BOLTS bolts and tighten th...

Страница 383: ...5 2008 TRX500 FA FGA 18 REAR DRIVING MECHANISM FINAL DRIVE DISASSEMBLY SYSTEM COMPONENTS 18 2 INSPECTION 18 10 SERVICE INFORMATION 18 3 FINAL GEAR CASE BEARING REPLACEMENT 18 16 TROUBLESHOOTING 18 6 FINAL DRIVE ASSEMBLY 18 18 REAR AXLE REMOVAL 18 7 FINAL DRIVE INSTALLATION 18 21 FINAL DRIVE REMOVAL 18 9 REAR AXLE INSTALLATION 18 23 18 18 1 ...

Страница 384: ...eManual SVC_MNL 61HN253 61HN2 1 of 1 3 9 2008 11 16 PM 2005 2008 TRX500 FA FGA REAR DRIVING MECHANISM SYSTEM COMPONENTS REARDRIVINGMECHANISM 137 N m 14 0 kgf m 101 lbf ft 54 N m 5 5 kgf m 40 lbf ft 44 N m 4 5 kgf m 33 lbf ft 44 N m 4 5 kgf m 33 lbf ft 32 N m 3 3 kgf m 24 lbf ft 18 2 ...

Страница 385: ...ater in the text gives both actual and indicated Replace the ring and pinion gears as a set SPECIFICATIONS Unit mm in ITEM STANDARD SERVICE LIMIT Axle runout 3 0 0 12 75 cm3 2 5 US oz 2 6 Imp oz Rear final Oil capacity After draining 100 cm3 3 4 US oz 3 5 Imp oz drive After disassembly Recommended oil Hypoid gear oil SAE 80 Gear backlash 0 05 0 25 0 002 0 010 0 4 0 02 Backlash difference 0 2 0 01 ...

Страница 386: ... 55 mm Attachment 62 x 68 mm 07749 0010000 07746 0010400 07746 0010500 Attachment 22 x 24 mm Pilot 32 mm Pilot 35 mm 07746 0010800 07MAD PR90200 07746 0040800 Driver attachment Pilot 14 mm Pinion holder 07LAD PW50500 07746 0041200 07SMB HM70200 Differential bearing compressor clip Lock nut wrench 30 x 64 mm Pinion puller base 07YME HN4010A U S A only 07916 MB00002 07HMC MM80110 or 07HMC MM8011A U ...

Страница 387: ...VING MECHANISM Puller shaft Driver 40 mm I D Attachment 30 mm I D 07931 ME40000 07746 0030100 07746 0030300 or 07931 ME4010B and Special nut 07931 HB3020A U S A only Bearing remover head 14 mm Remover shaft Remover weight 07WMC KFG0100 07936 KC10100 07741 0010201 or 07936 3710200 or 07936 371020A U S A only Oil seal driver 07965 KE80200 or 07947 KA50100 U S A only 18 5 ...

Страница 388: ...TROUBLESHOOTING Excessive noise Worn or damaged bearing Worn or scored splines Worn or damaged drive shaft propeller shaft or universal joint Worn pinion and ring gears Excessive backlash between pinion and ring gears Oil level too low Wobble or vibration in vehicle Axle not tightened properly Bent axle Oil leak Oil level too high Clogged breather Damaged seals Loose case cover 18 6 ...

Страница 389: ...page 16 19 breather hose JOINT PINS adjusting nuts joint pins springs brake cables BRAKE four nuts discard them CABLES brake panel assembly Do not get grease NUTS O ring on the shoe linings BREATHER ADJUSTING NUTS HOSE cotter pin WHEEL HUB hub nut left wheel hub COTTER PIN HUB NUT three bolts and skid plate LOWER left shock absorber lower mounting bolt MOUNTING BOLT four nuts and left axle housing...

Страница 390: ...EARING Remove the dust seals from the axle housing and AXLE BEARINGS brake panel Turn the inner race of each bearing with your finger The bearings should turn smoothly and quietly Also check that the bearing outer race fits tightly in the housing or panel DUST SEALS BEARING REPLACEMENT AXLE HOUSING Remove the dust seal and drive the axle bearing out DRIVER 11 0 11 5 mm of the axle housing 0 43 0 4...

Страница 391: ...emove the rear axle page 18 7 NUTS O RING Drain the final gear case oil page 3 18 Support the swingarm and remove the right shock absorber lower mounting bolt Remove the eight nuts four bolts and right axle housing Remove the O ring from the final drive gear case BOLTS NUTS RIGHT AXLE HOUSING LOWER MOUNTING BOLT Disconnect the breather hose from the final drive FINAL DRIVE BREATHER HOSE gear case ...

Страница 392: ...arm page 15 9 SEAL RUBBER Turn the pinion joint and check that the pinion and PINION JOINT ring gears turn smoothly and quietly without bind ing If the gears do not turn smoothly or quietly the gears and or bearing may be damaged or faulty They must be checked after disassembly replace faulty parts assemblies as required FINAL DRIVE DISASSEMBLY INSPECTION BACKLASH INSPECTION Remove the oil filler ...

Страница 393: ...hat the bearing is not installed squarely or the case is deformed Inspect the bearings and case If the backlash is excessive replace the ring gear right side shim with a thinner one RIGHT SHIM If the backlash is too small replace the ring gear right side shim with a thicker one Backlash changed by about 0 06 mm 0 002 in when thickness of the shim is changed by 0 12 mm 0 005 in Ring gear shims A th...

Страница 394: ...smoothly and quietly Also check that the bearing outer race fits tightly in the case or cover For ring gear bearing replacement see page 18 12 GEAR TOOTH CONTACT PATTERN CHECK Clean sealing material off the mating surfaces of the Keep dust and dirt RING GEAR gear case and cover being careful not to damage out of the case and them cover Apply thin coat of Prussian Blue to the pinion gear teeth for ...

Страница 395: ...ar tooth contact pattern through the oil HEEL filler hole The pattern is indicated by the Prussian Blue TOE applied to the pinion Contact is normal if the Prussian Blue is transferred FACE FACE to the approximate center of each tooth but slightly to the heel side and to the flank side FLANK FLANK If the patterns are not correct remove and change DRIVE COAST the pinion gear shim with a suitable one...

Страница 396: ...INION JOINT pulling it to force the stopper ring at the pinion gear shaft end past the groove in the pinion joint Remove the oil seal from the gear case OIL SEAL Unstake the pinion gear bearing lock nut with a drill Be careful that Unstake LOCK NUT or grinder metal particles do not enter the bearing and the threads of the case are not damaged Remove the lock nut using the special tool LOCK NUT WRE...

Страница 397: ...1 HB3020A U S A only PULLER BASE Pull the pinion gear assembly out of the gear case PINION GEAR BEARING SHIM REPLACEMENT Pull the pinion gear bearing from the shaft with a commercially available bearing puller Remove the pinion gear shim Install the shim and bearing onto the pinion gear PINION GEAR When the gear set ring gear bearing and or gear case has been replaced use a 2 00 mm 0 79 in thick s...

Страница 398: ... and cover OIL SEAL BEARING Drive the bearings out of the case and cover Drive new bearings in the case and cover using the special tools DRIVER TOOLS Driver 07749 0010000 Attachment 62 x 68 mm 07746 0010500 Pilot 35 mm 07746 0040800 PILOT ATTACHMENT Apply grease to new oil seal lips Drive the oil seals in the case and cover using the special tools until they are flush with the case and OIL SEAL c...

Страница 399: ... when handling the heated TOOLS gear case Using a Bearing remover head 14 mm 07WMC KFG0100 torch to heat the Remover shaft 07936 KC10100 ACCESS HOLE gear case may Remover weight 07741 0010201 cause warpage 07936 3710200 or 07936 371020A U S A only Install the stopper ring into the groove using special tool COMPRESSOR TOOLS STOPPER RING Differential Bearing 07YME HN4010A Clip Compressor U S A only ...

Страница 400: ...ING MECHANISM FINAL DRIVE ASSEMBLY GEAR CASE O RING OIL FILLER CAP RING GEAR BEARING OIL SEAL RING GEAR STOPPER RING SHIM PINION NEEDLE BEARING RING GEAR BEARING SHIM DRAIN BOLT STOP PIN OIL SEAL PINION GEAR SHIM SHIM PINION BEARING O RING GEAR CASE COVER OIL SEAL LOCK NUT STOPPER RING PINION JOINT BEARING 6007 BEARING 6206 NEEDLE BEARING BEARING 35x60 mm 15x25 mm 18 18 ...

Страница 401: ...new lock nut and tighten it using the special Refer to torque tool wrench reading information on page TOOL 18 3 Service Lock nut wrench 30 x 64 mm 07916 MB00002 Information TORQUE Actual 98 N m 10 0 kgf m 72 lbf ft Indicated 89 N m 9 1 kgf m 66 lbf ft Stake the lock nut into the case groove Be careful not to Stake damage the threads LOCK NUT of the case Apply grease to a new oil seal lips and inst...

Страница 402: ...ove the ring gear SHIM If the clearance is without the standard value heat Be sure to wear the case cover to approximately 80ºC 176ºF and heavy gloves to remove the stop pin by tapping the cover avoid burns when handling the heated Install a stop pin shim to obtain the correct clear gear case Using a ance torch to heat the Stop pin shims gear case may cause warpage A 0 10 mm 0 004 in B 0 15 mm 0 0...

Страница 403: ...n several It is important to steps until the cover evenly touches the gear case turn the pinion Then while rotating the pinion gear tighten the while tightening the bolts to the specified torque in a crisscross pattern bolts If the ring in several steps gear shim is too thick the gears will TORQUE 10 mm bolt 49 N m 5 0 kgf m 36 lbf ft lock after only light 8 mm bolt 25 N m 2 6 kgf m 19 lbf ft tigh...

Страница 404: ...ten the nuts ASSEMBLY Connect the breather hose to the hose joint of the gear case NUTS Coat a new O ring with grease and install it into the groove in the gear case O RING Install the right axle housing onto the gear case and NUTS swingarm with the four bolts and eight new nuts Tighten the four final drive assembly mounting nuts TORQUE 54 N m 5 5 kgf m 40 lbf ft Tighten the four axle housing moun...

Страница 405: ... CENTER SPLINES Coat a new O ring with grease and install it into the groove in the gear case Install the side collar onto the rear axle with the O RING tapered side facing inward SIDE COLLAR Install the left axle housing with four new nuts and LOWER MOUNTING BOLT tighten the nuts NUTS TORQUE 44 N m 4 5 kgf m 33 lbf ft Install the left rear shock absorber into the axle housing and tighten the lowe...

Страница 406: ... lbf ft Install a new cotter pin COTTER PIN HUB NUT Coat a new O ring with grease and install it into the BRAKE PANEL brake panel groove ASSEMBLY Install the brake panel assembly onto the axle Do not get grease on the brake shoe linings O RING Install new brake panel nuts and tighten them BRAKE CABLES SPRINGS TORQUE 44 N m 4 5 kgf m 33 lbf ft Install the brake cables into the cable holders on the ...

Страница 407: ...C_MNL 61HN253 61HN2 1 of 1 3 9 2008 11 19 PM 2005 2008 TRX500 FA FGA 19 BATTERY CHARGING SYSTEM BATTERY 19 5 COMPONENT LOCATION 19 2 CHARGING SYSTEM INSPECTION 19 8 SYSTEM DIAGRAM 19 2 ALTERNATOR CHARGING COIL 19 9 SERVICE INFORMATION 19 3 REGULATOR RECTIFIER 19 9 TROUBLESHOOTING 19 4 19 19 1 ...

Страница 408: ...ervices honda com ServiceManual SVC_MNL 61HN253 61HN2 1 of 1 3 9 2008 11 19 PM 2005 2008 TRX500 FA FGA BATTERY CHARGING SYSTEM COMPONENT LOCATION BATTERY CHARGINGSYSTEM BATTERY FUSE 30 A ALTERNATOR REGULATOR RECTIFIER SYSTEM DIAGRAM G Green R Red Y Yellow 19 2 ...

Страница 409: ...ie out For this reason the charging system is often suspected as the problem Battery overcharge often results from problems in the battery itself which may appear to be an overcharging symptom If one of the battery cells is shorted and battery voltage does not increase the regulator rectifier supplies excess voltage to the battery Under these conditions the electrolyte level goes down quickly Befo...

Страница 410: ...age Is the current leakage below 1 mA YES Faulty regulator rectifier NO Shorted wire harness Faulty ignition switch 4 Charging Voltage Inspection Measure and record the battery voltage using a digital multimeter page 19 5 Start the engine Measure the charging voltage page 19 8 Compare the measurements to the results of the following calculation STANDARD Measured BV Measured CV 15 5 V BV Battery vo...

Страница 411: ...ive cable clean dielectric grease Install the terminal cover to the position terminal securely POSITIVE CABLE NEGATIVE CABLE VOLTAGE INSPECTION Remove the seat page 2 4 Measure the battery voltage using a commercially available digital multimeter VOLTAGE Fully charged 13 0 13 2V Under charged Below 12 3V BATTERY TESTING Remove the battery page 19 5 Always clear the work area of flammable materi BA...

Страница 412: ...testing test it in an as is condition To avoid damaging the tester only test batteries with an amperage rating of less than 30 Ah Tester damage can result from overheating when The test button is pushed in for more than 3 seconds The tester is used without being allowed to cool for at least 1 minute when testing more than one battery More than ten consecutive tests are performed without allowing a...

Страница 413: ...ged not at the battery SELECTOR SWITCH terminal 5 5 to 9 0 3 5 to 5 0 9 5 to 16 0 16 5 to 30 0 to 3 0 Set the appropriate amp hour rating 3 Set the TIMER to the position indicated by the Honda Battery Tester RED 3 RED 2 or YEL LOW 1 If you are charging a new battery set NEW BATT the switch to the NEW BATT position RED 0 3 4 Attach the clamps to the battery terminals red to positive black to negati...

Страница 414: ...N A sudden surge of current may blow out the fuse in the tester SPECIFIED CURRENT LEAKAGE 1 mA maximum If current leakage exceeds the specified value a shorted circuit is likely Locate the short by disconnecting connections one by one and measuring the current CHARGING VOLTAGE INSPECTION Remove the seat page 2 4 Be sure the battery is in good condition before per forming this test Warm up the engi...

Страница 415: ...ire 5P NATURAL CONNECTOR terminals of the alternator side connector STANDARD 0 1 1 0 Ω at 20 C 68 F Check for continuity between each Yellow wire ter minal of the alternator side connector and ground There should be no continuity Replace the alternator stator if resistance is out of specification or if any wire has continuity to ground Refer to page 11 8 for alternator stator replacement REGULATOR...

Страница 416: ...tinuity between the Green wire termi nal of 3P Black connector and ground There should be continuity at all times CHARGING COIL LINE Measure the resistance between the Yellow wire terminals of 3P GRAY connector STANDARD 0 1 1 0 Ω at 20 C 68 F 3P BLACK CONNECTOR Check for continuity between each Yellow wire ter minal and ground There should be no continuity REMOVAL INSTALLATION Disconnect the regul...

Страница 417: ...m ServiceManual SVC_MNL 61HN253 61HN2 1 of 1 3 9 2008 11 20 PM 2005 2008 TRX500 FA FGA 20 IGNITION SYSTEM IGNITION SYSTEM INSPECTION 20 5 COMPONENT LOCATION 20 2 IGNITION COIL 20 7 SYSTEM DIAGRAM 20 2 IGNITION TIMING 20 7 SERVICE INFORMATION 20 3 TROUBLESHOOTING 20 4 20 20 1 ...

Страница 418: ...61HN2 1 of 1 3 9 2008 11 20 PM 2005 2008 TRX500 FA FGA IGNITION SYSTEM IGNITIONSYSTEM COMPONENT LOCATION IGNITION SWITCH ENGINE CONTROL ENGINE STOP SWITCH MODULE ECM IGNITION COIL BATTERY FUSE 10 A SPARK PLUG IGNITION PULSE GENERATOR SYSTEM DIAGRAM Bl Black Bu Blue G Green P Pink R Red W White Y Yellow 20 2 ...

Страница 419: ...roceeding Make sure the battery is adequately charged Using the starter motor with a weak battery results in a slower engine cranking speed as well as no spark at the spark plug This vehicle s spark plug is equipped with iridium type electrode Do not use any spark plug other than specified 11 8 for ignition pulse generator removal installation See page 22 9 for ignition switch servicing See page 2...

Страница 420: ...hronized System is normal if measured voltage is over the standard voltage at least once 5 Poorly connected connectors or an open circuit in the ignition system 6 Faulty ignition coil 7 Faulty engine control module ECM when above No 1 through 6 are normal No peak voltage 1 Incorrect peak voltage adaptor connections System is normal if measured voltage is over the specifications with reverse connec...

Страница 421: ... COIL PRIMARY PEAK VOLTAGE Check all system connections before this inspec tion Poor connected connectors can cause incor rect readings Check the cylinder compression and check that the spark plug is installed correctly in the cylin der head Disconnect the spark plug cap from the spark plug KNOWN GOOD SPARK PLUG page 3 9 Connect a known good spark plug to the spark plug cap and ground the spark pl...

Страница 422: ... yellow Body ground Shift the transmission into neutral Turn the ignition switch to ON Crank the engine with the starter motor and read the ignition pulse generator peak voltage BLUE YELLOW PEAK VOLTAGE 0 7 V minimum If the voltage measured at the ECM 21P Black con PEAK VOLTAGE nector is abnormal measure the peak voltage at the ADAPTOR alternator connector Remove the recoil starter cover page 2 4 ...

Страница 423: ...plug wire from the wire clamp CONNECTORS Disconnect the ignition coil connectors Remove the ignition coil Installation is in the reverse order of removal IGNITION COIL CLAMP IGNITION TIMING Remove the recoil starter cover page 2 4 Start the engine and warm it up to operating tem perature Stop the engine and remove the timing hole cap from the rear crankcase cover TIMING HOLE CAP Connect the timing...

Страница 424: ...the F mark on the INDEX MARK flywheel aligns with the index mark on the rear crankcase cover at idle Increase the engine speed and make sure the F mark begins to move F MARK Coat a new O ring with oil and install it onto the tim O RING ing hole cap Install the timing hole cap and tighten it to the spec ified torque TORQUE 10 N m 1 0 kgf m 7 lbf ft Install the recoil starter cover page 2 4 TIMING H...

Страница 425: ...onda com ServiceManual SVC_MNL 61HN253 61HN2 1 of 1 3 9 2008 11 21 PM 2005 2008 TRX500 FA FGA 21 ELECTRIC STARTER STARTER MOTOR 21 7 COMPONENT LOCATION 21 2 STARTER RELAY SWITCH 21 13 SYSTEM DIAGRAM 21 3 DIODE 21 14 SERVICE INFORMATION 21 4 TROUBLESHOOTING 21 5 21 21 1 ...

Страница 426: ...2008 11 21 PM 2005 2008 TRX500 FA FGA ELECTRIC STARTER ELECTRICSTARTER COMPONENT LOCATION STARTER SWITCH IGNITION SWITCH FRONT STOP SWITCH ECM ENGINE STOP SWITCH GEAR POSITION SWITCH BATTERY FUSE 30 A STARTER RELAY SWITCH STARTER MOTOR SYSTEM DIAGRAM Bl Black G Green Gr Gray Lg Light green P Pink R Red W White Y Yellow 21 2 ...

Страница 427: ...w the steps in the troubleshooting page 21 4 A weak battery may be unable to turn the starter motor quickly enough or supply adequate ignition current If the current is kept flowing through the starter motor to turn it while the engine is not cranking over the starter motor may be damaged 11 12 for starter clutch servicing See page 22 9 for ignition switch information See page 22 10 for engine sto...

Страница 428: ...f the starter relay switch page 21 12 Does the starter relay switch click YES GO TO STEP 4 NO GO TO STEP 5 4 Starter Motor Inspection Turn the ignition switch to OFF Apply battery voltage to the starter motor directly Does the starter motor turn YES Poorly connected starter motor cable Faulty starter relay switch page 21 12 NO Faulty starter motor page 21 6 5 Relay Coil Ground Line Inspection Turn...

Страница 429: ...tion properly NO Faulty starter relay switch YES Loose or poor contact of the starter relay switch connector terminal Starter motor turns engine slowly Low battery voltage Poorly connected battery cable Poorly connected starter motor cable Faulty starter motor Poorly connected ground cable terminal Starter motor turns but engine does not turn Faulty starter clutch Damaged starter gear train Starte...

Страница 430: ...OLTS Slide the rubber cap off the starter motor terminal STARTER RUBBER CAP and remove the terminal nut and starter motor MOTOR CABLE cable GROUND CABLE Remove the two mounting bolts and ground cable and the starter motor from the rear crankcase cover Remove the O ring from the starter motor BOLTS TERMINAL NUT STARTER MOTOR DISASSEMBLY INSPECTION Remove the starter motor case bolts set plates and ...

Страница 431: ...ear cover REAR COVER shims SEAL RING SHIMS seal ring armature ARMATURE Check the bushing in the rear cover for wear or damage BUSHING Check the dust seal and needle bearing in the front DUST SEAL cover for deterioration wear or damage NEEDLE BEARING Check the commutator bars of the armature for dis COMMUTATOR BARS coloration Do not use emery or sand paper on the commu tator 21 7 ...

Страница 432: ...irs of commutator Continuity bars There should be continuity Check for continuity between each commutator bar No continuity and the armature shaft There should be no continuity Check for continuity between the insulated brush INSULATED BRUSH Continuity and cable terminal There should be continuity Check for continuity between the cable terminal and No continuity motor case There should be no conti...

Страница 433: ...R WASHERS nut washer insulator washers brush holder assembly O ring insulator NUT BRUSH HOLDER WASHER Remove the brushes from the brush holder Measure the brush length SERVICE LIMIT 9 0 mm 0 35 in ASSEMBLY NUT WASHER INSULATED BRUSH INSULATOR WASHERS O RING REAR COVER INSULATED WASHER INSULATOR SHIMS O RING BRUSH SPRING SEAL RING SET PLATE SEAL RING MOTOR CASE ARMATURE SHIMS CASE BOLT LOCK WASHER ...

Страница 434: ...the armature tightly to keep the magnet of the Align damaged if the REAR COVER case from pulling the armature against it magnet pulls the SEAL RING armature against Install a new seal ring onto the motor case the case Install the same number of shims in the same loca tions as noted during disassembly Install the rear cover while pushing the brushes into the brush holder and aligning the brush hold...

Страница 435: ... Apply molybdenum oil solution to the starter motor shaft splines Install the starter motor into the rear crankcase Set the water STARTER RUBBER CAP cover with the two mounting bolts and ground pump bypass MOTOR CABLE cable and tighten the mounting bolts hose properly GROUND page 1 22 CABLE Install the starter motor cable and nut onto the motor terminal and tighten the nut securely Install the rub...

Страница 436: ...ION Remove the seat page 2 4 Shift the sub transmission into neutral Turn the ignition switch ON and push the starter switch The coil is normal if the starter relay switch clicks If you don t hear the switch CLICK inspect the relay switch using the procedure below Disconnect the starter relay 2P white connector STARTER RELAY SWITCH GROUND LINE Check for continuity between the Light green red LIGHT...

Страница 437: ...ged 12 V battery positive ter minal to the Yellow red wire terminal and negative terminal to the Light green red wire terminal of the relay switch side 2P connector STARTER RELAY There should be continuity between the cable termi SWITCH nals while the battery is connected and no continu ity when the battery is disconnected BATTERY DIODE INSPECTION Remove the following seat page 2 4 fuel tank heat ...

Страница 438: ... 61HN252 by American Honda Motor Co Page 438 of 540 http services honda com ServiceManual SVC_MNL 61HN253 61HN2 1 of 1 3 9 2008 11 22 PM 2005 2008 TRX500 FA FGA MEMO ...

Страница 439: ...EL SENSOR 22 15 ASSIST HEADLIGHT 22 4 TEMPERATURE INDICATOR 22 17 HEADLIGHT 22 5 ENGINE OIL TEMPERATURE EOT SENSOR 22 20 TAIL BRAKE LIGHT 05 06 22 6 ENGINE COOLANT TEMPERATURE ECT TAIL BRAKE LIGHT After 06 22 7 SENSOR 22 21 ACCESSORY SOCKET 22 8 REVERSE SWITCH 22 22 IGNITION SWITCH 22 9 GPS RECEIVER GPS model only 22 23 HANDLEBAR SWITCH 22 10 BRAKE LIGHT SWITCH 22 25 CARBURETOR HEATER 22 11 FRONT ...

Страница 440: ...HN2 1 of 1 3 9 2008 11 22 PM 2005 2008 TRX500 FA FGA LIGHTS METERS SWITCHES COMPONENT LOCATION LIGHTS METERS SWITCHES HANDLEBAR SWITCH IGNITION SWITCH COMBINATION METER REVERSE SWITCH FRONT BRAKE INHIBITOR SWITCH ECT SENSOR CARBURETOR HEATER FRONT VEHICLE SPEED SENSOR REAR VEHICLE SPEED SENSOR EOT SENSOR 22 2 ...

Страница 441: ... The following color codes are used throughout this section Bu Blue G Green Lg Light Green R Red Bl Black Gr Gray O Orange W White Br Brown Lb Light Blue P Pink Y Yellow SPECIFICATIONS ITEM SPECIFICATIONS Bulb Headlight high low beam 12V 30 30 W x 2 Assist headlight 12V 45 W Brake taillight 05 06 12V 21 5 W x 2 After 06 LED Neutral indicator LED Reverse indicator LED Coolant oil temperature indica...

Страница 442: ...ring by turning it counter clockwise and remove the bulb from the headlight Install a new bulb and removed parts in the reverse RETAINING RING order of removal HEADLIGHT CONNECTOR REMOVAL INSTALLATION Remove the assist headlight bulb page 22 4 NUTS HEADLIGHT Remove the two trim clips 8 mm nuts and the assist SOCKET FRONT COVER headlight meter bracket from the steering shaft BOLTS Remove the two ta...

Страница 443: ...ES HEADLIGHT BULB REPLACEMENT Remove the screw and headlight case cover cap HEADLIGHT COVER CAP SCREW Remove the dust cover BULB DUST COVER Remove the bulb socket and bulb BULB SOCKET Install a new bulb in the case aligning the bulb tab Align with the case groove Install the bulb socket BULB BULB SOCKET Install the dust cover with its tab facing left under DUST COVER side TAB 22 5 ...

Страница 444: ...oove as shown Align Install and tighten the headlight case cover cap HEADLIGHT COVER CAP SCREW screw REMOVAL INSTALLATION Remove the front side outer fender page 2 13 HEADLIGHT COVER TRIM CLIP Remove the screws trim clip bolt and headlight cover unit assembly Remove the headlight unit from the cover Installation is in the reverse order of removal SCREWS BOLT HEADLIGHT UNIT TAIL BRAKE LIGHT 05 06 B...

Страница 445: ...LB REMOVAL INSTALLATION Remove the taillight bulb socket page 22 6 TAILLIGHT COVER TRIM CLIPS Remove the trim clips screws and taillight cover Remove the taillight unit from the cover Install the taillight in the reverse order of removal Align the bosses and grommets properly TAILLIGHT UNIT SCREWS TAIL BRAKE LIGHT After 06 REMOVAL INSTALLATION Open the storage box GROMMETS Push the tail brake ligh...

Страница 446: ...ircuit in the wire harness Remove the accessory socket cap BOTTOM CENTER White black Check for continuity between the White black wire terminal of the socket side 2P Natural connector and bottom center terminal of the socket and between the Green wire terminal and side wall ter minal There should be continuity If there is no continuity replace the accessory socket SIDE WALL Green REPLACEMENT Remov...

Страница 447: ...r 06 Check for continuity between the switch side con nector terminals in each switch position Continuity should exist between the color coded wires as follows 4P CONNECTOR REMOVAL INSTALLATION Remove the following IGNITION SWITCH front fender page 2 11 combination meter page 22 14 Remove the ignition switch from the handlebar cover by pushing in the two stoppers STOPPERS Install the ignition swit...

Страница 448: ... Green connec 05 06 05 06 shown tor from the frame and disconnect it Remove the handlebar switch 14P Green connec After 06 tor from the frame and disconnect it Check for continuity between the switch side con nector terminals in each switch position Continuity should exist between the color coded wires as shown below 10P or 14P GREEN CONNECTOR See page 24 38 for gearshift switch inspection DIMMER ...

Страница 449: ...ween the Brown and Green wire terminals of the wire harness side connector There should be battery voltage with the ignition switch turned to ON If there is no voltage check for an open circuit in the wire harness Measure the resistance between the heater side connector terminals STANDARD 13 15 Ω at 20 C 68 F If the resistance is out of above range replace the carburetor heater REMOVAL INSTALLATIO...

Страница 450: ...E GUARD Disconnect the carburetor heater switch 2P Red connector 2P RED CONNECTOR Remove the clips and carburetor heater switch CARBURETOR COVER cover HEATER SWITCH Remove the clip and carburetor heater switch CLIP CLIPS Check for continuity between the switch side con 2P RED CONNECTOR nector terminals of the carburetor heater switch 2P Red connector Above 20 C 68 F No continuity Below 7 C 45 F Co...

Страница 451: ...egardless of the ignition switch position If there is no voltage check for an open circuit in the wire harness SPEEDOMETER REAR VSS Check that the hour meter and odometer trip meter function properly 05 06 shown If they do not function check the power ground line page 22 13 If they function properly check as follows Remove the front fender page 2 11 Remove the rear VSS 3P Yellow connector from the...

Страница 452: ... the Pink green wire between the rear VSS 3P Yellow connector and combination meter 14P Gray connector If the Pink green wire is OK replace the combination meter 14P GRAY CONNECTOR COMBINATION METER REMOVAL INSTALLATION Remove the front fender page 2 11 05 06 shown Remove the combination meter 14P Gray connec tor from the frame and disconnect it Release the meter wire from the wire clip on the ste...

Страница 453: ...ators function CONNECTORS properly If they do not function check the power ground line If they function check the as follows Remove the left inner fender page 2 9 Turn the ignition switch to OFF and disconnect the fuel level sensor 2P connector Turn the ignition switch to OFF GPS model Standard model Connect the meter side connector terminals with a jumper wire Turn the ignition switch to ON and c...

Страница 454: ... to OFF SEGMENTS F Move the float to the bottom RESERVE position GPS model Standard model turn the ignition switch to ON and check the fuel gauge Segment RES should blink If the fuel gauge does not function properly check the fuel level sensor page 22 17 If the fuel level sensor is OK replace the combina tion meter If all segments blink during inspection replace the combination meter Turn the igni...

Страница 455: ... fuel level sensor 2P connector and connect the ohmmeter to the sensor side connector terminals Measure the fuel level sensor resistance with the FLOAT float at the top FULL and bottom RESERVE posi tion Resistance 20 C 68 F FLOAT POSITION TOP 57Ω TOP FULL FULL 204 210 Ω BOTTOM RESERVE BOTTOM RESERVE TEMPERATURE INDICATOR SYSTEM INSPECTION The oil coolant temperature indicator should TEMPERATURE IN...

Страница 456: ...arter cover page 2 4 fuel tank cover page 2 6 air intake duct page 6 10 Disconnect the connector from the engine coolant temperature ECT sensor and check the tempera ture indicator with the ignition switch ON If the indicator goes off check the ECT sensor page 22 20 EOT SENSOR If the indicator does not go off disconnect the engine control module ECM 21P Black con nector and meter 14P Gray connecto...

Страница 457: ...CM 5P Black connector Check for short circuit in Green black wire between the ECM and fan motor FAN MOTOR CONNECTOR Fan motor does not start Remove the following CONNECTOR recoil starter cover page 2 4 fuel tank cover page 2 6 air intake duct page 6 10 Disconnect the engine coolant temperature ECT sensor connector and ground the connector termi nal Black blue with a jumper wire Turn the ignition s...

Страница 458: ...right inner fender page 2 9 Disconnect the connector and remove the engine oil temperature EOT sensor EOT SENSOR Suspend the EOT sensor in a pan of engine oil on an THERMOMETER electric heating element and measure the resistance through the sensor as the oil heats up Soak the EOT sensor in oil up to its threads with at least 40 mm 1 57 in from the bottom of the pan to the bottom of the sensor Keep...

Страница 459: ...ats up Soak the ECT sensor in coolant up to its threads with at least 40 mm 1 57 in from the bottom of the pan to the bottom of the ECT sensor Keep the temperature constant for 3 minutes before testing A sudden change of temperature will result in incorrect readings Do not let the thermometer or ECT sensor touch the pan 80 C 176 F 120 C 248 F Temperature ECT SENSOR 47 57 Ω 14 18 Ω Resistance Repla...

Страница 460: ...everse switch 2P connector Check for continuity between the switch side con nector terminals There should be continuity with the gearshift lever in reverse position and no continuity with it in except reverse REPLACEMENT Remove the screw and the reverse switch Install a new reverse switch by aligning the locating pin with the hole in the gearshift box base Route the switch wire properly page 1 22 ...

Страница 461: ...ithin about 8 min utes after the following situations When turning the ignition switch ON over 1 month after turning OFF When transporting the vehicle with the ignition switch OFF for over 100 km 60 mi When the battery is disconnected If the GPS indicator is blinking and the antenna mark and all segments do not indicate at all per form the following troubleshooting GPS INDICA TOR BLINKS page 22 23...

Страница 462: ...k for continuity between the meter side con nector terminal and ground Connection Green orange Ground Is there continuity G O YES GO TO STEP 4 NO Open circuit on the Green orange wire Inspect the combination meter page 22 13 4 GPS RECEIVER REPLACEMENT Replace the receiver with a known good one and recheck the GPS indicator after 5 minutes when turning the ignition switch ON Is the GPS indicator st...

Страница 463: ...hort circuit on the White pink wire Inspect the combination meter page 22 13 REMOVAL INSTALLATION Remove the combination meter assembly and GPS RECEIVER remove the meter bracket page 22 14 05 06 shown Remove the bolts and lift the GPS receiver BOLTS Disconnect the GPS 6P connector and remove the 6P CONNECTOR GPS receiver Installation is in the reverse order of removal GPS RECEIVER BRAKE LIGHT SWIT...

Страница 464: ...er released REAR BRAKE PEDAL Remove recoil starter cover page 2 4 Disconnect the rear brake pedal switch 2P Yellow connector and check for continuity between the switch side connector terminals There should be continuity with the rear brake pedal depressed and no continuity with the pedal released 2P YELLOW CONNECTOR FRONT BRAKE SWITCH Disconnect the front brake switch connectors and The lower swi...

Страница 465: ...ch wire connectors 05 06 shown CONNECTORS Check the continuity between the connector termi HORN SWITCH nals There should be continuity when the horn switch is pushed and be no continuity when the switch is released HORN U type only Disconnect the wire connectors from the horn CONNECTORS Connect a 12V battery to the horn terminals The horn is normal if it sounds when the 12V battery is connected ac...

Страница 466: ... 61HN252 by American Honda Motor Co Page 466 of 540 http services honda com ServiceManual SVC_MNL 61HN253 61HN2 1 of 1 3 9 2008 11 25 PM 2005 2008 TRX500 FA FGA MEMO ...

Страница 467: ... SVC_MNL 61HN253 61HN2 1 of 1 3 9 2008 11 25 PM 2005 2008 TRX500 FA FGA 23 SELECTABLE 4WD SYSTEM PROBLEM CODE INDEX 23 4 COMPONENT LOCATION 23 2 TROUBLESHOOTING 23 5 SYSTEM DIAGRAM 23 2 REAR VEHICLE SPEED SENSOR VSS 23 11 SERVICE INFORMATION 23 3 BEFORE STARTING TROUBLESHOOTING 23 4 23 23 1 ...

Страница 468: ... 3 9 2008 11 25 PM 2005 2008 TRX500 FA FGA SELECTABLE 4WD SYSTEM SELECTABLE4WDSYSTEM COMPONENT LOCATION COMBINATION METER 2WD 4WD 4WD INDICATOR SELECT SWITCH FRONT FINAL CLUTCH ENGINE CONTROL MODULE ECM BATTERY FRONT VSS REAR VSS SYSTEM DIAGRAM Bl Black G Green Gr Gray Lg Light green P Pink R Red W White Y Yellow 23 2 ...

Страница 469: ...rating the front final clutch with the 2WD 4WD select switch When checking the selectable 4WD system always follow the steps in the troubleshooting page 23 5 See page 17 3 for front final clutch information A faulty selectable 4WD system is often related to poorly connected or corroded connections Check those connections before proceeding Refer to page 24 9 for problem code retrieval and erasure p...

Страница 470: ...rm the troubleshooting page 23 5 Only one current problem code will be indicated even if two or more problems occur Once the ECM detects a problem it stores the problem code in the erasable memory It can be indicated as freeze code by retrieval of problem code Retrieval and erasure procedure are the same as the Hondamatic ones refer to page 24 9 The selectable 4WD function can be reset by turning ...

Страница 471: ...ector YES GO TO STEP 2 2 Front VSS Input Line Inspection Turn the ignition switch ON FRONT VSS CONNECTOR Measure the voltage between the wire harness Viewed from the terminal side side front VSS 3P Black connector terminals Connection Black orange Green yellow Does the battery voltage exist NO Open or short circuit in the Black orange wire or Green yellow wire Bl O YES GO TO STEP 3 G Y 3 Front VSS...

Страница 472: ...on SENSOR GUARD Remove the front VSS page 17 14 and check for any object on the sensor tip or ring gear sur face also check for damage on the sensor tip Is it installed correctly NO Clean the front VSS and ring gear cor rectly install the front VSS or replace the front VSS YES GO TO STEP 6 FRONT VSS 6 Failure Reproduction Interchange the front VSS 3P Black and rear 3P BLACK CONNECTOR VSS 3P Yellow...

Страница 473: ... CONNECTOR 2 Rear VSS Input Line Inspection Turn the ignition switch ON REAR VSS CONNECTOR Measure the voltage between the wire harness Viewed from the terminal side side rear VSS 3P Yellow connector terminal and ground Connection Black orange Green yellow Does the battery voltage exist NO Open or short circuit in the Black orange wire or Green yellow wire G Y Bl O YES GO TO STEP 3 3 Rear VSS Line...

Страница 474: ...stallation Remove the rear VSS page 23 11 and check for any object on the sensor tip or ring gear surface also check for damage on the sensor tip Is it installed correctly NO Clean the rear VSS and ring gear cor rectly install the rear VSS or replace the rear VSS YES GO TO STEP 6 REAR VSS 6 Failure Reproduction Interchange the front VSS 3P Black and rear 3P BLACK CONNECTOR VSS 3P Yellow connector ...

Страница 475: ... Turn the ignition switch ON Measure the voltage between the wire harness Be careful not side connector terminal and ground to bend the connector Connection Black green Ground terminals 11 16 V 20 C 68 F Standard Bl G Is the voltage within the standard value NO Open or short circuit in wire harness between the battery to fuse box and fuse box to ECM Undercharged battery ECM CONNECTOR Viewed YES Re...

Страница 476: ...pen circuit in White black wire W R W Bl YES GO TO STEP 3 ECM CONNECTOR Viewed from the terminal side 3 Front Final Clutch Line Short Circuit Inspection Check the White red and White black wires for WIRE HARNESS SIDE FINAL continuity between the wire harness side clutch CLUTCH CONNECTOR Viewed 2P Green connector terminals and ground from the terminal side Is there continuity YES Short circuit in t...

Страница 477: ...nt final clutch cover FINAL CLUTCH COVER BOLTS Remove the three front final clutch cover stay COVER STAY 2P GREEN mounting bolts and stay CONNECTOR Release the rear VSS wire from the wire clamp REAR VSS Remove the front final clutch 2P Green connector CLAMP BOLTS INSTALLATION Install the front final clutch 2P Green connector 2P GREEN Apply engine oil to a new O ring and install it onto CONNECTOR t...

Страница 478: ...h cover stay onto the REAR VSS CLAMP COVER STAY clutch housing then install and tighten the three mounting bolts Clamp the rear VSS wire with the wire clamp BOLTS Install the front final clutch cover onto the housing Align FINAL CLUTCH COVER while aligning its hole with the boss on the housing Install and tighten the two bolts BOLTS Connect the rear VSS 3P Yellow connector 3P YELLOW CONNECTOR 05 0...

Страница 479: ...OTING 24 12 COMPONENT LOCATION 24 2 GEAR POSITION SWITCH 24 37 SERVICE INFORMATION 24 3 ESP SHIFT SWITCH 24 38 CONNECTOR LOCATION 24 4 MODE SELECT SWITCH 24 39 CIRCUIT DIAGRAM 24 5 THROTTLE POSITION TP SENSOR 24 40 INITIAL SETTING PROCEDURE 24 6 ANGLE SENSOR 24 41 BEFORE STARTING TROUBLESHOOTING 24 8 CONTROL MOTOR 24 43 PROBLEM CODE INDEX 24 11 ENGINE CONTROL MODULE ECM 24 44 24 24 1 ...

Страница 480: ...M 2005 2008 TRX500 FA FGA HONDAMATIC COMPONENT LOCATION HONDAMATIC DRIVE MODE SELECT SWITCH COMBINATION METER ESP SHIFT SWITCH IGNITION SWITCH GEARSHIFT LEVER ENGINE CONTROL MODULE ECM THROTTLE POSITION SENSOR BATTERY FRONT VSS REAR VSS AUTOMATIC TRANSMISSION CONTROL MOTOR GEAR POSITION SWITCH ANGLE SENSOR IGNITION PULSE GENERATOR 24 2 ...

Страница 481: ...he problem code and related system before starting diagnosis and troubleshooting When the Engine Control Module ECM detects a problem with the Hondamatic system it stops the automatic trans mission function and the gear position indicator blinks After performing troubleshooting including initial setting 24 6 erase the problem code s and test drive the vehicle to be sure that the problem s has have...

Страница 482: ...r page 2 11 fender page 2 11 fender page 2 11 HANDLEBAR SWITCH 10P or 14P GREEN ESP SHIFT DRIVE MODE SELECT SWITCH Front fender page METER 14P GRAY METER 4P YELLOW SWITCH 4P BLACK Front 2 11 Front fender page 2 11 Front fender page 2 11 fender page 2 11 FRONT VSS 3P BLACK THROTTLE POSITION SENSOR 3P BLACK Inner fender page 2 9 Fuel tank cover page 2 6 ANGLE SENSOR 3P BLACK CONTROL MOTOR 2P NATURAL...

Страница 483: ... clutch power L_SW Low switch OIL_TEMP Oil temperature 4WD_IND 4WD indicator N_SW Neutral switch MODE Mode signal GND Ground R_SW Reverse switch MAP Map signal PGND Power ground SEL_UP Selector up R Reverse signal IND_1 Indicator 1 SEL_DOWN Selector down STOP Stop signal IND_2 Indicator 2 VSP Vehicle speed sen FAN Fan motor IND_3 Indicator 3 sor voltage MO_P Motor power IND_4 Indicator 4 FR_VWP Fr...

Страница 484: ...s in Indicator INDICATOR MODE 2 BLINK DURATION mode 2 when the initial setting was not made properly Repeat the procedure from the step 2 0 5 sec 0 5 sec ON Pattern repeated OFF INITIAL SETTING 1 Start the engine and let it idle about 30 seconds Make sure to check GEARSHIFT LEVER with the sub transmission in the neutral the oil level before executing the Initial 2 Move the gearshift lever to the D...

Страница 485: ... and UP Do not hold onto the switch If the gear position A constant should be displayed on the gear indicator shows the position indicator constant display of DOWN Listen for the control motor operation sound the N or the control control motor should function at this time to motor did not cycle adjust the angle sensor turn the ignition switch OFF and 9 Within 5 seconds of the display of and while ...

Страница 486: ... 24 12 Only one current problem code will be indicated even if two or more problems occur Once the ECM detects a problem it stores the problem code in the erasable memory It can be indicated as freeze code by retrieval of problem code page 24 9 The shift function can be reset by turning the ignition switch OFF and ON but the shift control stops when the ECM detects the problem again After performi...

Страница 487: ...shift switches ESP shift switches simultaneously 3 Release the UP and DOWN shift switches imme diately then push the UP and DOWN shift switches simultaneously again for 2 seconds or more 4 The problem code is displayed by a number of blinks on the gear position indicator page 24 8 If N stays on the gear position indicator the IGNITION SWITCH retrieval process was not correctly performed Repeat the...

Страница 488: ...ier problem code Example Blinking 3 Example Problem code 4 times Problem code 3 ERASURE 1 Push the UP and DOWN shift switches simulta neously for 3 seconds or more while the problem UP code is being displayed i e blinking on the gear position indicator 2 When the erasure is completed the blinking pat tern changes to the erasure confirmation blink 3 Turn the ignition switch OFF DOWN ERASURE CONFIRM...

Страница 489: ...le sensor system Control motor lock 24 20 6 Angle sensor output voltage is out of specified value 24 25 7 ESP shift Up and down switch circuit malfunction 24 27 8 EEPROM malfunction Writing Readout circuit 24 29 9 Voltage converter circuit malfunction 24 30 10 Fail safe relay circuit malfunction 24 30 11 Control motor driver circuit malfunction 24 30 12 CPU Central Processing Unit malfunction 24 3...

Страница 490: ...hat the sys tem is normal When connecting the ECM connector be careful not to enter the dust and dirt into the connector inside PROBLEM CODE 1 IGNITION PULSE GENERATOR SYSTEM 1 Ignition Pulse Generator Connection Inspection Check for loose or poor contact on the ECM 21P ECM 21P BLACK CONNECTOR Black connector 05 06 shown Check for loose or poor contact on the alternator 5P NATURAL CONNECTOR 5P Nat...

Страница 491: ... Peak Voltage Inspection Inspect the ignition pulse generator peak voltage ECM 21P BLACK CONNECTOR page 20 5 Viewed from the terminal side Connection Blue yellow Ground Standard 0 7 V minimum Is the voltage as specified NO Inspect the ignition pulse generator page 11 9 Bu Y YES GO TO STEP 5 PEAK VOLTAGE ADAPTOR 5 System Failure Reproduction Connect all connectors GEAR POSITION INDICATOR Test ride ...

Страница 492: ...centrifugal clutch page 10 9 YES GO TO STEP 2 2 Speedometer Indication Inspection Check the indication of the speedometer when driving at a low speed Is the indication accurate NO Perform the troubleshooting of meter speed sensor page 22 13 YES GO TO STEP 3 3 VSS Connection Inspection Check for loose or poor contact on the ECM 21P ECM 21P GRAY CONNECTOR Gray connector 05 06 shown Check for loose o...

Страница 493: ...ity NO Open circuit in the Pink green wire P G between the ECM connector and rear VSS connector YES GO TO STEP 6 REAR VSS P G CONNECTOR Viewed from the terminal side 6 Rear VSS Line Short Circuit Inspection Check the Pink green wire for continuity Be careful not between the ECM 21P Gray connector terminal to bend the and ground connector Check the Pink wire for continuity between the terminals rea...

Страница 494: ... or more at over 7 mph of vehicle speed Is problem code 2 indicated NO No problem Temporary failure Erase the problem code page 24 9 YES Faulty ECM After replacement per form initial setting procedure page 24 6 PROBLEM CODE 3 GEAR POSITION SWITCH SYSTEM 1 Gear Position Switch Connection Inspection Check for loose or poor contact on the ECM 21P ECM 21P GRAY CONNECTOR Gray connector 05 06 shown Chec...

Страница 495: ...for continuity between each terminal of the switch side 4P connector and ground D WIRE OLOR GEAR C Lb W Lg R Gr GND P OSITION L OW 1 2 3 5 4 RIVE 6 7 1 NEUTRAL R 1 10 11 82 EVERSE W 93 14 15 6 Is there normal continuity NO Faulty gear position switch Open or short circuit in engine sub harness YES Open or short circuit in wire between the ECM and junction box connector Open or short circuit in wir...

Страница 496: ...the TP sensor 3P Black connector YES GO TO STEP 2 3P BLACK CONNECTOR 2 TP Sensor Resistance Inspection 1 Measure the resistance at the TP sensor termi nals of the sensor side Connection Black red Green yellow Is the resistance within 4 0 6 0 kΩ 20 C 68 F NO Faulty TP sensor perform initial setting procedure after replacement page 24 6 YES GO TO STEP 3 3 TP Sensor Resistance Inspection 2 Check that...

Страница 497: ...e voltage within 4 7 5 3 V NO GO TO STEP 6 YES GO TO STEP 7 6 TP Sensor Line Inspection 1 Turn the ignition switch OFF Disconnect the ECM 21P Gray connector and the TP sensor 3P Black connector G Y Bl R Check for continuity at the Black red wire and Green yellow wire between the ECM connector and sensor connector Is there continuity Bl R G Y NO Open in wire between the ECM and TP sensor YES Faulty...

Страница 498: ...acement per form initial setting procedure page 24 6 PROBLEM CODE 5 ANGLE SENSOR SYSTEM MOTOR LOCK 1 Angle Sensor Connection Inspection Check for loose or poor contact on the ECM 21P ECM 5P BLACK CONNECTOR Gray and 5P Black connectors 05 06 shown ECM 21P GRAY CONNECTOR Check for loose or poor contact on the angle sen 3P CONNECTOR sor 3P connector Check for loose or poor contact on the control 2P N...

Страница 499: ...t possible to operate NO GO TO STEP 4 YES No problem Temporary failure Erase the failure code page 24 9 DOWN 4 Control Motor Power Input Line Inspection Turn the ignition switch OFF Disconnect the ECM 5P Black connector Measure the voltage between the wire harness side connector terminal Connection Red yellow Ground Does the battery voltage exist R Y NO Blown control motor fuse 30A Open in wire be...

Страница 500: ...otor YES GO TO STEP 7 O O 7 Control Motor Circuit Inspection Disconnect the control motor 2P Natural con nector Check for continuity between the motor side connector terminals G Is there continuity NO Faulty control motor YES GO TO STEP 8 O 8 Control Motor Inspection Remove the control motor from the crankcase Be extremely page 24 43 careful not to distort or apply any force to the grommet or wate...

Страница 501: ...GEAR Remove the control motor page 24 43 If the ball nut locks up try to rotate the motor shaft joint in the crankcase to move the ball nut The ball nut of the automatic transmission unit can strike the shaft end and lock up This is just a temporary symptom In this case be sure that the motor shaft joint turns smoothly after releasing it and recheck the indicator blinking after erasing the problem...

Страница 502: ...w blue wire between the ECM connector and main harness side angle sensor connector Is there continuity Y Bu NO Open in wire between the ECM and the angle sensor YES GO TO STEP 13 Y Bu 13 Angle Sensor Input Voltage Inspection Turn the ignition switch ON Measure the voltage between the wire harness side connector terminal Connection Black red Green yellow Is the voltage within 4 7 5 3 V NO Faulty EC...

Страница 503: ...CONNECTOR Gray connector 05 06 shown Check for loose or poor contact on the angle sen 3P BLACK CONNECTOR sor 3P Black connector Is there normal condition NO Loose or poor contact on the ECM con nector and the angle sensor connector YES GO TO STEP 2 2 Angle Sensor Resistance Inspection 1 Turn the ignition switch OFF Disconnect the ECM 21P Gray connector Measure the angle sensor resistance at the EC...

Страница 504: ...4 Angle Sensor Line Inspection 2 Disconnect the ECM 21P Gray connector and the angle sensor 3P Black connector Check for continuity on the Yellow blue wire between the ECM connector and main harness side angle sensor connector Is there continuity Y Bu NO Open in wire between the ECM and angle sensor YES GO TO STEP 5 Y Bu 5 Angle Sensor Input Voltage Inspection Measure the voltage between the wire ...

Страница 505: ...ndard resis tance G Y Y Bu No Faulty angle sensor After replace ment perform initial setting procedure page 24 6 YES GO TO STEP 8 8 System Failure Reproduction Install the angle sensor and connect all connec GEAR POSITION INDICATOR tors Turn the ignition switch ON Check the gear position indicator Is the problem code blink indicated NO No problem Temporary failure Erase the failure code page 24 9 ...

Страница 506: ...al NO Loose or poor contact on the ECM 21P Black connector and the handlebar switch 10P Green connector YES GO TO STEP 2 05 06 shown 2 ESP Shift Switch Line Inspection ECM side Check for continuity at the ECM 21P Black con nector terminals in each shift switch position page 24 38 ECM 21P BLACK Is there normal continuity CONNECTOR No GO TO STEP 3 YES GO TO STEP 5 3 ESP Shift Switch Condition Inspec...

Страница 507: ...pen or short circuit in wire between the ECM and the shift switch 05 06 shown 5 System Failure Reproduction Connect all connectors GEAR POSITION INDICATOR Turn the ignition switch ON Check the gear position indicator Is problem code 7 indicated NO No problem Temporary failure Erase the failure code YES Faulty ECM After replacement per form initial setting procedure PROBLEM CODE 8 ECM EEPROM WRITIN...

Страница 508: ...TO STEP 2 2 Retrieval of Problem Code Retrieve the problem code again and check page 24 9 Is a problem code indicated NO Perform the necessary diagnostic trou bleshooting of the output problem code YES Faulty ECM After replacement per form initial setting procedure page 24 6 PROBLEM CODE 11 ECM MOTOR DRIVER CIRCUIT 1 ECM Control Motor Connection Inspection Check for loose or poor contact on the EC...

Страница 509: ...M 5P Black connector Check for continuity between the wire harness side connector terminal and ground Connection Green Ground Is there continuity NO Open in wire between the ECM and G ground YES GO TO STEP 4 4 Control Motor Line Inspection Disconnect the ECM 5P Black connector and the control motor 2P Natural connector Check for continuity on the Green red wire and G R G R the Orange wire between ...

Страница 510: ...ary failure Erase the failure code page 24 9 YES Faulty ECM After replacement per form initial setting procedure page 24 6 PROBLEM CODE 13 MODE SELECT SWITCH SYSTEM D1 D2 AND ESP 1 Mode Select Switch Connection Inspection Check for loose or poor contact on the ECM 21P ECM 21P BLACK CONNECTOR Black connector 05 06 shown Check for loose or poor contact on the mode select switch 4P Black connector 05...

Страница 511: ...O TO STEP 4 3 Mode select Switch Inspection Handlebar switch side Disconnent the 4P Black connector 4P BLACK CONNECTOR Check for continuity at the mode select switch side 4P Black connector in the same manner as the STEP 2 page 24 33 Is there normal continuity NO Faulty mode select switch YES Open or short circuit in wire between the ECM and the mode select switch 4 System Failure Reproduction Con...

Страница 512: ...ESP GO TO STEP 2 2 System Failure Reproduction Turn the ignition switch ON GEAR POSITION INDICATOR Check the gear position indicator Is there the gear position D L N R indication NO Perform troubleshooting of problem code 3 gear position switch system page 24 16 YES Perform troubleshooting of problem code 7 ESP shift switch system page 24 27 PROBLEM NOT DETECTED BY ECM Gear position indicator does...

Страница 513: ...Inspection 1 Check for continuity between each gear position switch wire terminal of the ECM connector and ground WIRE OLOR GEAR C Lb W Lg R Gr GND P OSITION L OW 1 2 3 5 4 DRIVE 6 7 1 NEUTRAL R 1 10 11 82 EVERSE W 93 14 15 6 Is there normal continuity NO GO TO STEP 3 YES GO TO STEP 4 3 Gear Position Switch Line Inspection 2 Check for continuity between each terminal of the switch side 4P connecto...

Страница 514: ...witch Line Inspection Handlebar switch side Check for continuity at the switch side 4P Black connector in the same manner as the STEP 4 05 06 shown page 24 36 Is there continuity NO Faulty mode select switch YES Open or short circuit in wire between the ECM and the mode select switch 4P BLACK CONNECTOR 6 Meter Line Inspection Turn the ignition switch OFF Disconnect the ECM 21P Gray connector com b...

Страница 515: ...tor Check for continuity between each gear position switch wire terminal of the ECM connector and ground There should be continuity only at the terminals that correspond to the gear positions shown below and there should be no continuity at the other terminals You must test each of four wires in each gear posi tion Therefore you need to make 16 tests between each gear position switch wire terminal...

Страница 516: ...tions Mode select switch at ESP Electric Shift Pro gram Gearshift lever Sub transmission in D range Engine is running INSPECTION Turn the ignition switch OFF ECM 21P BLACK CONNECTOR Disconnect the ECM 21P Black connector Check for continuity between the ECM connector terminals in each switch position Continuity should exist between the color coded wires as follows 05 06 shown If the continuity is ...

Страница 517: ...onnect the mode select switch 4P Black connector and perform the 05 06 shown inspection at the 4P Black connector in the same manner as the previous step If the continuity at the ECM is abnormal and con tinuity at the 4P connector is normal check for an open or short circuit or loose or poor connector contact If the both continuities are abnormal replace the mode select switch 4P BLACK CONNECTOR R...

Страница 518: ...n sor and bracket as an assembly TP SENSOR BRACKET ASSEMBLY Install a new O ring onto the carburetor body O RING Install a new TP sensor assembly by aligning the Improper tabs of the sensor with the flat of the shaft as installation can shown cause damage to Install the screws and tighten them the TP sensor Connect the sensor 3P connector Install the removed parts in the reverse order of removal A...

Страница 519: ... parts in the reverse order of A Yellow Black removal B Green Yellow ANGLE SENSOR INSPECTION SENSOR RESISTANCE Turn the ignition switch OFF ANGLE SENSOR Disconnect the angle sensor 3P connector Measure the resistance at the angle sensor 3P con nector Connection Black red Green yellow Standard 1 6 2 4 kΩ 20 C 68 F Clean around the sensor base with compressed air ANGLE SENSOR before removing the ang...

Страница 520: ...vity and be sure that no foreign material is materials dust allowed water oil etc to get into the Align the tabs of the sensor with the flat of the sen clearance between sor joint and set the angle sensor onto the crank the sensor shaft case in the position as shown and sensor joint JOINT SENSOR PRELOAD Turn the sensor clockwise to align the bolt holes in ANGLE SENSOR the sensor bracket with the b...

Страница 521: ...nect the control motor 2P Natural connec tor 05 06 shown Remove the left engine side cover page 10 5 BOLTS Remove the two mounting bolts and control motor CONTROL MOTOR Coat a new O ring with engine oil and install it into the control motor groove O RING Apply molybdenum oil solution to the motor shaft splines and install the control motor into the front crankcase cover by aligning the bolt holes ...

Страница 522: ...1 22 and connect the motor 2P Natural con secure the wires nector with the clamp Install the removed parts in the reverse order of removal 05 06 shown ENGINE CONTROL MODULE ECM REMOVAL INSTALLATION Remove the front fender page 2 11 ECM 21P BLACK CONNECTOR Disconnect the ECM 21P Black 21P Gray and 5P 05 06 shown Black connectors Remove the ECM holder from the stay Installation is in the reverse ord...

Страница 523: ...1HN253 61HN2 1 of 1 3 9 2008 11 32 PM 2005 2008 TRX500 FA FGA 25 WIRING DIAGRAMS After 06 Standard model A CM type 25 6 05 06 Standard model A type CM type 25 3 After 06 Standard model U type 25 7 05 06 Standard model U type 25 4 After 06 GPScape model A CM type 25 8 05 06 GPScape model 25 5 25 25 1 ...

Страница 524: ...rican Honda Motor Co Page 524 of 540 http services honda com ServiceManual SVC_MNL 61HN253 61HN2 1 of 1 3 9 2008 11 32 PM 2005 2008 TRX500 FA FGA WIRING DIAGRAMS 05 06 Standard model A type CM type WIRINGDIAGRAMS 25 3 ...

Страница 525: ...N252 by American Honda Motor Co Page 525 of 540 http services honda com ServiceManual SVC_MNL 61HN253 61HN2 1 of 1 3 9 2008 11 32 PM 2005 2008 TRX500 FA FGA WIRING DIAGRAMS 05 06 Standard model U type 25 4 ...

Страница 526: ... 61HN252 by American Honda Motor Co Page 526 of 540 http services honda com ServiceManual SVC_MNL 61HN253 61HN2 1 of 1 3 9 2008 11 32 PM 2005 2008 TRX500 FA FGA WIRING DIAGRAMS 05 06 GPScape model 25 5 ...

Страница 527: ...2 by American Honda Motor Co Page 527 of 540 http services honda com ServiceManual SVC_MNL 61HN253 61HN2 1 of 1 3 9 2008 11 32 PM 2005 2008 TRX500 FA FGA WIRING DIAGRAMS After 06 Standard model A CM type 25 6 ...

Страница 528: ...252 by American Honda Motor Co Page 528 of 540 http services honda com ServiceManual SVC_MNL 61HN253 61HN2 1 of 1 3 9 2008 11 32 PM 2005 2008 TRX500 FA FGA WIRING DIAGRAMS After 06 Standard model U type 25 7 ...

Страница 529: ...52 by American Honda Motor Co Page 529 of 540 http services honda com ServiceManual SVC_MNL 61HN253 61HN2 1 of 1 3 9 2008 11 32 PM 2005 2008 TRX500 FA FGA WIRING DIAGRAMS After 06 GPScape model A CM type 25 8 ...

Страница 530: ... 61HN252 by American Honda Motor Co Page 530 of 540 http services honda com ServiceManual SVC_MNL 61HN253 61HN2 1 of 1 3 9 2008 11 32 PM 2005 2008 TRX500 FA FGA MEMO ...

Страница 531: ...rviceManual SVC_MNL 61HN253 61HN2 1 of 1 3 9 2008 11 32 PM 2005 2008 TRX500 FA FGA 26 TROUBLESHOOTING ENGINE DOES NOT START OR IS HARD TO POOR PERFORMANCE AT LOW AND IDLE START 26 2 SPEED 26 5 ENGINE LACKS POWER 26 3 POOR PERFORMANCE AT HIGH SPEED 26 6 POOR HANDLING 26 6 26 26 1 ...

Страница 532: ...TEP 3 3 Spark Test Perform spark test Is there weak or no spark YES Faulty spark plug Fouled spark plug Loose or disconnected ignition system wires Broken or shorted spark plug wire Faulty ignition coil Faulty ignition pulse generator Faulty engine stop switch Faulty ignition switch Faulty engine control module ECM NO GO TO STEP 4 4 Engine Starting Condition Start engine by following normal proced...

Страница 533: ...elerate lightly Does the engine speed increase NO Fuel air mixture too rich or lean Clogged air cleaner Restricted fuel flow Clogged muffler Restricted fuel tank breather hose YES GO TO STEP 4 4 Engine Condition Inspection Accelerate or run at high speed Is there knocking YES Worn piston and cylinder Use of poor quality fuel Excessive carbon build up in combustion chamber Ignition timing too advan...

Страница 534: ...ot serviced frequently enough NO GO TO STEP 9 9 Engine Oil Inspection Check oil level and condition Is there correct level and good condition NO Oil level too high Oil level too low Contaminated oil YES GO TO STEP 10 10 lubrication Inspection Remove cylinder head cover and inspect lubrication Is the valve train lubricated properly NO Clogged oil passage Clogged oil orifice YES GO TO STEP 11 11 Ove...

Страница 535: ...e leaking YES Loose carburetor insulator bands Damaged insulator NO GO TO STEP 3 3 Spark Test Perform spark test Is there weak or intermittent spark YES Faulty spark plug Fouled spark plug Loose or disconnected ignition system wires Broken or shorted spark plug wire Faulty ignition coil Faulty ignition pulse generator Faulty engine stop switch Faulty ignition switch Faulty engine control module EC...

Страница 536: ... valve timing correct NO Camshaft not installed properly YES GO TO STEP 4 4 Ignition Timing Inspection Check ignition timing Is the ignition timing correct NO Faulty engine control module ECM Faulty ignition pulse generator YES GO TO STEP 5 5 Valve Spring Inspection Check valve springs Are the valve springs weak YES Faulty valve spring NO Faulty automatic transmission system POOR HANDLING Steering...

Страница 537: ...ARING REPLACEMENT 18 16 CARBURETOR HEATER SWITCH 22 12 FLYWHEEL STARTER CLUTCH 11 12 CARBURETOR INSTALLATION 5 18 FRONT BRAKE CALIPER 16 14 CARBURETOR REMOVAL 5 6 FRONT BRAKE MASTER CYLINDER 16 8 CASE BEARING REPLACEMENT 17 24 FRONT BRAKE SWITCH 22 26 CENTER MUD GUARD 2 7 FRONT CARRIER 2 9 CENTRIFUGAL CLUTCH 10 9 FRONT CARRY PIPE 2 10 CENTRIFUGAL CLUTCH SPECIFICATIONS 1 8 FRONT CRANKCASE COVER 10 ...

Страница 538: ...COVER 12 6 SUB TRANSMISSION GEARSHIFT LINKAGE 12 2 REAR DRIVING MECHANISM SPECIFICATIONS 1 11 SYSTEM DIAGRAM REAR FENDER 2 12 BATTERY CHARGING SYSTEM 19 2 REAR FINAL GEAR CASE OIL AND DIFFERENTIAL ELECTRIC STARTER 21 3 OIL 3 18 IGNITION SYSTEM 20 2 REAR SHOCK ABSORBER 15 6 SELECTABLE 4WD SYSTEM 23 2 TAIL BRAKE LIGHT 22 6 REAR VEHICLE SPEED SENSOR VSS 23 11 T TAILLIGHT 22 7 REAR WHEEL 15 6 TEMPERAT...

Страница 539: ...PERFORMANCE AT LOW AND IDLE VALVE SEAT INSPECTION REFACING 8 13 WATER PUMP 6 12 SPEED 26 5 W WHEELS TIRES 3 25 REAR DRIVING MECHANISM 18 6 WIRING DIAGRAM REAR WHEEL SUSPENSION 15 5 GPScape model 25 5 25 8 SUB TRANSMISSION GEARSHIFT LINKAGE 12 5 VALVE CLEARANCE 3 10 Standard model A type CM type 25 3 25 6 V VALVE GUIDE REPLACEMENT 8 12 Standard model U type 25 4 25 7 27 3 ...

Страница 540: ... 61HN252 by American Honda Motor Co Page 540 of 540 http services honda com ServiceManual SVC_MNL 61HN253 61HN2 1 of 1 3 9 2008 11 34 PM 2005 2008 TRX500 FA FGA MEMO ...

Отзывы: