-8-
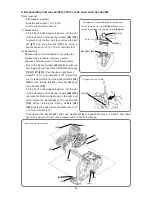
1. Disassembly and reassembly of the cleaner
[Tool required]
• Hex. bar wrench (4 mm)
(1) Disassembly
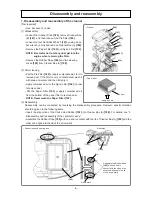
• Loosen the Cleaner Knob
[184]
, remove Cleaner Box
(B)
[187]
, and then take out the Pre Filter
[182]
.
• Loosen the four Set Bolts M5 x 25
[10]
by using a hex.
bar wrench (4 mm) and remove Cleaner Box (A)
[189]
.
• Remove the Paper Filter
[193]
and Nylon Filter
[194]
.
NOTE: Be careful not to let any dust get into the
engine when removing the filter.
• Remove the Rubber Rope
[188]
and two Bearing
Locks
[190]
from Cleaner Box (A)
[189]
.
(2) Filter cleaning
• Pat the Pre Filter
[182]
or apply compressed air to it to
remove dust. If the filter is very contaminated, wash it
with soap and water, and then fully dry it.
• Apply compressed air to the Nylon Filter
[194]
in order
to remove dust.
• Pat the Paper Filter
[193]
or apply compressed air
from the bottom of the paper filter to remove dust.
NOTE: Never wash the Paper Filter [193].
(3) Reassembly
Reassembly can be conducted by reversing the disassembly procedure. However, special attention
should be given to the following items.
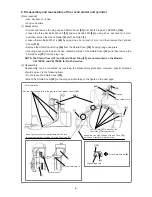
• Insert the slit portion of the Choke Rod Rubber
[192]
into Cleaner Box (A)
[189]
.
For details, see “3.
Disassembly and reassembly of the carburetor ass'y.”
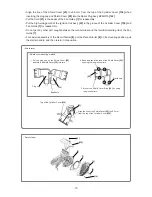
• Assemble the Rubber Rope
[188]
with one end in contact with the rib of Cleaner Box (A)
[189]
and the
other end aligned to the tip of the arrow mark.
Disassembly and reassembly
• Cleaner
[10]
[194]
[182]
[193]
[187]
[189]
[184]
[188]
Bottom
Apply air here.
• Rubber rope and bearing lock
[188]
[189]
[190]
Rear side
Rib
Arrow mark
Assemble the Rubber Rope
[188]
with one end in
contact with the rib and the
other end aligned to the tip
of the arrow mark.
• Paper filter
[189]

