Hidrex DP450 Скачать руководство пользователя страница 11

  Rev. 1.4 / 02-16-2017        

DP450 Tap Water Iontophoresis System User Manual


11 

Installation / Treatment Setup 

The following steps describe how you set up your therapy system for a treatment 
session. Please note that the setup for treating hands or feet is slightly different 
from the setup required for treating hands and feet simultaneously or for treating 
the underarms. 

Setup for Hands and Feet Treatment 

1) 

Place the device on a firm, level surface. Make sure an electrical outlet  is 

within reach.  

2) 

Insert the  AC  adapter cable


into jack 

4

 on the rear  panel and plug the 

adapter into an AC wall outlet.  

3) 

Plug the color-coded connectors of the cable set


into the jacks 

2

 on the 

back panel, to their matching colors. 

4) 

Push the red and black terminals of the cable set

 firmly onto the respec-

tive connectors on the treatment electrodes 

Make absolutely  sure to 

forcefully  push  the  connectors  all  the  way  onto  the  necks  of  the 
treatment electrodes.


5) 

Place  one  treatment  electrode

  in  each  hard  shell  case

1

,  or  in  each 

ergonomic  treatment  tray

,  respectively.  When  using  the  ergonomic 

treatment  trays

,


make sure  the  sloping  rims  point  toward  you  –  this  will 

facilitate hand immersion and increase comfort. 

6) 

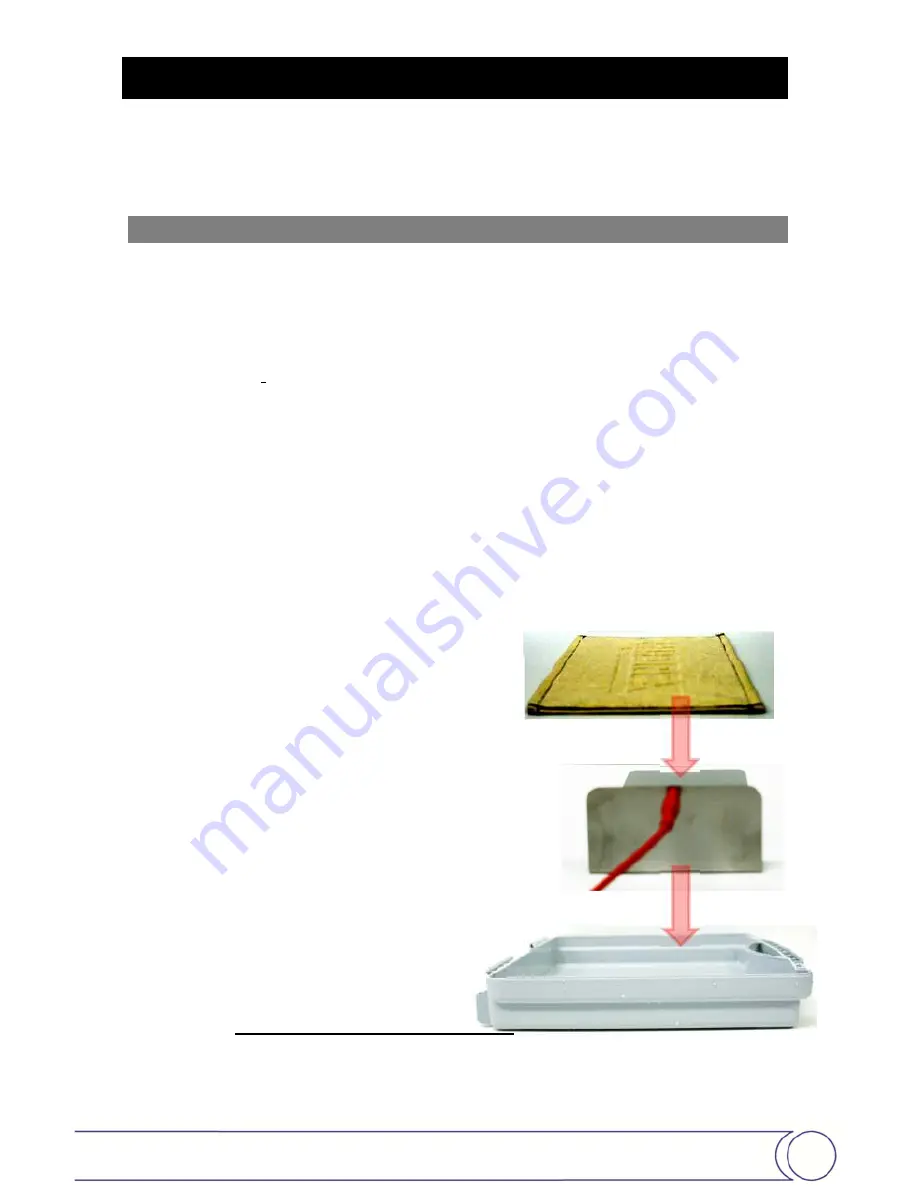
Completely  cover  the  long  part  of  each  treatment  electrode


with  a  tow-

el

7) 

Fill  both  hard  shell  cases  or 
treatment  trays  with  warm 
tap water so that the skin ar-
eas  to  be  treated  can  be 
easily  immersed.  (It  is  rec-
ommended  to  fill  the  trays 
with  just  enough  water  to 
treat the skin areas requiring 
treatment so that you get the 
most efficient treatment pos-
sible.    Filling  any  higher  is 
unnecessary and may result 
in  a  slightly  less  efficient 
treatment.)


1


The two basins of the case can easily be separated by pushing the left side away from you while 

pulling the right side toward you. The case must be completely open (lying flat) before attempting to 
separate the sides.


case tray


towel


electrode


Содержание DP450

Страница 1: ...DP450 Tap Water Iontophoresis TWI System User Manual Included and optional accessories not shown...

Страница 2: ...llation Treatment Setup 11 SetupforHandsandFeetTreatment 11 SetupforAxillary Armpits Treatment 12 Conducting Treatments 12 PrimaryParameterSetup SetupMode 13 BeginTreatment ProgrammingMode 15 Importan...

Страница 3: ...therwise come in contact with the water source trays or pads Keeping such accessories on would lead to localized minor elec trical burns that are secondary to increased current densities Avoid applica...

Страница 4: ...est brain or sinuses Patients with suspected or diagnosed heart problems or epilepsy Side Effects Possible side effects or results of using this device include Mild dysesthesia tingling or burning Sho...

Страница 5: ...laundry instructions on the tag Intended Use Mechanism of Action Intended Use This tap water iontophoresis device is intended to treat hyperhidrosis 1 excessive sweating affecting hands feet and under...

Страница 6: ...that is attached to the black positive cable It is recommended to conduct all treatments in the initial treatment phase Phase 1 without changing polarity until one side reaches an acceptable dryness...

Страница 7: ...ient method of tap water iontophoresis treatment available Due to user comfort preferences this device gives the user the option to choose PC as an alternative Pulsed Current PC In PC the current alte...

Страница 8: ...s explained in the following sections Standard Accessories Optional Accessories Ergonomic treatment trays Axillary Treatment Kit 1 1 Axillary Treatment Kit includes a pair of small electrodes AX elect...

Страница 9: ...Iontophoresis System User Manual 9 Control UnitSide Rear Panel Elements 1 Control unit main ON OFF switch main power switch 2 Jacks for connecting the cable set to the treatment electrodes 4 Connector...

Страница 10: ...type of current pulsed or direct Programming Mode Decrease time Programming Mode Increase time Setup Mode Select Profile Indicates Profile preset has been selected Indicates Pulsed Current has been se...

Страница 11: ...sure to forcefully push the connectors all the way onto the necks of the treatment electrodes 5 Place one treatment electrode in each hard shell case1 or in each ergonomic treatment tray respectively...

Страница 12: ...to re soak the axillary pads Conducting Treatments For your comfort please observe the following two instructions before you begin a treatment session 1 BEFORE you start a treatment session and close...

Страница 13: ...ing Setup Mode and dur ing treatment also Important If no button is pressed within 6 seconds the device will au tomatically switch from Setup Mode to Programming Mode Hint When the device automaticall...

Страница 14: ...in in order to access Setup Mode and alter the above treatment options In the factory your DP450 is pre set as follows Below are some recommendations for initial treatment although most users increase...

Страница 15: ...eatment session you need to check and or set the time and dose treatment parameters 1 Setting treatment parameters If Profile has been selected the device uses the saved treatment parame ters 1 If the...

Страница 16: ...rsion monitoring sys tem recognizes that the circuit is closed the ACTIVE LED lights up to indicate that the treatment is active When treatment is active ACTIVE LED light is ON the actual dose being c...

Страница 17: ...rotection OTP Feature If your skin is dryer than normal 1 the dose cannot be increased protection against over treatment Your HIDREX system automatically checks your specific skin conductance If your...

Страница 18: ...display will show StOP and all LEDs will blink Please turn it off unplug the power supply from the wall and send the device with all electrical accessories back to us if this occurs Please refer to s...

Страница 19: ...evice we recommend the following steps after each use Care after each treatment Wash out towels or axillary pads thoroughly with clean water without addi tion of detergents or cleaning agents Squeeze...

Страница 20: ...ual check of medical device and accessories Protective conductor test in accordance with EN 60601 1 2007 Leakage current test in accordance with EN 60601 1 2007 Operational check of the medical device...

Страница 21: ...rough the following checklist and perform the operational check before you send the device for repair This can save you considerable cost and inconvenience Thank you Error Checklist Please go through...

Страница 22: ...erial for shipping Make sure the device is protected against impact inside the case and that packaging is suitable for shipping Prior to shipping do not forget to clean and dry the system and the acce...

Страница 23: ...s is reusable and not contaminated at end of life complies with WEEE Directive 2012 19 EU Manufacturer Hidrex GmbH Otto Hahn Str 12 Heiligenhaus Germany 42579 info hidrex de www hidrex de CE Mark ID o...

Страница 24: ...close to them 3 If unexpected events occurs remove treated area from the water and turn the powered device OFF 4 Be aware that adding accessories or components or modifying the powered device may make...

Страница 25: ...61000 3 2 Class A Emission of voltage dips flicker following IEC61000 3 3 Compliant Table 2 Electromagnetic Immunity Susceptibility IEC 60601 test level Actual level ESD IEC 61000 4 2 6kV cd 8kV ad 6k...

Страница 26: ...parts in an environmentally acceptable way If the device can no longer be used please dispose of it properly The national ordinances are to be heeded regarding any other parts Appliances that are mark...

Страница 27: ...tment voltage 40 V max Treatment current 30 mA max into a 1 k load Effective treatment current 30 mA max 5 mA reserved for the device Max output power 225 mW Pulsed current output Treatment voltage 40...

Страница 28: ...al Water Surface 112 13 0 26 0 31 Hand Feet Ergonomic Tray individual Water Surface 90 88 0 33 0 38 Hand Feet individual Electrode 122 13 0 24 0 28 Hand Feet individual Cover Towel 98 8 0 30 0 35 Axil...

Отзывы: