n
Tick
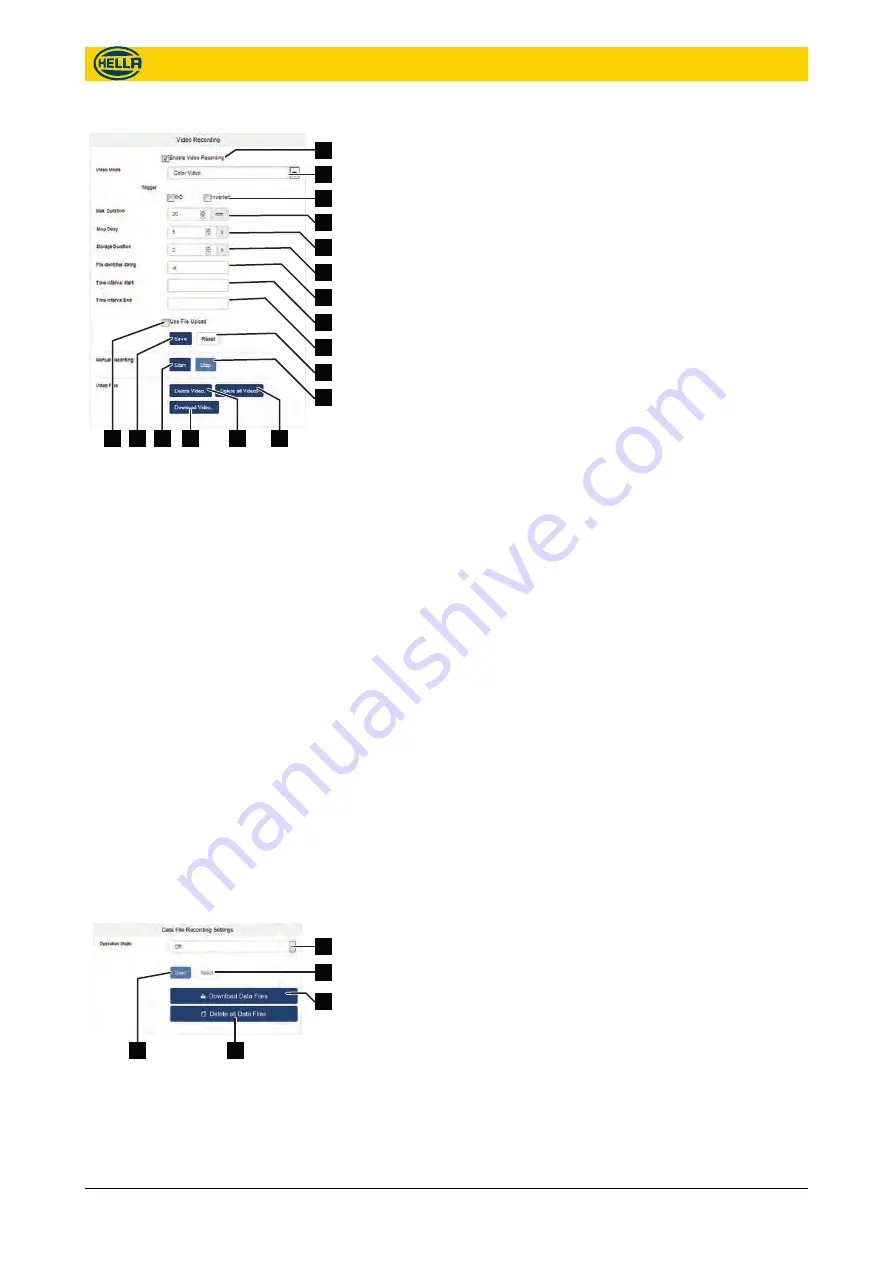
“Enable Video Recording”
checkbox ( Fig. 42/1) for acti-
vation.
n
Choose a
“Video Mode”
( Fig. 42/2) from the drop down list.
n
Tick Trigger checkbox
“In0”
or
“In1”
video recording automatically with trigger signal.
Checkout
“Inverted”
to invert the logic signal of
“In0”
or
“In1”
.
n
Set up a
“Max. Duration”
( Fig. 42/4) in minutes. This duration
sets the maximum video length that the counter will record,
regardless of how long the trigger is enabled for. The value
must be between 3 and 60 min.
n
Set up a
“Stop Delay”
( Fig. 42/5) to continue recording for a
set time after the stop trigger.
n
Set up a
“Storage Duration”
( Fig. 42/6) in hours after which
the video file is automatically deleted from the device. Setting
to zero stores video indefinitely on the counter. If storage
space is full the oldest file is deleted first.
n
Set up a
“File Identifier String”
( Fig. 42/7) to identify the data
files. All files names will start with this identifier.
n
Set up a
“Time Interval Start”
“Time
Interval End”
( Fig. 42/9). It must be entered in the format
YYYY-MM-DDTHH:MM:SS. If defined, videos will only be
recorded within this time period.
n
Tick
“Use File Upload”
checkbox for automatic upload of
completed files. File upload must be activated and defined in
“File Upload Settings” on page 40
n
Click the
“Save”
button ( Fig. 42/16) to save all the settings in
the device.
n
Click the
“Reset”
button ( Fig. 42/10) to go back to previous
settings.
n
Click the
“Start”
button ( Fig. 42/15) to start a manual
recording.
n
Click the
“Stop”
button ( Fig. 42/11) to end the manual
recording.
n
Click
“Delete Videos”
( Fig. 42/13) to delete a specific video
file from the device. Choose the file from the drop down list.
n
Click
“Delete all Videos”
( Fig. 42/12) to delete all video
recordings from the device. By default the oldest file is deleted
automatically if memory is full.
n
Click
“Download Video”
( Fig. 42/14) for immediate download
of a video file from the device to the PC. Choose a file from the
drop down list.
The device can save the counting data to CSV files.
Choose an operation mode ( Fig. 43/1).
1
2
3
4
5
6
7
8
9
10
11
12
13
14
15
16
17
Fig. 42: Video Recording
Data File Recording Settings
1
2
3
4
5
Fig. 43: Data File Recording Settings
Configuration
Data Recording
09.06.2017
39
The reproduction, distribution and utilization of this document as well as the communication of its contents to others
without express authorization is prohibited. Offenders will be held liable for the payment of damages.
All rights reserved in the event of the grant of patent, utility model or design.
Содержание APS-R
Страница 64: ......


