HeartSciences MyoVista  wavECG Скачать руководство пользователя страница 91


82

USER MANUAL   DO-LBL-06035(L)


 | MyoVista® Wavelet ECG (

wav

ECG™) 12-Lead Cardiac Testing Device

Device Settings

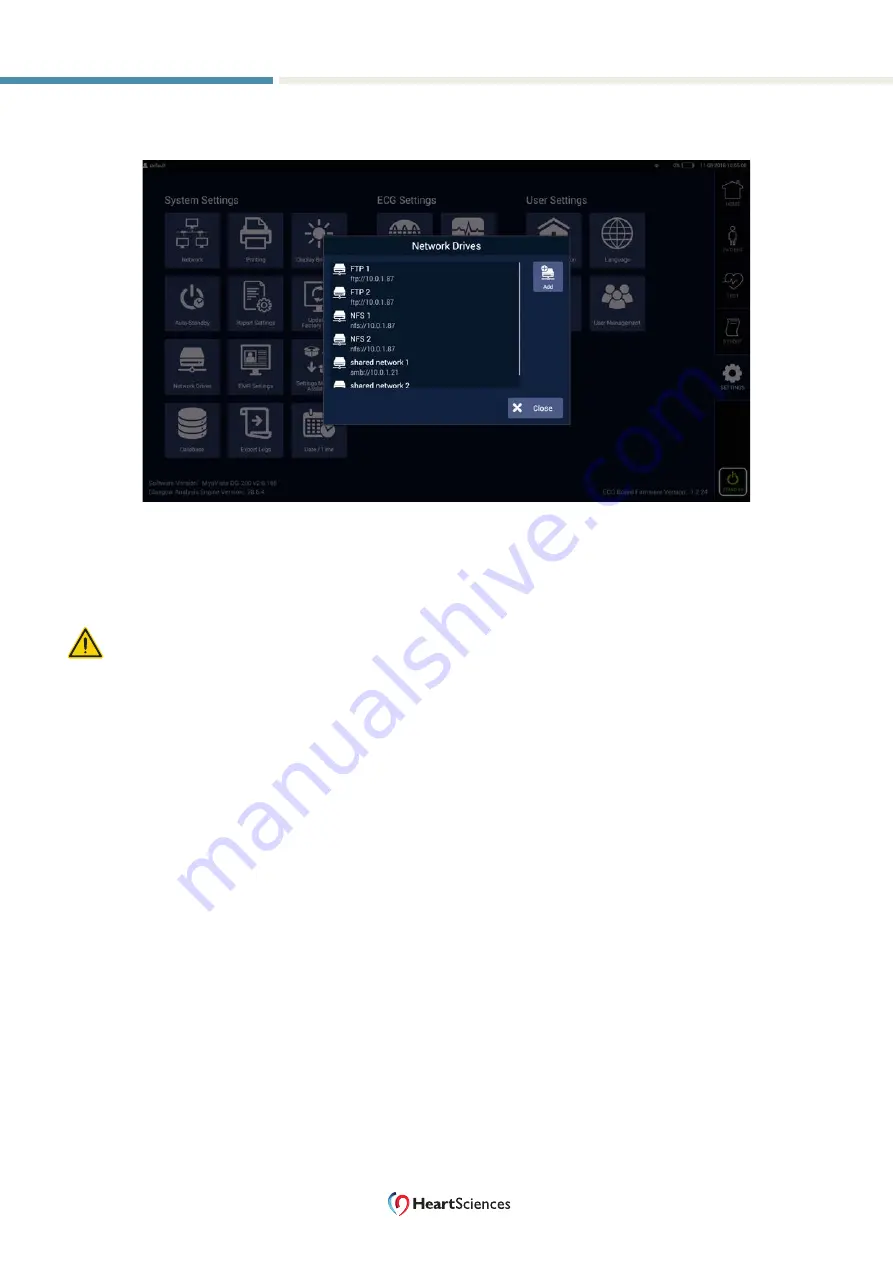
7 .  Select the Browse button, opening the Browse Network Drive dialog, as shown in Figure 5-38 .
 

Figure 5-38. Browse Network Drive Dialog 


8 .  Select the desired folder on the server and select the ‘Select’ button .


9 .  Select the Save button to save the network storage drive .

 Caution: Network drive authentication credentials can expire and cause export failures.

Содержание MyoVista wavECG

Страница 1: ...General Overview 15 MyoVista Operations 28 Patient Testing 36 Device Settings 63 Troubleshooting 99 Service Maintenance and Cleaning 103 MyoVista Wavelet ECG wavECG 12 Lead Cardiac Testing Device User Manual Software Version 2 0 Hardware Version 002 ...

Страница 2: ...FORMATION WITHOUT SPECIFIC LICENSE OR WRITTEN AUTHORIZATION IS STRICTLY FORBIDDEN THE PUBLICATION OF THIS DOCUMENT BY ANATEL IN BRASIL IS PERMITTED WHEN REQUIRED BY ANATEL HEARTSCIENCES AND OR ITS RESPECTIVE SUPPLIERS MAKE NO REPRESENTATIONS ABOUT THE SUITABILITY OF THE INFORMATION CONTAINED IN THIS DOCUMENT AND RELATED GRAPHICS PUBLISHED ALL SUCH DOCUMENTS AND RELATED GRAPHICS ARE PROVIDED AS IS ...

Страница 3: ... Use 2 Contraindications 2 Prescription Device Statement 2 Patient Recommendations 3 Patient Condition and History 3 2 Safety Summary 4 Safety Conventions 5 General Warnings and Cautions 5 Warnings 5 Cautions 6 Electrical Safety 7 Patient Safety 8 Symbols Glossary 9 Labeling 12 Device Identification 13 Device Label Format 13 Serial Number Format 13 Training 14 Medical Device Classification 14 3 Ge...

Страница 4: ...ista Energy Classification 24 System Overview 25 Front Panel 25 Rear Panel 26 Right Side with Patient Cable Port 27 Left Side with USB Ports 27 4 MyoVista Operations 28 Getting Started 29 Unpacking the Device 29 Package Contents 29 Setting up the MyoVista Device 29 System Setup and Operation 30 Setting Up the MyoVista Device 30 Initial Software Configuration 32 Built In Battery 32 Using the Built ...

Страница 5: ... Screen Icons 52 Setting Test Options 52 Running a Test 54 Re syncing the Waveforms 55 Report Screen 56 Displaying the Report Screen 56 Report Screen Icons 57 Printing a Patient Test Report 58 Selecting Pages 59 Report Templates 59 Report Settings 60 Exporting a Test Report 61 Deleting a Test Report 62 6 Device Settings 63 Settings Screen 64 Displaying the Settings Screen 64 Identifying the Curren...

Страница 6: ...rk Drives 80 Configuring Report Settings 83 Settings Migration Assistant 84 Export Device Settings 84 Import Device Settings 86 Export Logs 88 EMR Settings 89 LCD Brightness Settings 90 ECG Filter Settings 90 Configuring Filters 90 ECG Trace Colors 92 User Settings 93 Entering or Modifying the Clinic Information 93 Configuring a Language 94 Configuring the Patient Unit of Measurement 95 User Manag...

Страница 7: ... wavECG Specifications 108 MyoVista Center Post Electrode Specifications 108 ECG Specifications 109 Configuration 111 Data Use 111 Potential Issues with Network Based Printers 111 Potential Issues with Network Storage Mapped Network Drive s 111 EMC Declaration Tables 112 Electromagnetic Emissions 112 Electronic Immunity 112 Recommended Separation Distances 113 Appendix B Error Messages 114 Appendi...

Страница 8: ... and training Audience The MyoVista Device is intended for trained medical professionals who use maintain clean and troubleshoot the system All are expected to have a working knowledge of medical procedures and terminology required for evaluating cardiac patients MyoVista wavECG Information and the Glasgow Interpretive Analysis are intended to be used with other relevant patient information and in...

Страница 9: ...port heartsciences com Electronic Manual This document sets out original instructions from the manufacturer To print this manual completely or in part download the desired PDF files which can be found on the USB storage media provided within MyoVista ship container Follow standard print procedures Note The User Manual cannot be printed directly from the MyoVista Device We suggest you print a singl...

Страница 10: ...ction This chapter introduces the MyoVista wavECG Device Topics Intended Use 2 Indications for Use 2 Contraindications 2 Prescription Device Statement 2 Patient Recommendations 3 Patient Condition and History 3 ...

Страница 11: ... of the QRS P and T wave MyoVista wavelet signal processed information is used to identify patients at risk for LV diastolic dysfunction as an indicator of heart disease which may require further anatomical testing The interpretations offered by the device are significant only when reviewed by a licensed trained medical professional and considered in conjunction with all other relevant patient cli...

Страница 12: ...lis dobutamine amildarone and narcotics Prior to testing review the patient s history of health issues and medications 1 Silvio Buscemi Alessandro Mattina Maria Rosaria Tranchina Salvatore Verga Acute Effects of Coffee on QT Interval in Healthy Subjects Nutr J 2011 10 15 Published online 2011 Feb 2 doi 10 1186 1475 2891 10 15 PMCID PMC3038145 2 Gepner AD Piper ME Leal MA Asthana A Fiore MC Baker T...

Страница 13: ...s chapter provides information about the safe use and regulatory compliance of the MyoVista wavECG Device You should be familiar with this information and understand all instructions before using the device Topics Safety Conventions 5 General Warnings and Cautions 5 Electrical Safety 7 Patient Safety 8 Symbols Glossary 9 Labeling 12 Device Identification 13 Training 14 Medical Device Classificatio...

Страница 14: ...perators under the direct supervision of a licensed healthcare practitioner Warning DANGER OF ELECTRIC SHOCK Do not open the device case Only personnel authorized by the manufacturer may service the device open the enclosure or open the battery compartment Warning DANGER OF ELECTRIC SHOCK THERE ARE NO USER SERVICEABLE PARTS IN THIS DEVICE The battery is not user serviceable Warning DANGER OF ELECT...

Страница 15: ...unt interface on the back panel be careful to check the adequacy of the surface for example the cart wall or shelf to which the device will be attached The VESA mount and surface should be able to support 8 kg 17 6 lbs Caution When setting up be careful to place the device in a stable location away from the edge of tables or carts Avoid entangling the cables with the patient or the operator Cautio...

Страница 16: ...ng used the device should operate ONLY on battery power when running a test using the AC power ONLY to maintain battery charging or non test use Caution At the end of its service life the device and its accessories must be disposed of in compliance with the local governmental guidelines regulating the disposal of medical devices Caution When the low battery warning is displayed the user should com...

Страница 17: ...f product misuse and potentially adverse effects in patients with abnormal conditions Warning Do not use the device beyond the safe limits of environmental conditions of temperature and humidity see Environmental Specifications on page 108 Warning Magnetic field If this device is used in the presence of magnetic resonance imaging MRI the picture resolution of the MRI may be affected This environme...

Страница 18: ...information to be supplied Part 1 General requirements and or IEC TIR 60878 2015 Graphical symbols for electrical equipment in medical practice and or IEC 60417 2002 DB Graphical symbols for use on equipment Colored symbols indicate there might be a danger warning or mandatory action Black symbols provide additional information or might indicate a caution Table 2 1 Symbols and Icons on the Device ...

Страница 19: ...filling and charge indicator Device is connected to a wired network Device is connected to a wireless Wi Fi network Standby icon LED is illuminated when device is in standby mode LED also indicates power source and charge level Center negative symbol Indicates output plug tip center is Negative and output plug barrel ring is Positive IEC 60417 2002 5926 Symbol for electrical and electronics device...

Страница 20: ...gle use only ISO 15223 1 2016 5 4 2 European Community authorized representative ISO 15223 1 2016 5 1 2 Serial number ISO 15223 1 2016 5 1 7 Catalog number ISO 15223 1 2016 5 1 6 Meets FCC requirements USA only for use by or on the order of a physician Conforms with applicable EU directives Contains silver silver chloride Latex free Not made with natural rubber latex ...

Страница 21: ...ng Table 2 2 Labels on the Device and Its Packaging Label Location Description Rear of Device Identifies symbols ports and connectors See Symbols on page 9 Bottom of device Identifies the ETL classification number and conformance to applicable 60601 based safety standards Battery compartment Identifies that the unit is not serviceable by user The battery is not a user serviceable part For all serv...

Страница 22: ...l legend in Figure 2 1 and Table 2 3 describes the label component Figure 2 1 Device Label Table 2 3 Device Label Component Descriptions Symbol Description A Manufacturer B Country of origin C UDI bar code D Device serial number E Device part number F Date of manufacture in YYYY MM DD format Serial Number Format Each device has a serial number that uniquely identifies the device and provides impor...

Страница 23: ... IEC 60601 1 2005 R 2012 Category Classification Protection against electric shock Class I externally powered ME equipment Internally powered ME equipment Degree of protection against electrical shock Defibrillation Proof Type CF Applied Part Protection against harmful ingress of water or particulate matter The device is classified IP00 non protected for harmful ingress of particulate matter and w...

Страница 24: ...nd capabilities of the MyoVista wavECG Device It also provides an overview of system elements including MyoVista wavECG Information Topics Conventional 12 Lead ECG Waveform 16 Glasgow Interpretive Analysis 16 MyoVista wavECG Information 17 System Overview 25 ...

Страница 25: ...l processes that affect cardiovascular function The MyoVista wavECG Device was developed to include conventional ECG data and MyoVista wavECG Information and Analysis Conventional 12 Lead ECG Waveform The MyoVista Device provides conventional 12 lead ECG waveforms These waveforms represent the overall direction and magnitude of the heart s electrical potential during the cardiac cycle by measuring...

Страница 26: ... in five forms A MyoVista Energy Waveform B MyoVista Summary Statement and Indicators C MyoVista Wavelet Analysis Algorithms and Statements D MyoVista Ventricular Indices E MyoVista Energy Classification Figure 3 0 MyoVista Device Display Screen The following section provides a high level overview of MyoVista wavECG Information Note The MyoVista Wavelet Analysis is independent of Glasgow Interpret...

Страница 27: ...te or Low Detailed information on the MyoVista wavECG Information is described below MyoVista Energy Waveform Figure 3 1 Shows an example of the MyoVista Energy Waveform after signal processing using Continuous wavelet transform and its relationship to the QRST Q R S and T waves complex Figure 3 1 MyoVista Energy Waveform The color scaling provides a non linear mapping of energy from 0 to 100 whic...

Страница 28: ...lic dysfunction a classification of Normal is displayed see Figure 3 2 This occurs when no abnormalities associated with MyoVista Measures Analysis and Algorithms are identified Note This is not a rule out measure but rather a measure representing a lower risk of relaxation abnormalities associated with LV diastolic dysfunction when compared to clinical study patients whose categorizations are Bor...

Страница 29: ...Statements The MyoVista Wavelet Analysis Algorithms and Statements provide the results of the Wavelet Analysis with inputs from the MyoVista Energy Classification and MyoVista Ventricular Indices as well as other conventional measures such as T Axis sex and age and provides statements that can be used to assist in determining the relative risk of a patient having a relaxation abnormalities associa...

Страница 30: ...aset that was independent from the development dataset see Appendix E Table 3 1 MyoVista Repolarization Measures Algorithm Statement Sex Relative Risk Borderline Repolarization Measure compared to Categorization of Normal Men 4 0X Women 2 0X Abnormal Repolarization Measure compared to Categorization of Normal Men 5 0X Women 2 7X For example a patient in this category would have a greater than 170 ...

Страница 31: ...ge of energy in relation to the peak energy detected during the cardiac cycle usually close to or at an R Wave peak There are four Index values provided as well as numeric comparisons differences and ratios for these four measurements The right ventricle indices are an average of V1 and V2 leads and the left ventricle indices are an average of V4 V5 and V6 leads Figure 3 6 shows an example of a My...

Страница 32: ...ure 3 7 Figure 3 7 Table 3 4 Provides the relative risk calculations for a patient having relaxation abnormalities associated with LV diastolic dysfunction Table 3 4 Sex Rule MyoVista Wavelet Analysis Statement Relative Risk Men and Women VIEM RV 20 Abnormal VIEM RV 20 1 4X Men and Women VILM RV 17 Abnormal VILM RV 17 1 3X Women VIEM LV 22 Abnormal VIEM LV 22 1 5X Women VILM LV 21 Abnormal VILM LV...

Страница 33: ...nd reports this information in a simplified category of either High Moderate or Low see Figure 3 8 The overall calculation performs a complex set of transformations as well as applying a variety of heuristic rules to formulate a final classification of High Moderate or Low The MyoVista Energy Classifications primarily use wavECG Measures but also make adjustments for other factors such as sex and ...

Страница 34: ...em Overview This section provides an overview of the MyoVista Device panels and controls Front Panel Figure 3 9 MyoVista Device Front Panel Table 3 7 Front Panel Legend Callout Description A Touchscreen LCD display B Home button C Patient button D Test button E Report button F Standby button and LED B C D E F A ...

Страница 35: ...l Legend Callout Description A Kensington security slot B HDMI port C Two USB ports D Ethernet port E Power adapter connector F Power Switch G Adjustable stand Note A USB storage media uniquely identifies storage media inserted into the top port named as USB1 and the bottom port named as USB2 Only FAT32 and NTFS file formats are supported on USB storage devices B C D E F G A ...

Страница 36: ... 12 Right Panel Legend Callout Description A 15 pin patient cable port Left Side with USB Ports Figure 3 9 Shows the left side of the device Callouts A and B identify the two USB ports for connecting a USB storage media or peripheral device Note A USB storage media inserted into one of the side ports in Figure 3 12 will be shown as follows port A USB3 and port B USB4 Figure 3 12 Left Side of the M...

Страница 37: ...4 MyoVista Operations This chapter describes the operations you can perform using the MyoVista wavECG Device Topics Getting Started 29 System Setup and Operation 30 Operating Environment 35 ...

Страница 38: ...plug MV CABLE 1 EA AHA MyoVista Patient Cable 10 leads AHA MV CABLE 1 EA IEC MyoVista Patient Cable 10 leads IEC MV USBLT 1 EA USB Drive w Product Literature MV ELTRD 25 BX Electrodes Box of 25 packs 10 ea per pack MV CBLMGT 09 001 Cable Management Kit DO LBL 06111 Quick Start Instructions Insert MV USBLT 1 EA will be attached to this insert Power cord configurations and ratings vary by geographic...

Страница 39: ...er adapter to the receptacle on the device as shown in Figure 4 1 3 Plug the power cord into an AC outlet 4 Use Power Switch to power on device and begin charge process 5 Allow battery to charge for 8 hours or until screen indicator shows 100 before initial use Device must be plugged in and turned on in order to charge Note To avoid personal injury store the power cable properly when not in use Th...

Страница 40: ...ent Cable with the 15 pin port on the side of the MyoVista Device Ensure the orientation of the cable snout pins and shroud matches the orientation of the receiving port on the MyoVista Device Insert the MyoVista Patient Cable into the 15 pin port on the side of the MyoVista Device If it does not plug in easily check the orientation of the connector on the cable and the MyoVista Device Forcing the...

Страница 41: ...igned to attenuate frequencies above the selected frequency While these filter settings have little to no impact on the conventional 12 lead ECG recording and the Glasgow Interpretive Analysis MyoVista wavECG Information are quite sensitive and depend on processing the composite myocyte activity that is present in the ECG signal to reliably perform computations required for MyoVista Information He...

Страница 42: ...t charge to perform a test battery is partially charged and should be charged and or switched to AC power Device is operating on battery power battery is close to depletion and must be charged and or switched to AC power Table 4 3 Standby Button Power Indicator Standby battery status Description Solid green Device is operating on AC power and or is charging Blinking green Device is operating on ba...

Страница 43: ...ilable Monitoring the Battery Monitor the battery gauge on the status bar of the device If the battery begins to deplete at a faster rate than usual it may be time to replace the battery Contact an authorized representative for service Maximizing the Battery Life Use Use device on AC power unless it is being transported or used briefly in a location where an AC power outlet is not readily availabl...

Страница 44: ...ses accurately The power adapter should not share an AC outlet with any other device Avoid placing the MyoVista Device next to any other powered device see page 113 For optimal performance do not operate the MyoVista Device close to wireless transmission devices or powered ultrasound equipment The power socket must be grounded Note For hazards related to environmental conditions see the warnings a...

Страница 45: ...form patient testing procedures using the MyoVista wavECG Device Topics Patient Recommendations 37 Patient Condition and History 37 Electrode Placement 37 Connecting Leads to Electrodes 41 Home Screen 42 Patient Screen 45 Test Screen 51 Report Screen 56 ...

Страница 46: ...lacement can cause misinterpretation of an ECG and result in the wrong diagnosis delaying or prompting poor treatment recommendations that could be harmful to the patient Some of the most common lead placement mistakes are 1 limb lead reversal and 2 Incorrect lead placement Special attention must be given to placing leads at the correct anatomical landmarks while recognizing other soft tissue cons...

Страница 47: ... Lead Cardiac Testing Device Patient Testing Electrode Placement The following figures show various ECG electrode placement guidance Figure 5 1 AHA Diagnostics ECG Electrode Chest and Appendages Placement Figure 5 2 AHA Diagnostics ECG Electrode Chest Placement ...

Страница 48: ...O LBL 06035 L MyoVista Wavelet ECG wavECG 12 Lead Cardiac Testing Device Patient Testing Figure 5 3 IEC Diagnostics ECG Electrode Chest and Appendages Placement Figure 5 4 IEC Diagnostics ECG Electrode Chest Placement ...

Страница 49: ...he sternum Blue V5 Level with V4 at left anterior axillary line Orange V6 Level with V5 at left midaxillary line directly under the midpoint of the armpit Violet Table 5 2 IEC Electrode Identification System Electrode ID Color Code Limb Leads RA Right Arm Red LA Left Arm Yellow RL Right Leg Black LL Left Leg Green Precordial Leads C1 4th intercostal space to the right of the sternum Red C2 4th int...

Страница 50: ...e leads to the electrodes 1 To attach the MyoVista Patient Cable to the HeartSciences MyoVista Center Post Electrodes find the peg on the end of the grabber 2 Align the grabber peg with the center hole of the MyoVista Center Post Electrodes 3 Squeeze to open the claws of the grabber 4 Place the peg in the center post and then release the grabber Ensure the connection is secure ...

Страница 51: ...uthenticate Table 5 3 Describes the icons in the right toolbar and the Reference Materials icons with their active links Table 5 3 Home Screen Legend Icon Icon Name Description Home Returns you to the Home screen from any other screen Patient Opens the patient screen Test Opens the Test screen Report Opens the Report screen Settings Opens the Settings screen Standby Places device in Standby mode a...

Страница 52: ... Opens the Electrode Placement AHA Diagram on the Home screen Electrode Placement IEC Opens the Electrode Placement IEC Diagram on the Home screen Common Icons Table 5 4 Describes frequently used icons Table 5 4 Common Icons Icon Description Saves the current screen information Cancels the operation and closes the screen without saving new information Closes the screen Continues the current operat...

Страница 53: ...ce USB port Figure 5 6 Touchscreen Keyboard Table 5 5 Touchscreen Keyboard Legend Callout Description 1 Backspace Deletion key 2 Enter key 3 Up Down Right Left arrow keys 4 Forward Deletion key 5 Shift Caps Lock key Select this key one time to activate Shift only one typed capital character or two times to activate Caps Lock All typed characters are capitalized until turned off by selecting the ke...

Страница 54: ...via barcode reader See Scanning a Patient ID via Barcode Reader on page 49 Edit a patient record See Editing Patient Information on page 50 Delete a patient record See Deleting a Patient Record on page 50 Displaying the Patient Screen To display the Patient screen Figure 5 7 From the tool bar on the right select the Patient icon OR Below the screen select the Patient hard button Note There may be ...

Страница 55: ...ation is enabled Caution If User Authentication is disabled it is possible to delete patient records Patient Search Searches for a patient record based on selected criteria See page 48 Scan Opens barcode scanner prompt dialog See page 49 Adding a New Patient To add a new patient 1 Select the New Patient icon The New Patient screen appears Figure 5 8 Figure 5 8 New Patient Screen Caution A Patient ...

Страница 56: ... of Birth Enter the patient s date of birth This field is required Age Age of the patient The software calculates this value automatically Height Enter the height of the patient This field is required To change between imperial and metric units go to the Settings screen Weight Enter the weight of the patient This field is required To change between imperial and metric units go to the Settings scre...

Страница 57: ...hrough the patient database to find a patient record To select a patient record press or select anywhere on the patient entry Note that the newest entered patient details are always at the bottom of the list Note Using a Barcode Scanner at any time will select the patient if a matching patient record exists on the MyoVista Device Searching for a Patient Record To search for a patient record 1 On t...

Страница 58: ...ssage appears No records found 5 Select the OK icon to return to the Patient screen Figure 5 11 Patient Selected Screen Scanning a Patient ID via Barcode Reader A user may scan a Patient ID barcode 1D or 2D only from any screen If the Patient ID is found in the patient database the device will navigate to the Patient screen and select the scanned patient record If the Patient ID is not found in th...

Страница 59: ...Notes 4 Select the Save icon to save the changes or select Cancel icon to discard them Deleting a Patient Record The following procedure describes how to delete a patient record Note When you delete a patient record all the records associated with the patient including test results are removed from the device Note This is an administrator only function if User Authentication is enabled Caution Whe...

Страница 60: ...orms on page 55 Note To access the Test screen you must first select a patient record The device prompts you to select a patient before performing a test Displaying the Test Screen To display the Test screen Figure 5 13 From the screen menu on the right side select the TEST icon OR Below the screen press the Test button Figure 5 13 Test Screen Note We recommend enabling an A C line frequency filte...

Страница 61: ...rt Test Starts a test See page 55 Stop Test Stops a test this icon appears after a test starts See page 55 Test Countdown Displays a countdown timer for test completion Re Sync Re syncs waveforms See page 55 Re Sync Countdown Time Shows a countdown timer until waveforms are re synced Setting Test Options To set test parameters 1 On the Test screen select the Test Options Icon The Test Options scre...

Страница 62: ... be reset using the Revert button to reset Report Options as below Gain All leads 1x Chart Speed 25mm s 2 Under Test Time Setup select a test duration 20s 30s or 60s 3 Ifnecessary underMyoelectricityInterface selectanoption 25Hz 35Hz 45Hz 75Hz 100Hz orDisable Caution The Myoelectricity Interface filter may impact the test results of the MyoVista wavECG calculations We do not recommend using a filt...

Страница 63: ...a algorithms and must be confirmed as accurate before running the test Be sure there is sufficient battery power to complete test Greater than 20 remaining battery is recommended Check the adequacy of ECG waveforms prior to running a test Perform any necessary corrections to resolve any noise or other problems with the input signal At any point during testing the MyoVista Device warns if the cable...

Страница 64: ...lasgow Analysis Report If present attempt to resolve the issue and retest the patient Figure 5 16 Test Screen 2 To stop a test a Press the Stop Test icon The following message appears The test results were not saved Select the OK icon to continue b Select the OK icon to cancel the test and discard the collected data Note Be sure to put the device in standby mode when testing is complete Re syncing...

Страница 65: ...wing a report Note The primary data source for a patient s test report is a Portable Document Format PDF file or printed report The ECG trace and MyoVista Energy Waveforms in reports are interactive To view Other time segments scroll through the report by swiping horizontally across the device surface on the appropriate leads data Waveform data from other leads swipe vertically across the device s...

Страница 66: ...5 8 Describes the icons on the Report screen Table 5 8 Icons on the Report screen Icon Icon Name Description Print Prints a patient test report See page 58 Export Report Exports a patient test report See page 61 Delete Deletes a patient test report See page 62 Note This is an Administrator only function if User Authentication is enabled See User Management ...

Страница 67: ...con The Print Preview Settings screen appears Figure 5 18 Print Preview Settings Screen 2 Select Report Options see page 60 The Report Settings screen appears Note If you change print settings from this screen the changes apply to the current report only and are not saved If you print a new report reconfigure the print settings for the new report as needed or change the global defaults from the se...

Страница 68: ...contains the Summary Report as page 1 followed by a traditional 4x3 12 lead trace view with a configurable reference trace Section 1 Summary Report Section 2 4x3 12 lead trace 3 Standard 12x1 Report This report contains the Summary Report as page 1 followed by a traditional 12x1 12 lead trace view Section 1 Summary Report Section 2 12x1 12 lead trace 4 Detailed Report This report contains the Summ...

Страница 69: ...or each lead the gain setting is displayed to the left of the waveform Selecting All from the Lead Gain drop down menu activates the All Gain option icon as shown in Figure 5 19 The default option for the Lead Gain setting is x1 1 Select a Gain setting x2 x1 x0 5 or x0 25 2 Under Chart Speed select a setting 5mm s 12 5mm s 25mm s 50mm s or 100mm s Note Default settings can be reset using the Rever...

Страница 70: ...ecognize USB devices connected through a USB hub The MyoVista Device accesses only the first supported partition of a USB storage media s main root directory We recommend you use blank media for all USB functions and avoid using storage media with formatted partitions If multiple USB storage media are connected select one from the drop down menu For information about USB mapping see Rear Panel on ...

Страница 71: ... The Export File s will be set automatically However you can change the selected export formats if desired Note The EMR export option is disabled until the device EMR Configuration Settings are set and authenticated successfully 5 Select Export If the Export completes successfully the following message appears Export completed successfully Deleting a Test Report To delete a test report 1 On the Re...

Страница 72: ...Topics Device Settings 64 Configuring Auto Standby Settings 79 Configuring Network Drives 80 Configuring Report Settings 83 Settings Migration Assistant 84 Export Logs 88 EMR Settings 89 LCD Brightness Settings 90 ECG Filter Settings 90 Configuring Filters 90 ECG Trace Colors 92 User Settings 93 User Management 96 ...

Страница 73: ... 90 User settings See User Settings on page 93 Displaying the Settings Screen To display the Settings screen from the screen menu on the right side select the Settings tab Figure 5 22 Settings Screen Identifying the Current Software and Firmware Versions The MyoVista software version appears at the lower left side of the Settings screen along with the Glasgow Analysis Engine version The ECG board ...

Страница 74: ...on and allows you to configure wireless network settings All Network Drives Configures settings for network connected storage Administrator Printing Configures printer settings All Database Displays database information backs up the current database on external storage media and deletes and restores the database Administrator Report Settings Configures report preferences All Settings Migration Exp...

Страница 75: ...er Settings Language Sets the device language All Clinic Information Used to input clinic information All User Management Configures device authentication settings including users and password management All Patient Units Sets the default displayed measurement units for patient height and weight All When User Authentication is enabled the disable option in Auto Standby is not available Functionali...

Страница 76: ...own in Figure 5 23 Figure 5 23 Date Time Screen 2 Select the appropriate date or time settings field MONTH DAY YEAR HOUR and MINUTE 3 Modify the information using the touchscreen keypad 4 Repeat steps 2 and 3 to modify each field Note After you change the value in a field the device moves to the next field automatically 5 Select AM or PM The keypad displays only the AM and PM keys 6 Select one of ...

Страница 77: ...ized service representatives Note MyoVista Software can only be updated to newer versions Once updated you cannot restore to an older version software Note When updating the MyoVista Software from a previous version of MyoVista Software any previously saved printers will be removed and must be re configured 1 Under System Settings select the Update Factory Reset icon The Update Factory Reset scree...

Страница 78: ...Administrator roles The factory reset function resets device and user settings to their factory default settings and removes all patient data and all instructional reference documents It does not change the MyoVista Device software version During this procedure you have the option to back up the database Warning Do not remove power from the device until the update factory reset process completes T...

Страница 79: ... pop up window with a warning will be displayed warning the user not to remove power from the device until the update factory reset process completes Click on OK 4 The system will start powering down and will go through the reset sequence The device will boot the MyoVista home screen after reset The process takes about 2 minutes Note If needed contact customer service for instructions on how to re...

Страница 80: ...net connection is in use wired network information similar to the following is shown Figure 5 25 Figure 5 25 Wired Network Screen If a wireless Ethernet connection is in use any available wireless network options will be shown in Figure 5 26 Figure 5 26 Wireless Network Screen Connecting to a Wired Network To connect to a wired network plug in an Ethernet cable to the port on the rear panel of the...

Страница 81: ...Enable Wi Fi icon A list of available wireless networks appears as shown in Figure 5 27 Figure 5 27 Network Screen 3 Select a wireless network If the selected network is protected enter the Wi Fi password in the password screen Figure 5 28 and then select the Connect icon The Network screen appears Figure 5 28 Entering a Password 4 Select the Save icon to save the Wi Fi connection settings 5 Selec...

Страница 82: ...red properly See Configuring Network Settings on page 71 To select a printer 1 Under System Settings select the Printing icon The Printing screen appears as shown in Figure 5 29 Figure 5 29 Printing Screen 2 Select a printer or select the Add icon to add a new printer If you select Add the Add Printer screen in Figure 5 30 appears A list of available printers will be shown Figure 5 30 Add Printer ...

Страница 83: ...d then press the Add icon A dialog box confirms that the printer was set up successfully Note If the printer selection fails use the Select Driver function to select a driver manually see Figure 5 31 Select the first driver listed and then press the Add icon If printer setup fails again select other drivers until the printer setup succeeds Figure 5 31 Select Driver Screen ...

Страница 84: ... Up a Database on page 76 Restore the database See Restoring a Database on page 78 Viewing the Current Database Information To view information from the current database 1 Under System Settings select the Database icon The Database Information screen appears as shown in Figure 5 32 Figure 5 32 Database Information Screen The following information appears in the screen Database space size of the da...

Страница 85: ...screen appears as shown in Figure 5 32 2 In the Database Information screen select the Delete icon The following message appears The existing database will be erased Proceed 3 Select Yes icon to delete the database or select No icon to retain it Backing Up a Database 1 Under System Settings select the Database icon The Database Information screen appears as shown in Figure 5 32 2 Connect a USB sto...

Страница 86: ...ackup icon The Backup Database screen appears as shown in Figure 5 33 Note If multiple USB storage media are connected select one from the drop down menu For information about USB mapping see Rear Panel on page 26 Figure 5 33 Backup Database Screen 4 Within the Notes field add an optional note Tip We recommend you add a note in the remark box to help identify the database backup correctly 5 Select...

Страница 87: ...ars as shown in Figure 5 31 2 Connect USB storage media to a USB port on the MyoVista Device Note If multiple USB storage media are connected select one from the drop down menu 3 Select Restore icon The Restore Database screen appears as shown in Figure 5 34 Figure 5 34 Restore Database Screen 4 In the table select the database file to restore Review the information in the Notes column to confirm ...

Страница 88: ...Figure 5 35 Figure 5 35 Auto Standby Screen 2 Select the number of minutes of inactivity that is acceptable before the device enters standby mode 5 minutes 10 minutes 30 minutes or Disable 3 Select the Save icon to save the setting or select Cancel icon to discard it Note To exit Standby mode press the Standby icon or press anywhere on the touchscreen Note The disable option cannot be selected if ...

Страница 89: ...ws SMB NFS or FTP This mapped drive can be used to export test reports and system logs Note other export and restore features still require removable storage devices and do not use mapped network storage locations 1 Under System Settings select the Network Drives icon The Network Drives screen appears 2 Select the Add button opening the Configure Network Drive screen as shown in Figure 5 36 Figure...

Страница 90: ...igure 5 37 Drive Authentication Dialog Note The NFS protocol does not require Authentication Information so no screen will be displayed a For Windows SMB Enter the Domain optional Note If left blank the server s domain will be assumed b Enter the User Name c Enter the Password d Select the Test button to test the drive and authentication settings e Select OK to save the Authentication information ...

Страница 91: ...button opening the Browse Network Drive dialog as shown in Figure 5 38 Figure 5 38 Browse Network Drive Dialog 8 Select the desired folder on the server and select the Select button 9 Select the Save button to save the network storage drive Caution Network drive authentication credentials can expire and cause export failures ...

Страница 92: ...ault report template and leads to be included on the summary page and 4x3 views 1 Under System Settings select the Report Settings icon The Report Settings screen appears as shown in Figure 5 39 Figure 5 39 Report Settings Screen 2 Select the desired Paper Size 3 Select the desired Default Template 4 Select the Top lead for the Summary Page 2 lead View 5 Select the Bottom lead for the Summary Page...

Страница 93: ...onfiguration settings using a attached storage device This feature can be used to quickly replicate a device configuration to a different device s Export Device Settings 1 Under System Settings select the Settings Migration Assistant icon The Settings Migration Assistant screen appears as shown in Figure 5 40 Figure 5 40 Settings Migration Assistant Screen 2 Select the desired settings to Export N...

Страница 94: ... appears as shown in Figure 5 41 Figure 5 41 Export File Screen 5 Select the Disk to export to 6 The system automatically populates the Filename However you can change the Filename 7 Select the Export button Upon successful completion the following message will appear Export Succeeded 8 Select the OK button to dismiss the dialog Caution When exporting login settings make sure there is at least one...

Страница 95: ...1 Under System Settings select the Settings Migration Assistant icon The Settings Migration Assistant screen appears as shown in Figure 5 42 Figure 5 42 Settings Migration Assistant Screen 2 Select the desired settings to Import 3 Select the Import button Note To import Login Settings or Network Drives you must enter the Pass Phrase previously assigned during export ...

Страница 96: ...nd with prf 7 Select the OK button Upon successful completion the following message will appear Import Succeeded 8 Select the OK button to dismiss the dialog Tip If needed export the current device settings backup before importing settings Caution Ensure the correct settings and file are chosen before import Caution Importing Login Settings may put the device in a state that requires login credent...

Страница 97: ...crypted and must be sent to your authorized HeartSciences representative for decryption and diagnosis 1 Under System Settings select the Export Logs icon The Export System Logs screen appears as shown in Figure 5 44 Figure 5 44 Export Logs Screen 2 Select the Disk to export to 3 The system automatically populates the Filename However you can change the Filename 4 Select the Export button Upon succ...

Страница 98: ... interface needs please consider a Mapped Network Drive and file export to your EMR system 1 Under System Settings select the EMR Settings icon The EMR Settings screen appears as shown in Figure 5 45 Figure 5 45 EMR Settings Screen 2 Select the Auth Service button to authorize the device to the EMR interface 3 Complete the EMR Authentication Service entry fields 6 Select the Authenticate button Up...

Страница 99: ... to select the appropriate brightness Adjusting screen brightness may impact battery power run time 3 Select the Save icon to save the setting or select Cancel icon to discard it ECG Filter Settings ECG Settings allows users to configure the filters for the device This section covers the Myoelectricity Interface filters settings described below and ECG Trace Color settings described on page 92 Con...

Страница 100: ...ons required for MyoVista wavECG Information and Measures HeartSciences has determined that for myoelectricity settings of 75Hz or higher there is no significant impact on MyoVista Information For filter settings at frequencies of 45 Hz or below the performance of MyoVista Information may be degraded and it is possible that a patient s test results may be affected When muscle noise is present duri...

Страница 101: ...eep pressing over the desired lead to move through all the colors until you select the desired color The available colors are green blue brown purple yellow white and red 3 Repeat step 2 for each desired lead 4 Move the Grid Brightness slider to the right or left to select the desired grid brightness Note Grid Brightness determines the transparency of the grid lines behind the ECG waveform traces ...

Страница 102: ...inic Information Clinic Information allows users to configure the clinic information to be included in the test reports for the device To enter or modify clinic information 1 Under User Settings select the Clinic Information icon The Clinic Information screen appears as shown in Figure 5 49 Figure 5 49 Clinic Information Screen 2 Enter or modify the following clinic information in the appropriate ...

Страница 103: ...e the language the MyoVista Device reboots 1 Under User Settings select the Language icon The Language screen appears as shown in Figure 5 50 Figure 5 50 Language Screen 2 Select the appropriate language 3 Select the Save icon to save the setting or select Cancel icon to discard it If you select Save the following message appears The MyoVista Device will restart to change the language 4 Select OK ...

Страница 104: ...ers to configure the height and weight units for the device To configure the patient unit of measurement 1 Under User Settings select the Patient Units icon The Patient Units screen appears as shown in Figure 5 51 Figure 5 51 Patient Units Screen 2 For Height select cm or in 3 For Weight select kg or lb 4 Select the Save icon to save the settings or select Cancel icon to discard them ...

Страница 105: ...User Management icon The Login Configuration screen appears as shown in Figure 5 52 Figure 5 52 Login Configuration Screen Note By default the device ships with User Authentication disabled 2 Select the User Authentication button to enable authentication Note Once authentication is enabled make sure to add at least one administrator account Note If an admin account cannot be accessed forgot passwo...

Страница 106: ... appears as shown in Figure 5 53 Figure 5 53 Add User Screen 4 Enter the user Name 5 Enter a unique Username 6 Select the user Type User or Administrator 7 Enter and confirm the user Password 8 Optionally enter a password Hint 9 Select the Save button Note Routinely audit the user accounts and delete unused accounts and employees no longer employed ...

Страница 107: ...nder User Settings select the User Management icon The Edit User screen appears as shown in Figure 5 54 Figure 5 54 Edit Users Screen 2 Enter a new Password 3 Re enter to confirm password 4 Optionally enter an updated password Hint 5 Select the Save button Caution Protect your password to prevent unintended patient information disclosure ...

Страница 108: ...6 Troubleshooting In the event you encounter a problem using the MyoVista wavECG Device use the information in this chapter to identify and resolve the problem Topics Troubleshooting Table 100 ...

Страница 109: ...onnections to electrodes Be sure electrodes have proper skin contact MyoVista Device does not power up Battery is fully discharged and the power adapter is not connected Power cord and supply are not attached Connect the power adapter to the MyoVista Device Connect the power cord and supply power to the MyoVista Device Ensure device Power Switch is in the On position while connected to AC power to...

Страница 110: ...tient skin for electrode attachment attach the electrodes to the patient and attach the leads to the electrodes per the Electrode Placement section of this manual Ensure patient s condition is as described in the Patient Recommendations section of this manual File export unsuccessful The USB storage media is not connected properly to the MyoVista Device USB port Confirm that the USB storage media ...

Страница 111: ...offender Note Sources of EMI may still emit interfering signals when placed in stand by mode Recommendation is that identified sources of EMI are either removed from the testing environment testing environment is moved or devices are fully powered down and unplugged from AC power i Top Offenders ii Ultrasound Machines See Recommended Separation Distances for RF interference guidance on page 113 ii...

Страница 112: ... This chapter covers routine device service maintenance and cleaning procedures for the MyoVista wavECG Device Topics Warnings 104 Service Maintenance 104 Periodic Inspection 106 Battery Maintenance 107 Supplies and Accessories 107 ...

Страница 113: ...device be sure that an authorized representative has provided proper training of device functions and safety precautions If there is any uncertainty about maintenance or cleaning instructions or procedures refer to the supplied maintenance and cleaning instructions The following maintenance instructions do not override any statutory or local regulations or procedures for the prevention of accident...

Страница 114: ...g remove the patient cable and the electrode lead wires from the device 2 To clean the cable wipe with a lightly moistened cloth dampened in a mild soap and water solution 3 To disinfect wipe a cloth dampened with isopropyl alcohol Use the following solutions as recommended in the APIC Guidelines for Selection and Use of Disinfectants 1996 Sodium hypochlorite 5 2 household bleach minimum 1 500 dil...

Страница 115: ...proper performance and safety have the device inspected and tested annually by authorized service personnel Inspection and testing should be performed only by authorized service personnel trained in maintenance of the MyoVista Device Annual Inspection Perform the following safety checks at least every 12 months and record the data per your facilities protocol If the device is not working properly ...

Страница 116: ...ery from the enclosure Monitor the battery performance and have it serviced or replaced by an authorized service technician when necessary See Monitoring the Battery on page 34 Discontinue battery use if battery power appears weak or appears to discharge at a rate faster than expected Follow local ordinances or regulations for disposal Supplies and Accessories Use only genuine HeartSciences dispos...

Страница 117: ...ution 1920 x 1080 dots per inch DPI Controls Touchscreen and membrane key panel Memory Storage Patient Test Records 50 000 Electrical Specifications Specification Description Power Supply Voltage 100 240 VAC 50 60 Hz Power consumption 48 Watts max Battery Operation with built in rechargeable battery Battery new battery with full charge Capacity Approximately 1 hour normal use Approximately 2 hours...

Страница 118: ... F Humidity non condensing Storage 80 RH non condensing ECG Specifications Specification Description ECG Leads Standard 12 simultaneous leads Touchscreen Display Leads 12 channel display of the selected leads selectable amplitude 5 10 20 mm mV Status Filter status on off Insufficient electrode contact Date time Patient demographics Printout Chart print out speed 5 25 50 100 mm s manual print Sensi...

Страница 119: ...fibrillation protection 5 000 VDC Defibrillation recovery time 5 s ECG Durations and isoelectric waves From Glasgow Interpretive Analysis documentation With respect to global QRS duration the Glasgow program measures QRS duration from the global QRS onset to the global QRS termination This means that an isoelectric segment within one particular QRS complex by definition will lead to a shorter QRS ...

Страница 120: ...on USB Though unlikely a report may contain inaccurate data under certain circumstances such as due to electromagnetic interference The TCP IP protocol and Ethernet WLAN transport typically resolve these issues automatically without software or end user action Review and verify all data on printed and exported reports Printing to an unattended or remote group printer can result in an unauthorized ...

Страница 121: ...f floors are covered with synthetic material the relative humidity should be at least 30 Electrical fast transient burst IEC 6100 4 4 2 kV for power supply lines 2 kV for input output lines 2 kV for power supply lines 2 kV for input output lines Mains power quality should be typical of a commercial or hospital environment Surge IEC 61000 4 5 1 kV differential mode 2 kV common mode 1 kV differentia...

Страница 122: ... MyoVista Device is used exceeds the applicable RF compliance level above then the MyoVista Device should be observed to verify normal operation If abnormal performance is observed additional measures may be necessary such as reorienting or relocating the MyoVista Device b Over the frequency range 150 kHz to 80 MHz field strengths should be less than 3 V m c Amplitude modulated at 80 with a modula...

Страница 123: ...e The device connects to a wireless network and the wrong password is entered Select the Close icon and then enter correct password Failed to configure network No storage disk selected A function requiring a USB device is being performed but the device did not find a USB device connected to its USB ports Connect or reconnect a USB drive to one of the USB ports and ensure it is seated properly ...

Страница 124: ...ort at least 8 kg 17 6 lbs Note The MyoVista Device accommodates a 100 mm by 100 mm standard VESA mount The adjustable stand does not have to be removed when using the VESA mount To attach a VESA mount Appendix 1 Locate the four VESA mount holes on the back of the MyoVista Device 3 Align the VESA mount kit with the VESA mount holes and then insert the screws 2 Locate the four screws from the VESA ...

Страница 125: ...ontinuous wavelet transform ECG Electrocardiograph EMR Electronic Medical Record GUI Graphical User Interface HDMI High Definition Multimedia Interface IFU Instructions for Use VIEM Ventricular Index Early Measure for both Left Ventricle and Right Ventricle VILM Ventricular Index Late Measure for both Left Ventricle and Right Ventricle ...

Страница 126: ...physician as part of an overall risk assessment to assist in determining if a patient should receive further testing evaluation and or treatment Clinical data has been generated in prospective non randomized clinical studies conducted at three institutions Subjects were all adults which were either healthy volunteers with no known cardiac disease or at risk symptomatic or asymptomatic subjects who...

Страница 127: ...ontal axis x axis is time and the vertical axis y axis is frequency The frequencies range from 3 Hz at the bottom of the display to 200 Hz at the top using a non linear scale This visual representation is provided to give context for the remainder of the wavelet measures and statements provided by the MyoVista Device MyoVista Summary Statement and Indicators The MyoVista Summary Statement and Indi...

Страница 128: ...lasgow Interpretive Analysis findings Figure E 3 For patients which are identified by the MyoVista Device as having an elevated risk of relaxation abnormalities associated with LV diastolic dysfunction or where a risk assessment is inconclusive a categorization of Borderline is displayed see Figure E 4 In this case additional statements explaining the summary categorization will be provided which ...

Страница 129: ... E 6 Figure E 6 Repolarization Measures Algorithm Statement The Repolarization Measures Algorithm Statement is optimized to correlate to relaxation abnormalities associated with LV diastolic dysfunction and provide the results of applying a series of criteria using clinical study data This criteria includes wavECG Measures such as the MyoVista Energy Classification and the MyoVista Ventricular Ind...

Страница 130: ...with a categorization of Normal HeartSciences recommends using the MyoVista wavECG Information in conjunction with other health related patient information to determine the appropriate clinical pathway and treatment options for each patient Ischemic or Structural Risk assessment statement if applicable If the Repolarization Measures Algorithm Statement is either Borderline or Abnormal then an Isch...

Страница 131: ...ically insignificant measures p value is 0 05 Men Women Possible Ischemic or Structural Abnormality compared to Categorization of Normal Combined 2 92X 95 CI 1 81 4 72 p value 0 0001 Men 4 77X 95 CI 2 05 11 06 p value 0 0003 Women 1 62X 95 CI 0 76 3 47 p value is 0 2155 Probable Ischemic or Structural Abnormality compared to Categorization of Normal Combined 3 89X 95 CI 2 47 6 11 p value 0 0001 Me...

Страница 132: ...nd V2 leads and the left ventricle indices are an average of V4 V5 and V6 leads Figure E 7 Shows an example of a MyoVista Ventricular Indices table Table E 3 Defines each cell in the table including the numeric comparisons differences and ratios for these four index measurements Figure E 7 Table E 3 Index Description VIEM RV Ventricular Indices Early Measure Right Ventricle VILM RV Ventricular Ind...

Страница 133: ...MyoVista Wavelet Analysis Statement Relative Risk n 1027 Men and Women VIEM RV 20 Abnormal VIEM RV 20 1 42X 95 CI 1 16 1 76 p value 0 0009 Men and Women VILM RV 17 Abnormal VILM RV 17 1 33X 95 CI 1 02 1 73 p value 0 0331 Women VIEM LV 22 Abnormal VIEM LV 22 1 48X 95 CI 1 27 1 73 p value 0 0001 Women VILM LV 21 Abnormal VILM LV 21 1 53X 95 CI 1 32 1 77 p value 0 0001 Women VIEM RV VIEM LV 2 5 Abnor...

Страница 134: ...mplified category of either High Moderate or Low see Figure E 9 The overall calculation performs a complex set of transformations as well as applying a variety of heuristic rules to formulate a final classification of High Moderate or Low The MyoVista Energy Classifications primarily use wavECG Measures but also make adjustments for other factors such as sex and age The MyoVista Energy Classificat...

Страница 135: ...etween Licensor and Licensee or otherwise that given the circumstances under which such information is disclosed or provided by Licensor to Licensee would lead a reasonable person to conclude that such information is confidential to Licensor All Confidential Information is the property of Licensor 1 2 Derivative Work means a new or modified work that is based on or derived from a preexisting work ...

Страница 136: ...ve a demonstrable need to know or execute the Licensed Software in order to perform the internal business of Licensee 2 2 Notwithstanding any other statement in this Agreement no right to Source Code and no right to make Derivative Works are granted in this Agreement 2 3 The licenses granted herein are granted on the following conditions 2 3 1 Licensee shall not a use the Licensed Software in a ma...

Страница 137: ...ially in accordance with the applicable Documentation ii it has not inserted any Disabling Code as defined herein into the Licensed Software and iii it will use reasonable commercial efforts consistent with industry standards to scan the Licensed Software for and remove any software viruses before installation into the Product Except as indicated otherwise below HeartSciences warrants that it has ...

Страница 138: ...ES NO INDEMNITY TO LICENSEE 3 4 Licensee Representations Licensee represents and warrants that Licensee has read and understands the description of the Licensed Software as may be included in the Licensed Software or indicated at the address specified by any URL provided for such description 4 Consulting Services 4 1 No consulting or professional services are provided as part of this Agreement 5 C...

Страница 139: ... be entitled without posting bond to seek injunctive and other equitable relief including but not limited to specific performance to prevent a breach continued breach or threatened breach of any confidentiality obligation of this Agreement in addition to any damages that may be awarded to Licensor 6 Limitation of Liability 6 1 LICENSOR SHALL NOT BE RESPONSIBLE OR LIABLE FOR ANY INDIRECT INCIDENTAL...

Страница 140: ...sclose to the Licensee any technical information 9 2 Entire Agreement Amendment Waiver This Agreement together with all exhibits and schedules hereto if any constitute the entire agreement between the parties pertaining to the Licensed Software and supersede all prior agreements understandings negotiations and discussions whether oral or written of the parties This Agreement may not be amended exc...

Страница 141: ...gality or unenforceability shall not affect any other provision of this Agreement or any other such instrument 9 9 Independent Contractors There is no relationship of agency partnership joint venture employment or franchise between the parties Neither party has the authority to bind the other or to incur any obligation on its behalf 9 10 Remedies Cumulative All rights and remedies with respect to ...

Страница 142: ...ences or a HeartSciences authorized representative and any reference herein to you or your means the Purchaser This Limited Warranty gives the Purchaser express limited warranty rights from HeartSciences In addition you may also have other legal rights under applicable local law This Limited Warranty is applicable in all countries and may be enforced in any country or region where HeartSciences or...

Страница 143: ...s EXCEPT FOR THE LIMITED WARRANTY SET FORTH IN THE IMMEDIATELY PRECEDING PARAGRAPH HEARTSCIENCES MAKES NO WARRANTY WHATSOEVER WITH RESPECT TO THE PRODUCTS OR ACCESSORIES INCLUDING ANY A WARRANTY OF MERCHANTABILITY B WARRANTY OF FITNESS FOR A PARTICULAR PURPOSE EVEN IF HEARTSCIENCES HAS BEEN INFORMED OF SUCH PURPOSE C WARRANTY OF DESIGN D WARRANTY OF SATISFACTORY QUALITY OR E WARRANTY AGAINST INFRI...

Страница 144: ...e for any tariffs or duties that may be incurred in transferring the Products or Accessories Transfer of the Products or Accessories may be covered by export controls issued by the United States or other governments HeartSciences may repair or replace Products or Accessories a with new or previously used Products or Accessories or parts equivalent to new in performance and reliability or b with pr...

Страница 145: ... data or programs that is not dependent on the Product Accessory or Electrode under warranty support Notify HeartSciences if you use Product or Accessories in an environment that poses a potential health or safety hazard to HeartSciences employees or subcontractors HeartSciences may require you to maintain such Products or Accessories under HeartSciences supervision and may postpone warranty servi...

Страница 146: ...al number name and model number for the Product Accessory or Electrode Detailed description of the symptoms including when the symptoms first occurred how frequently they are occurring and applicable error messages Detailed description of any changes made to your Product Accessory or Electrode s configuration or network environment prior to the start of the symptoms occurring Detailed description ...

Страница 147: ...view 32 35 Buttons 42 43 C Cancel icon 43 Cautions 5 6 Classification 14 24 Cleaning 104 105 housing 104 patient cable 105 touchscreen 105 Close icon 43 Colors battery LED 33 ECG trace 92 electrodes 40 Connecting electrodes to leads 41 Contents iii Continue icon 43 Continuous wavelet transform viii 116 117 Contraindications 2 Conventions viii 5 document viii safety 5 typographic viii D Database ba...

Страница 148: ... 24 125 Environmental specifications 108 Error messages 114 Ethernet port 26 Export test report 56 61 to PDF icon 61 F Factory default settings 69 79 Factory Reset icon 65 Filters 90 91 icon 66 screen 91 Firmware version 64 Format device label 13 serial number 13 Frequency Interface filters settings 32 91 Front panel of device 25 G Glasgow Interpretative Analysis 16 Glossary 116 H HDMI port 26 27 ...

Страница 149: ... with a new version of the software All patient data and relevant user settings will be preserved 68 Backup successful 77 Delete the current report 62 MyoVista will restart to change the language 94 No records found 49 Permanently Delete Patient from Database 50 Print successful 60 Restore Successful 78 The existing database will be erased Proceed 76 The Factory Reset operation has been aborted 70...

Страница 150: ...ecting 48 unit of measurement 95 Patient cable cleaning 105 connecting 41 port 27 Patient screen 45 displaying 45 Patient Search icon 46 Patient Selected screen 49 Patient Units icon 66 screen 95 Periodic inspection 106 Permanently Delete Patient from Database message 50 Ports Ethernet 26 HDMI 26 27 power adapter 26 USB 26 Power adapter connector 26 source indicators 33 switch 26 Prescription Devi...

Страница 151: ...rt 57 Report Settings 60 65 83 Restore Database 76 78 Search Conditions 48 Select Driver 74 Settings 64 Test 51 52 Test Time Setup 53 Update Factory Reset 65 68 Wired Network 10 71 Wireless Network 65 72 Search Conditions screen 48 Searching for a patient 48 Seasonal safety check 106 Select Driver screen 74 Selecting patient 48 printer 73 wireless network 65 72 Serial number format 13 Set up 30 Se...

Страница 152: ...e not saved Select the OK button to continue message 55 Touchscreen 25 44 cleaning 105 keyboard 44 Conventional 12 lead ECG Waveform 16 Troubleshooting 99 U Unpacking 29 Update Factory Reset 65 68 70 icon 65 screen 68 Updating System Software 68 USB guidelines 76 77 USB ports rear panel 26 right panel 27 User settings 93 V Ventricular Indices 22 23 123 124 VESA mounting 115 Viewing current databas...

Страница 153: ...1 682 237 7781 Fax 1 817 796 2075 HeartSciences com 2019 Trademark of HeartSciences Reg US Pat TM Off All rights reserved wavECG and wavEKG are trademarks of HeartSciences All rights reserved DO LBL 06035 L Not FDA cleared Not available in the United States ...

Отзывы: