


10
MAC Ultra Performance Safety and Installation Manual
3. See Figure 3 on page 9. Align the first
clamp and bracket with 2 mounting
points in the base, and engage both the
clamp bracket’s quarter-turn fasteners in
corresponding sockets in the base. See
Figure 4. Turn the levers on the
quarter-turn fasteners a full 90°
clockwise to lock.
4. Repeat for the second clamp, installing it
opposite the first so that the fixture will
be held in balance.
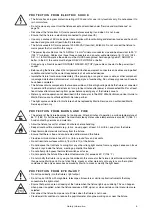
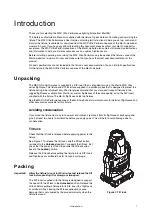
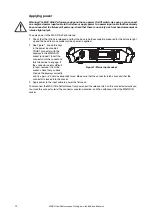
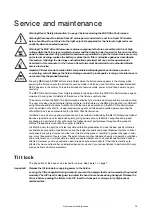
5. Block access under the work area. See
Figure 5. Note the position of the arrow
marked
FRONT
on the base of the
fixture. Working from a stable platform,
hang the fixture on the rigging truss with
the arrow marked
FRONT
facing
towards the area to be illuminated.
Tighten the rigging clamps.
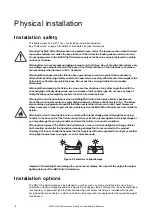
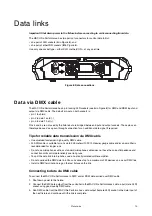
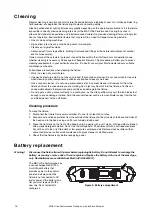
6. See Figure 6. Install a safety cable that is
approved as a safety attachment for the
weight of the fixture by looping it through
one of the safety cable attachment points
(arrowed) in the bottom of the base and
around a secure anchoring point so that
the safety cable will catch the fixture if a
primary attachment fails. Remove as
much slack as possible from the safety
cable (by looping it more than once
around the truss, for example).
7. Check that the tilt lock is released. Check
that there are no combustible materials
within 0.2 m (8 in.) or surfaces to be
illuminated within 4.75 m (15.6 ft.) of the
fixture, and that there are no flammable
materials nearby.
8. Check that there is no possibility of the
head colliding with objects or other
fixtures.
9. Check that other lighting fixtures cannot project light at the MAC Ultra Performance, as powerful
illumination can damage the fixture’s display.
Figure 5: Front of fixture
ATTENTION!
•Pour consignes de sécurité voir guide de l’utilisateur
.
• A
vant la mise sous tension, vérifier que l'appareil accepte
la tension et la fréquence d'alimentation.
•Confier la maintenance à un personnel qualifié.
•T
empérature ambiante maximum d’utilisation T
a = 40°C.
•Emplacements secs.
•Risque de feu et de choc électrique.
•Ne convient pas à l’usage domestique.
•Ne pas regarder directement dans la source lumineuse.
HARMAN Professional Denmark ApS
Olof Palmes Allé 44
8200 Aarhus N, Denmark
Covered by one or more intellectual property rights, including one or
more intellectual property rights listed on www.martin.com/ipr
and design 2019 Martin Professional ApS
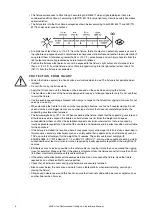
SAFETY
CABLE
WARNING!
•Lock bracket with both 1/4 turn fasteners.
•T
urn 1/4 fasteners fully clockwise to lock.
•Use 2 clamps to mount fixture.
•Secure fixture with safety cable when
suspending.
1/4 turn fasteners
CW
CCW
ATTENTION!
•V
errouiller les crochets avec les
deux 1/4 de tour.
•V
errouiller les 1/4 de tour en tournant à
fond dans le sens des aiguilles d'une montre.
•Utiliser deux crochets pour monter la machine.
•Installer une élingue de sécurité.
SAFETY
CABLE
WARNING!
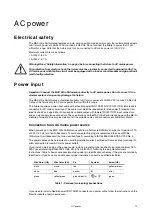
•For safety instructions see user guide.
•Before operation ensure that voltage and frequency
match local power supply.
•Refer servicing to qualified service personnel.
•Maximum ambient temperature
Ta
= 40°C.
•Use only in dry locations.
•R
isk of fire and electric shock.
•Not for residential/household use.
•Do not look directly into the light.
This device complies with part 15 of the FCC Rules.
Operation is subject to the following two conditions:
(1) This device may not cause harmful interference, and
(2) this device must accept any interference received,
including interference that may cause undesired operation.
CAN ICES-3 (B) / NMB-3 (B); CAN ICES-5 (B) / NMB-5 (B)
5002071
Conforms to
UL Std. 1573
Certified to
CSA Std.
C22.2 No. 166
See user guide for
photobiological
safety information.
Voir le guide de l’utilisateur
pour plus d’information sur la
sécurité photobiologique.
Figure 6: Safety cable attachment points
ATTENTION!
•Pour consignes de sécurité voir guide de l’utilisateur
.
• A
vant la mise sous tension, vérifier que l'appareil accepte
la tension et la fréquence d'alimentation.
•Confier la maintenance à un personnel qualifié.
•T
empérature ambiante maximum d’utilisation T
a = 40°C.
•Emplacements secs.
•Risque de feu et de choc électrique.
•Ne convient pas à l’usage domestique.
•Ne pas regarder directement dans la source lumineuse.
HARMAN Professional Denmark ApS
Olof Palmes Allé 44
8200 Aarhus N, Denmark
Covered by one or more intellectual property rights, including one or
more intellectual property rights listed on www.martin.com/ipr
and design 2019 Martin Professional ApS
SAFETY
CABLE
WARNING!
•Lock bracket with both 1/4 turn fasteners.
•T
urn 1/4 fasteners fully clockwise to lock.
•Use 2 clamps to mount fixture.
•Secure fixture with safety cable when
suspending.
1/4 turn fasteners
CW
CCW
ATTENTION!
•V
errouiller les crochets avec les
deux 1/4 de tour.
•V
errouiller les 1/4 de tour en tournant à
fond dans le sens des aiguilles d'une montre.
•Utiliser deux crochets pour monter la machine.
•Installer une élingue de sécurité.
SAFETY
CABLE
WARNING!
•For safety instructions see user guide.
•Before operation ensure that voltage and frequency
match local power supply.
•Refer servicing to qualified service personnel.
•Maximum ambient temperature
Ta
= 40°C.
•Use only in dry locations.
•Risk of fire and electric shock.
•Not for residential/household use.
•Do not look directly into the light.
This device complies with part 15 of the FCC Rules.
Operation is subject to the following two conditions:
(1) This device may not cause harmful interference, and
(2) this device must accept any interference received,
including interference that may cause undesired operation.
CAN ICES-3 (B) / NMB-3 (B); CAN ICES-5 (B) / NMB-5 (B)
5002071
Conforms to
UL Std. 1573
Certified to
CSA Std.
C22.2 No. 166
See user guide for
photobiological
safety information.
Voir le guide de l’utilisateur
pour plus d’information sur la
sécurité photobiologique.
Содержание Martin MAC Ultra Performance
Страница 1: ...MAC Ultra Performance Safety and Installation Manual...
Страница 33: ......
Страница 34: ......
Страница 35: ......
Страница 36: ...www martin com...


