


14
MAC Ultra Performance Safety and Installation Manual
4. Terminate the data link by connecting a 120 Ohm, 0.25 Watt resistor between the data 1 hot (+) and cold
(-) conductors at the data output of the last fixture on the link. If the link is divided into branches using a
DMX splitter, terminate each branch of the link.
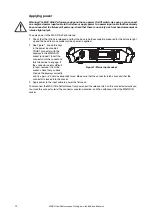
5. You can now apply power.
Data via Ethernet cable
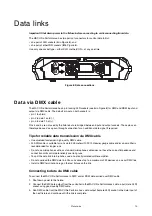
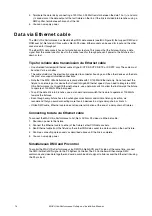
The MAC Ultra Performance has Neutrik etherCON data sockets (see
B
in Figure 8) that support DMX and
RDM over Art-Net and sACN as well as Martin P3 video. Either socket can be used for input and the other
socket used for throughput.
The etherCON data sockets have a fail-safe bypass feature. This means that the fixture will relay a data
signal from the socket used for input to the socket used for throughput even if power to the fixture is shut
down or lost.
Tips for reliable data transmission via Ethernet cable
• Use shielded twisted-pair Ethernet cable of type S/UTP, SF/UTP, S/STP or SF/STP only. The cable must
be rated Cat 5e or better.
• The cable shield must be electrically connected to connector housings, and the other devices on the data
link must also support shielded connections.
• Note that the MAC Ultra Performance is compatible with 10/100 Mbit Ethernet only. Do not connect the
fixture to a network port or device that is fixed to Gigabit Ethernet speed. If you need to integrate a MAC
Ultra Performance in a Gigabit Ethernet network, use a network switch to allow the link towards the fixture
to operate at 100 Mbit/s Ethernet speed.
• To split the data link into branches, use a standard network switch that is able to operate at 100 Mbit/s
towards the fixtures.
• Even though every fixture has a fail-safe bypass mechanism and minimal latency insertion, we
recommend that you avoid connecting more than 50 devices in a single daisy-chain or branch.
• Unlike DMX cable, Ethernet cable does not require termination at the end of a daisy-chain of fixtures.
Connecting to data via Ethernet cable
To connect the MAC Ultra Performance to Art-Net, sACN or P3 video via Ethernet cable:
1. Shut down power to the fixture.
2. Connect the Ethernet cable to either of the fixture’s etherCON data sockets.
3. Run Ethernet cable from the fixture’s other etherCON data socket to a data socket on the next fixture.
4. Continue connecting data sockets as described above until the link is complete.
5. You can now apply power.
Simultaneous DMX and P3 control
To control the MAC Ultra Performance using DMX/Art-Net/sACN and P3 video at the same time, connect
the DMX/Art-Net/sACN signal to the P3 System Controller. The P3 Controller will then merge DMX
commands and video data together and send a combined data signal to fixtures over the Ethernet link using
the P3 protocol.
Содержание Martin MAC Ultra Performance
Страница 1: ...MAC Ultra Performance Safety and Installation Manual...
Страница 33: ......
Страница 34: ......
Страница 35: ......
Страница 36: ...www martin com...


