


Introduction
7
Introduction
Thank you for selecting the MAC Ultra Performance lighting fixture from Martin®.
This Safety and Installation Manual is supplied with the fixture. It gives details of installing and servicing the
fixture. The MAC Ultra Performance User Guide, containing full instructions to help you set up, control and
monitor the fixture, is available for download from the MAC Ultra Performance area of the Martin website at
www.martin.com. If you have any difficulty locating this document, please contact your Martin supplier for
assistance. The MAC Ultra Performance area of the Martin website also contains full product specifications
and information to help you order accessories such as cables, flightcases etc.
Before installing, operating or servicing the MAC Ultra Performance, please check the fixture’s area of the
Martin website at www.martin.com and make sure that you have the latest user documentation for the
product.
Product specifications are not included in the fixture’s user documentation. You can find full specifications
for the fixture in the MAC Ultra Performance area of the Martin website.
Unpacking
The MAC Ultra Performance is supplied in a SIP insert that is intended for use in the Martin MAC Ultra
series flightcase. The fixture and SIP insert are supplied in a cardboard box that is designed to protect the
fixture during initial shipment only. We strongly recommend that you store and transport fixtures in the
rugged flightcases available from Martin (or custom flightcases of the same quality) using the SIP insert
supplied with the fixture. The Martin flightcase holds two fixtures.
See the MAC Ultra Performance area of the Martin website at www.martin.com for details of flightcases and
other accessories available for this fixture.
Avoiding condensation
If you move the fixture from a cold to a warm environment, remove it from its flightcase or packaging and
give it at least two hours to acclimatise before you apply power. This will help to avoid damage due to
condensation.
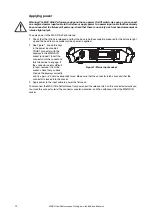
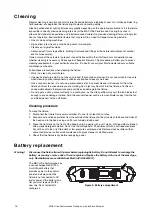
Tilt lock
Check that the tilt lock is released before applying power to the
fixture.
See Figure 1. To release the tilt lock, slide the tilt lock button
(arrowed) to the
Unlocked
position. To reapply the tilt lock, first
check that the power is off and then slide the tilt lock button
back to the
Locked
position.
Release the tilt lock before putting the fixture into its SIP insert
and flightcase or cardboard box for transport or storage.
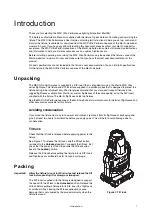
Packing
Important!
Allow the fixture to cool for 30 minutes and release the tilt
lock before packing it for storage or transport.
The SIP insert supplied with the fixture is designed to support
the head with the tilt lock in the
Unlocked
position. Release the
tilt lock before putting a fixture into its SIP insert in a flightcase
or cardboard box. Leaving the tilt lock applied may cause
damage that is not covered by the product warranty when the
fixture is moved.
Figure 1: Tilt lock
Содержание Martin MAC Ultra Performance
Страница 1: ...MAC Ultra Performance Safety and Installation Manual...
Страница 33: ......
Страница 34: ......
Страница 35: ......
Страница 36: ...www martin com...


