manualshive.com logo in svg
background image

Service and maintenance

 17

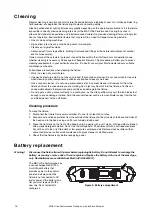
See Figure 9. The battery is located in the USB port / battery compartment (arrowed) next to the control 
panel on the base of the fixture.

To replace the battery:

1. Disconnect the fixture from AC 

mains power and allow to cool.

2. See Figure 10. Push down on the 

locking tab (arrowed) with a 
screwdriver to release the USB 
port / battery compartment cover 
and remove the cover.

3. Remove the used battery and 

insert a new one of the correct 
type, respecting battery polarity 
(positive terminal facing 
downwards, away from the 
head).

4. Reinstall the compartment cover and check that it is closed securely before reapplying power.

Send used batteries to an authorized waste recycling center for recycling. Do not treat a battery as 
household waste.

Head air filter

The MAC Ultra Performance is protected from the entry of dirt and dust by an air filter in the head. Free 
airflow through filters is important for effective cooling, effective performance and maximum product life. Air 
filters therefore require periodical service.

Two types of air filter are available from Martin suppliers as service items for the MAC Ultra Performance:

• Re-usable air filters with a metal element, available as single filters (P/N 5132434-00).

• Disposable air filters with a paper element, available in sets of 12 filters (P/N 50400765).

Regardless of which type of filter the fixture is supplied with, you are of course free to choose which type 
you will use. The metal filters can be cleaned and re-used. Note that the filter mesh is not as fine as with 
paper filters, so the fixture may require internal cleaning at shorter intervals than you are used to.

Air filter service intervals depend on the environment the fixture is used in. Inspect air filters visually at 
regular intervals. Clean the fixture’s metal re-usable filters – or replace paper filters – if they are visibly 
contaminated by dust, dirt, residue from atmospheric effects, etc. 

To service the head air filter:

1. Disconnect the fixture from power and allow components to cool for 30 minutes.

2. The air filter is located in the left-hand side of the head. Position the head so that the air filter cover is 

accessible and apply the tilt lock (see Figure 1 on page 7).

3. See Figure 11. 

Unclip the air 
filter cover and 
lift it off the 
head.

4. Remove the air 

filter from its 
recess in the 
head. 

5. Dispose of 

paper air filters. 
Do not try to 
clean or re-use 
a paper air filter. 
Clean metal air 
filters with a soft 
brush and vacuum cleaner or compressed air, taking care to avoid damaging the filter mesh. If metal 
filters are greasy, you can clean them in a household dishwasher at maximum 50° C (122° F), short 
cycle recommended. Dry them completely before reinstalling. The metal filter is designed to be re-used, 
but replace it with a new item if it is not in clean, undamaged condition after cleaning.

Figure 10: Battery replacement

+

Figure 11: Releasing head air filter

Содержание Martin MAC Ultra Performance

Страница 1: ...MAC Ultra Performance Safety and Installation Manual...

Страница 2: ...age direct or indirect loss consequential or economic loss or any other loss occasioned by the use of inability to use or reliance on the information contained in this document Martin is a registered...

Страница 3: ...ata via DMX cable 13 Data via Ethernet cable 14 Service and maintenance 15 Tilt lock 15 Cleaning 16 Battery replacement 16 Head air filter 17 Lubrication 18 Service utilities 18 Calibration 18 Install...

Страница 4: ...Martin website at www martin com Before you install operate or service the fixture check the Martin website and make sure that you have the latest user documentation for the fixture Document revisions...

Страница 5: ...manual or in the MAC Ultra Performance User Guide to Martin Service or an authorized Martin Service partner The light source contained in this fixture shall be replaced by Martin Service or an author...

Страница 6: ...o half coupler clamps Do not use G clamps quick trigger clamps or any other type of clamp that does not completely encircle the supporting structure when fastened The fixture weighs 44 kg 97 1 lbs Whe...

Страница 7: ...shipment only We strongly recommend that you store and transport fixtures in the rugged flightcases available from Martin or custom flightcases of the same quality using the SIP insert supplied with...

Страница 8: ...MAC Ultra Performance fixtures beside each other allow a minimum center to center distance between fixtures of 830 mm 32 7 in The fixture also contains a programmable pan tilt limitation system that a...

Страница 9: ...s Clamping the fixture to a truss To clamp the MAC Ultra Performance to a rigging truss 1 Check that all rigging hardware is undamaged and can bear at least six 6 times the weight of the fixture or as...

Страница 10: ...hine Installer une lingue de s curit SAFETY CABLE WARNING For safety instructions see user guide Before operation ensure that voltage and frequency match local power supply Refer servicing to qualifie...

Страница 11: ...le cables with female TRUE1 TOP input connectors and can also supply loose connectors The specifications on the MAC Ultra Performance page on the Martin website at www martin com give details of all t...

Страница 12: ...ddenly when power is applied 2 See Figure 7 line up the keys in the power input cable s TRUE1 connector with the keyways in the MAINS IN socket arrowed Insert the connector into the socket and twist c...

Страница 13: ...twisted pair high quality DMX cable 24 AWG cable is suitable for runs up to 300 meters 1000 ft Heavier gauge cable and or an amplifier is recommended for longer runs Do not use microphone cable as sta...

Страница 14: ...re to a network port or device that is fixed to Gigabit Ethernet speed If you need to integrate a MAC Ultra Performance in a Gigabit Ethernet network use a network switch to allow the link towards the...

Страница 15: ...ay also upload firmware fixture software to the fixture via the DMX data input port or USB port using firmware and instructions from Martin All other service operations on the MAC Ultra Performance mu...

Страница 16: ...ill remove dirt from the fixture and from the area where you are working An air jet may blow dirt into the fixture and this can cause visible objects in projections and possibly even damage to the fix...

Страница 17: ...f filter the fixture is supplied with you are of course free to choose which type you will use The metal filters can be cleaned and re used Note that the filter mesh is not as fine as with paper filte...

Страница 18: ...xt section USB provides two utilities USB FIRMWARE lets you update the firmware fixture software from a USB flash memory drive For a detailed guide to updating the firmware from a USB drive see Instal...

Страница 19: ...on about this product on the Martin website at www martin com or a USB flash memory drive formatted in Windows using the FAT32 file system Installing using a Martin Companion Cable If you use a Martin...

Страница 20: ...eboot is complete 7 Remove the USB drive from the fixture The newly installed firmware version will now be displayed in the INFORMATION menu Opening the head for access To open the head for access to...

Страница 21: ...dark coatings on either side as these will absorb heat either directly from the light source or reflected back from other optical components and will not be durable Do not use metal gobos in the MAC...

Страница 22: ...heel 1 the aerial wheel is the wheel that is closer to the LEDs at the back of the head To replace a rotating gobo on Gobo Wheel 1 1 If you have not already removed the top head cover remove it as des...

Страница 23: ...both sides of the goboholder 6 Line up your reference point on the goboholder with your reference point in the effects module Holding the goboholder teeth with flat nosed pliers slide the goboholder...

Страница 24: ...n in the gobo wheel by clips see Figure 13 on page 22 When you reinstall the goboholder you must make sure that the jaws of the clip engage in the flange in the goboholder on both sides of the gobohol...

Страница 25: ...der to avoid heat damage More reflective side towards LEDs To minimize the risk of gobo overheating and damage turn the more reflective side of a coated gobo towards the lamp Less reflective side away...

Страница 26: ...r so that it faces towards the front lens Gobo orientation Wheels 1 and 2 On both gobo wheels in the MAC Ultra Performance Images or text on gobos must appear correctly i e not flipped left to right w...

Страница 27: ...that the gobo is held securely in the goboholder 5 Reinstall the goboholder in the gobo wheel and reinstall the top head cover following the directions given earlier in this section Replacing the pris...

Страница 28: ...the side that the glass is glued into faces towards the back of the fixture See Figure 25 Slide the filter into the jaws arrowed and check that it is held securely 8 If you touched the glass with you...

Страница 29: ...d for the head to move suddenly Check that there will be no risk of collision with persons or objects In a hot or cold environment check the temperature Do not operate the fixture if the ambient tempe...

Страница 30: ...f the fixtures is defective and is disturbing data transmission on the link Unplug the data in and out connectors and connect them directly together or insert a relay cable to bypass one fixture at a...

Страница 31: ...ces du R glement sur le Mat riel Brouilleur du Canada CAN ICES 003 B NMB 003 B CAN ICES 005 B NMB 005 B EU Declaration of Conformity An EU Declaration of Conformity covering this product is available...

Страница 32: ...uct is recycled at the end of its life Your supplier can give details of local arrangements for the disposal of Martin products The MAC Ultra Performance contains a lithium battery Ensure that the bat...

Страница 33: ......

Страница 34: ......

Страница 35: ......

Страница 36: ...www martin com...

Отзывы: