background image

8

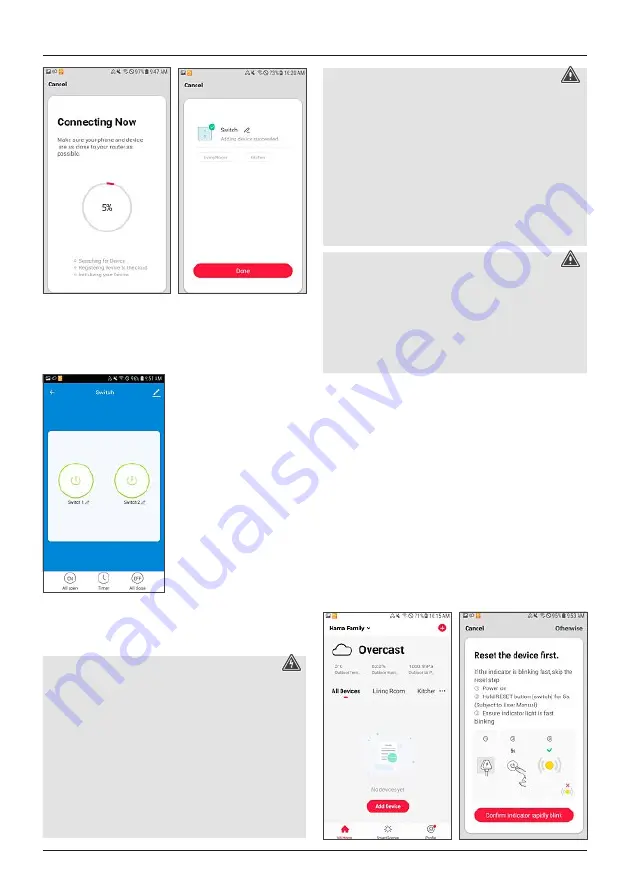
The control light stops flashing and the app confirms that

your wall switch was connected. You can now give the

wall switch a name.

Click

Finish

to complete the process.

You can now control the WiFi wall switch with the app.

4.3 WiFi Power Socket
4.3.1 Product features
Safety Notes

Risk of electric shock

Do not open the product. Do not continue to operate

the product if it is damaged, which may be indicated

by smoke, odour or loud noises. Immediately contact

your dealer or our service department (see item

“Service and Support”).

Do not use the product if the

AC adapter, the adapter cable or the mains cable are

damaged.

Do not attempt to service or repair the product

yourself. Leave any and all service work to qualified

experts.

Warning

Only connect the product to a socket that has been

approved for the device. The socket must be installed

close to the product and easily accessible.

The product has replaceable fuse. Always replace this

fuse with the same type of fuse with the same electrical

values.

When using a multi-socket power strip, make sure that

the sum power draw of all the connected devices does

not exceed its maximum throughput rating.

If you will not be using the product for a long period

of time, disconnect it from mains power.

Warning

Do not use any heat-generating devices (such as

electric blankets, coffee machines, etc.) with this

product. There is a risk of fire and injury.

Do not use this product with any devices that are

motorised or any devices that have a rotating

component or workpiece. There is a risk of injury.

Never connect multiple units of this product in series.

This WiFi socket controls electrical devices (for example, a

floor lamp) in the home (switch on/off).

The following voice command is available:

Turn on/off

‘Alexa/OK Google, turn on/off the light.’

4.3.2 Integrating devices in the Hama Smart

Solution app

Connect the WiFi socket adapter to a properly installed

and easily accessible mains socket.

Press and hold the button on the front side for approx. 5

seconds until the blue LED begins to flash quickly.

Open the

Hama Smart Solution

app and log in.

Press

+

in the upper-right corner to add a new device.

Select ‘Sockets’ in the list and then select your device.

Now confirm that the LED flashes quickly.

Содержание 176547

Страница 1: ...B Operating instruction WiFi Devices WiFi Ger te 00176547 00176548 00176549 00176550 00176551 00176552 00176553 00176554 00176555 00176556 00176558 00176559 00176565 00176566 00176567 00176568 0017657...

Страница 2: ...2 Mounting 9 4 4 3 Integrating devices in the Hama Smart Solution app 10 4 5 WiFi Motion Detector 11 4 5 1 Product features 11 4 5 2 Mounting 12 4 5 3 Integrating devices in the Hama Smart Solution a...

Страница 3: ...uld repeat this check at regular intervals Before mounting check that the wall you have chosen is suitable for the weight to be mounted Also make sure that there are no electric water gas or other lin...

Страница 4: ...r remove rooms at any time to do so simply click the cog wheel at the top right Click Finish Note Family location To complete a family it is not necessary to define the family location manually Based...

Страница 5: ...click your smartphone s Back button to return to the app Your lamp will now be connected 4 Mounting and getting Started 4 1 WiFi LED bulbs 4 1 1 Product features Safety Notes Warning Use this product...

Страница 6: ...evice you want to integrate Now confirm that the lamp flashes quickly Pic 2 Pic 1 Pic 2 Next enter your WiFi password and confirm with OK Your lamp will now be connected Pic 3 Pic 4 Once the connectio...

Страница 7: ...damaged which may be indicated by smoke odour or loud noises Immediately contact your dealer or our service department see item Service and Support This WiFi wall switch controls up to two ceiling lam...

Страница 8: ...multi socket power strip make sure that the sum power draw of all the connected devices does not exceed its maximum throughput rating If you will not be using the product for a long period of time dis...

Страница 9: ...sh message to smartphone on triggering and querying the status of windows and doors open closed The following voice command is available Status query Alexa OK Google is my window door open closed Batt...

Страница 10: ...batteries accordingly Failure to do so could result in the batteries leaking or exploding Only use batteries or rechargeable batteries that match the specified type Before you insert the batteries cle...

Страница 11: ...that your sensor was connected You can now give it a name Click Finish to complete the process You can now fit the sensor and then configure it 4 5 WiFi Motion Detector 4 5 1 Product features This Wi...

Страница 12: ...d observing correct polarity Warning Batteries When inserting batteries note the correct polarity and markings and insert the batteries accordingly Failure to do so could result in the batteries leaki...

Страница 13: ...your sensor was connected You can now give it a name Click Finish to complete the process You can now fit the sensor and then configure it 4 6 WiFi camera 4 6 1 Product features Note Protect the prod...

Страница 14: ...ambient humidity sunlight or cold can impair the durability of the adhesive pad We cannot guarantee that residue will not be left on the mounting surface after the adhesive pad is removed 4 6 3 Integr...

Страница 15: ...ke sure that the polarity is correct The arrow on the plug indicates that the contact that must be connected to the 12 V contact of the LED light strip Please also refer to the operating instructions...

Страница 16: ...e to in the app disconnect the controller from the power and connect the supplied adapter cable between the controller and the LED light strip 5 Timer automation and 1 click control 5 1 Timer To acces...

Страница 17: ...ore another action is executed If after selecting the task you press Next in the upper right area you are taken to a Smart Setting screen in which your selected conditions prerequisites only for autom...

Страница 18: ...counts will be linked Finally you can rename your devices for example fan or assign them to individual rooms for example office Now you can also use your voice and the Google Home app to control your...

Страница 19: ...ck the device from the network What should I do if the device is displayed as offline 1 Make sure that the device is supplied with power 2 Make sure that the network the device is on is stable How to...

Страница 20: ...state applies meaning the light is switched on How can I deactivate a countdown after it has been set Set the countdown to 0 hours 0 minutes this will deacti vate it Switch the temperature display be...

Страница 21: ...Hz WiFi socket 176552 Input voltage 220 240V 50Hz Output voltage 220 240V 50Hz Maximum connection power 16A 3680W Frequency band frequency bands 2 4GHz Degree of protection IP 20 indoor use WiFi Door...

Страница 22: ...unting improper use of the product or from failure to observe the operating instructions and or safety notes 12 Note on environmental protection After the implementation of the European Directive 2012...

Страница 23: ...om 00176555 Downloads www hama com 00176556 Downloads www hama com 00176558 Downloads www hama com 00176559 Downloads www hama com 00176565 Downloads www hama com 00176566 Downloads www hama com 00176...

Страница 24: ...hnical changes Our general terms of delivery and payment are applied 00176547_00176548_00176549_00176550_00176551_00176552_00176553_00176554_00176555 00176556_00176558_00176559_00176565_00176566_00176...

Отзывы: