9
•
Next enter your WiFi password and confirm with OK.
•
Your power socket will now be connected.
•
Once the connection has been established, the LED stops
flashing quickly and the app confirms that your socket
was connected. You can now give the socket a name.
•
Click
Finish
to complete the process.
•
You can now control the WiFi Smart socket.
4.4 WiFi Door / Window Contact
4.4.1 Product features
This WiFi door/window contact is used for monitoring
(push message to smartphone on triggering) and querying
the status of windows and doors (open/closed).
The following voice command is available:
•
Status query
‘Alexa/OK Google, is my window/door open/closed?’
Battery compart-
ment closure
Pairing-
button
Manipulation protection
LED
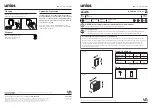
4.4.2 Mounting
•
We recommend attaching the sensor on the window or
door frame and the device directly on the window or door.
•
Ensure that the markings (triangles) on the device and
the sensor are lined up and separated by no more than
10 mm when the door or window is closed.
Device
Sensor
•
You can fix the device and the sensor with screws, or
attach them using adhesive pads.