background image

17

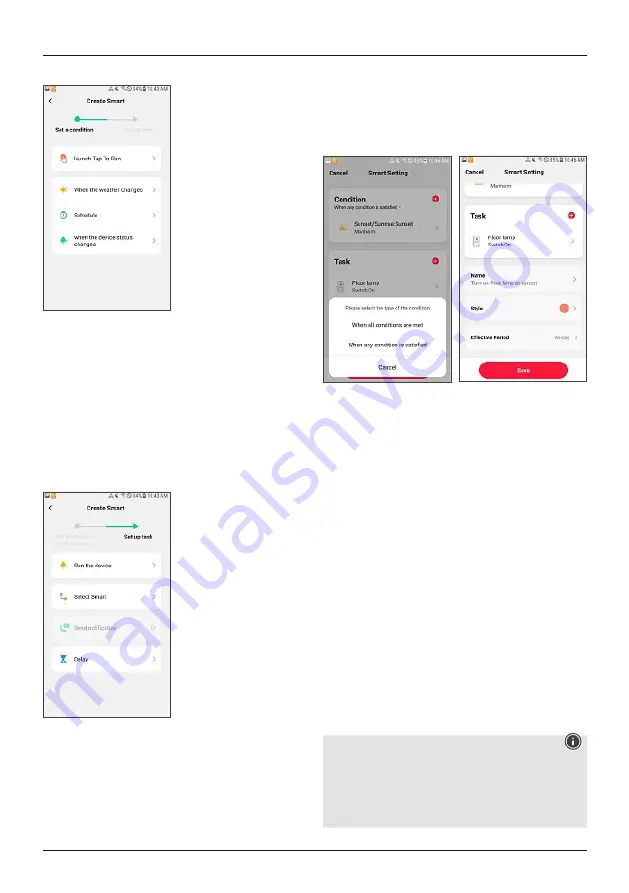
You are now on the ‘Create Smart’ screen.

If you press ‘Launch Tap to Run’, you will access the

screen for setting up the tasks for 1-click control.

If you tap ‘When the weather changes’, ‘Schedule’

or ‘When the device status changes’, then you can

select a condition for the execution of the automation.

Various possibilities are available here. With ‘When the

device status changes’, you can set, for example, the

smart motion detector 00176554 so that a task can be

executed when movement is detected.

The tasks for 1-click control and automation are set up in

exactly the same way. Here, you can select between three

possibilities for 1-click control, and four for automation.

‘Run the Device’ allows you to select a device from those

you have integrated into the app, and have it switch on

or off automatically.

‘Select Smart’ allows you to execute/activate a scene

(1-click control) or an automation.

For an automation, you can also have a push notification

sent to your mobile phone (for this purpose, select ‘Send

Notification’). You therefore receive a notification when

the automation is executed.

‘Delay’ allows you to select a time that is to elapse

before another action is executed.

If, after selecting the task, you press ‘Next’ in the upper-

right area, you are taken to a ‘Smart Setting’ screen, in

which your selected conditions/prerequisites (only for

automation) and tasks are shown ordered. Now you can

select further prerequisites/states, and specify whether

only one of the states, or all of them, must be fulfilled

for the automation to be executed. If you scroll down,

you can also add new tasks, or move a task by pressing

and holding on it. By moving a task to the left, you can

delete it.

‘Name’ allows you to give your 1-click control or

automation a name.

‘Style’ allows you to assign a colour and a picture to your

1-click control or automation, which are subsequently

displayed in the app.

‘Effective Period’ allows you to select the times at which

your 1-click control or automation can be executed, and

the days on which it is effective.

6. Integration in Amazon Alexa

A detailed guide on connecting your smart products to

Alexa can be found at www.amazon.co.uk, under ‘Connect

Smart Home Devices to Alexa’ in the Help. Follow the

instructions there.

Note - Groups and scenes (Alexa app)

If you have already created groups and/or scenes in the

Hama Smart Solution app, you might not be able to

use them in the Alexa app.

It is only possible to group lamps with the Alexa app;

scenes are not possible.

Содержание 176547

Страница 1: ...B Operating instruction WiFi Devices WiFi Ger te 00176547 00176548 00176549 00176550 00176551 00176552 00176553 00176554 00176555 00176556 00176558 00176559 00176565 00176566 00176567 00176568 0017657...

Страница 2: ...2 Mounting 9 4 4 3 Integrating devices in the Hama Smart Solution app 10 4 5 WiFi Motion Detector 11 4 5 1 Product features 11 4 5 2 Mounting 12 4 5 3 Integrating devices in the Hama Smart Solution a...

Страница 3: ...uld repeat this check at regular intervals Before mounting check that the wall you have chosen is suitable for the weight to be mounted Also make sure that there are no electric water gas or other lin...

Страница 4: ...r remove rooms at any time to do so simply click the cog wheel at the top right Click Finish Note Family location To complete a family it is not necessary to define the family location manually Based...

Страница 5: ...click your smartphone s Back button to return to the app Your lamp will now be connected 4 Mounting and getting Started 4 1 WiFi LED bulbs 4 1 1 Product features Safety Notes Warning Use this product...

Страница 6: ...evice you want to integrate Now confirm that the lamp flashes quickly Pic 2 Pic 1 Pic 2 Next enter your WiFi password and confirm with OK Your lamp will now be connected Pic 3 Pic 4 Once the connectio...

Страница 7: ...damaged which may be indicated by smoke odour or loud noises Immediately contact your dealer or our service department see item Service and Support This WiFi wall switch controls up to two ceiling lam...

Страница 8: ...multi socket power strip make sure that the sum power draw of all the connected devices does not exceed its maximum throughput rating If you will not be using the product for a long period of time dis...

Страница 9: ...sh message to smartphone on triggering and querying the status of windows and doors open closed The following voice command is available Status query Alexa OK Google is my window door open closed Batt...

Страница 10: ...batteries accordingly Failure to do so could result in the batteries leaking or exploding Only use batteries or rechargeable batteries that match the specified type Before you insert the batteries cle...

Страница 11: ...that your sensor was connected You can now give it a name Click Finish to complete the process You can now fit the sensor and then configure it 4 5 WiFi Motion Detector 4 5 1 Product features This Wi...

Страница 12: ...d observing correct polarity Warning Batteries When inserting batteries note the correct polarity and markings and insert the batteries accordingly Failure to do so could result in the batteries leaki...

Страница 13: ...your sensor was connected You can now give it a name Click Finish to complete the process You can now fit the sensor and then configure it 4 6 WiFi camera 4 6 1 Product features Note Protect the prod...

Страница 14: ...ambient humidity sunlight or cold can impair the durability of the adhesive pad We cannot guarantee that residue will not be left on the mounting surface after the adhesive pad is removed 4 6 3 Integr...

Страница 15: ...ke sure that the polarity is correct The arrow on the plug indicates that the contact that must be connected to the 12 V contact of the LED light strip Please also refer to the operating instructions...

Страница 16: ...e to in the app disconnect the controller from the power and connect the supplied adapter cable between the controller and the LED light strip 5 Timer automation and 1 click control 5 1 Timer To acces...

Страница 17: ...ore another action is executed If after selecting the task you press Next in the upper right area you are taken to a Smart Setting screen in which your selected conditions prerequisites only for autom...

Страница 18: ...counts will be linked Finally you can rename your devices for example fan or assign them to individual rooms for example office Now you can also use your voice and the Google Home app to control your...

Страница 19: ...ck the device from the network What should I do if the device is displayed as offline 1 Make sure that the device is supplied with power 2 Make sure that the network the device is on is stable How to...

Страница 20: ...state applies meaning the light is switched on How can I deactivate a countdown after it has been set Set the countdown to 0 hours 0 minutes this will deacti vate it Switch the temperature display be...

Страница 21: ...Hz WiFi socket 176552 Input voltage 220 240V 50Hz Output voltage 220 240V 50Hz Maximum connection power 16A 3680W Frequency band frequency bands 2 4GHz Degree of protection IP 20 indoor use WiFi Door...

Страница 22: ...unting improper use of the product or from failure to observe the operating instructions and or safety notes 12 Note on environmental protection After the implementation of the European Directive 2012...

Страница 23: ...om 00176555 Downloads www hama com 00176556 Downloads www hama com 00176558 Downloads www hama com 00176559 Downloads www hama com 00176565 Downloads www hama com 00176566 Downloads www hama com 00176...

Страница 24: ...hnical changes Our general terms of delivery and payment are applied 00176547_00176548_00176549_00176550_00176551_00176552_00176553_00176554_00176555 00176556_00176558_00176559_00176565_00176566_00176...

Отзывы: