background image


26

Group deletion

G p N o : * *

NO

W a n t   t o

d e r e g i s t e r

U n i t   I D : * * * * * *

f r o m   G p   * * ?

YES

Unit ID

* * * * * *

* * * * * *

* * * * * *

* * * * * *

* * * * * *

* * * * * *

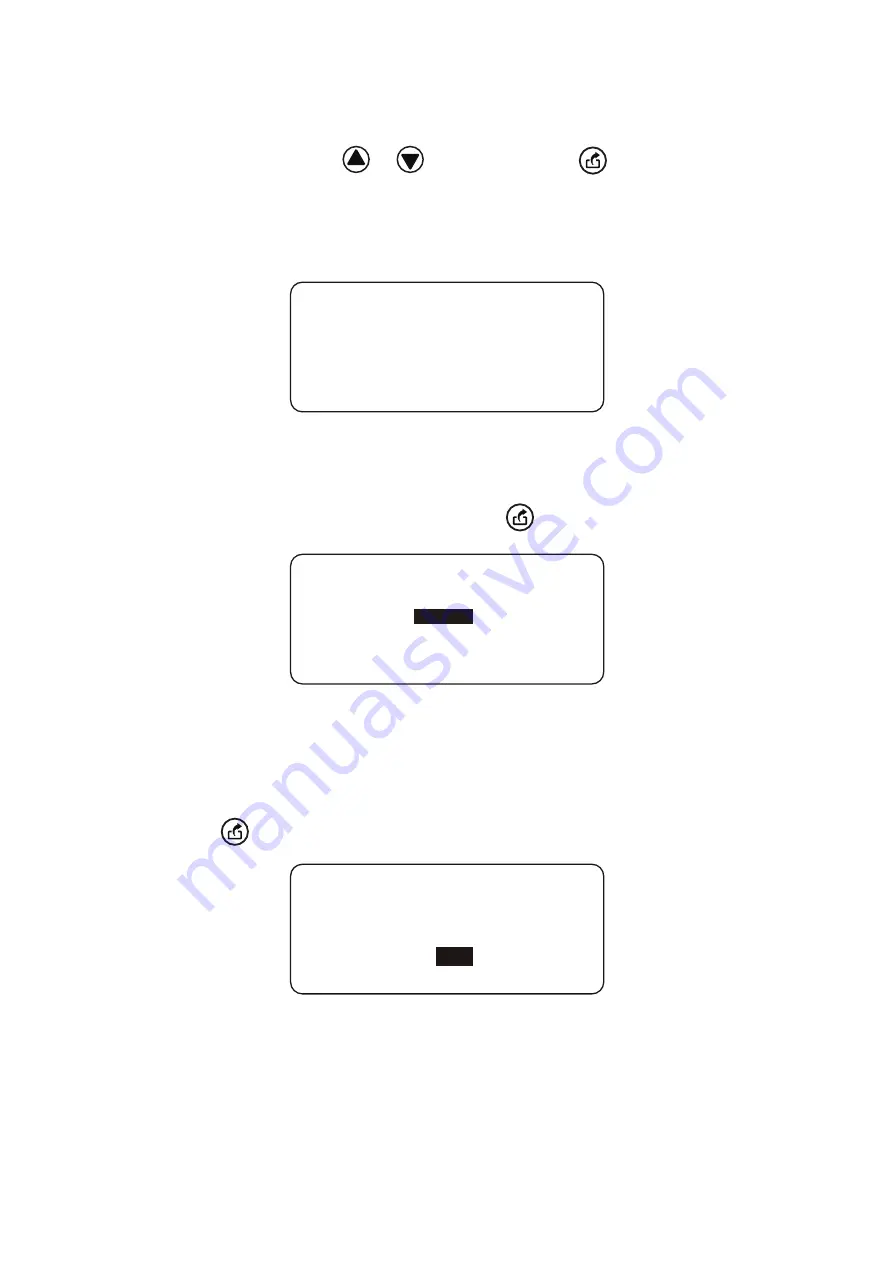
Deleting from group(Gp deletion)

With this function, you can delete unit IDs from each group.

1. 

Set the number by using the         or         button and press the         button to determine the 

setting.

* If there is no unit ID registered for the designated group, the buzzer will beep and 

nothing will be displayed.

2. Then select a unit ID to delete and press the          button.

3. The screen transitions to the deletion reconfirmation screen. Select Yes or No and

press the         button to determine it.

Group No. selection screen

Unit ID selection screen

Yes/No selection screen

Содержание FG-102

Страница 1: ...LESHOOTING GUIDE Thank you for purchasing the HAKKO FG 102 Thermometer This thermometer can transfer the following data to PC making them into one file And it can set up some particular temperature se...

Страница 2: ...1 1 1 PACKING LIST AND PART NAMES 1 Sensor terminals Slide pin Slide button Barcode reader connector Handle PC interface Holder Battery box HAKKO FG 102 Barcode reader USB cable Sensor 10 pcs AA size...

Страница 3: ...2 3 MAX HOLD Measurement Mode HAKKO FG 102 M H 305 Temp 2 0 1 4 0 8 3 1 1 4 0 1 Model name Resolution Temperature measurement range Applicable sensor Measurement tolerance Display Power supply Outlin...

Страница 4: ...r terminals CAUTION Since the sensor is made of a very thin 0 2 copper clad aluminum wire any hard press on it may break the wire Be careful when handling it Attach the sensor Set the batteries Put si...

Страница 5: ...cking the barcode seal The barcode itself should be 2 5 mm wide or over There should be a margin of 2 mm or over on both ends of the barcode as shown on the figure Do not use metallic luster for the b...

Страница 6: ...stallation requires Administrator s privileges 1 Please insert the accompanying CD ROM into the CD ROM drive of the PC 2 Select Run DriverInstaller bat The following window appears AutoPlay confirmati...

Страница 7: ...led If no window appears or the window was closed double click DriverInstaller located in the CD ROM to start it Connect the HAKKO FG 102 and the PC 1 Turning on the power of HAKKO FG 102 2 Connect it...

Страница 8: ...Cypress com is required for downloading Checking Device Manager Installing PC software Communicate with the equipment and install a piece of software to save the data 1 Open the CD ROM that comes wit...

Страница 9: ...Framework 4 Redistributable Package Microsoft web site http www microsoft com Take note of the COM number Once the COM number is set the set number is recorded You can safely close the software Please...

Страница 10: ...9 4 Double click the software FG102_DataSave exe and start it 5 Select File Port Setting and open it Start screen of the software Select Port Setting Screen of Port Setting...

Страница 11: ...10 6 Input your written number for COM and press OK button Input the port number...

Страница 12: ...riod Screen Just after the power switch is on 5 OPERATION 11 Control buttons This unit has the following four 4 buttons The major functions are as shown below recording data going back to previous scr...

Страница 13: ...rement it will automatically save the data If no recovery occurs in 3 minutes after the entry into the power save state the device will be powered OFF Recovery from the power save mode Pressing the SE...

Страница 14: ...de you will be prompted to enter the password Refer to P14 Refer toP15 Refer toP17 Refer toP18 Refer toP18 Refer toP19 Refer toP19 P20 Refer toP21 Refer toP21 Refer toP22 Refer toP23 Refer toP24 Refer...

Страница 15: ...orate by the repeated measurements To ensure accurate measurement of the temperature replace any sensor that is worn at the temperature measurement section The rough standard for the replacement is ap...

Страница 16: ...pressed the function will be automatically released B Recording MODE The unit ID scan or pressing the button in the measurement mode causes the transition to this mode The recorded data is possible t...

Страница 17: ...r to P27 P r e s s b u t t o n F a i l e d Fail O u t o f t e m p s e t t i n g r a n g e P r e s s b u t t o n 455 3 Measure the temperature The following shows the temperature measurement procedure...

Страница 18: ...D or after the temperature recording causes the transition to the Unit record mode In this mode you can view data for a particular unit ID out of the recorded data 1 The unit ID selection screen will...

Страница 19: ...re range judgment Scroll the data by using the or button If there is no fail data the relevant items will be shown blank E Calibration date MODE In this mode the screen displays the last and the next...

Страница 20: ...nded for viewing the unit ID registered for the group 1 Gp selection screen 2 Using the or button select a group No 3 Press the button to determine By the above action the unit ID registered for a par...

Страница 21: ...for each digit 2 Press the button to determine the number Repeat the above steps for 4 digits to determine the password The initial value for the password is 0000 Menu screen Once the password is auth...

Страница 22: ...tting screen Setting the limits Set the number by using the or button and press the button to determine the setting Setting range Range setting Set the temperature setting upper limit temperature and...

Страница 23: ...Example When setting a range of 10 C with the iron temperature setting of 360 C Example When setting a range of 10 C and 15 C with the iron temperature setting of 380 C Temp 360 10 10 Temp 380 10 15...

Страница 24: ...ON If ON go on to the next calibration date setting screen Enter the last calibration date and the next calibration date The method of entry is the same as with the date setting The following cases ar...

Страница 25: ...g the unit ID again before pressing the button you can change the unit ID 3 Press the button to determine 4 The screen transitions to the group registration confirmation screen Select Yes or No using...

Страница 26: ...registered the following message will be shown Press the button to return to the Setting menu screen If the maximum number of unit IDs are already registered the following message will be shown Press...

Страница 27: ...he or button and press the button to determine the setting If there is no unit ID registered for the designated group the buzzer will beep and nothing will be displayed 2 Then select a unit ID to dele...

Страница 28: ...ved a fail If the function is set ON no unit ID other than the one that has been judged a fail is accepted for reading Cumulative rounds resetting screen Fail proof setting Release method of fixed ID...

Страница 29: ...pass Set the number by using the or button and press the button to determine the setting Usable charactersinclude numbers 0 9 and letters A Z 2 In the same manner enter the new password New pass Once...

Страница 30: ...ected with the PC using a USB cable 2 Double click the software FG102_DataSave exe and start it Connected to a PC Start screen of the software Confirmation screen Press the Data Receive button PC Pres...

Страница 31: ...31 14 01 Recording mode FG 102 Press the button Transfer preparation FG 102 Press the button Transfer start FG 102 Select either Yes or No DATA clear or not FG 102 Completed Refer to P31 Saving the d...

Страница 32: ...ive Data screen as shown below will be displayed Saving the data Record MODE Select File Save Data on the RecieveData window Select File Save Data Read Only on the ReceiveData window You can save the...

Страница 33: ...wn below will be displayed Saving the data Group ID List MODE Select File Save Group List on the RecieveData window Select File Save Group List Read only on the ReceiveData window You can save the dat...

Страница 34: ...creen will be shown 1 To correct the discrepancy click the OK button on the screen 2 Set the clock of the device main body at the same time as the PC s Refer to P21 Setting date Date setting 3 After t...

Страница 35: ...sconnected Please be attached to the connector body NG lock function or does not have the ON Do continue the measurement ID became NG until receive the OK determination please turn OFF the function Di...

Страница 36: ...date on the calendar It is not possible to set the date Do not try to set no date on the calendar Please set the date on the calendar If any other failures are found or if you cannot solve your probl...

Отзывы: