background image

TESTit 
Measurement 


102 


Order h49 7144.907-333 


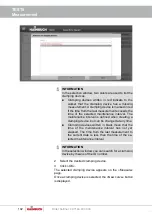
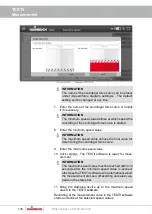
INFORMATION 

In the selection window, two colors are used to list the 
clamping devices. 


Clamping  devices  written  in  red  indicate  to  the 
worker  that  the  clamping  device  has  a  missing 
measurement. A clamping device is marked in red 
if the time from the last measurement exceeds the 
time  of  the  selected  maintenance  interval.  The 
maintenance  interval  is  defined  when  creating  a 
clamping device, but can be changed at any time. 


Clamping devices written in black mean that the 
time  of  the  maintenance  interval  has  not  yet 
elapsed. The time from the last measurement to 
the  current  date  is  less  than  the  time  of  the  se-
lected maintenance interval. 


INFORMATION 

In the selection window you can search for a clamping 
device by means of the ID number. 


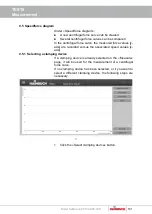
2.  Select the desired clamping device. 

3.  Click »OK«. 

The  selected  clamping  device  appears  on  the  »Measure« 
page. 

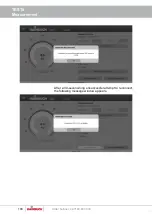
Once a clamping device is selected, the »New curve« button 
is displayed. 

Содержание TESTit

Страница 1: ...Operating instructions incl installation manual TESTit EN...

Страница 2: ...TESTit 2 Order hotline 49 7144 907 333 Translation of the original operating instructions Order hotli ne 49 7144 907 333...

Страница 3: ...Functionality 18 2 7 Environmental protection 19 3 Technical data 20 3 1 General information 20 3 2 Performance values 23 3 3 Speed 23 3 4 Operating conditions 24 3 5 Type designation 24 4 Layout and...

Страница 4: ...7 5 3 Customizing the scale values maximum values factor 50 7 5 4 Customizing the name of the curve 51 7 5 5 Delete curve button 52 7 6 Language selection 52 7 7 Legal notice quick guide 55 8 Measurin...

Страница 5: ...ving the measurement 92 9 4 5 Creating a measurement protocol 95 9 4 6 Overload 98 9 4 7 Checking the connection between TEST module and the IT module 99 9 5 Speed force diagram 101 9 5 1 Selecting a...

Страница 6: ...for steep taper 21 Table 5 Technical data for TEST module for zero point measuring systems 22 Table 6 Technical data for TEST module for centroteX S centroteX AC 22 Table 7 Technical data for TEST mod...

Страница 7: ...lly and understood its contents before starting any work The basic requirement for safe work is compliance with all stipulated safety notices and work related instruc tions in this manual If the produ...

Страница 8: ...avoid accidents injury to people and damage to materials Safety notices DANGER indicates an immediate and hazardous situation that can lead to death or serious injury if not avoided WARNING indicates...

Страница 9: ...ll details and notices in this manual were compiled with due reference to applicable standards and specifications state of the art technology and our many years of expertise and experience The manufac...

Страница 10: ...this product includes IT module basic unit USB stick with the measurement and TESTit archiving software Bluetooth stick USB charger power adapter USB charging cable for the IT module Magnet holder Tor...

Страница 11: ...flange and drawtube adapter only for TEST module for drawtube 1 7 Spare parts and accessories WARNING Serious injuries can be caused by incorrect or de fective spare parts Always use genuine spare par...

Страница 12: ...splay device Effects such as Installation of additional software Software updates Connection with external devices and or a network Is prohibited HAINBUCH accepts no responsibility for loss of data on...

Страница 13: ...sonal injury and or damage to materials INFORMATION This equipment has been tested and found to comply with the limits for a Class A digital device pursuant to part 15 of the FCC Rules These limits ar...

Страница 14: ...o identify and avoid potential haz ards Hydraulics specialist Hydraulics specialists are trained in the specific task profile for which they are employed and are familiar with the rele vant standards...

Страница 15: ...ed in this manual see Use chapter Furthermore an ex tended form of use can be agreed contractually between manufacturer and operator Only skilled staff from the appropriate specialist fields may opera...

Страница 16: ...y use with compatible products NOTE Damage to materials caused by incorrect use of the product Only in a CE compliant machine tool with a sepa rating set of guards Only use for the type of use indicat...

Страница 17: ...coming into contact with moving machine parts Do not wear rings chains or other jewelry Safety footwear To protect the wearer from any heavy items that may fall and from losing their footing on slipp...

Страница 18: ...ctions to reduce the risk of health hazards and to pre vent dangerous situations Sharp edged parts WARNING Serious cut injuries caused by sharp edged parts and burrs All installation of individual par...

Страница 19: ...es enter the environment accidentally take immediate re medial action If in doubt notify the relevant municipal authori ties about the incident The following environmentally hazardous substances are u...

Страница 20: ...150 Max clamping force meas uring range 3 meas uring points 0 75 0 140 0 225 0 30 Max clamping force meas uring range 2 meas uring points 0 90 0 150 0 15 0 150 Max speed 10000 8000 6000 6000 6000 Dime...

Страница 21: ...Table 2 Technical data for TEST module for internal clamping de vices TEST module for hollow tapered shanks draw in force Size HSK 40 HSK 50 HSK 63 HSK 100 Measuring range 0 20 0 20 0 50 0 90 Dimensi...

Страница 22: ...o point measuring systems TEST module for centroteX S centroteX AC axial force measurement Size centroteX S centroteX AC Measuring range 0 90 Dimensions x length 224 x 153 Protection class IP21 Table...

Страница 23: ...formation chapter On all products used do not exceed the lowest of the maximum performance values Only use product in machine tools with the same performance values INFORMATION Details of maximum perf...

Страница 24: ...range 15 40 C Humidity 80 Table 9 Operating conditions 3 5 Type designation The type designation is on the product and it includes the following indications Manufacturer Product designation ID number...

Страница 25: ...25 4 Layout and function 4 1 Overview and brief description External clamping devices clamping force measure ment 1 Clamping device 2 TEST module 3 IT module Internal clamping devices clamping force...

Страница 26: ...TESTit Layout and function 26 Order hotline 49 7144 907 333 Hollow tapered shanks draw in force 1 Tool holder 2 TEST module 3 IT module...

Страница 27: ...TESTit Layout and function Order hotline 49 7144 907 333 27 Steep taper draw in force measurement 1 Tool holder 2 TEST module 3 IT module...

Страница 28: ...e 49 7144 907 333 Zero point clamping systems draw in force measure ment 1 IT module 2 TEST module 3 Measuring adapter 4 Zero point clamping sys tem centroteX S centroteX AC axial force measurement 1...

Страница 29: ...from each other The clamping device is equipped to hold the measuring de vice The measuring device is clamped by means of the clamping device The TEST module determines the force by means of sensors...

Страница 30: ...e Together with the TEST module it forms a measuring device with which the actual measurement is made 4 2 4 Measuring adapter The measuring adapter is required for measurement of the pull in force of...

Страница 31: ...used for force measurement Any other fields of application require the explicit approval of the manufacturer With the help of suitable TEST modules from the manufac turer the measuring device can rap...

Страница 32: ...r use appropriate load bearing equipment and lifting tackle WARNING Serious injuries caused by transporting off center equipment Pay attention to marks on the packaging items Attach the crane hook dir...

Страница 33: ...aterials or total failure of the product due to improper transport Transport product with extreme care Never drop or otherwise subject the product to strong shocks 6 2 Symbols on the packaging Fragile...

Страница 34: ...nsation claims can only be enforced during the applicable complaint periods 6 4 Storage INFORMATION The packaged items may display information relating to storage and readmission to storage that exten...

Страница 35: ...livered The TESTit software must be in stalled on a suitable display device INFORMATION The selected display device must meet the hardware requirements of the TESTit software Operating system WINDOWS...

Страница 36: ...TESTit Installing and setting up the TESTit software 36 Order hotline 49 7144 907 333 4 Click Next 5 Accept the license agreement 6 Click Next...

Страница 37: ...setting up the TESTit software Order hotline 49 7144 907 333 37 7 Select the destination folder for installation of the TESTit software 8 Click Next 9 Select the Start menu folder for the program sho...

Страница 38: ...ick Install The TESTit software is being installed Following installation the TESTit software is started automatically 12 Exit the TESTit software to complete the installation 13 Click Finish The TEST...

Страница 39: ...tart page of the TESTit software After the TESTit software has been started the Measure page is displayed The area highlighted in yellow opens the menu The area highlighted in red shows the page curre...

Страница 40: ...ce does not have an in ternal Bluetooth module the Bluetooth stick included in the scope of delivery must be plugged into a USB port on the display device The Bluetooth stick is a plug and play device...

Страница 41: ...the TESTit software Order hotline 49 7144 907 333 41 7 3 Administration It is recommended that you make certain settings before us ing for the first time On the Administration it is possible to creat...

Страница 42: ...r hotline 49 7144 907 333 7 3 1 Tester To create a new tester 1 Click the New button INFORMATION The input field is limited to 20 characters 2 Enter the name of the new tester 3 Click OK If an existin...

Страница 43: ...e TESTit software Order hotline 49 7144 907 333 43 deleted that can be set as the default A tester who is set as the default is highlighted in bold in the listing When a measurement is saved the teste...

Страница 44: ...w in pressing force diagram if power operated force actuated axial Maximum axial draw in pressing force Actuation pressure at maximum axial draw in pressing force diagram if power operated manually ac...

Страница 45: ...TESTit software Order hotline 49 7144 907 333 45 To create a new clamping device 1 Click the New button INFORMATION The input field is limited to 30 characters 2 Enter the required data for the new c...

Страница 46: ...ESTit software 46 Order hotline 49 7144 907 333 If an existing clamping device is selected from the list the following is possible INFORMATION The ID number of the clamping device cannot be changed af...

Страница 47: ...for configuring the measurement protocol Managing the TESTit V1 devices 7 4 1 Configuring the measurement protocol The configuration page can be used to select all the infor mation to be provided on t...

Страница 48: ...to man age the TESTit V1 devices When the Search button is pressed the system searches for TESTit V1 devices that are switched on and within range A red progress bar is displayed during the search If...

Страница 49: ...Clicking on the relevant field opens a window where the new color is selected 7 5 2 Customizing the background color of the diagram The color of the selected field can be adjusted by clicking on the...

Страница 50: ...can be used to change the maximum value for the force and speed to be displayed The controller shows the maximum values in percent 100 The value 1 corresponds to 100 the value 1 05 corre sponds to 105...

Страница 51: ...rocedure is used for scaling the speed These settings are the basic settings Example Maximum measuring force value max Messkraft 71 The set factor for force is Kraft 1 05 The maximum force value displ...

Страница 52: ...elete removes the curve from the database 7 6 Language selection The language setting for the TESTit software is set via the language of the Windows 10 operating system This means that on an English o...

Страница 53: ...TESTit Installing and setting up the TESTit software Order hotline 49 7144 907 333 53 1 In the Start menu select Settings 2 Select the tab Time and Language 3 Select the Language tab...

Страница 54: ...language 5 Select the Windows display language Already installed languages can be selected via a drop down menu As an example English is now selected as the Windows display language INFORMATION The c...

Страница 55: ...played in English by default 7 7 Legal notice quick guide The software terms privacy policy and user manual are linked as PDFs on the Legal notice Quick Guides page In addition support and contact dat...

Страница 56: ...1 the IT module switches itself off The IT module must then be recharged The blue LED located below the Bluetooth symbol lights up if there is a connection to the TESTit software It goes out again as...

Страница 57: ...signa tion Tightening torque at screw quality Nm 10 9 12 9 M4 4 5 M5 7 9 M6 12 15 M8 25 38 M10 50 70 M12 100 130 M16 220 300 M20 400 550 M24 600 800 Table 11 Screw tightening torques metric control th...

Страница 58: ...for a different T211 mandrel for a different zero point clamping system the measuring adapter must also be reattached as described be low 8 5 1 TEST module for T211 mandrel A Disc A1 Disc fixing scre...

Страница 59: ...uring device Order hotline 49 7144 907 333 59 1 Place the disc on the product 2 Screw in the fastening screws for the disc and tighten them to the specified tightening torque see chapter Screw tighten...

Страница 60: ...ing device 60 Order hotline 49 7144 907 333 3 Screw the tension bolt into the product and apply light pressure 8 5 2 TEST module for zero point clamping system Variant 1 A Disc A1 Disc fixing screws B...

Страница 61: ...r hotline 49 7144 907 333 61 Variant 2 A Disc A1 Disc fixing screws B Adapter C Clamping pin C1 Clamping pin fastening screw The following steps are necessary to set up the TEST mod ule Variant 1 1 Pl...

Страница 62: ...der hotline 49 7144 907 333 2 Screw in the fastening screws for the disc and tighten them to the specified tightening torque see chapter Screw tightening torques 3 Screw the clamping pin into the prod...

Страница 63: ...device Order hotline 49 7144 907 333 63 Variant 2 1 Place the disc on the product 2 Screw in the fastening screws for the disc and tighten them to the specified tightening torque see chapter Screw ti...

Страница 64: ...TESTit Measuring device 64 Order hotline 49 7144 907 333 3 Screw the clamping pin together with the adapter into the product 4 Screw in the clamping pin fastening screw and apply light pressure...

Страница 65: ...scribed be low The tightening torque of 0 8 Nm for the measuring pin fastening screw must be observed For size 32 make sure that the correct measuring pins not the flat measuring pins are used for thr...

Страница 66: ...to convert the TEST mod ule from three clamping points to two clamping points INFORMATION For conversion first remove tho two measuring pins which are next to the free attachment point 1 Loosen and r...

Страница 67: ...easuring pin on the attachment point for two clamping points on the product 5 Screw in the fastening screw of the measuring pin and tighten it to a tightening torque of 0 8 Nm INFORMATION After conver...

Страница 68: ...ne 49 7144 907 333 8 6 2 TEST module for external clamping device size 32 A Torx wrench B Measuring pin B1 Measuring pin fastening screw C Attachment point of two clamping points D Flat measuring pin...

Страница 69: ...to convert the TEST mod ule from three clamping points to two clamping points INFORMATION For conversion first remove tho two measuring pins which are next to the free attachment point 1 Loosen and r...

Страница 70: ...oints for exam ple in a vice the flat measuring pins not included in the scope of delivery must be used 4 Place the flat measuring pin on the attachment point for two clamping points on the product 5...

Страница 71: ...ring device Order hotline 49 7144 907 333 71 6 Loosen and remove the fastening screw for the measur ing pin located opposite the attachment point of two clamping points 7 Remove the measuring pin from...

Страница 72: ...uring pin on the product opposite the attachment point of two clamping points 9 Screw in the fastening screw for the flat measuring pin and tighten it to a tightening torque of 0 8 Nm INFORMATION Afte...

Страница 73: ...65 4 A Torx wrench B Measuring pin B1 Measuring pin fastening screw The TEST module is prepared for four clamping points The following steps are necessary to convert the TEST mod ule from four clampi...

Страница 74: ...3 1 Loosen and remove the fastening screw for the measur ing pin 2 Remove the measuring pin from the product 3 Also remove the second measuring pin as described INFORMATION After conversion the number...

Страница 75: ...49 7144 907 333 75 8 7 Assembling a TEST module with an IT module A TEST module B IT module B1 IT module fastening screws C Torx wrench 1 Put the TEST module and the IT module together posi tion them...

Страница 76: ...TESTit Measuring device 76 Order hotline 49 7144 907 333 2 Press the TEST module and IT module firmly together 3 Screw in the IT module fastening screws and tighten them hand tight...

Страница 77: ...TESTit Measuring device Order hotline 49 7144 907 333 77 8 8 Disconnecting a TEST module from an IT module A TEST module B IT module B1 IT module fastening screws C Torx wrench...

Страница 78: ...TESTit Measuring device 78 Order hotline 49 7144 907 333 1 Loosen and remove the IT module fastening screws 2 Pull the TEST module and IT module apart thereby sep arating them...

Страница 79: ...ring device from unplanned process start in automatic mode Before starting the measurement set the ma chine to manual operation INFORMATION Before measuring Switch off supply of cooling lubricant to t...

Страница 80: ...nt of a T211 mandrel or a pull in force measurement of a zero point clamping sys tem attach the measuring adapter see chapter Setting up the TEST module 2 When measuring the clamping force of an exter...

Страница 81: ...clamping head INFORMATION The marking on the TEST module must always be po sitioned at the center of the steel segments of the clamping element 3 Insert the measuring device into the clamping device...

Страница 82: ...by the clamping elements 4 Clamp the measuring device 9 3 3 Hollow tapered shanks The following steps are required to check the draw in force 1 Remove the tool from the HSK holder 2 Inspect the HSK ho...

Страница 83: ...these operating instructions also read and follow the operating instructions for the relevant clamping device 1 Attach the clamping device see operating instructions for the clamping device 2 Move th...

Страница 84: ...nt 84 Order hotline 49 7144 907 333 9 4 Measuring The measurement process is performed by the TESTit soft ware 1 Select Measure in the menu 9 4 1 Selecting a clamping device 1 Click the Select clampin...

Страница 85: ...g a clamping device but can be changed at any time Clamping devices written in black mean that the time of the maintenance interval has not yet elapsed The time from the last measurement to the curren...

Страница 86: ...essure or torque to the value set on the machine tool The clamping pressure or the torque as well as the clamping device data axial radial ratio selected tolerance must be entered correctly in the TES...

Страница 87: ...taught they appear in the right hand column of the selection window The TESTit V2 devices are listed in the left hand column If no TESTit V1 devices have been taught the left column is displayed in f...

Страница 88: ...suring device area For a TESTit V1 Variant of the TESTit the maximum measuring force the number of clamping points if selection of the meas uring points is provided The TESTit serial number For a TEST...

Страница 89: ...asuring points with which the connected measuring device is equipped 6 Click OK The scaling of the tachometer and the maximum measuring force are updated on the basis of the selected measuring point v...

Страница 90: ...mode the data for the selected clamping de vice and measuring device are hidden The force display ta chometer is enlarged and displayed as a bar The red bar represents the measuring range of the tach...

Страница 91: ...Performing a measurement 1 Prepare the TESTit software and the measuring device see chapter Preparation 2 Select the clamping device in the TESTit software 3 Select the measuring device in the TESTit...

Страница 92: ...The evaluation of a meas urement is carried out at the discretion of the worker Select tester Select action optional Enter comments optional INFORMATION The saving process can be canceled at any time...

Страница 93: ...otline 49 7144 907 333 93 4 Select the tester 5 Click Next Alternatively create a new tester Enter the new tester in the search field Click New tester This creates new testers and auto matically saves...

Страница 94: ...line 49 7144 907 333 6 Optionally select an action 7 Click Next Alternatively create a new action Enter the new action in the search field Click New action This creates the new action and au tomatical...

Страница 95: ...reated from a saved meas urement This is possible regardless of whether a measuring device is connected or not The measurement report can be created as a CSV formatted file or in PDF format 1 Click th...

Страница 96: ...t button 2 Save the displayed document by using Save As The location where the document is saved can be freely se lected by the operator Filtering and sorting The list of saved measurements can be sor...

Страница 97: ...the time from the last measurement exceeds the time of the selected maintenance interval The maintenance interval is defined when creating a clamping device but can be changed at any time Clamping de...

Страница 98: ...e 1 Enter the start date and the end date in the correspond ing fields 9 4 6 Overload Each variant of the TEST modules is designed for a maxi mum measuring force If the maximum measuring force is exce...

Страница 99: ...4 7 Checking the connection between TEST module and the IT module An IT module cannot be connected to the TESTit software unless an TEST module is attached To ensure that an IT module is correctly co...

Страница 100: ...TESTit Measurement 100 Order hotline 49 7144 907 333 After a 30 second long unsuccessful attempt to reconnect the following message window appears...

Страница 101: ...curve the measured force values y axis are recorded versus the associated speed values x axis 9 5 1 Selecting a clamping device If a clamping device is already selected on the Measure page it will be...

Страница 102: ...tenance interval is defined when creating a clamping device but can be changed at any time Clamping devices written in black mean that the time of the maintenance interval has not yet elapsed The time...

Страница 103: ...e chap ter Measuring The selected measuring device appears on the Measure page All relevant data for the selected measuring device are dis played on the Measure page in the Clamping force measuring de...

Страница 104: ...e the TESTit software and the measuring device see chapter Preparation 2 Select the clamping device in the TESTit software 3 Select the measuring device in the TESTit software 4 Clamp the measuring de...

Страница 105: ...e positioned over the turned groove on the measuring device housing so that the distance between the magnet and the measuring de vice is a maximum of 5 mm 5 Position the magnet over the measuring devi...

Страница 106: ...ue INFORMATION The maximum speed value defines the final value for determining the centrifugal force curve 9 Enter the maximum speed value 10 Click Apply The TESTit software is ready for meas urement...

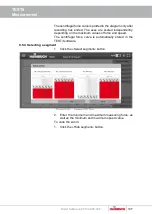
Страница 107: ...scaled independently depending on the maximum values of force and speed The centrifugal force curve is automatically stored in the TESTit software 9 5 4 Selecting a segment 1 Click the Select segment...

Страница 108: ...been recorded it is possible to load curves into the diagram via Add curve and com pare them It is not necessary to select a clamping device to visualize stored curves Up to six curves can be loaded...

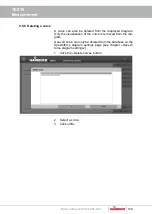
Страница 109: ...deleted from the displayed diagram Only the visualization of the curve is removed from the dia gram A saved curve can only be deleted from the database on the Speed force diagram settings page see ch...

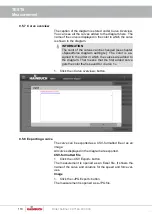
Страница 110: ...color is as signed in the order in which the curves are added to the diagram That means that the first added curve gets the color that is saved for Curve 1 1 Click the Curve overview button 9 5 8 Exp...

Страница 111: ...e basic equip ment 1 Use a cloth moistened with detergent to remove all oil and grease residues from the product 10 3 Annual factory calibration The TEST module is already calibrated at the factory wh...

Страница 112: ...t Maintenance 112 Order hotline 49 7144 907 333 Other service work performed by HAINBUCH will also be noted in the service passport and this will be returned to gether with the newly calibrated TEST m...

Страница 113: ...f the carrier for transport of lithium polymer rechargeable batteries installed in equipment must be observed DANGER Serious injuries from possible fire and explosion when removing the battery Never r...

Страница 114: ...al equipment press the Emergency Stop but ton on the machine tool immediately 2 Establish the cause of the fault 3 If troubleshooting requires work to be conducted in the danger area switch the machin...

Страница 115: ...ach IT module to TEST module Skilled special ist IT module is at range limit of the radio signal Move IT module closer to TESTit software display device Skilled special ist IT module needs to be reboo...

Страница 116: ...at the factory If necessary components must be replaced HAINBUCH Table 13 Fault table 12 3 Reseting the IT module In rare cases it is necessary to restart the IT module This restart is performed by me...

Страница 117: ...3 Tracking hotline Current status of your order Just call 49 7144 907 222 24 hour emergency phone line Has a system crash occurred or some other technical emer gency Our experts are there for you arou...

Страница 118: ...e values 23 Personnel requirements 13 Electricians 14 Hydraulics specialist 14 Pneumatics specialist 14 Skilled specialist 14 Trainees 15 Preparation Measuring device 80 Software 80 Protective equipme...

Страница 119: ...TESTit Order hotline 49 7144 907 333 119 W Warranty 12...

Страница 120: ...ations reserved HAINBUCH GMBH SPANNENDE TECHNIK Postfach 1262 71667 Marbach Erdmannh user Strasse 57 71672 Marbach Germany Tel 49 7144 907 0 Fax 49 7144 18826 verkauf hainbuch de www hainbuch com 24 h...

Отзывы: