background image


7-2 

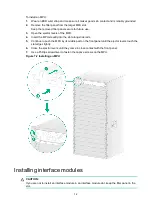
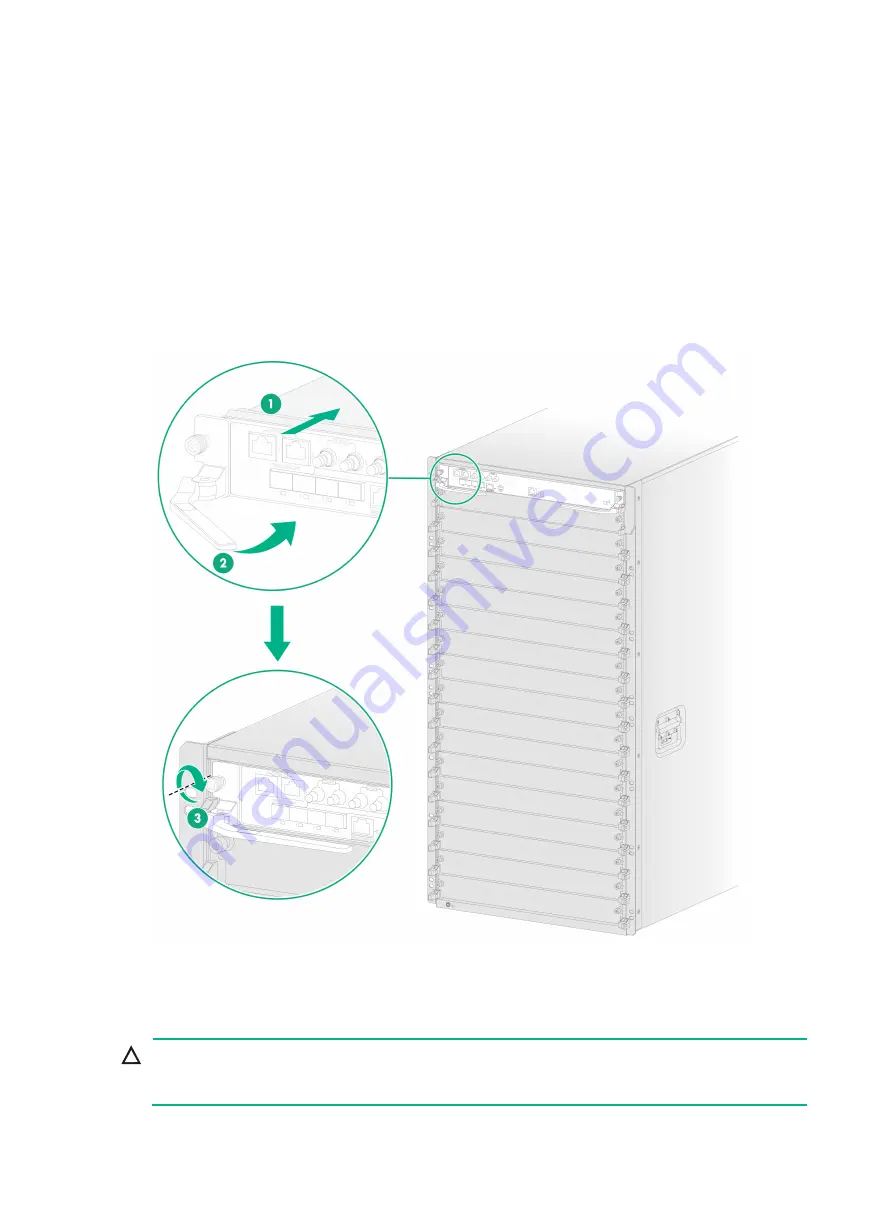
To install an MPU: 

1. 

Wear an ESD wrist strap and make sure it makes good skin contact and is reliably grounded. 

2. 

Remove the filler panel from the target MPU slot. 

Keep the removed filler panel secure for future use. 

3. 

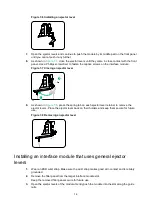
Open the ejector levers of the MPU. 

4. 

Insert the MPU steadily into the slot along slide rails. 

5. 

Continue to push the MPU by its middle part on the front panel until the ejector levers touch the 
slot edges tightly. 

6. 

Close the ejector levers until they come in close contact with the front panel. 

7. 

Use a Phillips screwdriver to fasten the captive screws on the MPU. 

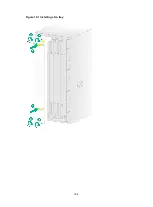
Figure 7-2 Installing an MPU 


Installing interface modules 


CAUTION: 

If you are not to install an interface module in an interface module slot, keep the filler panel in the 
slot. 


Содержание CR19000-16

Страница 1: ...H3C CR19000 16 Core Router Installation Quick Start New H3C Technologies Co Ltd http www h3c com BOM 3104A0W2 Document version 6PW109 20211015...

Страница 2: ...respective owners Notice The information in this document is subject to change without notice All contents in this document including statements information and recommendations are believed to be acc...

Страница 3: ...Available DC power supplies 6 1 DC power supply configuration guidelines 6 1 Installing a DC power supply 6 1 Connecting a DC power cord 6 3 Installing AC power supplies 6 5 Available AC power supplie...

Страница 4: ...Cables for connecting E1 ports 11 3 Connecting an E1 cable 11 3 Routing signal cables 11 4 12 Verifying the installation 12 1 13 Power on check 13 1 Power on check flowchart 13 1 Checking the LEDs 13...

Страница 5: ...the items secure for future use IMPORTANT Install the router after finishing inspection Do not inspect the router when installing it Keep the packaging materials secure for future moving or shipment I...

Страница 6: ...other devices The ambient temperature for the router is maintained in the range of 0 C to 45 C 32 F to 113 F The ambient humidity for the router is maintained in the range of 5 RH to 95 RH non conden...

Страница 7: ...74 in Cable management bracket 92 mm 3 62 in Fan tray handle at the rear 30 mm 1 18 in As a best practice use a rack that meets the following requirements With dimensions H W D of 2200 600 1200 mm 86...

Страница 8: ...adequate clearance is reserved around the air vents Make sure the rack for the router has a good cooling system with the perforation rate of rack doors greater than 50 Make sure the air conditioners d...

Страница 9: ...t pay special attention to the following symbols WARNING means an alert that calls attention to important information that if not understood or followed can result in personal injury CAUTION means an...

Страница 10: ...SD damage wear an ESD wrist strap before working with the router and the modules To attach an ESD wrist strap 1 Put the wrist band of the strap on your wrist and fasten the band so that it makes good...

Страница 11: ...rting moving and installing the router be careful not to bump the router into the door or wall To move the chassis to the installation location 1 Unpack the chassis 2 Remove the screws on the L bracke...

Страница 12: ...ring installation tools Installation tools are required when installing the router Prepare installation tools as required Figure 2 6 provides installation tools for your reference Figure 2 6 Installat...

Страница 13: ...able components Connect cables Verify the installation Check before and after power on Troubleshoot the router Power off the router Operating correctly Read safety recommendations Inspect the router E...

Страница 14: ...ation about installing the slide rails see H3C LSXM1BSR 1U Bottom Support Rails Installation Guide available also at https www h3c com en Support Resource_Center EN Routers Catalog CR19000 CR19000 Whe...

Страница 15: ...e nuts are not required for the two upper marked installation holes on the right front rack post Figure 4 2 Installing the cage nuts 3 Place the router on the slide rails from the front of the rack Sl...

Страница 16: ...4 3 Figure 4 3 Mounting the router in a rack...

Страница 17: ...room To ground the router 1 Remove the grounding screws from the grounding point on the chassis 2 Use the grounding screws to attach the two hole grounding lug of the grounding cable to grounding poin...

Страница 18: ...d on the system power consumption and the DC power supply configuration based on the power input mode As a best practice configure N M M 1 DC power supply redundancy Make sure N M is not larger than t...

Страница 19: ...ving a filler panel 2 Correctly orient the power supply 3 Align the power supply with the power supply slot Then slide the power supply along the guide rails into the slot until the latch locks the po...

Страница 20: ...ceptacle on the power supply 3 Fasten the screw on the connector to secure the connector to the receptacle 4 Connect the other end of the power cord to the DC power distribution panel in the equipment...

Страница 21: ...6 4 6 Affix cable labels to the power cord 20 mm 0 79 in to each end of the power cord Figure 6 3 Connecting a DC power cord...

Страница 22: ...put power 100 to 130 VAC 60 Hz 1200 W 200 to 240 VAC 50 Hz 2400 W 240 VDC 2400 W 100 to 130 VAC 60 Hz 1200 W 200 to 240 VAC 50 Hz 3000 W 240 VDC 3000 W AC power supply configuration guidelines Determi...

Страница 23: ...ving a filler panel 2 Correctly orient the power supply 3 Align the power supply with the power supply slot Then slide the power supply along the guide rails into the slot until the latch locks the po...

Страница 24: ...e cable ladder 2 Connect the AC power cord female connector to the AC input receptacle on the power supply 3 Use a releasable cable tie or Velcro strap to secure power cord to the handle of the AC pow...

Страница 25: ...6 8 Figure 6 6 Connecting an AC power cord using a releasable cable tie...

Страница 26: ...section LPU in Figure 7 1 refers to an interface module and SFU refers to a fabric module Figure 7 1 CR19000 16 router main sections Installing MPUs CAUTION The router supports active standby MPU swi...

Страница 27: ...ly into the slot along slide rails 5 Continue to push the MPU by its middle part on the front panel until the ejector levers touch the slot edges tightly 6 Close the ejector levers until they come in...

Страница 28: ...ce module Do not hold detachable ejector levers to lift an interface module Figure 7 3 Detachable ejector lever To install an interface module that uses detachable ejector levers 1 Wear an ESD wrist s...

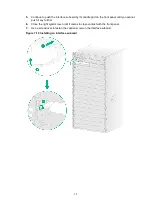
Страница 29: ...t and push it steadily into the slot along the guide rails until about half of the module is in the slot Figure 7 5 Installing an interface module that uses detachable ejector levers 5 Attach the ejec...

Страница 30: ...hown in Figure 7 8 press the spring tab on each ejector lever retainer to remove the ejector levers Place the ejector lever back on their holders and keep them secure for future use Figure 7 8 Removin...

Страница 31: ...CR19000 16 Core Router Hardware Information and Specifications If you are not to install an interface subcard in a slot on an interface module keep the filler panel in the slot To install an interfac...

Страница 32: ...rt on the front panel until you cannot push it any further 6 Close the right ejector lever until it comes in close contact with the front panel 7 Use a screwdriver to fasten the captive screw on the i...

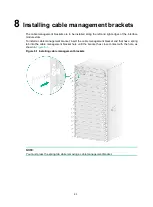
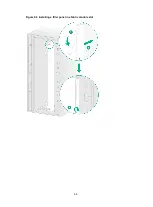
Страница 33: ...le slots To install a cable management bracket insert the cable management bracket end that has a spring tab into the cable management bracket hole until the bracket has close contact with the hole as...

Страница 34: ...tall two to six fabric modules for the router To install a fabric module 1 Place the fabric module on a workbench and remove the protection box from the connector side of the fabric module Figure 9 1...

Страница 35: ...panel and then open the ejector levers 2 Align the filler panel with the fabric module slot Push the filler panel slowly into the slot along the guide rails 3 Continue to push the filler panel until t...

Страница 36: ...9 3 Figure 9 3 Installing a filler panel in a fabric module slot...

Страница 37: ...he fabric module slots before installing a fan tray The procedure is the same for installing a fan tray in the FAN1 slot and FAN2 slot The following procedure installs a fan tray in the FAN1 slot To i...

Страница 38: ...10 2 Figure 10 1 Installing a fan tray...

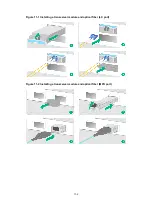
Страница 39: ...iably grounded 2 Remove the dust plug from the target fiber port 3 Pull the bail latch on the transceiver module upwards Skip this step if the bail latch is plastic 4 Take the transceiver module by it...

Страница 40: ...11 2 Figure 11 1 Installing a transceiver module and optical fiber LC port Figure 11 2 Installing a transceiver module and optical fiber MPO port...

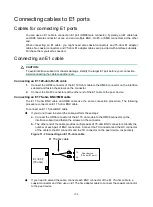
Страница 41: ...45 connectors at the other end of the E1 cable to the peer device Connecting an E1 75 ohm BNC SMB cable The E1 75 ohm BNC cable and SMB cable use the same connection procedure The following procedure...

Страница 42: ...ng an impedance converter Routing signal cables The cable management brackets are installed along the left and right edges of the front panel As a best practice route signal cables along the cable man...

Страница 43: ...11 5 Figure 11 6 Routing signal cables...

Страница 44: ...ends of the grounding cable are securely connected No switch or fuse is installed on the grounding cable The power cords are connected reliably and no short circuit has occurred in power input and ou...

Страница 45: ...ectly by observing the LEDs on the MPUs and other components When the router and components are operating correctly the LEDs are as described in Table 13 1 and Table 13 2 If the LED states are not as...

Страница 46: ...s Description Interface module LED RUN Fast flashing green 4 Hz The interface module is loading software Slow flashing green 0 5 Hz The interface module is operating correctly Fan tray LED OK Steady g...

Отзывы: