background image


Ocus® User Guide version 9.0


21 

Hermiankatu 6-8G, 33720 Tampere, Finland 

©2021 Grundium. All rights reserved.


-


Image 18 

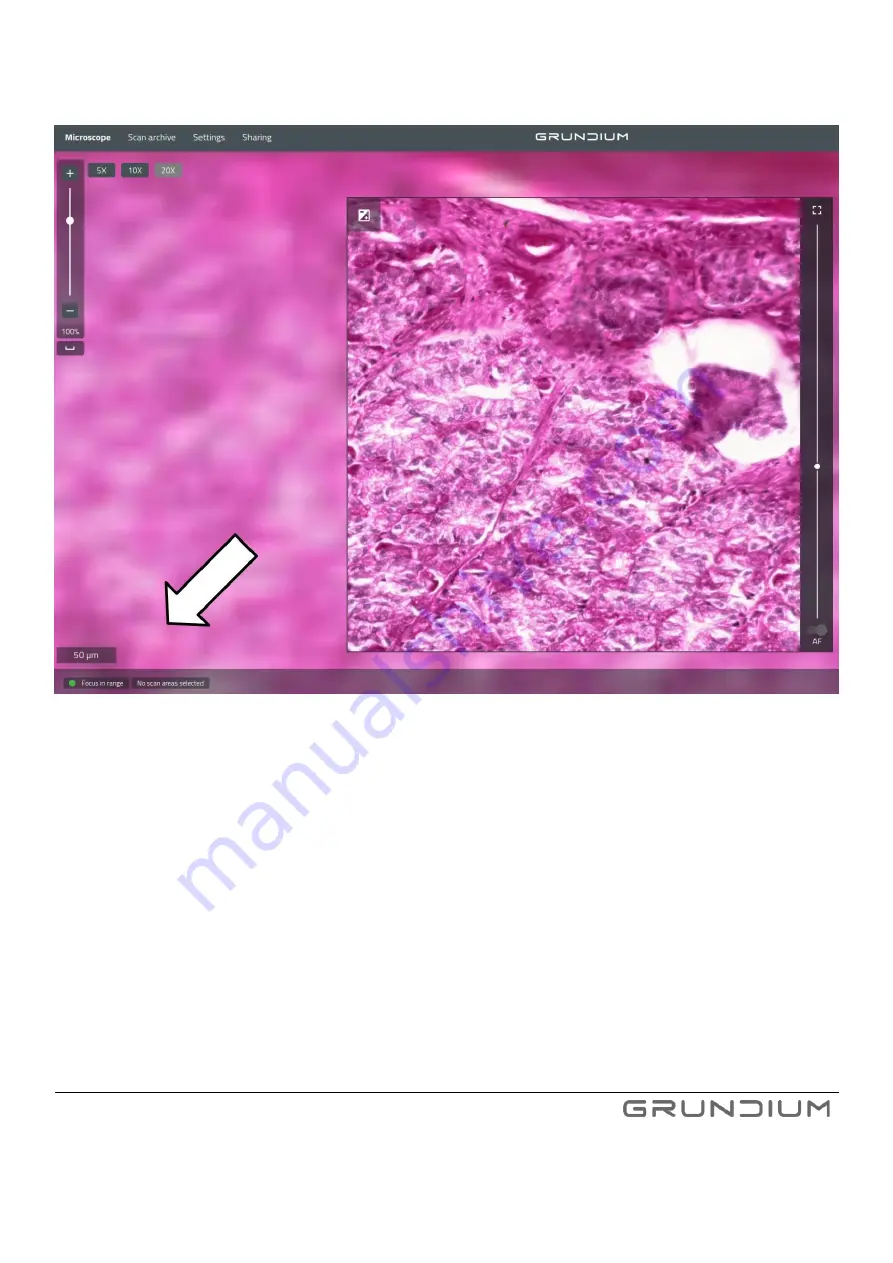
Information in Navigator -box when Focus in range.


7.


For best results, scanner’s mechanical focus needs to be adjusted for each sample, especially if slide 

thickness has even slightly changed. To do this, press 

Live view

 and pick a target area using the crosshair 

cursor or zoom in to 100%. Use the focus knob on the scanner to adjust the focus. 

Quick tip

 dialog will assist 

you with knob directions. Focus is properly adjusted, when 

Focus in range

 is shown on screen. 


8.


Zoom out, press 

Add 

and select one or more areas you want to scan. To adjust the areas further, drag the 

borders of the areas. Estimated scan time is shown on screen.  
 
If 

Focus not in range 

is shown on screen, you need to adjust the mechanical focus using live view (Image 16 

and Image 19). 
 

Tip:

 To quickly remove extra areas from the selected scanning area, press 

Trim all

.  The success of trimming 

depends on the sample, so always confirm the trimming result visually. 


Содержание OCUS MGU-00001

Страница 1: ...USER GUIDE MGU 00001 ...

Страница 2: ...ork settings 15 8 Logging in to the scanner 16 8 1 Logging in to the scanner with Internet connection 16 8 2 Logging in to the scanner with direct WLAN WI FI connection 17 9 Scanning 17 9 1 Optical sectioning Z Stack 22 9 2 Image adjustments 24 10 Viewing the images 26 11 Exporting an image 26 12 Annotations 28 13 Sharing 29 14 Controlling multiple scanners 30 15 Switching off the scanner 30 16 Sc...

Страница 3: ...ot your password 37 25 4 Power button light is steady red 37 25 5 Connecting to Internet via Proxy 37 25 6 Scanner always connects to an unwanted WLAN and does not go into WLAN access point mode 38 25 7 Need to reset all changes to network settings 38 25 8 Download does not start automatically when exporting to WebDL 38 26 Certifications and patents 38 27 Customer care and support 39 28 Manufactur...

Страница 4: ...MGU 00001 o Transportation pin o Protective cover o Power supply and mains cable o Quick guide o Carrying case 2 TO USE THE OCUS SCANNER YOU ALSO NEED o Computer or tablet o Internet connection o Grounded mains outlet recommended to use UPS device in critical operations o Browser recommended Chrome Firefox Safari Internet Explorer not supported It is recommended to use the latest available browser...

Страница 5: ...c IVD medical devices Ocus technology has been granted U S Patents No 10 341 551 and 10 564 408 Ocus design has been granted U S Patent No D872789 Important Notice In the USA Grundium Ocus is for research use only RUO and not for use in diagnostic procedures Important Notice The functionality of the scanner must be verified every time before critical operation The scanner s intended usage flow inc...

Страница 6: ...tion microscope 20X 0 48 µm pix Resolution overview 10 µm pix Depth of focus 5 µm Focusing Manual coarse automatic scan fine tune in live mode Image sensor 6 Mpix Slide capacity 1 Slide format 75 x 25 mm Scan speed 15 x 15 mm 2 mins Connectivity 1 GigE 802 11 ac WLAN Image formats TIFF SVS SZI W x D x H cm 18 x 18 x 19 Weight kg 3 5 kg Illumination Koehler LED ...

Страница 7: ...avoid leaving fingerprints on the glass surfaces or lenses while removing the pin Image 1 Remove the transportation support pin by turning it counterclockwise Place the scanner on a flat surface and make sure there is at least 10 centimetres 4 inches of free space around it Tip To ensure safe transportation screw the transportation support pin back in before moving the scanner to another location ...

Страница 8: ...iankatu 6 8G 33720 Tampere Finland 2021 Grundium All rights reserved 6 SCANNER PARTS Image 2 Scanner parts 1 Focus knob 2 Power button 3 Objective 4 Cover plate 5 X Y stage 6 Lever 7 Slide holder 8 Slide support glass 9 Overview camera ...

Страница 9: ... rights reserved 6 1 SCANNER CONNECTORS Image 3 Scanner connectors 1 USB connector 2 Power supply connector Use only the power supply delivered with the scanner Important notice If there is any damage in the mains cable or the power supply do not use the device 3 Network cable connector ...

Страница 10: ...you use the scanner for the first time you need to connect it to your computer or tablet and set up an Internet connection for the scanner You can use either a network cable or a WLAN Wi Fi for the connection During the setup process assign the scanner to either an existing team or create a new team A team can have any number of members but each user must have a valid Grundium account to use the s...

Страница 11: ...etween devices in the network must be allowed 7 1 FIRST USE WITH A NETWORK CABLE CONNECTION 1 Attach the power cable to the scanner and plug the cable in a wall outlet The power button shows a breathing green light 2 Connect one end of the network cable to the scanner and the other end to the Ethernet connector for your network which has connection to the Internet 3 Press the power button The powe...

Страница 12: ...o Grundium cloud 6 When registering a new user enter your email address and press Add a new account Read and Accept Terms and Conditions Verification email will be sent to address you have registered Check your email and copy the verification code to the line and press Continue Note Verification code is valid 72 hours or until it has been used successfully Image 6 Add verification code that has be...

Страница 13: ...land 2021 Grundium All rights reserved 7 Enter your name and create a password then press Confirm Image 7 Enter your name and create a password 8 After registering is done login to the system with your email address and password Image 5 9 Click Register a new device ...

Страница 14: ...n the Quick guide and at the bottom of the scanner Press Register when ready Note Your scanner must be switched on and connected to Internet when registering a device Image 9 Type the serial number of your Ocus 40 scanner 11 Select existing team from the dropdown menu or add a new team by pressing After entering a valid team name press ADD Note Name of the team needs to be in lower case and withou...

Страница 15: ... now you are ready to use your Ocus scanner 7 2 FIRST USE WITH A WLAN WI FI CONNECTION To use a WLAN Wi Fi connection you need The name of the WLAN Wi Fi SSID provided by the scanner and your password These are found on the label at the bottom of the scanner or on the label attached to quick start guide Details of the WLAN Wi Fi to which the scanner connects for Internet access These include the W...

Страница 16: ...ner and your browser are connected to the Internet you will see the login page Image 5 Tip You can use your smart phone s mobile hotspot feature to create a WLAN Wi Fi Internet connection 7 Continue following chapter 7 1 step 5 7 3 NETWORK SETTINGS The scanner can be used either with cable or wireless Internet connection either directly or via proxy or with direct WLAN Wi Fi connection between the...

Страница 17: ...for assistance and see Troubleshooting for more information 8 LOGGING IN TO THE SCANNER 8 1 LOGGING IN TO THE SCANNER WITH INTERNET CONNECTION This connection method works when the power button light is green or yellow 1 Open the browser on your computer or tablet and go to https www grundium net 2 Enter your e mail address and password and press Login 3 Select your team and the scanner you want t...

Страница 18: ...Fi access point provided by the scanner WLAN Wi Fi name SSID and password can be found on the label on the bottom of the device or in the quick guide see Image 4 2 Open the browser in your computer or tablet and go to http www grundium net 3 Type your e mail address and password and press Login Image 11 9 SCANNING Important notice Both in local and remote use remember to keep at least 10 centimete...

Страница 19: ...e Finland 2021 Grundium All rights reserved Image 14 Open the slide holder and place the slide in the scanner 3 Place the slide in the scanner so that the label is on the right 4 Push the lever right to secure the slide 5 Press New scan to take an overview image ...

Страница 20: ...oom in and out on the specimen use your mouse scroll or press or 5x 10x 20x quick buttons next to the zoom bar on display To pan the image use your fingertip or the left button of your mouse to move it Image 16 Zooming options Tip The image is saved automatically in the scanner s hard drive If you want to give the image a specific name type the name in the File name field ...

Страница 21: ... take a snapshot image of the live view by pressing Save image Tip Scanner s electronic fine focus can be adjusted with the slider on the right side of the live view image If you use a mouse with roller wheel the roller will move the focus when mouse cursor is on top of the slider The fine focus is much more precise than the coarse focus but is limited in range Pressing AF next to the slider activ...

Страница 22: ...ob on the scanner to adjust the focus Quick tip dialog will assist you with knob directions Focus is properly adjusted when Focus in range is shown on screen 8 Zoom out press Add and select one or more areas you want to scan To adjust the areas further drag the borders of the areas Estimated scan time is shown on screen If Focus not in range is shown on screen you need to adjust the mechanical foc...

Страница 23: ...are marked with gray outlines in the overview image and you can zoom into them 9 1 OPTICAL SECTIONING Z STACK Optical sectioning z stack mode can be used to scan the sample with different focus depths The number of scan layers and their offset from optimal focus plane can be defined in Scan Mode settings see Image 20 The settings view can be entered by pressing Configure button next to Scan mode s...

Страница 24: ...miankatu 6 8G 33720 Tampere Finland 2021 Grundium All rights reserved Image 20 Optical sections can be selected in Configure window Note The depth figures have the accuracy of 10 and are valid for samples having refractive index of 1 0 ...

Страница 25: ...eir default value by pressing next to the slider see Image 22 The outcome of adjustment is immediately seen in the live view and the parameters are applied to upcoming scans To return all parameters to their default values press see Image 23 Important notice The adjustments are stored to the scanner and will be applied for live view and upcoming scans If there are several users for the scanner ple...

Страница 26: ...Ocus User Guide version 9 0 25 Hermiankatu 6 8G 33720 Tampere Finland 2021 Grundium All rights reserved Image 22 Image adjustment options Image 23 Reset all adjustments ...

Страница 27: ...n view This will automatically export all scanned areas on the slides selected OR 2 Export from Scan Archive single slide view you can select the scanned areas you want to export OR 3 Export from Microscope view by using Scan Export button This automatically exports all scanned areas on the slide after the scanning is completed Common to all three export methods is that the export parameters meani...

Страница 28: ...and SZI The progress of ongoing scans can be followed in Exports list Image 26 Image 26 Ongoing and completed exports Note Some export destinations are not available until they are enabled from plugin settings Note The time stamp of the exported USB files is by default in UTC time zone Some file systems are naturally always in UTC and will therefore display the time stamps properly in local times ...

Страница 29: ...h in Microscope view and in Scan Archive view Image 27 Annotations in navigator window Annotation type rectangle free hand textbox and colour can be selected from bottom pane Image 28 Several annotation layers can be created and this allows multiple users to annotate same slides Image 28 Annotation controls Note Annotations are visible only when viewing the slides in Ocus device when scanned slide...

Страница 30: ...roscope and Scan Archive views is available Note The sharing feature requires a separate license which can be obtained by contacting your distributor or Grundium 1 A shared session can be started by pressing Sharing and Start the session specific link can be copied or emailed to participants Image 29 Establishing shared session 2 After receiving the link the participants can login into the shared ...

Страница 31: ...splay to select another scanner 15 SWITCHING OFF THE SCANNER There are two ways to switch off the scanner 1 In the microscope view press Change slide Shutdown Note If you are preparing the scanner for transportation remove the slide from the scanner before pressing Shutdown OR 2 Press the power button During the shutdown the power key blinks red When the scanner is switched off the power key shows...

Страница 32: ... the settings including plugins are set correctly for your use case every time you start using the device 17 CREATING A NEW TEAM WHEN OCUS HAS ALREADY BEEN TAKEN INTO USE 1 Select Team management from the menu under your name in up right of the screen Image 32 To create a new team click Team management from a menu 2 Click Create team Name your team The name must be in lower case and cannot include...

Страница 33: ... 1 Select Team management from the menu under your name in the top right of the screen Image 32 2 Add users to the team by clicking Add An e mail address is required for each user Select a device or devices for the user from the menu All available devices appear in the menu Image 35 E mail address of a new team member is required when adding new users 3 Close the menu when done exampleteam team me...

Страница 34: ...vity scanning and exporting function properly 20 FACTORY RESET In a factory reset all user team data and configurations will be deleted from the device To initiate the factory reset press i to open the info window and press Factory reset After the factory reset has completed the device needs to be taken into use according to instructions in chapter First use Image 36 Factory reset button in Info w...

Страница 35: ...n use a microscope detergent for example Reagena which consists of Propan 2 ol and ammonia The Ocus scanner has been tested with the Reagena microscope detergent 6 Put the cover plate back 7 Slide the topmost plate back to its normal position 8 Connect the cables and switch the scanner on Verify with a known sample slide that overview camera produces good quality live view from microscope camera p...

Страница 36: ... 4 Place the scanner into carrying case close the lid and secure it by locking latches If you need to send the scanner to another location do the following 1 Switch off the scanner and detach the cables 2 Turn the focus knob until the camera lens is in the uppermost position 3 Insert the transportation support pin Image 38 4 Place the scanner into carrying case close the lid and secure it by locki...

Страница 37: ... to normal room temperature 15 to 25 degrees of Celsius or 59 to 77 Fahrenheit An airtight carrying case is available for purchase at Grundium or your distributor Use the scanner in temperatures between 15 and 40 degrees Celsius 59 to 104 Fahrenheit Do not open the scanner or try to change the objective Only persons authorized by Grundium may repair the product Unauthorized modifications may damag...

Страница 38: ...e scanner are on the same network 25 3 FORGOT YOUR PASSWORD Solution Go to https www grundium net and click Forgot password in the bottom right of the screen Type your e mail address and click Continue A verification code is emailed to you Enter the verification code and click Continue Enter the new password and click Confirm 25 4 POWER BUTTON LIGHT IS STEADY RED Solution Device is in error state ...

Страница 39: ...release the finger when the light blinks blue All user made changes to network settings are cleared from the device The WLAN access point password is reset back to the same as in device label 25 8 DOWNLOAD DOES NOT START AUTOMATICALLY WHEN EXPORTING TO WebDL Solution Check your web browser settings and disable all ad blockers and pop up blockers for grundium net 26 CERTIFICATIONS AND PATENTS CE st...

Страница 40: ... licence conformes aux RSS RSS d Innovation Sciences et Développement économique Canada Le fonctionnement est soumis aux deux conditions suivantes 1 Cet appareil ne doit pas causer d interférences 2 Cet appareil doit accepter toutes les interférences y compris celles susceptibles de provoquer un fonctionnement indésirable de l appareil Cet équipement est conforme aux ISED Canada des limites d expo...

Отзывы: