Grundig GRT-K1104A Скачать руководство пользователя страница 107


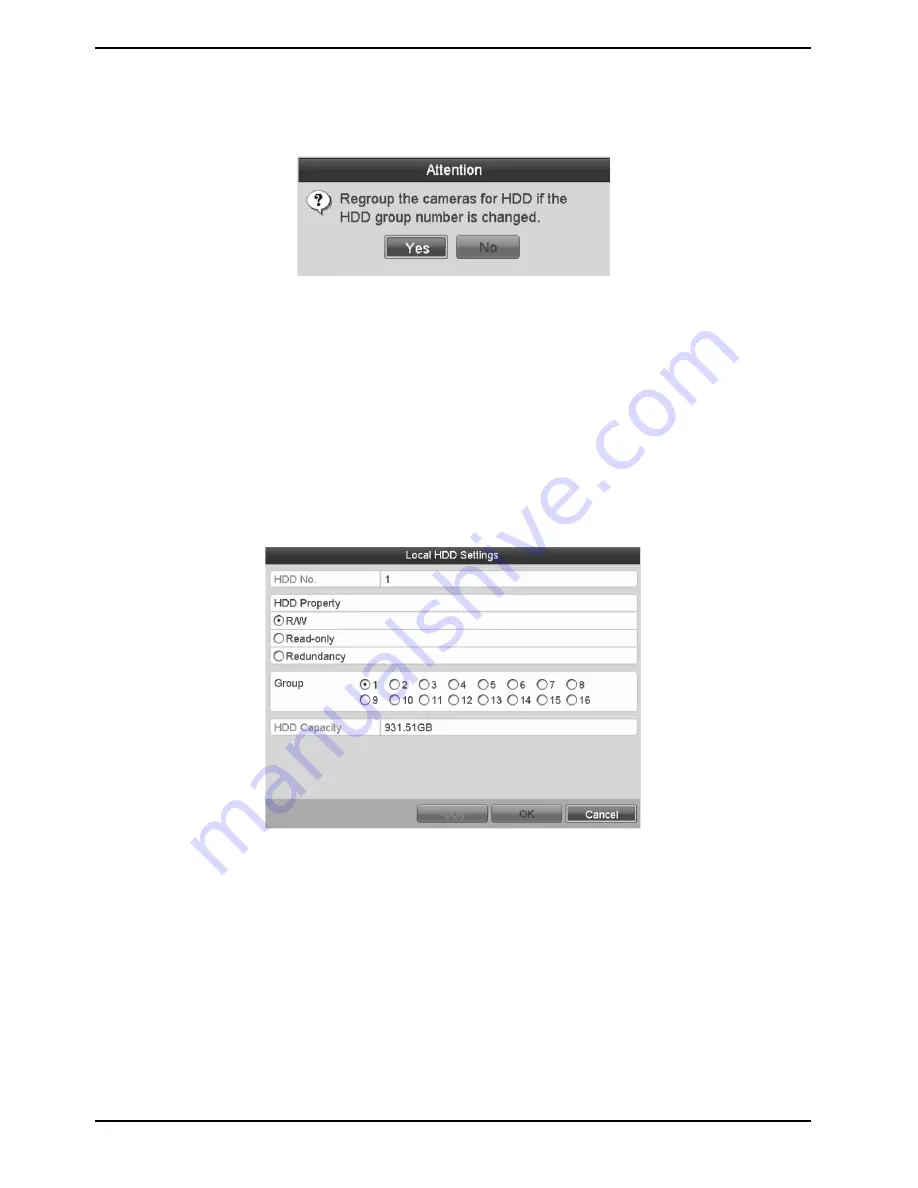
7. Select the Group number for the current HDD. 
 
NOTE: The default group No. for each HDD is 1.


8. Click the “OK” button to con

fi

rm the settings.


9. In the pop-up Attention Box, click the “Yes” button to 

fi

nish the settings.

13.4.2. Setting a HDD Property

The HDD property can be set to redundancy, read-only or read/write (R/W). Before setting the HDD property, 
please set the “Storage Mode” to “Group” (refer to Steps 1-4 of the Chapter “Setting up HDD Groups”). 
An HDD can be set to read-only to prevent important recorded files from being overwritten when the HDD 
becomes full in overwrite recording mode.
When the HDD property is set to redundancy, the video can be recorded both onto the redundancy HDD and the 
R/W HDD simultaneously so as to ensure high security and reliability of video data.

Steps:


1. Enter the HDD Information interface: Menu> HDD> General


2. Select a HDD from the list and click the on the “(pencil on a written sheet)” icon to enter the Local HDD 
Settings interface, as shown below.


3. Set the HDD property to R/W, Read-only or Redundancy.


4. Click the “OK” button to save the settings and exit the interface.


5. In the HDD Information menu, the HDD property will be displayed in the list.
 
NOTE: At least 2 hard disks must be installed on your NVR/DVR when you want to set a HDD to “Redundancy”, 
and only one HDD can be set to “R/W”.

107

English

Содержание GRT-K1104A

Страница 1: ...ner s Manual ASP AG HD Video Recorders GRT K1104A 4 CH Hybrid HD TVI Analog real time Video Recorder GRT K2208A 8 CH Hybrid HD TVI Analog real time Video Recorder GRY K4416A 16 CH Tribrid HD TVI IP An...

Страница 2: ......

Страница 3: ...ations in Live View Mode 32 6 2 1 Using the Mouse in Live View 32 6 2 2 Quick Setting Toolbar in Live View Mode 33 6 3 Adjusting the Live View Settings 35 6 4 Digital Spot 36 6 5 Manual Video Quality...

Страница 4: ...Alarms 82 11 3 Detecting Video Tampering 84 11 4 Detecting a Video Loss Alarm 85 11 5 Handling an Exceptions Alarm 86 11 6 Setting Alarm Response Actions 86 11 7 Triggering or Clearing an Alarm Outpu...

Страница 5: ...ewing the System Information 114 15 2 Searching Exporting Log Files 114 15 3 Importing Exporting IP Camera Information 116 15 4 Importing Exporting Configuration Files 117 15 5 Upgrading the System 11...

Страница 6: ...re and not due to a problem in the NVR DVR The warranty period for the Fan is one year after purchase This product is not for exclusive use of crime prevention but also for assistance in cases of fire...

Страница 7: ...taneous HDMI Trademark and VGA outputs with up to 1920 1080 resolution Multiple screen display in live view is supported and the display sequence of channels is adjustable Live view screen can be swit...

Страница 8: ...s pause play reverse speed up speed down skip forward and skip backward during playback and locating by dragging the mouse Up to 16 ch synchronous playback in 4CIF real time Backup Exports video data...

Страница 9: ...Product is for indoor use It is not weatherproof Please use the product considering its environmental specifications Temperature Humidity To clean the product gently wipe the outside with a clean dry...

Страница 10: ...3 Package Contents These parts are included 10 English...

Страница 11: ...4 Installation 4 1 Connections and Control Keys Front View 11 English...

Страница 12: ...Rear View of the recorder model GRT K1104A GRT K2208A Rear View of the recorder model GRY K4416A 12 English...

Страница 13: ...k Do not seal the inside of the rack where the NVR DVR is installed Keep the airflow through the inlet and outlet If there is another device installed in the rack secure the additional space or instal...

Страница 14: ...st be removed for the HDDs previously used in a PC or other DVR models before installation Before you start Disconnect the power from the NVR DVR before installing a hard disk drive HDD A factory reco...

Страница 15: ...rm input and the device To connect to an alarm output AC or DC load use the following diagram For DC load the jumpers can be used within the limit of 12V 1A safely To connect an AC load jumpers should...

Страница 16: ...for the models GRT K1104A GRT K2208A To connect the PTZ to the models GRT K1104A GRT K2208A 1 Disconnect the pluggable block from the RS 485 terminal block 2 Press and hold the orange part of the plu...

Страница 17: ...op screws 4 Connect the pluggable block back into the terminal block Make sure both the controller and the DVR are grounded Termination Switch Operation The termination switch is placed on the mainboa...

Страница 18: ...eration of the DVR 5 1 1 Remote Control It is possible to use all functions of the NVR DVR with the remote control If several NVR DVRs are set with unique ID numbers they can be controlled with one re...

Страница 19: ...19 English...

Страница 20: ...u have installed the batteries properly in the remote control And you have to aim the remote control at the IR receiver in the front panel If there is no response after you press any button on the rem...

Страница 21: ...not turn blue and there is still no response from the remote please check the following 1 Batteries are installed correctly and the polarities of the batteries are not reversed 2 Batteries are fresh a...

Страница 22: ...ent and the ground connection is working properly Starting up the NVR DVR Steps 1 Check whether the power supply is plugged into an electrical outlet It is HIGHLY recommended that an Uninterruptible P...

Страница 23: ...button 3 Click the Yes button 4 Turn off the power switch on the rear panel when the attention window pops up Rebooting the NVR DVR In the Shutdown menu you can also reboot the NVR DVR Steps 1 Enter...

Страница 24: ...d can take you through some important settings of the NVR DVR If you do not want to use the Setup Wizard at that moment click the Cancel button You can also choose to use the Setup Wizard next time by...

Страница 25: ...the New Admin Password checkbox Enter the new password and confirm the password in the given fields 5 Click the Next button to enter the date and time settings window 6 After the time settings click t...

Страница 26: ...HDD click the Init button Initialisation removes all the data saved in the HDD 9 Click the Next button You enter the Adding IP Camera interface 10 Click Search to find an online IP Camera Select the I...

Страница 27: ...function of the NVR DVR you must login the device before operating the menu and other functions Steps 1 Select the User Name in the dropdown list 2 Input the Password 3 Click OK to log in In the Logi...

Страница 28: ...tion interface of the device the main menu bar will be displayed on the top of the screen You can click on the icons to enter the corresponding submenus and perform the operations The icon of the curr...

Страница 29: ...g and configuring of the network please see Chapter 9 3 Checking Network Traffic and the Chapter Configuring Network Detection Steps 1 Enter the Camera Management interface Menu Camera Camera 2 Select...

Страница 30: ...era 4 To add other IP cameras 1 Click the Custom Adding button to pop up the Add IP Camera Custom interface 2 You can edit the IP address protocol management port and other information of the IP camer...

Страница 31: ...essage box after the importing process is complete The imported IP cameras will be displayed on the IP Camera Management interface Export the configuration file of the IP cameras to the backup device...

Страница 32: ...ere are many functions provided The functions are listed below Single Screen showing only one screen on the monitor Multi screen showing multiple screens on the monitor simultaneously Auto switch the...

Страница 33: ...6 2 2 Quick Setting Toolbar in Live View Mode On the screen of each channel there is a quick setting toolbar which shows when you single click the mouse in the corresponding screen 33 English...

Страница 34: ...g from the last five minutes If no recording is found it means there was no recording during the last five minutes Digital Zoom Digital Zoom can zoom in the selected area to the full screen You can le...

Страница 35: ...al time Balanced Fluency 6 3 Adjusting the Live View Settings The Live View settings can be customised according to different needs You can configure the output interface dwell time for the screen to...

Страница 36: ...e camera to be displayed in the live view interface click the corresponding X button to stop it You can also click on the Forward image button to start the live view for all the channels and click the...

Страница 37: ...al Manual Video Quality Diagnostics 2 Check the checkboxes to select the channels for diagnostics 3 If you click the button Diagnose the results will be displayed in a list You can view there the vide...

Страница 38: ...eed to be configured directly in the camera OSD Steps 1 Enter the PTZ Settings interface Menu Camera PTZ 2 Click the RS 485 Settings button to set the RS 485 parameters 3 Choose the camera for PTZ set...

Страница 39: ...ocation where you want to set the limit and click the Left Limit or Right Limit button to link the location to the corresponding limit NOTE A speed dome starts a linear scan from the left limit to the...

Страница 40: ...ey points for the patrol 4 Configure the key point parameters such as the Key Point No duration of staying for one key point and speed of patrol The key point is corresponding to the preset The Key Po...

Страница 41: ...ol 3 Select a patrol in the dropdown list and click the Call Patrol button to call it 4 You can click the Stop Patrol button to stop calling it 7 2 5 Customising the Patterns Patterns can be set by re...

Страница 42: ...select the PTZ option in the right click menu to show the PTZ control panel 2 Click the button to show the general settings of the PTZ control 3 Click the Call Pattern button to call it 4 Click the St...

Страница 43: ...to call the linear scan in the predefined scan range Steps 1 Click the button PTZ in the lower right corner of the PTZ setting interface Or press the PTZ button on the front panel or click the PTZ Con...

Страница 44: ...5s 4 Click the button again to inactivate it 7 3 PTZ Control Panel To enter the PTZ control panel two ways are supported OPTION 1 In the PTZ settings interface click the PTZ button on the lower right...

Страница 45: ...been installed If not please install a HDD and initialise it Menu HDD General 2 Check the storage mode of the HDD 1 Click Advanced to check the storage mode of the HDD 2 If the HDD mode is Quota plea...

Страница 46: ...d the recording ends at 11 00 if you set the post record time as 5 seconds it records till 11 00 05 Expired Time The expired time is the longest time for a record file to be kept in the HDD if the dea...

Страница 47: ...Select a camera in the camera dropdown list 3 Configure the parameters 4 Click Apply to save the settings 5 Optional If the parameters can also be used for other cameras click Copy to copy the settin...

Страница 48: ...can choose the day for which you want to set a schedule You can click the clock button to set the accurate time of the schedule II To schedule an all day recording check the checkbox after the All Day...

Страница 49: ...ttings are only available to IP cameras that are supporting these functions Repeat the above edit schedule steps to schedule the recording for other days in the week You can click Copy to enter Copy t...

Страница 50: ...io warning notifying the surveillance center and so on In this chapter you can follow the steps to schedule a recording which is triggered by the detected motion Please note Only cameras using Grundig...

Страница 51: ...OK to go back to the upper level menu 8 Exit the Motion Detection menu 3 Edit the Motion Detection Recording Schedule For detailed information of schedule configuration see Chapter Configuring the Re...

Страница 52: ...ding channel 6 Check the checkboxes to select the channels 7 Click Apply to save the settings 8 Click OK to go back to the upper level menu Repeat the above steps to configure other alarm input parame...

Страница 53: ...tatus button in front of the camera number to change from OFF to ON 3 Disable Manual Recordin Click the status button to change from ON to OFF NOTE The ON written in green means that the channel is co...

Страница 54: ...ly to save the settings 6 Click OK to exit the Edit interface 3 Enter the Recording Schedule settings interface to edit the holiday recording schedule For details see Chapter 6 2 Configuring the Recor...

Страница 55: ...ou set the HDD property to Redundant For detailed information please refer to Setting the HDD Property There should be at least another HDD which is in Read Write status 3 Enter the Recording setting...

Страница 56: ...the pencil on a written sheet button to enter the editing interface 5 Configuring the HDD group 1 Choose a group number for the HDD group 2 Click Apply and then in the pop up message box click Yes to...

Страница 57: ...the checkbox 3 Configure the recording type file type and start end time 4 Click Search to show the results 5 Protect the recording files 1 Find the recording files you want to protect and then click...

Страница 58: ...property to Read only 4 Click OK to save the settings and to go back to the upper level menu NOTE You cannot save any files on a Read only HDD If you want to save files on the HDD change the property...

Страница 59: ...the backward arrow on an SD card button in the quick setting toolbar NOTE In the instant playback mode only the recording files recorded during the last five minutes on this channel will be played ba...

Страница 60: ...2 Playback management The toolbar in the bottom part of the Playback interface can be used to control the playing progress Click on the channel s to execute simultaneous playback of multiple channels...

Страница 61: ...re supported Steps 1 Enter the playback interface Menu Playback 2 Check the checkbox of the channel s in the channel list and then double click to select a date on the calendar This function plays bac...

Страница 62: ...ace can be used to control the playing process 9 1 3 Playing Back by Event Search This function plays back the recording files on one or several channels searched out by the restricting event type e g...

Страница 63: ...r for the result 5 Click the button to play back the file You can click the Back button to go back to the search interface NOTE Pre play and post play can be configured 6 Playback interface The toolba...

Страница 64: ...supported Steps 1 Enter the playback interface Menu Playback 2 Check the checkbox of the channel s in the channel list and then double click to select a date on the calendar 9 1 4 Playing Back by Tag...

Страница 65: ...e video file 3 Tag management Click the cogwheel button to check edit and delete tag s Steps 1 Select Tag from the drop down list in the Playback interface 2 Choose channels edit the start time and en...

Страница 66: ...ured 9 1 5 Playing Back by System Logs This function plays back recording file s associated with channels after searching the system logs Steps 1 Enter the Log Information interface Menu Maintenance L...

Страница 67: ...er the Playback interface NOTE If there is no recording file at the time point of the log the message box No result found will pop up 4 Playback interface The toolbar in the bottom part of the Playbac...

Страница 68: ...ry Functions of Playback 9 2 1 Playing Back Frame by Frame This function plays the video files frame by frame for checking the image details of the video when abnormal events happen Steps Go to the Pl...

Страница 69: ...Multi channel You can play back the recording files of multi channel reversely Up to 16 ch with 1280 720 resolution simultaneous reverse playback is supported up to 4 ch with 1920 1080P resolution sim...

Страница 70: ...and USB HDDs Steps 1 Enter the Export interface Menu Export Normal 2 Set the search condition and click the Search button to enter the search result interface 3 Select the recording files you want to...

Страница 71: ...vice If this does not work this device might not be supported or defect You can also format USB flash drives or USB HDDs via the device Stay in the Exporting interface until all recording files are ex...

Страница 72: ...h button to enter the search result interface 3 Select the recording files you want to back up Click the button to play the recording file if you want to check it Check the checkbox in front of the re...

Страница 73: ...ackup result Choose the recording file in the Export interface and click the button to check it 10 1 2 Backing up by Event Search This function backs up event related recording files using USB devices...

Страница 74: ...icking the Quick Export button will export the recording files of all channels triggered by the selected alarm input 2 Click the Details button to view detailed information of the recording file e g s...

Страница 75: ...ed Click the Refresh button Reconnect the device If this does not work this device might not be supported or defect You can also format the USB flash drive or the USB HDDs via the device Stay in the E...

Страница 76: ...Please refer to Chapter 6 1 Playing Back Recording Files 2 During playback use the buttons scissors and scissors with a tick in the playback toolbar to start or stop clipping the recording file s 3 C...

Страница 77: ...until all recording files are exported and the pop up message Export finished appears 5 Check the backup result NOTE The Player player exe will be exported automatically during the recording file exp...

Страница 78: ...utton if you want to create a new folder on the backup device Select a recording file or folder on the backup device and click the red bin button if you want to delete it Select a recording file on th...

Страница 79: ...k the Search button to enter the Search Result interface NOTE At least one channel shall be selected 2 Select the recording files you want to back up Click the Export All button to export all the reco...

Страница 80: ...supported or defect 11 Alarm Settings 11 1 Setting the Motion Detection Alarm Steps 1 Enter the Motion Detection interface of the Camera Management and choose a camera you want to set up the motion d...

Страница 81: ...ions for the motion detection 2 Choose one day of a week and up to eight time periods can be set within each day 3 Click Apply to save the settings NOTE Time periods shall not be repeated or overlappe...

Страница 82: ...Settings interface 2 Set up the handling action of the selected alarm input Check the Enable checkbox and click the Settings button to set up its alarm response actions 3 Select the Trigger Channel t...

Страница 83: ...etting Alarm Response Actions 6 If necessary select the PTZ Linking tab and set the PTZ linkage of the alarm input Set the PTZ linking parameters and click OK to complete the settings of the alarm inp...

Страница 84: ...per sensitivity level Use the mouse to draw an area where you want to detect video tampering Click the cogwheel button to set up the handling action of video tampering 3 Set the arming schedule and al...

Страница 85: ...n to set up the handling action of video loss 3 Set up the arming schedule of the handling actions 1 Select the Arming Schedule tab to set the channel s arming schedule 2 Choose one day of a week and...

Страница 86: ...Alarm response actions will be activated when an alarm or exception occurs including Event Hint Display Full Screen Monitoring Audible Warning buzzer Notify Surveillance Center Upload Picture to FTP T...

Страница 87: ...ation Live View Full Screen Monitoring Dwell Time Auto switch will terminate once the alarm stops and you will be taken back to the Live View interface NOTE You must select during the Trigger Channel...

Страница 88: ...Configuration Alarm Alarm Output Select an alarm output and set the alarm name and dwell time Click the Schedule button to set the arming schedule of alarm output NOTE If Manually Clear is selected i...

Страница 89: ...alarm can be triggered or cleared manually If Manually Clear is selected in the dropdown list of the dwell time of an alarm output the alarm can be cleared only by clicking the Clear button in the fol...

Страница 90: ...o allows access by Point to Point Protocol over Ethernet PPPoE Steps 1 Enter the Network Settings interface Menu Configuration Network 2 Select the PPPoE tab to enter the PPPoE Settings interface 3 Ch...

Страница 91: ...er the DDNS Settings interface 3 Check the Enable DDNS checkbox to enable this feature 4 Select DDNS Type 4 different DDNS types are selectable IPServer DynDNS PeanutHull and NO IP IPServer Enter the...

Страница 92: ...he FTP server on your PC and put the firmware file into the directory as required Steps 1 Enter the Network Settings interface Menu Configuration Network 2 Select the NTP tab to enter the NTP Settings...

Страница 93: ...ed to send the alarm event and exception message to the surveillance center 12 2 6 Configuring the Remote Alarm Host With a remote alarm host configured the NVR DVR will send the alarm event or except...

Страница 94: ...eaming media servers Steps 1 Enter the Network Settings menu Menu Configuration Network 2 Select the More Settings tab to enter the More Settings menu 3 Enter the RTSP port in the text field of RTSP S...

Страница 95: ...at maintains an SMTP mail server The network must also be connected to either an intranet or the Internet depending on the location of the e mail accounts to which you want to send the notification St...

Страница 96: ...time between two actions of sending attached pictures E Mail Test Sends a test message to verify that the SMTP server can be reached 6 Click the Apply button to save the Email settings 7 You can clic...

Страница 97: ...Plug and Play UPnP can permit the device to seamlessly discover the presence of other network devices on the network and to establish functional network services for data sharing communications etc Yo...

Страница 98: ...ol to activate the External Port Settings dialogue box Steps 1 Select Manual in the drop down list of Mapping Type 2 Click on the pencil on a written sheet symbol to activate the External Port Setting...

Страница 99: ...xternal port No For server port http port RTSP port and https port respectively NOTE The value of the RTSP port No Should be 554 or between 1024 and 65535 while the value of the other ports should be...

Страница 100: ...e etc Steps 1 Enter the Network Traffic interface Menu Maintenance Net Detect 2 You can view the sending rate and receiving rate information on the interface The traffic data is going to be refreshed...

Страница 101: ...he Network Traffic interface Menu Maintenance Net Detect 2 Click the Network Detection tab to enter the Network Detection interface 3 Select the backup device from the dropdown list of Device Name NOT...

Страница 102: ...ck on the Network button to show the quick setting interface of the network parameters 12 4 4 Checking the Network Statistics You can check here the network status to obtain the real time information...

Страница 103: ...mmediately or you can perform the following steps to initialise the HDD Steps 1 Enter the HDD Information interface Menu HDD General 2 Select the HDD to be initialised 3 Click the Init button 2 Select...

Страница 104: ...the allocated NetHDD 4 Select the type from NAS or IP SAN2 5 Configure the NAS or IP SAN settings Add an NAS disk 1 Enter the NetHDD IP address in the text field 2 Click the Search button to search t...

Страница 105: ...ect it and click the Init button for initialisation 13 3 Managing an eSATA HDD only HQT GRY K4416A When there is an external eSATA device connected to DVR you can configure eSATA for the use of Record...

Страница 106: ...ultiple HDDs can be managed in groups The Video from specified channels can be recorded onto a particular HDD group through the HDD settings Steps 1 Enter the Storage Mode interface Menu HDD Advanced...

Страница 107: ...erwrite recording mode When the HDD property is set to redundancy the video can be recorded both onto the redundancy HDD and the R W HDD simultaneously so as to ensure high security and reliability of...

Страница 108: ...uota as shown below NOTE The NVR DVR must be rebooted to enable the changes to take effect 3 Select a camera for which you want to configure the quota 4 Enter the storage capacity in the text fields o...

Страница 109: ...ck and maintenance in case of HDD failure Checking the HDD Status on the HDD Information Interface Steps 1 Enter the HDD Information interface Menu HDD General 2 Check the status of each HDD which is...

Страница 110: ...various indicators of reliability in the hope of anticipating failures S M A R T Settings Steps 1 Enter the S M A R T Settings interface Menu Maintenance HDD Detect 2 Select the HDD to view ist S M A...

Страница 111: ...use resume or cancel the detection 13 8 Configuring HDD Error Alarms You can configure the HDD error alarms when the HDD status is Uninitialized or Abnormal Steps 1 Enter the Exception interface Menu...

Страница 112: ...field 4 Configure the Display Name Display Date and Display Week by clicking the checkboxes 5 Select the Date Format Time Format and Display Mode 6 You can use the mouse to click and drag the text fr...

Страница 113: ...Menu Camera Image 2 Select the camera to set the image parameters 3 Two periods for different image settings are provided select the period name in the dropdown list NOTE The time periods cannot overl...

Страница 114: ...Info Camera Record Alarm Network and HDD tabs to view the system information of the device 15 2 Importing Exporting IP Camera Information The operation alarm exception and information of the NVR DVR...

Страница 115: ...ill be displayed on the list shown below NOTE Up to 2000 log files can be displayed each time 5 You can click the tick button of each log or double click it to view its detailed information as shown b...

Страница 116: ...xport all the log files stored in the HDD 15 3 Importing Exporting IP Camera Information The information of the added IP camera can be generated into an excel file and exported to the local device for...

Страница 117: ...mport button After the import process is completed you must reboot the NVR DVR NOTE After having finished the import of configuration files the device will reboot automatically 15 5 Upgrading the Syst...

Страница 118: ...2 Click the FTP tab to enter the local upgrade interface as shown below 3 Enter the FTP Server Address in the text field 4 Click the Upgrade button to start upgrading 5 After the upgrading is complete...

Страница 119: ...ect a serial device directly to the NVR DVR The serial device will be controlled remotely by the PC through the network and the protocol of the serial device Steps 1 Enter the RS 232 Settings interfac...

Страница 120: ...tment item Or you can manually check the Enable DST checkbox and then you choose the date of the DST period 16 4 Configuring More Settings for the Device Parameters Steps 1 Enter the General Settings...

Страница 121: ...or user name is admin and the password is 1234 The Administrator has the permission to add and delete a user and configure the user parameters 16 5 1 Adding a User Steps 1 Enter the User Management in...

Страница 122: ...k the OK button to save the settings and go back to the User Management interface The added new user will be displayed on the list as shown below 5 Select the user from the list and then click the tic...

Страница 123: ...live video of the selected camera s Local Manual Operation Locally starting stopping the manual recording and alarm output of the selected camera s Remote Manual Operation Remotely starting stopping t...

Страница 124: ...parameters Operator and Guest You can edit the user information including the user name password permission level and MAC address Check the checkbox next to Change Password if you want to change the p...

Страница 125: ...Committee NTSC is an analogue television standard used in such countries as the United States and Japan Each frame of an NTSC signal contains 525 scan lines at 60Hz NVR Acronym for a Network Video Re...

Страница 126: ...u don t want to install a HDD select Menu Configuration Exceptions and uncheck the Audible Warning checkbox of HDD Error 2 Verify that the HDD is initialised 1 Select Menu HDD General 2 If the status...

Страница 127: ...eps If it is solved finish the process If not please contact the manufacturer of the IP camera Live view gets stuck when video is output locally Possible Reasons a Poor network between the NVR DVR and...

Страница 128: ...d Parameters Record and set the Frame Rate to Full Frame 2 Verify that the hardware can afford the playback Reduce the channel number of playback Select Menu Record Encoding Record and set the resolut...

Страница 129: ...NOTE Simultaneously press Ctrl and C to exit the ping command If there exists a return information and the time value is little the network is normal 2 Verify the configuration parameters are correct...

Страница 130: ...icator is normal 2 When the IP camera is offline please try the ping the command on the PC to check if the PC connects with the IP camera 3 Verify whether the network between the IP camera and the NVR...

Страница 131: ...ected Possible Reasons After connecting the IP camera to the NVR DVR the image is output via the main spot interface by default Steps 1 Enable the output channel 2 Select Menu Configuration Live View...

Страница 132: ...eps If it is solved finish the process If not please contact the manufacturer of the IP camera Live view gets stuck when video is output locally Possible Reasons a Poor network between the NVR DVR and...

Страница 133: ...Ctrl Alt and Delete to enter the windows task management interface as shown in the following picture Select the Performance tab check the status of the CPU and Memory If the resource is not enough pl...

Страница 134: ...e NVR DVR with the RS 232 cable 2 Open the Super Terminal and execute the command of ping 192 168 0 0 l 1472 f the IP address may change according to the real condition and check if there exists a pac...

Страница 135: ...t Menu Configuration General General and verify that the Device Time is correct 2 Verify that the search condition is correct Select Playback and verify that the channel and time are correct 3 Verify...

Страница 136: ...tocol IPv4 IPv6 TCP IP UDP RTP DHCP DNS DDNS NTP SADP SMTP SNMP NFS iSCSI Client software Windows Vista 7 8 Web Viewer IE Firefox Safari Chrome Mobile iOS Android Serial Interface s 1x RS485 half dupl...

Страница 137: ...Serial Interface s 1x RS 232 1x RS 485 PTZ 1x RS 485 Keyboard Alarm Inputs 16 Alarm Outputs 4 Chassis 19 inch rack mounted 1 5U Supply Voltage 110 240 Vac 50 60Hz no HDD 55 W Power Consumption 5 kg W...

Страница 138: ...l time Video Recorder It is hereby certified that the products meet the standards in the following relevant provisions EC EMC Directive 2004 108 EC Applied harmonised standards and technical specifica...

Отзывы: