


-36-
Model G0853 (Mfd. Since 07/18)
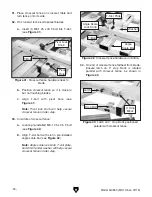
42. Install (1) M12-1.75 x 75 hex bolt and (1)
M12-1.75 hex nut on welded tab, as shown
in
Figure 47.
Figure 47. Fasteners installed on welded tab.
Hex Bolt
Welded
Tab
Hex Nut
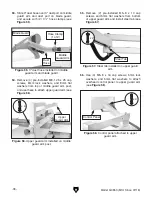
43. Remove (3) pre-installed hex nuts and wash-
ers from M20-2.5 x 130 studs (see
Figure 48)
on back side of machine.
44. Install lower guard arm on studs (see
Figure 48), and secure with hex
nuts and washers removed in
Step
43. Only hand-tighten for now.
45. Use a level to ensure lower guard arm is par-
allel with the floor.
46. Secure position of lower guard arm by adjust-
ing hex bolt installed in
Step 42 until head
of bolt rests against top of guard arm, then
tighten hex nut against tab.
47. Tighten hex nuts installed in Step 44 (see
Figure 49).
Figure 48. Lower guard arm installed on studs.
Lower
Guard Arm
Studs
Figure 49. Tightening hex nuts to secure lower
guard arm.
Lower
Guard Arm
x 3
48. Use (4) M8-1.25 x 25 cap screws, 8mm lock
washers, and 8mm flat washers to attach
middle guard arm post to lower guard arm
(see
Figure 50).
Figure 50. Middle guard arm post attached to
lower guard arm.
x 4
Middle Guard
Arm Post


