to assure a good bond between the servo and the servo
tape that will be used for holding the servo to the wing.
❏ ❏
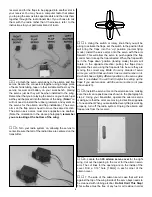
8. Tie the string inside the aileron servo bay to the
aileron servo wire. Pull the servo wire out towards the wing
root with the string. Feed the end of the wire through the
hole in the top of the wing center-section. Remove the string
from the servo lead and tape the servo lead to the top of the
wing to prevent it from falling back into the wing.
❏ ❏
9. Place the aileron servo into the servo bay. Temporarily
place the aileron cover over the servo to help locate the final
position for the servo. Remove the cover and make a couple
of reference marks inside the servo bay for the servo
location. This will help you relocate the servo when it is
installed in the next step.
❏ ❏
10. Using 6-minute epoxy, permanently glue the servo
in place inside the servo bay, gluing it to the wing skin.
Note:
We understand that some modelers may resist gluing a
servo permanently to the wing. Because of the very thin
airfoil it becomes difficult to make a removable servo
mounting assembly. Fortunately the servo required for the
aileron are the standard, inexpensive type and permanently
installing them should not be cost prohibitive. The Expert Tip
that follows presents an alternative method of gluing in
the servos.
❏ ❏
11. Place the aileron servo cover over the servo, making
sure the servo arm is centered in the cut out. Using the
cover as a guide, drill a 1/16" [1.6mm] hole into the wing skin
through each of the holes in the cover. Remove the cover.
❏ ❏
12. Thread a #2 x 3/8" [9.5mm] sheet metal screw into
each of the four holes. Remove the screw, then saturate the
holes with thin CA. Enlarge the holes in the cover only with
a 3/32" [2.4mm] drill. Allow the CA to cure and then install
the cover into place over the servo.
❏ ❏
13. Locate the wood flap servo cover for the right wing.
Cut the covering from the opening for the servo in the cover.
Temporarily place the cover into position with the slot
towards the wing tip. Note: On the left wing, the slot in the
cover is towards the wing root. Drill a 1/16" hole [1.6mm]
through each corner of the aileron cover and through the
hardwood tabs in the wing. Remove the cover. Drill a 3/32"
[2.4mm] clearance hole through each of the holes in the
servo cover only!
Should you ever need to remove the servo simply cut the
heat shrink tubing and remove the servo. If you do not
have heat shrink tubing readily available, you can achieve
similar results by wrapping the servo with electrical tape
and then gluing it in position.
One method for gluing the servo in place while still having
the option to remove it is to wrap 2-1/2" [64mm] heat
shrink tubing around the servo (PARC1625). This heat
shrink is commonly used for making battery packs. After
the servo is tightly encapsulated with the heat shrink
tubing, glue the servo in place in the wing.
10
Содержание Lancair ES
Страница 40: ......


