GREAT PLANES Giles G-202 Скачать руководство пользователя страница 23

to end again flying knife-edge to the right. Note that you may
need to use some positive elevator and/or left aileron to stop
the tumble at exactly knife-edge. This maneuver is easier to
the right because torque helps stop the tumble, and it can
be done at varied airspeeds with proper throttle and rudder
modulation.

Knife-Edge Slide:

A knife-edge slide is a unique landing

approach which MUST be practiced with altitude until
complete confidence is gained. From several hundred feet
out from the end of the field, rotate to knife-edge, throttle
back and apply full rudder. Allow the aircraft to descend
rapidly in knife-edge flight, gradually rolling the aircraft into
a slip as it approaches the runway, then set the plane on the
runway on its gear. This maneuver takes LOTS of courage
and even more practice so be sure to practice the landing
phase of it at a hundred feet or more until you get
comfortable, then gradually work the plane down.

Rolling Circle:

A rolling circle is a gorgeous precision

maneuver this plane does so well we just had to mention it!
You must be able to confidently do slow rolls, including
proper rudder application, before learning to do a proper
rolling circle. Once you can do a slow roll properly, practice
adjusting the elevator and rudder application off by 1/4 roll,
so you apply the most push at the first quarter, the most
rudder at the inverted stage, the most pull at the 3rd quarter,
etc. As you get confident, practice varying the roll rates and
rudder/elevator application until you can control the plane’s
roll rate and position at each quarter of the circle, resulting
in an 8 roll rolling circle (2 rolls per quarter), then a 4 roll,
then a 2 roll, and then, with tons of practice, a single roll
rolling circle. Practice rolling to the outside and to the inside,
and modifying the roll timing and variations (inside roll then
outside roll then inside roll, or 3 rolls, etc.)

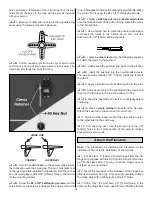
At this time check all connections including servo horn
screws, clevises, servo cords and extensions.

Follow the battery charging procedures in your radio
instruction manual. You should always charge your
transmitter and receiver batteries the night before you go
flying and at other times as recommended by the radio
manufacturer.

Carefully balance your propellers before flying. An
unbalanced prop is the single most significant cause of
vibration. Not only may engine mounting screws vibrate out,
possibly with disastrous effect, but vibration may also
damage your radio receiver and battery. Vibration may
cause your fuel to foam, which will, in turn, cause your
engine to run lean or quit.

We use a Top Flite Precision Magnetic Prop Balancer

(TOPQ5700) in the workshop and keep a Great Planes
Fingertip Balancer (GPMQ5000) in our flight box.

Since you have chosen the Giles G-202 ARF, we assume
that you are an experienced modeler. Therefore, you should
already know about AMA chartered flying fields and other
safe places to fly. If for some reason you are a relatively
inexperienced modeler and have not been informed, we
strongly suggest that the best place to fly is an AMA
chartered club field. Ask the AMA or your local hobby shop
dealer if there is a club in your area and join. Club fields are
set up for R/C flying and that makes your outing safer and
more enjoyable. The AMA address and telephone number
are in the front of this manual. If a club and flying site are not
available, find a large, grassy area at least 6 miles away
from houses, buildings and streets and any other R/C radio
operation like R/C boats and R/C cars. A schoolyard may
look inviting but is too close to people, power lines and
possible radio interference.

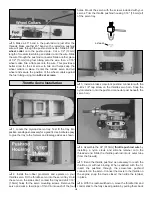
Inspect your radio installation and confirm that all the control
surfaces respond correctly to the transmitter inputs. The
engine operation must also be checked by confirming that
the engine idles reliably, transitions smoothly and rapidly to
full power and maintains full power, indefinitely. The engine
must be “broken-in” on the ground by running it for at least
two tanks of fuel. Follow the engine manufacturer’s
recommendations for break-in. Make sure that all screws
remain tight, that the hinges are secure and that the prop is
on tight.

Whenever you go to the flying field, check the operational

range of the radio before the first flight of the day. First,
make sure no one else is on your frequency (channel). With
your transmitter on, you should be able to walk at least 100
feet away from the model and still have control. While you
work the controls, have a helper stand by your model and
tell you what the control surfaces are doing. Repeat this test
with the engine running at various speeds with a helper

Range Check Your Radio

Ground Check the Model

Find a Safe Place to Fly

Balance the Propeller

Charge the Batteries

PREFLIGHT

23

Содержание Giles G-202

Страница 1: ...the user of the final user assembled product By the act of using the user assembled product the user accepts all resulting liability If the buyer is not prepared to accept the liability associated wi...

Страница 2: ...truly ready to solo Your local hobby shop has information about flying clubs in your area whose membership includes qualified instructors You can also contact the national Academy of Model Aeronautics...

Страница 3: ...Power Point refer to your engine s instructions for proper size 3 Medium 3 32 Glow Fuel Tubing GPMQ4131 1 4 Latex Foam Rubber Padding HCAQ1000 These are the building tools that are required We recomm...

Страница 4: ...op Balancer GPMQ5000 Fueling System Great Planes Top Fueler GPMQ4160 1 Closely inspect the fuselage wing panels rudder assembly and stabilizer assembly for damage If you find any damage contact the pl...

Страница 5: ...Tray 1 15 Wing Joiner 1 16 Wing Bolt Plate 1 Parts Not Shown In Photo Description Qty Adjustable Engine Mount Right Left Halves 2 Tail Wheel Assembly 1 Main Wheels 2 CA Hinge Strip 2 x 9 1 Hardware B...

Страница 6: ...e is no gap when you join them 4 Tape a piece of wax paper or Great Planes Plan Protector over your work surface Thoroughly coat the joiner pockets and the mating ends of both wing halves with 30 minu...

Страница 7: ...t marks 4 Locate the 1 8 x 6 x 3 1 8 3mm x 150mm x 78mm plywood wing bolt plate Draw a vertical and horizontal centerline onto the plate as shown in the photo 5 Draw a line 3 1 8 78mm to each side of...

Страница 8: ...tab saddle to correct the problem Work slowly and check the alignment often 5 Use a felt tip pen to mark the sides of the fuselage on the bottom and top of the stab Remove the stab from the fuselage 6...

Страница 9: ...ng the rails 5 Position the engine on the engine mount rails so the propeller thrust washer is 5 3 4 136mm ahead of the firewall Use a Great Planes Dead Center Hole Locator GPMR8130 not included or a...

Страница 10: ...engine and install the cowl Transfer the glow plug needle valve and exhaust holes from the templates onto the cowl 6 Remove the cowl and templates then remount the engine Cut out the holes in the cow...

Страница 11: ...ole in the firewall The silicone will seal the opening and help hold the tank in position after it has cured Use two or three 64 rubber bands at the aft end of the tank to secure it to the tank floor...

Страница 12: ...a 5 32 wheel collar onto the axle Thread a 6 32 set screw into the wheel collar base and secure the collar in position 5 16 8mm from the hex on the axle as shown 10 Slide the wheel pant wheel and a 5...

Страница 13: ...CA accelerator allow the CA to cure slowly 1 Install the rubber grommets and eyelets on your aileron servos Attach a servo extension to the aileron servo Use heat shrink tubing or electrical tape to...

Страница 14: ...the clevis to the pushrod A Lightly sand the pushrod and clean it with alcohol B Insert the pushrod into the non threaded clevis The wire should protrude 1 16 1 5mm inside the forks of the clevis C Ap...

Страница 15: ...Attach a servo extension to the elevator servo Use heat shrink tubing or electrical tape to secure the servo lead to the extension so they don t unplug in flight Drop the extension into the fuselage...

Страница 16: ...slot Drill two evenly spaced holes for the bottom hinge If you use a Dremel MultiPro for this task it will result in a cleaner hole than if you use a slower speed drill Drilling the hole will twist s...

Страница 17: ...readed clevis The wire should protrude 1 16 1 5mm inside the forks of the clevis C Apply a small amount of soldering flux to the joint D Apply heat evenly to the pushrod and the clevis and then touch...

Страница 18: ...e servo tray Hold the servo so the sides don t contact the tray and drill 1 16 1 5mm holes for the servo mounting screws Remove the servo and wick a few drops of thin CA into each of the four holes Mo...

Страница 19: ...to the bottom of the fuse at the tail Use a rubber band to attach the antenna to a T pin at the aft end of the fuselage Do not cut or shorten the antenna wire Leave any excess to hang free 1 Fit appr...

Страница 20: ...and easily measure actual throws first so you can make necessary corrections before you fly Large no slip rubber feet provide a firm grip on covered surfaces without denting or marring the finish Spr...

Страница 21: ...f struggling with the clevises to try to keep full throttle but not have the binding you can turn down the ATV slightly until the binding is gone Why only adjust ATV slightly Control linkages are real...

Страница 22: ...from twisting off vertical or it will fall out of the torque roll This is much more difficult than it sounds because you must notice the slightest need for correction and make it promptly plus you ha...

Страница 23: ...nbalanced prop is the single most significant cause of vibration Not only may engine mounting screws vibrate out possibly with disastrous effect but vibration may also damage your radio receiver and b...

Страница 24: ...f a running engine Read and abide by the following Academy of Model Aeronautics Official Safety Code General 1 I will not fly my model aircraft in sanctioned events air shows or model flying demonstra...

Страница 25: ...PS PCM 8 Channel Radio Since your eyes can t leave your plane all trims beep as they pass neutral You can trim your plane by ear The 8UAPS also offers 8 model memory a large LCD screen for programming...

Страница 26: ...uld be almost hands off Without touching any other control on the transmitter suddenly chop the throttle Did the nose drop When you add power again did the nose pitch up a bit If so you need some down...

Страница 27: ...de loops D Yaws right on insides and left on outside loops E Yaws left in insides and right on outside loops A Wings are level and plane falls to either side randomly B Falls off to left in loops Wors...

Страница 28: ...________________ Date Construction Started __________________ Date Construction Finished _________________ Finished Weight __________________________ Date of First Flight ________________________ FLIG...

Отзывы: