6
Vertical LED Task Lights for Surface Mounted
4” deep Mirrored Cabinet
FOR INSTALLATION OF A SURFACE MOUNTED CABINET
BE SURE TO TURN OFF THE POWER AT THE SERVICE PANEL
BEFORE WORKING ON WIRING.
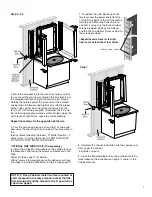
1. Install the rough service wiring from the switch box as lo-
cated in the wall near the final cabinet position. Rough wire
from the Switch Box to the general area for each light at the
measured and marked location for the cabinet installation.
2. Install the Glasscrafters, Inc. Mirrored Cabinet on the
finished surface following the manual instructions supplied
with the cabinet. Drill a 3/4” dial. hole 3” above the cabinet
base and 1” from the cabinet wall. Pull the rough wiring
through the wall.
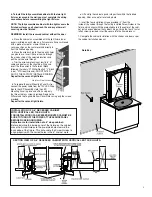
3. To gain access to the
interior of the light
fixture to connect power
supply you must open
the fixture with these
steps:
--Remove Top & Bottom
plates with the two
screws located in the
rectangular part of the
plates.
--Remove the acrylic
diffuser by squeezing
from the narrow side
and pivoting it away
from the fixture.
--Unscrew the three
flathead stainless
screws holding the
Mounting Panel, the
panel with the mounted LED strips (the outside panel). Pivot
the Mounting Panel to the outside and disconnect the plug
that connects the 12V LED Driver box to the light strips and
set the LED Mounting Panel assembly aside.
Service Wire
Wall Switch
Mark the
Cabinet
Surface Mount
Location
Service Wiring
to Each Side
in approximate
location
for Light Fixtures.
Pull through
at least 15”
Service Wire
Step 1
BLACK
WHITE
12V LED DRIVER
GREEN
L
G
N
TERMINAL
BLOCK
SERVICE WIRE
Detail #1
Squeeze
Diffuser and
Pivot away
from
Narrow side
Remove top
and
bottom Plates
NOTE: TAKE CARE IN HANDLING AND INSTALLING TO
AVOID DAMAGE TO MIRRORS. ALWAYS PLACE THE
MIRRORED CABINET ON A PADDED SURFACE TO
PROTECT GLASS.
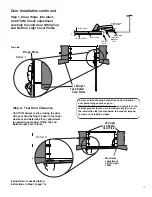
SECTION VIEW OF A 4” SURFACE MOUNTED CABINET WITH
VERTICAL LED TASK LIGHTS.


