13
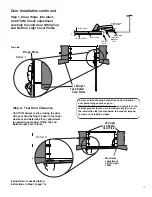
1) Insert into
Hinge Toe
first
Hinge Plate
2) Lift and snap
into place
O
u
tsi
d
e
M
i
rr
o
r
Doo
r
F
ram
e
C
ab
i
n
et
F
a
ce
I
n
si
d
e
M
i
rr
o
r
Maximum
adjustment
Left to right
1 MM
LED Light
Top & Bottom
Cover Plates
Det
a
il
2
Hinge Plate
Hinge Plate
LED Light
Top & Bottom
Cover Plates
Det
a
il 1
(CAUTION) Check adjustment
carefully to avoid door hitting Top
and Bottom Light Cover Plates
Top view
Step 1- Snap Hinge into place
Step 2-- Test Door Clearance
Door Installation continued
CAUTION: Always test by closing the door
with your hand behing the door to test door
clearance and determine if any adjustment
is needed to avoid door hitting Top and
Bottom Light Cover Plates.
If adjustment is needed follow
instructions in Step 3 (page 14).
To view a video showing helpful tips on how to adjust
our cabinet hinges, please go to --
GlassCraftersMirrored Cabinets.com and navigate to the
cabinet product that you are installing. Simply click on
the installation tab (located below the product images)
to view our installation videos.


