14
#3
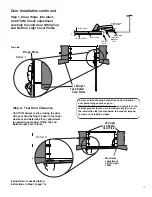
Screws adjust
for Flush Fit
to cabinet face
#2
Screws adjust
for Fit to
Top and Bottom
to cabinet face
#1
Screws adjust
for Fit alignment
left and right
to cabinet face
Other adjustments for the door
--
B
lum Hinge Adjustment
When the doors adjustments are completed
place cover caps on hinges.
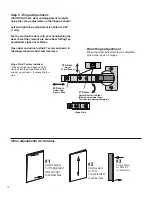
Step 3 - Hinge Adjustment:
(CAUTION) Check door and adjustment carefully
using the screw adjustmets on the hinge as shown.
Left and right hinge adjustment is limited to 1/32”
(1 mm).
Test by closing the door with your hand behing the
door to test the clearance to avoid door hitting Top
and Bottom Light Cover Plates.
Open door and adjust using #1 screw as shown in
the diagram below and retest clearance.
#1 Screw -
Adjust Door Left to Right
(Maximu adjustment 1mm)
Test fit before closing completely
#3 Screw -
Adjust Door
Front to Back
#2 Screw -
Adjust
Top to Bottom
Hinge Plate
Hinge Plate* Factory Installed.
*If the door binds and does not fully
close, adjust the Hinge Plate on the
cabinet up and down, to relieve the ten-
sion.


