background image

Operation Manual for ZBL-R620/R630 Rebar Locator 

external  storage  device,  personal  computer  or  notebook  computer.  Make  sure  that  the 

computer  has  already  been  installed  with  the  “rebar  detect  data  treatment  software” 

before transmission. Use a USB cable to connect the USB port of the instrument and USB 

port of the computer; if this data transmission function is used for the first time, you need 

to install appropriate driver first, the reader is directed to the appendix of R630 software 

operation manual. 


Please strictly obey the operation order following strictly. 

1) Connection between reinforced detector and computer 

  Use a USB cable to connect the instrument and computer. If the device is not 

recognized and the computer indicates that it has “found new hardware device” 

the  user  is  directed  to  the  appendix  of  R650  software  operation  manual  for 

further advice. 

2) Computer operation 

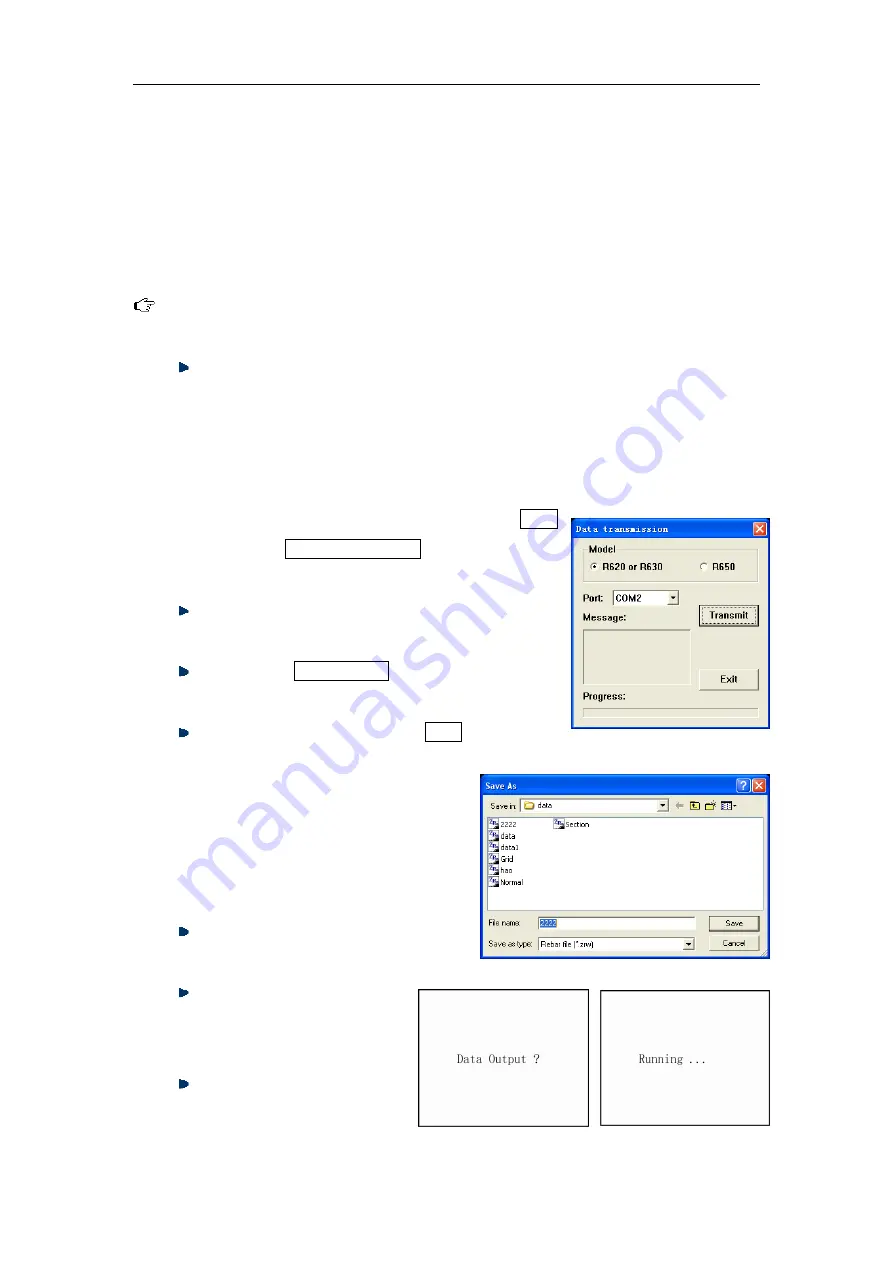
Launch “Rebar test data analysis software”, select Tools 

menu,  then  select  Data  transmission,  the  transmission 

window shall now appear (see fig. 2.11).


  Select rebar test data (R630) from data type, then 

select USB port as data transmission port. 

  press  the  Transmission  key,  pop-up  window 

shown in fig. 2.12 appears. 

  Input  file  name  and  press  Save  key.  The 

computer  is  now  ready  to  receive 

data transmitted from the instrument. 

The  screen  will  displays  “port 

initialization finished”. 

3) Rebar locator operation 

  Select  “data  transmission”  option 

from ZBL-R620/R630 menu 

  press 

Enter

key to access 

data  transmission  interface 

(fig. 2.13); 

  press 

Enter

key again to 

begin  transmitting  data  (fig. 

Fig. 2.11 

Fig. 2.12 

Fig. 2.14     

Fig. 2.13                                       

Содержание ZBL-R620

Страница 1: ...ZBL R620 630 Rebar Locator Operation Manual...

Страница 2: ...2 2 1 System Connection 3 2 2 Startup 4 2 3 System Reset 4 2 4 Choosing Scan Mode 5 2 5 Parameter Settings 5 2 6 Scan Operation 7 2 7 Data Display 10 2 8 Data Transmission 10 2 9 Deleting Data 12 2 1...

Страница 3: ...ver and rebar diameter 1 2 Components of ZBL R620 R630 ZBL R620 R630 Rebar Locator is composed of a main instrument body a probe a scan car ZBL R630 only and signal transmission wire The probe has dir...

Страница 4: ...erface Soft keyboard interface Fig 1 2 Menu Operation Interface The testing interface is used to scan data and display image including shown in Fig 1 3 General test scan Profile scan ZBL R630 only Gri...

Страница 5: ...ig 2 1 Insert the plug black of the signal line into the socket on the left of the rebar locator rotate clockwise and lock it tightly in place Insert the other end of the signal line into the socket o...

Страница 6: ...ry must be re charged If the automatic self test is OK it automatically enters the menu display after about five seconds Shortcuts in Main Menu interface key background light on off switch keys move c...

Страница 7: ...ess highlight option Back key save current parameter setting return to previous menu and reset the system Menu key return to main menu interface Parameter amendment 1 General situation keys select the...

Страница 8: ...and the interface automatically returns to the parameter setting interface 3 Thickness setting Set the concrete cover thickness of test rebar the available range is 10 99mm the initial value is automa...

Страница 9: ...odes 1 General Test It is the basic scan mode of R630 It accurately measures the thickness of concrete cover and the diameter of rebar it may also judge if the component conforms to international stan...

Страница 10: ...d the thickness is the lowest The central line of the probe is then the accurate location of the rebar Select the central location of the two rebars which have largest distance between each other as t...

Страница 11: ...ing point unit cm will be displayed above the black dot The instrument automatically saves the test data and the image Press Back key return to parameter setting interface Press Menu key access the ma...

Страница 12: ...ce move the cursor to data display option Press Enter to access the components list interface 2 In data display interface The left column shows the components list listed in descending order with the...

Страница 13: ...ot recognized and the computer indicates that it has found new hardware device the user is directed to the appendix of R650 software operation manual for further advice 2 Computer operation Launch Reb...

Страница 14: ...plays deleting 2 10 System Settings When accessing the system setting function the information below may be amended Fig 2 16 Date Year Month Day Time Hour Minute Second 24hours mode Power status may b...

Страница 15: ...s signal cable is correct Check if the power is low battery power 0 3 3 No keypad tone Check system settings turn keyboard tones on then save settings If settings are normal but there are still no key...

Страница 16: ...ndix A General Principles of Rebar Testing Scan surface should be smooth and flat If the surface is too rough to clean put a thin board on the scan surface after completing the scan the board s thickn...

Отзывы: