background image

22     Maintaining and Troubleshooting the Gateway ALR 9000 Server

5. Connect the drive cable, making certain to match pin 1 on both connectors.  

On most standard cables, pin 1 is designated by a colored wire on the cable.  
In some cases, the connector is keyed.

6. Connect a drive power cable to the drive (these connectors are keyed).

7. If you installed a fixed-media device, reinstall the plastic filler panel on the 

front of the bay. 

8. Close the system (as described on page 16) and power it up.

9. Enter the BIOS Setup program by pressing 

<F2>

 before the system boots, as 

prompted on the monitor screen.

10. Press 

<Esc>

 to save the device configuration information to CMOS and 

reboot the system.  For more information regarding the BIOS Setup program 
refer to Chapter 3.

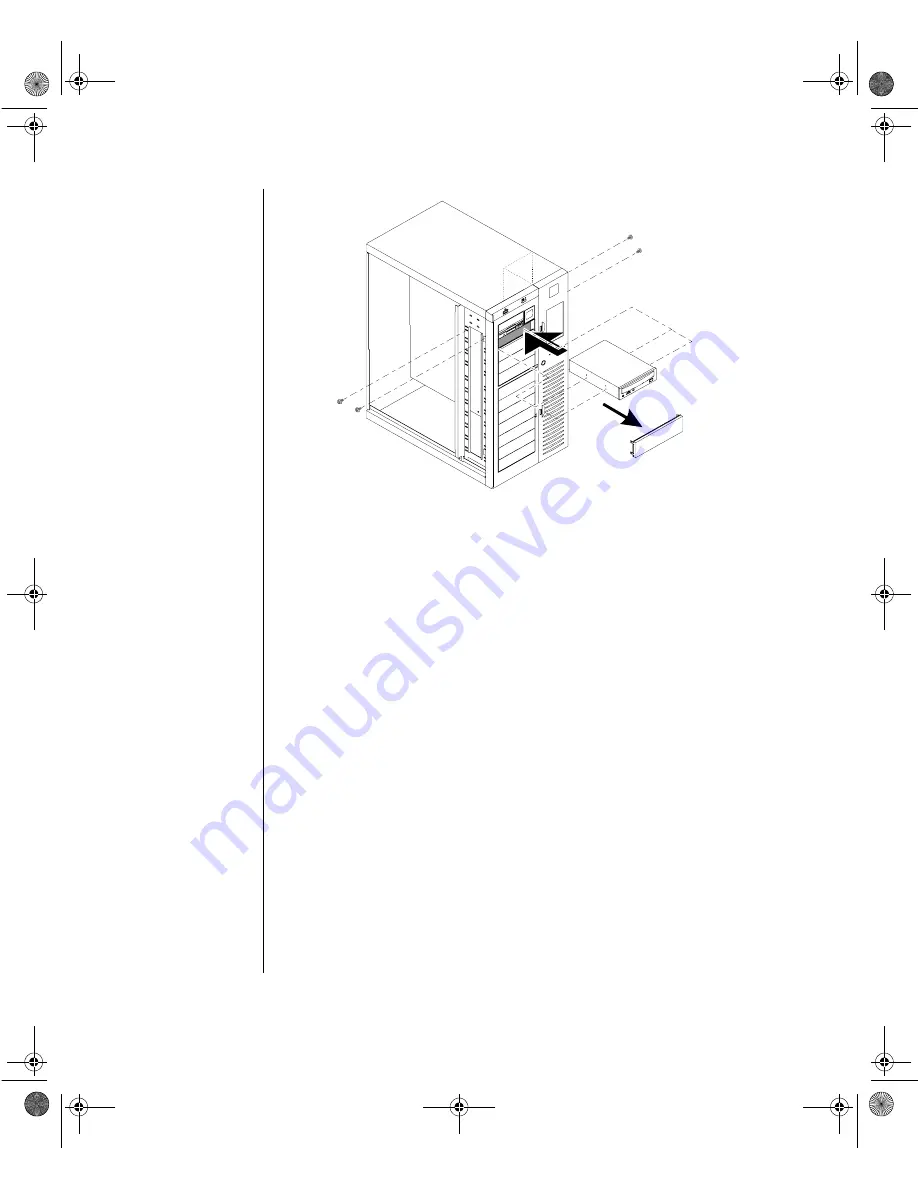
Figure 20: Installing a Device into a 5.25-inch External Bay

Maints.boo  Page 22  Friday, July 10, 1998  1:47 PM

Содержание ALR 9000

Страница 1: ...9000 TECH REF R2 7 98 In our effort to use nature s resources efficiently and wisely we print all manuals on recycled papers that meet the minimum requirements established by the Federal EPA in its g...

Страница 2: ...Gateway 2000 Inc Intel Intel Inside logo and Pentium are registered trademarks and MMX is a trademark of Intel Corporation Microsoft MS MS DOS and Windows are trademarks or registered trademarks of Mi...

Страница 3: ...s 6 Installing a CPU 8 Changing Jumper Settings 11 System Memory 12 Memory Subsystem Architecture 12 RAM Expansion Chart 13 Installing Memory 14 Adapter Card 16 Storage Bays 18 Installing a Device in...

Страница 4: ...s 42 Looking Things Over 42 Verifying Your Configuration 42 Common Problems 43 Drive Problems 44 Monitor Problems 44 Printer Problems 46 Installation Problems 47 TTIRHM 7TIGMJMGEXMSRW System Specifica...

Страница 5: ...make sure the total ampere ratings on the products plugged into the extension cord do not exceed the extension cord ampere rating Also the total ampere requirements for all products plugged into the w...

Страница 6: ...nto an outlet on a circuit different from that to which the receiver is connected Consult the dealer or an experienced radio TV technician for help Accessories This equipment has been tested and found...

Страница 7: ...fety 73 23 EEC as per EN 60950 1992 This is a Class A product based on the standard of the Voluntary Control Council for Interference by Information Technology Equipment VCCI If this equipment is used...

Страница 8: ...However a virus is inactive until the infected program is executed or a boot record is read Thereafter the virus loads itself into system memory and begins to copy and spread itself Diskettes used in...

Страница 9: ...k drives CD ROMs floppies boot sectors and partition tables VirusScan also provides advanced protection against unknown viruses We continuously update and use the most current version of McAfee VirusS...

Страница 10: ...x Maintaining and Troubleshooting the Gateway ALR 9000 Server Maints boo Page x Friday July 10 1998 1 47 PM...

Страница 11: ...Preface Contents About This Guide xii Conventions Used in this Guide xiii Maints boo Page xi Friday July 10 1998 1 47 PM...

Страница 12: ...opening and closing the system Chapter 2 Components covers information on maintaining replacing upgrading the components in the system This section includes information regarding available options for...

Страница 13: ...er side of it must be pressed simulta neously Setup Commands to be entered as well as mes sages that appear on your monitor are printed in ARIAL font Technical Reference Names of publications and file...

Страница 14: ...xiv Maintaining and Troubleshooting the Gateway ALR 9000 Server Maints boo Page xiv Friday July 10 1998 1 47 PM...

Страница 15: ...Chapter 1 System Access Contents About This Guide 2 ESD Precautions 2 Opening the System 3 Closing the System 4 Maints boo Page 1 Friday July 10 1998 1 47 PM...

Страница 16: ...circuits Always observe the following precautions before you install a system component 1 Always unplug the AC Power Cable from the AC Power Receptacle before you open the system 2 DO NOT remove a com...

Страница 17: ...crews located on the rear of the system Save the screws 3 Slide the side panel back enough for the edge to clear the keylock loop then pull the panel off the chassis 4 If necessary repeat steps 2 and...

Страница 18: ...ly installed and firmly seated 1 Align the side cover with the ledges on the chassis 2 Slide the cover toward the front of the unit 3 Secure the cover with the screws you removed when opening the syst...

Страница 19: ...tem Memory 12 Memory Subsystem Architecture 12 RAM Expansion Chart 13 Installing Memory 14 Adapter Card 16 Storage Bays 18 Installing a Device in the Internal Bay 18 Installing a Device in the Externa...

Страница 20: ...at is the first CPU must be installed in CPU socket C the second in socket B and the third in socket A In the same manner the corresponding VRMs must also be installed in their respective sockets Refe...

Страница 21: ...Components 7 Figure 3 CPU Installation Guide Maints boo Page 7 Friday July 10 1998 1 47 PM...

Страница 22: ...m each other to release the card from its slot see Figure 5 4 Holding on to the ejector arms gently pull out the CPU card A or B depending on how many CPUs are already installed in your system 5 Lay t...

Страница 23: ...yer of CPU grease to the top of the CPU to ensure proper contact and heat dissipation 9 Place the fansink assembly squarely on top of the CPU 10 Secure the assembly by clipping the bracket to the plas...

Страница 24: ...h the card in adjust the ejector arms so they latch on to the mounting bracket as shown in Figure 9 15 Push the ejector arms inward until the CPU card is locked into place 16 Reinstall the screws you...

Страница 25: ...the location of the jumper on the system board For a more detailed illustration of the system board refer to the System User s Guide Figure 10 CPU Clock Speed Settings Figure 11 CPU Clock Jumpers War...

Страница 26: ...one row An interleave in this system requires a minimum of two 36 bit SIMMs 1 row 72 bit wide containing a total of 64 data bits plus 8 bits of ECC RAM To ensure optimum performance follow the procedu...

Страница 27: ...AL MEMORY MINIMUM OF SIMM S TOTAL MEMORY MAXIMUM 512KB x 36 2 4MB 4 8MB 8 16MB 16 32MB 1MB x 36 2 8MB 4 16MB 8 32MB 16 64MB 2MB x 36 2 16MB 4 32MB 8 64MB 16 128MB 4MB x 36 2 32MB 4 64MB 8 128MB 16 256...

Страница 28: ...firmly seated 5 Tilt up the memory module to a vertical position until the spring loaded latches locks it into place 6 Repeat steps 4 through 6 to install additional memory modules 7 Reinstall the mem...

Страница 29: ...Components 15 Figure 14 Installing Memory Units Maints boo Page 15 Friday July 10 1998 1 47 PM...

Страница 30: ...Do not rest the board on any static generating surface such as carpeting or paper 1 Open the system as described on page 15 2 Remove the screw securing the cover plate from an available expansion slo...

Страница 31: ...7 Configure the adapter card through the EISA Configuration Utility program EISA adapter cards are supplied with a configuration file with which to configure the card Maints boo Page 17 Friday July 10...

Страница 32: ...ed on page 15 Remove both side panels 2 From the right side of the chassis insert the device into the top most area between the two mounting brackets located towards the front of the chassis 3 Positio...

Страница 33: ...talling a device in any of these bays you must first remove the RF shield as follows a Remove the screws securing the RF shield b Pull out the RF shield from behind the plastic filler panel and save f...

Страница 34: ...20 Maintaining and Troubleshooting the Gateway ALR 9000 Server Figure 17 Unlatching the Plastic Filler Panel Maints boo Page 20 Friday July 10 1998 1 47 PM...

Страница 35: ...ntly insert the device into the bay and position the device so that the mount holes on both the device and mounting brackets are aligned 4 With the mounting screws supplied with the device secure the...

Страница 36: ...you installed a fixed media device reinstall the plastic filler panel on the front of the bay 8 Close the system as described on page 16 and power it up 9 Enter the BIOS Setup program by pressing F2 b...

Страница 37: ...or the power supply bay Save the screws 2 Remove the cover plate and discard or save for future use 3 Remove the power supply from its protective packaging 4 Holding the power supply by the handle gen...

Страница 38: ...24 Maintaining and Troubleshooting the Gateway ALR 9000 Server Maints boo Page 24 Friday July 10 1998 1 47 PM...

Страница 39: ...Chapter 3 BIOS Setup Contents About BIOS Setup 26 Using BIOS Setup 27 Main Menu 28 Advanced Menu 33 Security Menu 36 Exit Menu 38 Maints boo Page 25 Friday July 10 1998 1 47 PM...

Страница 40: ...ices installed The BIOS Setup program also allows you to customize your system configuration You must run the BIOS Setup program whenever you want to perform any of the following Install or remove a p...

Страница 41: ...Move through and change the BIOS Setup screens and parameters using the following keys Esc Returns you to the previous menu Up or Down Arrow Moves the cursor up to the next field Left or Right Arrow M...

Страница 42: ...mon functions can be set and changed Upon entering the BIOS Setup program the following screen will be displayed System Time and Date We recommend that you set these fields as many software packages r...

Страница 43: ...ve Types 1 39 and Autodetect or Auto Sense For most drives Autodetect can correctly sense the drive type installed If not you can manually enter the drive specifications as described in the documentat...

Страница 44: ...transfer mode Large Disk DOS Compatibility Enable this feature if you have a disk with more than 1024 cylinders This feature works with DOS OS 2 and Windows NT Disable this feature if you are running...

Страница 45: ...contents of the BIOS chip on your video card into RAM when Enabled allowing faster execution and increased performance Shadow Memory Region allows specific memory addresses into RAM for faster execut...

Страница 46: ...epressed key repeats This can be set to 1 4 second 1 2 second 3 4 second and 1 second System Memory This parameter reflects the current amount of memory installed in your system If you have changed yo...

Страница 47: ...ing Disabled and Auto LPT Port reflects the address and interrupt values currently reserved for that port with six settings including Disabled and Auto LPT Mode allows for a faster data transfer rate...

Страница 48: ...devices only and 8 16 bit for 8 16 bit combinations or 16 bit devices only I2C Address defines the I2C address when Enabled UART 2 Mode sets the serial port to either Standard or IrDA Advanced Resour...

Страница 49: ...ay O S Set this feature to Yes if you are using a Plug and Play capable operating system Reset ConfigurationData When set to Yes this feature clears the Plug and Play configuration data The system aut...

Страница 50: ...for information purposes and cannot be changed in this field The status of the password will be automatically updated if the Supervisor Password is changed or disabled UserPassword This parameter is a...

Страница 51: ...for a password before booting the system Diskette Access This feature prevents unauthorized access to the floppy drives reducing the possibility of file copying and virus contamination When set to Sup...

Страница 52: ...tions as shown below Save Changes and Exit Select this option to save your current values and exit the BIOS program The system will automatically reboot using the new values stored in the system BIOS...

Страница 53: ...from the BIOS program Load Previous Values Select this option to set the values to the settings which were last saved This option will not exit you from the BIOS program Save Changes Select this optio...

Страница 54: ...40 Maintaining and Troubleshooting the Gateway ALR 9000 Server Maints boo Page 40 Friday July 10 1998 1 47 PM...

Страница 55: ...tents Handy Checklists 42 Looking Things Over 42 Verifying Your Configuration 42 Common Problems 43 Drive Problems 44 Monitor Problems 45 Printer Problems 46 Installation Problems 47 Maints boo Page 4...

Страница 56: ...trouble Before powering up the system perform the following checks 1 Is the power cord connected to the PC and an AC outlet 2 Is the AC outlet supplying power 3 If a power strip is used is it switched...

Страница 57: ...orrectly Enter the BIOS Setup program and correct the date and time settings The backup battery may need to be replaced Contact Technical Support for assistance The Power LED is flashing ECC memory fa...

Страница 58: ...file is corrupted bad Try the diskette on another computer Re copy the file if necessary Files cannot be written to the disk or diskette The disk is write protected Remove the write protect tab or sw...

Страница 59: ...eo cable is not connected to the system s video port Check the video cable and ensure it is connected to the proper port The video cable s connector has a bent pin Check the cable s connector and repa...

Страница 60: ...eck the cable and make certain it is connected to the correct port The printer s data cable is damaged Check the cable for bent pins or broken wires The port is bad Call Technical Support The printer...

Страница 61: ...e DIMMs for proper installation A memory DIMM is not functioning properly Replace the faulty DIMM An adapter card is not recognized by the system The interrupt and or I O address is set incorrectly Ch...

Страница 62: ...48 Maintaining and Troubleshooting the Gateway ALR 9000 Server Maints boo Page 48 Friday July 10 1998 1 47 PM...

Страница 63: ...Appendix A Specifications Contents System Specifications 50 Dimensions 50 Environment 50 Maints boo Page 49 Friday July 10 1998 1 47 PM...

Страница 64: ...er Specification Height with feet installed 26 75 inches Width 12 75 inches Depth 23 inches Weight 115 pounds Parameter Specification Operating Temperature 10 to 40 degrees Celsius Storage Temperature...

Страница 65: ...nd Correcting ECC 34 43 47 ESD 2 F floppy check 29 format 47 H hard drive 29 heads 29 30 humidity 50 I I2C address 34 ISA 34 L LED 43 46 logo 35 LPT port 33 LPTmode 33 M McAfee VirusScan ix memory 2 2...

Страница 66: ...s 46 shadow 31 storage bays 3 5 inch 29 5 25 inch 29 system backup 37 system configuration 26 T Technical Support ix temperature 50 time 28 U Unix 30 V VGA 26 30 Video BIOS 30 video cable 45 video car...

Отзывы: