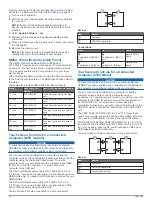
Connections
From
To
Cable
Computer's HDMI OUT
port
Chartplotter's HDMI IN
port
Garmin HDMI
Cable
Chartplotter's HDMI
OUT port
Monitor's HDMI IN port
Garmin HDMI
Cable
Monitor's USB port
Chartplotter's USB
HOST port
Garmin OTG
Adapter Cable
Chartplotter's USB OTG
port
Computer's USB HOST
port
Garmin USB Cable
Controlling a Computer with the Chartplotter
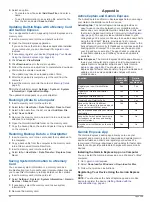
Before you can control a computer using the chartplotter, you
must connect the chartplotter and computer correctly. See the
chartplotter installation instructions for connection information.
1
Select
OneHelm™, A/V, Gauges
>
Video
.
2
Select the HDMI source for the computer.
3
Select
Menu
>
USB Touch Out
.
You can now control your computer using two-finger touch
gestures on the chartplotter screen.
4
If necessary, select
Menu
>
Full Screen
to view the
computer screen in full screen mode.
TIP:
To exit full screen mode, press .
Pairing the GRID Device with the
Chartplotter from the Chartplotter
NOTE:
These steps are applicable to both the GRID device and
the GRID 20 device.
Before you can pair the GRID 20 device with the chartplotter to
make the data connection, you must supply power using
batteries, the included power cable, or a NMEA 2000 network
connection.
Before you can pair the GRID device with the chartplotter, you
must connect it to the Garmin Marine Network.
1
Select
Settings
>
System
>
Station Information
>
GRID™
Pairing
>
Add
.
2
Select an action:
• On the GRID remote input device, press
SELECT
.
• On the GRID 20 remote input device, press and until
the remote control beeps three times.
Pairing the GRID Device with the Chartplotter from
the GRID Device
NOTE:
This is not applicable to the GRID 20 device.
1
On the GRID remote input device, press
+
and
HOME
at the
same time.
A selection page opens on all of the chartplotters on the
Garmin Marine Network.
2
Rotate the wheel on the GRID remote input device to
highlight
Select
on the chartplotter you want to control with
the GRID remote input device.
3
Press
SELECT
.
Rotating the GRID Remote Input Device
For certain installation situations, you can rotate the orientation
of the GRID device.
NOTE:
This is not applicable to the GRID 20 device.
1
Select
Settings
>
Communications
>
Marine Network
.
2
Select the GRID device.
Cleaning the Screen
NOTICE
Cleaners containing ammonia will harm the anti-reflective
coating.
The device is coated with a special anti-reflective coating which
is very sensitive to waxes and abrasive cleaners.
1
Apply an eyeglass lens cleaner specified as safe for anti-
reflective coatings to the cloth.
2
Gently wipe the screen with a soft, clean, lint-free cloth.
Viewing Images on a Memory card
You can view images that are saved on a memory card. You
can view .jpg, .png, and .bmp files.
1
Insert a memory card with image files into the card slot.
2
Select
Info
>
Image Viewer
.
3
Select the folder containing the images.
4
Wait a few seconds for the thumbnail images to load.
5
Select an image.
6
Use the arrows to scroll through the images.
7
If necessary, select
Menu
>
Start Slideshow
.
Screenshots
You can capture a screenshot of any screen shown on your
chartplotter as a .png file. You can transfer the screenshot to
your computer.
Capturing Screenshots
1
Insert a memory card into the card slot.
2
Select
Settings
>
Preferences
>
Screenshot Capture
>
On
.
3
Go to a screen you want to capture.
4
Hold
Home
for at least six seconds.
Copying Screenshots to a Computer
1
Remove the memory card from the chartplotter, and insert it
into a card reader that is attached to a computer.
2
From Windows Explorer, open the Garmin\scrn folder on the
memory card.
3
Copy a .bmp file from the card and paste it to any location on
the computer.
Troubleshooting
My device will not acquire GPS signals
If the device is not acquiring satellite signals, there could be a
few causes. If the device has moved a large distance since the
last time it has acquired satellites or has been turned off for
longer than a few weeks or months, the device may not be able
to acquire the satellites correctly.
• Ensure the device is using the latest software. If not, update
the device software (
).
• If the device is using an internal GPS antenna, make sure the
device has a clear view of the sky so the internal antenna can
receive the GPS signal. If it is mounted inside of a cabin, it
should be close to a window so it can receive the GPS signal.
If the device is mounted inside a cabin and cannot be placed
in a location where the device can acquire satellites, use an
external GPS antenna.
• If the device is using an external GPS antenna, make sure
the antenna is connected to the chartplotter or the NMEA
network. If necessary, see the GPS antenna installation
instructions for connection information and diagrams.
• If the device is using an external GPS antenna connected
using the NMEA 2000 network, select
Settings
>
Appendix
69
Содержание GPSMAP 87 Series
Страница 1: ...GPSMAP 84XX 86XX 87XX Owner sManual...
Страница 85: ......
Страница 86: ...support garmin com GUID 25CCEC48 337E 47C0 8B89 5C35CCDB65AC v17 March 2021...


