Part # GCTRM Rev 3 (12/10/09)
Page 34
The valve itself allows you to bypass the plunger by pushing
it in. This allows gas flow to the pilot, which then must be
ignited. The valve must be held depressed for approximately
30 seconds in order to sufficiently heat the thermocouple
and generate millivoltage. If the valve is not depressed for 30
seconds it shuts down the gas flow.
Once the pilot is lit and the millivolts have been generated,
the magnetic coil takes over and holds the valve open. If
there is no heat at the thermocouple, the valve will not stay
open. The same coil controls the burner flow, therefore, if
you have ignited the thermocouple and you’ve got the valve
to stay open, you can then go ahead and turn the burner on
and the pilot will light the burner.
The particular pilot used on most of our burners is a fishtail
design, which throws flames in two directions (one to ignite
the burner and the other to keep the thermocouple junction
hot). In between the pilot and the thermocouple is an
electrode, which can be used to spark ignite the pilot. This
can either be from a piezo igniter or from an electric spark.
All enclosed burners ignite in the high position and then
they have to be pushed into go to the low position. The
reason for this is to ensure no delay in ignition.
Burner Gas/Air Adjustments
Variations in field conditions, rough handling of the
equipment in transit may indicate the need for adjustment
of the primary air to the burners. Check the operation and
adjust as below to provide a sharp blue flame at the full
rate (open valve fully so that the thermostat is calling for
maximum gas flow).
1. On the burner (star, “H” griddle, broiler, oven burners)
locate the air shutter.
2. Loosen the lock nut so that the air shutter turns freely.
3. Reinstall the burner.
4. Turn on the gas flow and ignite the burner.
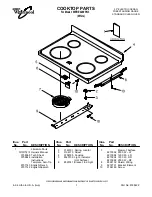
5. Rotate the air shutter to obtain the following:
Open (Star) burner
1/2” stable, sharp inner blue cones.
1/2"
Star Burner
Hot tops, griddles
5/16” stable sharp inner blue cones.
5/16"
Griddle "H" Burner - Side View
Содержание G Series
Страница 2: ...Part GCTRM Rev 3 12 10 09 Page 2...
Страница 4: ...Part GCTRM Rev 3 12 10 09 Page 4...
Страница 5: ...Part GCTRM Rev 3 12 10 09 Page 5 Section 1 Model Number Identification...
Страница 17: ...Part GCTRM Rev 3 12 10 09 Page 17 Section 2 Serial Number Identification...
Страница 20: ...Part GCTRM Rev 3 12 10 09 Page 20...
Страница 21: ...Part GCTRM Rev 3 12 10 09 Page 21 Section 3 Certification Markings...
Страница 24: ...Part GCTRM Rev 3 12 10 09 Page 24...
Страница 25: ...Part GCTRM Rev 3 12 10 09 Page 25 Section 4 Properties And Characteristics of Fuel Gases...
Страница 27: ...Part GCTRM Rev 3 12 10 09 Page 27 Section 5 Operation Of Controls...
Страница 31: ...Part GCTRM Rev 3 12 10 09 Page 31 Section 6 Gas Valves And Adjustments...
Страница 36: ...Part GCTRM Rev 3 12 10 09 Page 36...
Страница 37: ...Part GCTRM Rev 3 12 10 09 Page 37 Section 7 Adjustments Removal Replacement And Calibration Of Controls...
Страница 48: ...Part GCTRM Rev 3 12 10 09 Page 48...
Страница 49: ...Part GCTRM Rev 3 12 10 09 Page 49 Section 8 Gas Pressure Regulators...
Страница 52: ...Part GCTRM Rev 3 12 10 09 Page 52...
Страница 53: ...Part GCTRM Rev 3 12 10 09 Page 53 Section 9 Thermocouples And How They Work...
Страница 55: ...Part GCTRM Rev 3 12 10 09 Page 55 Section 10 Trouble Shooting The Oven Pilot Safety System...
Страница 59: ...Part GCTRM Rev 3 12 10 09 Page 59 Section 11 Gas Equipment Field Service Trouble Shooting Guide...
Страница 61: ...Part GCTRM Rev 3 12 10 09 Page 61 Section 12 Maintenance Care Instructions For Ranges And Oven Surfaces...
Страница 65: ...Part GCTRM Rev 3 12 10 09 Page 65 Section 13 Gas Technician s Glossary...
Страница 70: ...Part GCTRM Rev 3 12 10 09 Page 70...
Страница 71: ...Part GCTRM Rev 3 12 10 09 Page 71 Section 14 Range Wiring Diagrams...
Страница 75: ...Part GCTRM Rev 3 12 10 09 Page 75 3056100 US Range C836C Cuisine Series...
Страница 76: ...Part GCTRM Rev 3 12 10 09 Page 76 229064 US Range 836C Cuisine Series...
Страница 77: ...Part GCTRM Rev 3 12 10 09 Page 77 2706601 US Range Px S Series Left Single RC Oven...
Страница 78: ...Part GCTRM Rev 3 12 10 09 Page 78 2706602 US Range Px S Series Right Single RC Oven...
Страница 79: ...Part GCTRM Rev 3 12 10 09 Page 79 2706603 US Range Px S Series 2 RC Ovens...
Страница 80: ...Part GCTRM Rev 3 12 10 09 Page 80 4514771 US Range Px SX Series Left Single RC Oven...
Страница 81: ...Part GCTRM Rev 3 12 10 09 Page 81 4514772 US Range Px SX Series Right Single RC Oven...
Страница 82: ...Part GCTRM Rev 3 12 10 09 Page 82 4514774 US Range Px SX SeriesTwo RC Ovens...
Страница 83: ...Part GCTRM Rev 3 12 10 09 Page 83 2529700 ME MSTE 40RC Electric Spark...
Страница 84: ...Part GCTRM Rev 3 12 10 09 Page 84 2529701 M MS 40RC...
Страница 85: ...Part GCTRM Rev 3 12 10 09 Page 85 2529600 M MS 40 Electric Spark...
Страница 86: ...Part GCTRM Rev 3 12 10 09 Page 86 2444200 Sentry Electric Spark...
Страница 87: ...Part GCTRM Rev 3 12 10 09 Page 87 2444300 STE286RC STE284RC Left ST283RCE...
Страница 94: ...Part GCTRM Rev 3 12 10 09 Page 94 30129 Sheet 2 of 3 Master Series Broiler Range interconnection kit...
Страница 95: ...Part GCTRM Rev 3 12 10 09 Page 95 30129 Sheet 3 of 3 Restaurant Series Broiler Range interconnection kit...
Страница 97: ...Part GCTRM Rev 3 12 10 09 Page 97 Section 15 Service Bulletins...
Страница 108: ......