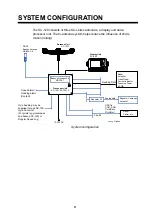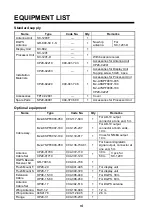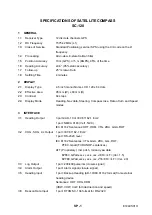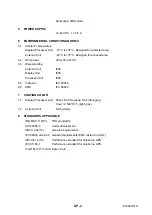
background image


2-3 

• 

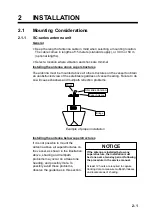
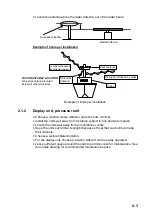
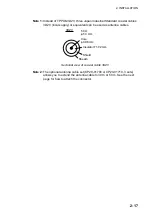
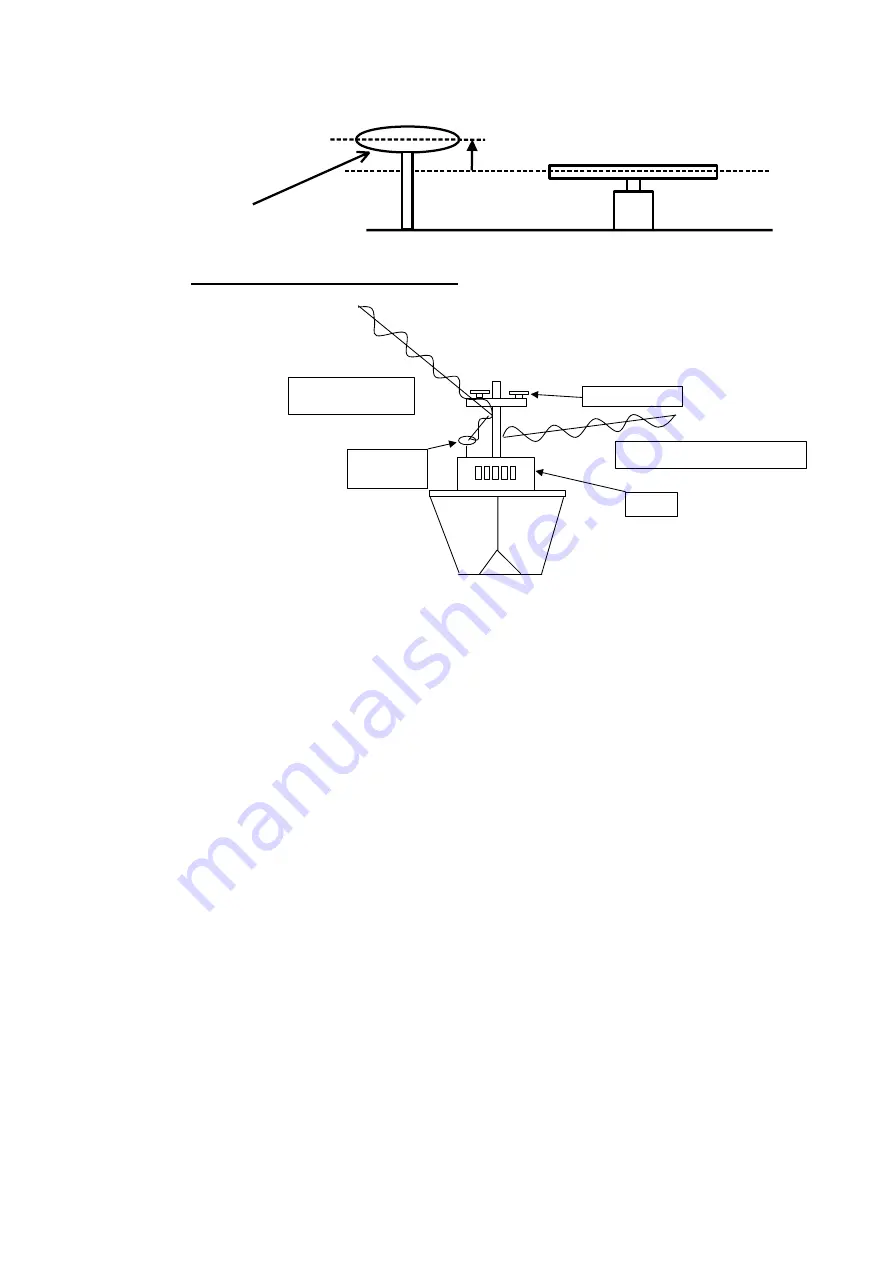
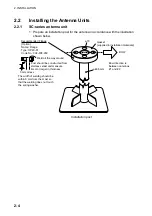
Locate the antenna above the radar antenna, out of the radar beam. 

Sc-series Antenna

Radar Antenna


Example of improper installation 

Radar Antenna

SC-series 
Antenna

Bridge

Reception blocked by mast.

Location influenced
by reflected wave.

NO! UNSUITABLE LOCATION

SC-series antenna located
below all other structures


Example of improper installation 


2.1.2 

Display unit, processor unit 

• 

Choose a location where vibration and shock are minimal. 

• 

Install the units well away from locations subject to rain and water splash. 

• 

Locate the units well away from air conditioner vents. 

• 

Keep the units out of direct sunlight because of heat that can build up inside 
their cabinets. 

• 

Choose a well-ventilated location. 

• 

For the display unit, choose a location where it can be easily operated. 

• 

Leave sufficient space around the units to permit access for maintenance. See 
the outline drawing for recommended maintenance space. 

Содержание SC-120

Страница 1: ...SATELLITE COMPASS SC 120...

Страница 2: ...200 FIRST EDITION FIRST EDITION MAR MAR 2001 2001 Printed in Japan Printed in Japan All rights reserved All rights reserved P1 P1 FEB FEB 26 2004 26 2004 PUB No PUB No OME 72490 OME 72490 00080919206...

Страница 3: ...gation for safety of vessel and crew Use the proper fuse Use of a wrong fuse can result in damage to the equipment WARNING Do not open the cover unless totally familiar with electrical circuits and se...

Страница 4: ...usting for orientation error 2 14 2 4 Installing the Display Unit 2 14 2 4 1 Desktop overhead mounting 2 14 2 4 2 Flush mounting 2 15 2 5 Wiring 2 16 2 6 Initial Settings 2 19 2 6 1 Confirming satelli...

Страница 5: ...3 10 4 Erasing individual user stations 3 17 3 10 5 Erasing all user beacon stations 3 17 3 11 OTHERS Menu 3 18 3 12 TRIP Menu 3 19 3 13 Resetting Distance Run 3 19 4 MAINTENANCE TROUBLESHOOTING 4 1...

Страница 6: ...d and follow the operation and maintenance procedures set forth in this manual We would appreciate feedback from you the end user about whether we are achieving our purposes Thank you for considering...

Страница 7: ...Beacon Antenna GR 800 1 S Heading Data Repeater I F Repeater Compass Radar Autopilot VideoPlotter Current Indicator Scanning Sonar ECDIS Radar Plotter etc GPS fix COG SOG Pitch Roll Time Date 2 ports...

Страница 8: ...Qty Remarks MJ A6SPF0003 050 000 117 603 1 For AD 10 output connector at one end 5 m MJ A6SPF0007 100 000 125 237 1 For AD 10 output connector at both ends 10 m MJ A6SPF0012 100 000 133 817 1 Cross f...

Страница 9: ...vii SOFTWARE VERSION LIST DISPLAY UNIT 205 1312 009 PROCESSOR UNIT 205 1311 016 GPS1 205 1313 004 GPS2 205 1313 004 GPS3 205 1313 004 DGPS 085 0182 002...

Страница 10: ...This page is intentionally left blank...

Страница 11: ...ding Nav data Steering Compass rose Rate of turn and Speed modes 3 INTERFACE 3 1 Heading Output 3 ports AD 10 or IEC 61162 1 Ed 2 1 port NMEA 0183 Ver1 5 2 0 IEC 61162 Sentences HDT HDM VTG ZDA GGA RO...

Страница 12: ...t IPX5 Processor Unit IPX0 6 4 Vibration IEC 60945 6 5 EMC IEC 60945 7 COATING COLOR 7 1 Display Processor Unit Panel N3 0 Newtone No 5 dark gray Cover 2 5GY5 1 5 light gray 7 2 Antenna Unit N9 5 whit...

Страница 13: ...raction of a carrier wavelength is processed by FURUNO s advanced kinematic technology in geographical survey thus determining a vector range and orientation A1 to A2 In reality a third antenna is use...

Страница 14: ...This page is intentionally left blank...

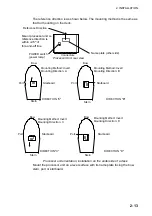
Страница 15: ...ill cause shadows and multipath reflection problems Mast Radar Antenna Bridge SC series Antenna Example of proper installation Installing the antenna below superstructures If it is not possible to mou...

Страница 16: ...lengths of 15 meters standard supply or 30 m or 50 m optional lengths The field of view above the antenna should be as shown below 80 against zenith To avoid reflections from masts and the like locate...

Страница 17: ...1 2 Display unit processor unit Choose a location where vibration and shock are minimal Install the units well away from locations subject to rain and water splash Locate the units well away from air...

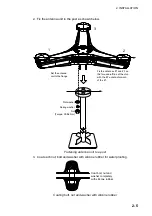
Страница 18: ...ween antennas 1 and 2 Gasket supplied in installation materials f60 5 mm f15 Recommended Flange Post should be constructed from stainless steel and measure 4mm or larger in thickness 3 mm or less Opti...

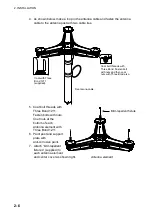
Страница 19: ...2 on the fore and aft line of the ship with the 2 a ntenna forward of the 1 Flat washer Spring washer Nut Torque 29 58 Nm Fastening antenna unit to a post 3 Coat each nut bolt and washer with silicon...

Страница 20: ...s with Three Bond Fasten bolt with nuts and then coat nuts with Three Bond also 5 Coat bolt threads with Three Bond 1211 Fasten bolts with nuts Coat nuts at the bottom of each antenna element with Thr...

Страница 21: ...ound the antenna to prevent receiving problems CAUTION Whip Antenna Spring Washer Hose Clamp Ground Wire 0 3 m Post f35 f90 Tap M4 threads in mast Fasten ground wire with an M4 screw 50 Witt Threads W...

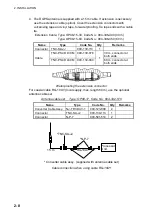
Страница 22: ...00 139 113 1 TNC PS 3D L30M 000 139 078 30 m connector at both ends Cable TNC PS 3D L60M 000 139 080 1 60 m connector at both ends Waterproofing the extension connector For coaxial cable RG 10UY local...

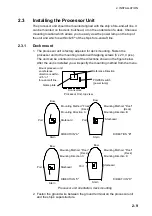
Страница 23: ...s shown in the figure below After the unit is installed you will specify the mounting method from the menu Bow Stern Stern Stern Stern Port Starboard Mounting Method Floor Deck Mounting Direction A Mo...

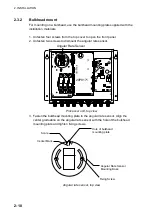
Страница 24: ...o screws to dismount the angular rate sensor BEACON Angular Rate Sensor 20P8171 Processor unit top view 3 Fasten the bulkhead mounting plate to the angular rate sensor Align the center graduation on t...

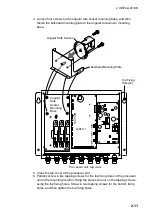
Страница 25: ...e Angular Rate Sensor Angular Rate Sensor Mounting Base Top Fixing Hole x2 Processor unit top view 5 Close the top cover of the processor unit 6 Partially screw in two tapping screws for the top fixin...

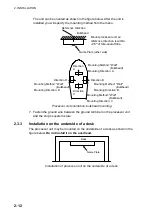
Страница 26: ...l Bulkhead Mounting Direction D Mounting Method Wall Bulkhead Mounting Direction C Mount processor unit so reference direction is within 2 5 of fore and aft line Bulkhead Processor unit orientation bu...

Страница 27: ...Mounting Method Invert Mounting Direction D Bow Port Starboard Bow Port Starboard Bow Port Starboard Name plate other side Connectors Reference Direction POWER switch power lamp Processor Unit rear v...

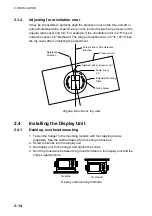
Страница 28: ...ference Direction Processor Unit Fore aft line or Port starboard direction Bulkhead Mounting Plate Fixing Screw Alignment hole on processor unit Scale every 2 5 Angular rate sensor top view 2 4 Instal...

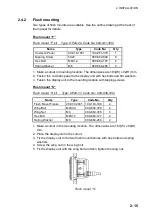
Страница 29: ...t with hex bolts and flat washers 3 Fasten the display unit to the mounting location with tapping screws Flush mount S Flush mount S kit Type OP20 17 Code No 000 040 720 Name Type Code No Qty Flush Mo...

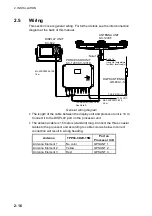
Страница 30: ...NA UNIT SC 1203F Note 1 Cable Tie Long life temperature resistant local supply General wiring diagram The length of the cable between the display unit and processor unit is 10 m Connect it to the DISP...

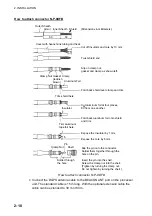
Страница 31: ...equivalent can be used as antenna cables Core f0 96 mm Sheath Shield Insulator T1 02 mm 3D2V 50 W f5 3 mm Sectional view of coaxial cable 3D2V Note 2 The optional antenna cable set CP20 01700 or CP20...

Страница 32: ...m foil onto shield and trim Trim aluminum tape foil here Insulator Expose the insulator by 1 mm Expose the core by 5 mm Clamp Nut Pin Solder through the hole Slip the pin onto the conductor Solder the...

Страница 33: ...ALLATION SETUP MOUNTING FLOOR DIRECTION A LANGUAGE ENG Installation setup menu 3 Confirm that MOUNTING is selected and press the ENT key 4 Use the Omnipad to choose the mounting method FLOOR WALL or I...

Страница 34: ...tion 2 6 2 Choosing heading source Choose the source of heading data as below CAUTION 1 Never switch from internal to external heading while the autopilot is in the automatic mode Change to the manual...

Страница 35: ...ading format of the equipment connected to the ports HDG OUT 1 HDG OUT 2 and HDG OUT 3 with the jumper wires on the circuit board 20P8171 referring to the table below The default setting for each port...

Страница 36: ...9P Output PC in NMEA 0183 IEC 61162 Cable D sub 9P The data of external heading must come from type approved sensor in case of SOLAS vessel External heading input format and output sentence AD 10 Head...

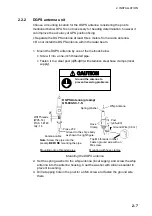
Страница 37: ...de at step 4 and fasten it with the toothed washer and nut 6 Fasten the DGPS receiver assembly at the location shown below DGPS Receiver Assembly Cable Assembly TNCBPJ 140 Panhead Screw M3X8 2 pcs Nut...

Страница 38: ...ration below J1 J4 J3 J1 J7 J10 9 RED J8 BLK J6 J2 J4 RED J5 BLK 20P8164 20P8171 Pass PH connector through clamp DGPS Receiver Assy Processor unit cover removed top view 10 Close the top cover of the...

Страница 39: ...for description SAT TRACKING STATUS TIMER 5 52 OK NO GOOD STATUS GPS1 8 8 D3D GPS2 7 7 D3D GPS3 8 8 D3D Satellites being tracked Satellites used for measurement 3D shown when no beacon receiver is use...

Страница 40: ...the SC 120 is showing reliable heading data to prevent heading output error Note 2 The display flashes when backup heading data is used 3 3 Panel Illumination Display Contrast 1 Press the DIM key DIM...

Страница 41: ...0 8 3 2 SOG COG 2 1 3 4 kt 0 0 01 DEC 01 23 54 13 HDG Date day month year Time Course over ground Heading Heading Status Mark Acquiring satellite Calculating heading Final calculations 2D 2D GPS posit...

Страница 42: ...ng Rolling Compass display ROT Rate of Turn display The ROT display provides digital and analog indications of rate of turn 3D min 2 2 1 ROT STBD 20 30 10 0 10 20 30 PORT ROT scale ROT ROT display Set...

Страница 43: ...ARMS BUZZER LONG DGPS OFF HDG RESTORATION MAN HDG BACKUP 5MIN Alarm menu 3 Press the ENT key SHORT LONG CONSTANT Alarm menu GPS buzzer options 4 Use or on the Omnipad to choose buzzer type desired SHO...

Страница 44: ...to open the menu 2 Choose SATELLITE and press the ENT key GPS1 N DOP 1 5 3D DOP 02 10 12 05 08 06 04 05 01 10 12 08 North Position fixing status Antenna element no Elevation angle 45 Elevation angle 5...

Страница 45: ...the more smoothing However too high a setting slows updating of position 0 is the default setting increase the setting if the GPS fix fluctuates largely SMOOTH S C Smoothing speed course Ship s speed...

Страница 46: ...lay HDT True heading required for radar AIS ECDIS etc HDM Magnetic heading VTG Course over ground and ground speed ZDA Time and date GGA Global positioning system GPS fix data ROT Rate of turn data VD...

Страница 47: ...latitude and longitude ROT Rate of turn data 4 Choose item desired and press the ENT key OFF ON 5 Choose ON or OFF as appropriate and press the ENT key 6 Press the DISP key to close the menu 3 8 3 Int...

Страница 48: ...nd press the ENT key 5 Press the DISP key to close the menu 3 8 5 Talker identifier mnemonics Choose the heading talker ID for the output data sentence HDT and HDM as follows 1 Press the MENU key 2 Ch...

Страница 49: ...TEM SETUP DATUM WGS84 UNITS kt TIME DIFF 00 00 TIME DISP 24 HOUR TEST DEMO OFF EXCHANGE BATTERY SYSTEM SETUP menu 3 Confirm that the cursor is selecting DATUM and press the ENT key 4 Choose WGS84 GPS...

Страница 50: ...enter the time difference range 13 30 to 13 30 between local time and UTC 1 Press the MENU key to open the menu 2 Choose SYS SETUP and press the ENT key 3 Choose TIME DIFF and press the ENT key 4 Pres...

Страница 51: ...nt to set it manually or are using an external beacon receiver follow the procedure below Note that DGPS increases position accuracy fix but it does not affect heading accuracy 3 10 1 Manual DGPS setu...

Страница 52: ...8 5 Press the ENT key 6 Choose DGPS beacon station selection method AUTO MANUAL or LIST AUTO Automatically searches for best DGPS beacon station MANUAL Manually enter DGPS beacon station specificatio...

Страница 53: ...Press the ENT key 8 Press the DISP key to close the menu 3 10 2 Programming user beacon stations The user may program 20 DGPS beacon stations from which to use in selection of DGPS beacon station When...

Страница 54: ...the station and press the ENT key 11 Choose SAVE and press the ENT key 12 Press the DISP key to close the menu 3 10 3 Editing user beacon stations 1 Press the MENU key to open the menu 2 Choose DGPS...

Страница 55: ...ERASE 8 Press the ENT key to erase channel selected 3 10 5 Erasing all user beacon stations 1 Press the MENU key to open the menu 2 Choose DGPS and press the ENT key 3 Choose STATION and press the EN...

Страница 56: ...HDG DATA OFF SMOOTH ROT 2 5SEC ROT RANGE 60 min Others menu 4 Choose HOLD HDG DATA and press the ENT key 5 Choose ON to use at power on last used heading until current heading is calculated Last used...

Страница 57: ...gh water or VBW Dual ground water speed VLW requires DS 80 type Doppler speed log and VBW requires Current indicator or Doppler speed log Press the ENT key 5 Choose DRIFT AVG and press the ENT key 6 I...

Страница 58: ...This page is intentionally left blank...

Страница 59: ...shed and should include the following points Check connectors and ground terminal on the processor unit and display unit for tightness Check ground terminal for rust Clean or replace as necessary Chec...

Страница 60: ...the connector Heading output from SC 120 does not appear on external equipment Sensor trouble Run the diagnostic test1 to determine the cause If large hading error occurs or heading indication is fre...

Страница 61: ...egments go on 2 sec All LCD segments go off 3 sec ROM RAM KEY check appears after 3 sec ROM RAM BAT GPS1 OK OK PUSH KEY GPS2 OK OK GPS3 OK OK CAL OK OK OK DISP OK OK OK DGPS OK OK CNT STOP PWR OFF Num...

Страница 62: ...ate heading data 1 Press the MENU key to open the menu 2 Choose SYS SETUP and press the ENT key 3 Choose TEST and press the ENT key TEST1 TEST2 Test menu options 4 Choose TEST2 and press the ENT key T...

Страница 63: ...1 Press the MENU key to open the menu 2 Choose ERASE and press the ENT key 3 Choose GPS DATA SYSTEM DATA or ALL BACKUP DATA clears GPS and SYSTEM data as appropriate One of the following displays app...

Страница 64: ...580553A 000 139 951 Processor Unit CR2450 F2ST2 000 133 495 1 Press the MENU key to open the menu 2 Choose SYS SETUP and press the ENT key 3 Choose EXCHANGE BATTERY And press the ENT key DISPLAY UNIT...

Страница 65: ...ror is eliminated Find the cause for the alarm s as follows 1 Press the MENU key to open the menu 2 Choose MESSAGES and press the ENT key MESSAGES GPS DATA ERROR Message display 3 Press the DISP key t...

Страница 66: ...d the heading indication shows Check navigator DGPS ERROR DGPS data from the DGPS receiver in the processor unit is lost for one minute Ship may not be within DPGS service area GPS DATA ERROR GPS data...

Страница 67: ...TORATION MAN AUTO HDG BACKUP 1 5 MIN 5 INT is default for model with interal beacon receiver Available when STATION is set to MANUAL Default settings in bold italics SYS SETUP INST MENU ERASE DATUM WG...

Страница 68: ...CH Morocco 081 MIDWAY ASTRO 1961 Midway Is 082 MINNA Nigeria 083 NAHRWAN Masirah Is 0man 084 United Arab Emirates 085 Saudi Arabia 086 NAMIBIA Namibia 087 MAPARIMA BWI Trinidad Tobago 088 NORTH AMERIC...

Страница 69: ...ts as listener Isolation Optocoupler Input Impedance 220 ohms due to common use of output port AD 10 and NMEA Max Voltage 15 V Threshold 4 mA In case of connection of FURUNO device talker Data transmi...

Страница 70: ...APPENDIX A 4 Schematic diagrams HDG IN port listener Load requirements Isolation Optocoupler Input Impedance 220 ohm Max voltage 15V HDG OUT1 port Output drive capability Max 10 mA...

Страница 71: ...APPENDIX A 5 NAV OUT1 Port Output drive capability Max 10 mA HDG4 NAV2 port RS 232C level...

Страница 72: ...s 1111 11 a yyyyy yy a x xx x x x x M x x M x x xxxx hh CR LF Number of satellites in use 11 12 may be different from the number in view GPS quality Longitude E W Latitude N S UTC of position GLL Geog...

Страница 73: ...Rate of turn ROT derived from a changing rate of GPS compass heading ROT x x A hh CR LF Status A data valid Rate of turn degrees min bow turns to port VBW Dual ground water speed VBW x x x x A x x x x...

Страница 74: ...h the vessel points and the speed of the vessel relative to the water VHW x x T x x M x x N x x K hh CR LF 5 4 3 2 1 1 Heading degrees true 2 Heading degrees magnetic 3 Speed knots 4 Speed km h 5 Chec...

Страница 75: ...tatus field The Status field shall be set to V invalid for all values of Operating Mode except for A Autonomous and D Differential The positioning system Mode indicator and Status field shall not be n...

Страница 76: ...menu is output HDG OUT4 DSUB9 O Heading 1 IEC 61162 NMEA 0183 only 2 Signal level RS 232C 3 Used for program upgrade NAV OUT1 IEC 61162 MJ6 NAV OUT2 RS 232C DSUB9 O Speed course position and time 1 I...

Страница 77: ...nu during the period of internal heading sensor failure VBW VHW VLM may be input from a current indicator Note Each GPS receiver GPS1 GPS2 and GPS3 calculates VTG GGA GLL ZDA The output from HDG OUT a...

Страница 78: ...ore they are not listed in this manual Major modules can be located on the parts location photo on page A 5 F U R U N O Model SC 60 Unit SC 601 PROCESSOR UNIT ELECTRICAL PARTS LIST Ref Dwg C7248 K01 A...

Страница 79: ...1 FP14 02801 FP14 02801 FP14 02801 COVER 20 016 1091 2 100 297 032 1 INSTALLATION MATERIALS INSTALLATION MATERIALS INSTALLATION MATERIALS INSTALLATION MATERIALS TAPPING SCREW 5X20 SUS304 1 000 802 081...

Страница 80: ...SC 1203F 000 041 926 1 INSTALLATION MATERIALS CP20 02241 BIRD REPELLENT FIXTURE 20 024 3101 2 100 315 302 4 HEX NUT M10 SUS304 000 863 111 4 WASHER 10X30 A140 000 809 251 4 SEALANT 1211 50G 000 854 11...

Страница 81: ...R CABLE MJ A3SPF0013 035 1 000 135 397 1 CODE NO MJ CABLE ASSY MJ A6SPF0007 100 1 000 125 237 2 CODE NO MJ CABLE ASSY MJ A7SPF0006 100 1 000 143 578 3 CODE NO DIMENSIONS IN DRAWING FOR REFERENCE ONLY...

Страница 82: ......

Страница 83: ......

Страница 84: ......

Страница 85: ...100 GP 1640 F SC 60 120 GD GP 280 680 380 20AG X 9404 ANTENNA CABLE ASSY 8D FB CV 30M 1 TO BE SELECTED 000 111 547 1 CODE NO CABLE ASSY 8D FB CV 50M 1 TO BE SELECTED 000 117 599 2 CODE NO DIMENSIONS...

Страница 86: ...SSY NJ TP 3DXV 1 2 000 123 809 1 CODE NO VINYL TAPE NO360 02X19X10000 1 000 835 215 2 CODE NO N CONNECTOR N P 8DFB 1 000 111 549 3 CODE NO SELF BONDING TAPE U 0 5X19X5M 1 000 800 985 4 CODE NO DIMENSI...

Страница 87: ...Takahashi T Takahashi T D 1...

Страница 88: ...Takahashi T Y Hatai D 2...

Страница 89: ...Takahashi T Y Hatai D 3...

Страница 90: ...Takahashi T Y Hatai D 4...

Страница 91: ...Takahashi T Y Hatai D 5...

Страница 92: ...D 6...

Страница 93: ......

Страница 94: ......

Страница 95: ...odetic chart codes A 2 Geodetic data 3 11 GPS setup menu 3 7 H Heading display 3 3 Heading setup menu 2 19 I Illumination 3 2 L Local time 3 12 Log pulse 3 10 M Maintenance battery replacement 4 5 cle...

Страница 96: ......
Отзывы: