WARNING
Have any worn or damaged wheel components
replaced by a qualified person using the wheel
manufacturer’s instructions and the wheel
industry’s standard safety precautions and
equipment. Otherwise a vehicle or workshop
accident could occur, possibly resulting in
serious personal injury or death.
4.2
Inspect for broken, cracked, badly worn,
bent, rusty, or sprung rings and rims.
NOTICE
Use the recommended torque values and follow
the proper tightening sequence. Insufficient
wheel nut torque can cause wheel shimmy,
resulting in wheel damage, stud breakage, and
extreme tire tread wear. Excessive wheel nut
torque can break studs, damage threads, and
crack discs in the stud hole area.
4.3
Make sure all wheel nuts are tightened. If
tightening is necessary, use the tightening
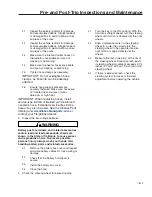
pattern in
to initially tighten the
flange nuts 50 to 100 lbf·ft (68 to 136
N·m). Then tighten the flange nuts 450 to
500 lbf·ft (610 to 678 N·m).
5.
Inspect the outboard side of all wheel hubs and
the hub oil seal area on the inboard side of each
wheel for signs of oil leakage. If any oil is found
on wheel and tire or brake components, remove
the vehicle from service until the leak has been
fixed.
If needed, fill the hubs to the level indicated on
the hub cap. See
of the
eCascadia
Maintenance Manual
for recommended
lubricants.
6.
Check that mud flaps are undamaged and hang
10 inches (25.4 cm) or less from the ground.
Mid-Frame Area Inspection
WARNING
When draining the air reservoir, do not look into
the air jets or direct them toward anyone. Dirt or
sludge particles may be in the airstream and
could cause injury.
NOTICE
If the water drained from the air reservoirs is
cloudy or oily, it may indicate a problem with the
compressor. If oil is allowed to contaminate the
air dryer, it will not remove the water from the air
brake system, which could adversely affect
braking.
1.
On vehicles without automatic drains, drain the
brake system air reservoirs.
2.
Inspect visible frame rails for missing bolts, shiny
areas, or rust streaks. Check all visible
crossmembers for damage or signs of looseness.
Front Box Inspection
1.
Check the ground underneath the front box for
oil leaks.
2.
Check the ground underneath the front box and
along the chassis for coolant leaks.
3.
Open the hood.
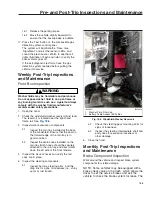
Check the power steering reservoir fluid level.
The power steering fluid level should be between
the MIN COLD mark and the middle mark just
above it. See
If needed, fill the reservoir with automatic
transmission fluid that meets Dexron III or TES-
389 specifications.
f400268
1
10
8
6
4
9
2
7
5
3
04/30/2007
Fig. 18.2, Tightening Pattern, 10-Hole Wheels
Pre- and Post-Trip Inspections and Maintenance
18.3
Содержание PX113064S T 2016
Страница 4: ......
Страница 10: ......
Страница 18: ......
Страница 57: ...f611343 09 28 2016 AIR SLIDE SLIDE LOCK Fig 4 18 Fifth Wheel Air Slide Dash Switch Driver Controls 4 8...
Страница 58: ......
Страница 83: ...6 Driver Assistance Features Electronic Stability Control ESC 6 1 PasSmart 6 1 SafetyDirect by Bendix 6 2...
Страница 86: ......
Страница 112: ......
Страница 122: ......
Страница 142: ......
Страница 154: ......
Страница 155: ...12 Steering System Power Steering System 12 1...
Страница 158: ......
Страница 159: ...13 eAxle eAxle 2 Speed Transmission 13 1...
Страница 176: ......
Страница 190: ......
Страница 202: ......
Страница 222: ......
Страница 223: ...20 Emissions Information Noise Emissions 20 1 Greenhouse Gas Emissions 20 1...
Страница 229: ......
Страница 236: ......

