background image

ELIOS 3 User Manual

5.

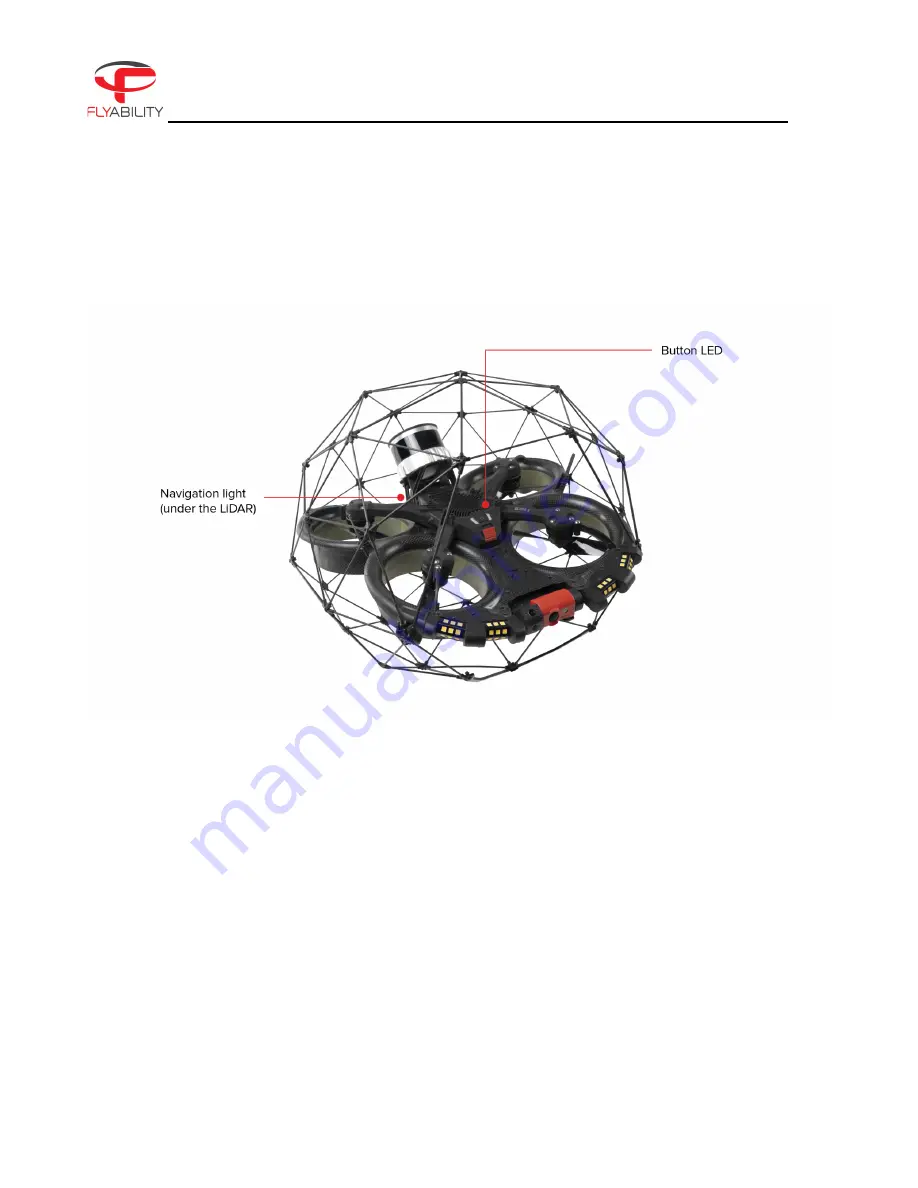
Drone user interface

Figure 4.10: Drone Button LED & Navigation Lights

5.1.

Button LED & navigation lights

ELIOS 3 comes with navigation light LEDs and button LEDs. These LEDs give information about the status of
the transmitter.

They are located at the front of the drone (where the power button is located), and on the back of the drone.

Here is a description of what each color stands for:

GREEN LED

The operation system is working properly.

RED LED

There is an error. Don’t fly the drone.

ELIOS 3 User Guide

Page 46 of 94

Содержание Elios 3

Страница 1: ...FLYABILITY ELIOS 3 USER MANUAL VERSION 1 FLYABILITY SA 41 21 311 55 00 INFO FLYABILITY COM EPFL INNOVATION PARK BLDG C 1015 LAUSANNE SWITZERLAND ...

Страница 2: ...ra lens and the optical sensors 24 3 2 Setting up the ground control system 24 3 3 Inserting and plugging in the Battery 26 4 Flying ELIOS 3 28 4 1 Power button 28 4 2 Arming 29 4 3 Disarming 30 4 4 Aircraft controls 30 4 5 Flight modes 33 4 6 Failsafe 36 4 7 Camera control 37 4 8 Lighting controls 38 4 9 2D measurements 42 4 10 Distance lock 43 4 11 Flight data logging and video recording 44 ELIO...

Страница 3: ... 3 Settings menu 61 6 4 Error messages 75 7 Advanced set up 84 7 1 Controller pairing 84 8 Charging 85 8 1 Charging GCS 85 8 2 Charging the battery 86 9 Maintenance 88 9 1 Update the aircraft firmware 88 9 2 Cleaning the drone 88 9 3 Changing a propeller 89 9 4 Changing motors 91 9 5 Changing a cage element 93 9 6 Changing an LED 94 ELIOS 3 User Guide Page 3 of 94 ...

Страница 4: ... ELIOS was developed explicitly as a flying platform capable of entering confined and cluttered environments Figure 2 1 System overview The operator controls ELIOS 3 through the ground control system GCS A tablet allows the operator to monitor a live video feed a 3D Live Map and other information and flight parameters transmitted by ELIOS 3 The Flyability Inspector post mission analysis software a...

Страница 5: ... to slide through extremely confined spaces MOTORS AND PROPELLERS Four shrouded propellers create the thrust required to fly and to maneuver the aircraft The motors have fast reversing capability allowing the aircraft to correct the effects of collisions AVIONICS The avionics is one of the brains of the ELIOS 3 On top of its flight control role the Avionics coordinate all ELIOS 3 sub systems ELIOS...

Страница 6: ...gh the EV settings to get a brighter or darker image if needed The 4K optical camera allows users to record video into this resolution 4K UHD 3840 x 2160 at 30 fps data rate 600MB min The video recording automatically starts when the drone is armed and stops when the drone is disarmed provided that there is enough available space on the CAM SD card The 4K optical camera allows the user to take 12M...

Страница 7: ...ing system composed of multiple LED panels The panels can be controlled independently to offer optimal lighting for capturing visual inspection data The intensity of each panel is adjusted depending on the pitch of the camera head to ensure optimal lighting while saving battery charge and flight time LED status Gives information about the status of the overall aircraft which includes both avionics...

Страница 8: ... Pack Capacity 4350mAh Battery Pack Energy 99 18Wh Battery Pack Weight 620g Dimensions 140 X 54 x 75 5 2 2 1 Overview Figure 2 2 Battery Overview LATCH MECHANISM The battery is mechanically secured to the drone with this locking latch mechanism ELIOS 3 User Guide Page 8 of 94 ...

Страница 9: ...nual Figure 2 3 Latch Mechanism BUTTON The button allows the user to cycle through the menu to display specific information or to enter discharge storage modes Figure 2 4 Battery Button ELIOS 3 User Guide Page 9 of 94 ...

Страница 10: ...ay the remaining capacity of the battery and serve as a selection menu in menu mode 2 2 2 Displaying state of charge A short press on the button will reveal the battery s state of charge If all four capacity LEDs are lit then the battery is fully charged The battery will go back into standby mode after 10 seconds 2 2 3 Entering the selection menu A long two second press on the button will take you...

Страница 11: ...ATE OF CHARGE This will display the battery state of charge i e how full the battery is If all four capacity LEDs are lit then the battery is fully charged Figure 2 5 Battery state of charge ELIOS 3 User Guide Page 11 of 94 ...

Страница 12: ...teries with many cycles will have a lower state of health and provide shorter flight times when compared to brand new ones Figure 2 6 Battery state of health STORAGE MODE Batteries are best stored at 50 charge to avoid long term chemical decay ELIOS 3 batteries will automatically start to discharge to this level if left unused for 5 days but you can also trigger this process ELIOS 3 User Guide Pag...

Страница 13: ...re 2 7 Battery storage mode TRANSPORT MODE According to IATA regulations all batteries carried on board an aircraft must be discharged to at least 30 state of charge Selecting transport mode will set the battery to slowly discharge to 30 The status LED will blink magenta during this process Figure 2 8 Battery transport mode ELIOS 3 User Guide Page 13 of 94 ...

Страница 14: ...ELIOS 3 User Manual ELIOS 3 BATTERIES GENERATE APPROXIMATELY 1W OF HEAT WHILE SELF DISCHARGING DO NOT BE ALARMED IF THEY FEEL WARM TO THE TOUCH DURING THIS PROCESS ELIOS 3 User Guide Page 14 of 94 ...

Страница 15: ...visual interface with the aircraft and controller It displays the live video feed transmitted by ELIOS and the 3D Live Map as well as important flight parameters The Samsung Galaxy Tab S7 LTE tablet with the pre installed cockpit app comes standard with every ELIOS 3 system ELIOS 3 User Guide Page 15 of 94 ...

Страница 16: ...rrounding sounds such as the voice of the inspector for reporting COCKPIT APPLICATION This app is developed by Flyability and functions as an interface with the aircraft It displays the video stream from the aircraft as well as essential flight parameters and settings For a complete overview of its functions please refer to the Flyability Cockpit part of the Manual 2 3 2 Controller The controller ...

Страница 17: ...ure 2 11 Pilot controller overview The controller is set to mode 2 by default Consult the Cockpit App section of this user manual for information on how to switch to other stick mapping modes ELIOS 3 User Guide Page 17 of 94 ...

Страница 18: ...es the distance lock mode If a distance has been previously set and is within 500mm from the current front distance the aircraft will use this value If not the aircraft will use the current front distance value Long press activates the distance lock mode and resets the distance value to the current front distance The set lock distance can be increased or decreased with the forward backward control...

Страница 19: ...ting left right or both LED panels FLIGHT MODE SWITCH This 3 way switch selects the flight mode of the drone POI BUTTON Press to take a 12MP still image This will also create a Point Of Interest POI which can be reviewed after the flight in the Flyability Inspector software Please note that you can take a maximum of 40 POI per flight SRC BUTTON Switches the video feed between the 4K optical camera...

Страница 20: ... connect the controller to a PC for firmware updates 2 4 LiDAR payload ELIOS 3 can carry an optional LiDAR payload The LiDAR data is used in real time by the drone to generate a 3D Live Map of the surrounding environment The 3D Live Map is streamed directly to the pilot on the tablet for improved situational awareness The user can see both the live visual feed and the 3D Live Map on the tablet and...

Страница 21: ...es with Ouster s OS0 32 beam LiDAR To learn more about it please visit the Ouster website 2 4 1 Mounting removing the LiDAR 2 4 1 2 HOW TO REMOVE THE LIDAR REQUIRED TOOLS Torque adjustable driver adjusted at 0 4 Newton meters T8 Torx size bit ELIOS 3 User Guide Page 21 of 94 ...

Страница 22: ...should be clean prior to its installation 2 Tighten the 2 screws with the T8 screwdriver attached to the torque control driver adjusted at 0 4 Nm Those 2 screws will maintain the whole structure so it is important that you tighten them correctly 3 Once the LiDAR has been fixed to the drone you need to connect the cable to the AUX connector To do this align the dot on the rubber of the connector on...

Страница 23: ...ift Above 7m s 23 f s wind even pushing the sticks will not help and the drone will start to drift away Dusty environments Staying too long in a cloud of dust will generate points in the model representing the dust Flying fast through the dust so the drone is not in the middle of it ensures that you will create a nice model and no drift will happen Also filtering will get rid of most dust Please n...

Страница 24: ...the drone improve the image quality increase the value of the footage obtained during an inspection and give you higher chances for a coherent and dense 3D map 1 Using the brush side remove all the dust from the lens 2 Using the dry cleaner side remove all the grease and fingerprints from the optics Figure 3 1 Lens cleaner overview 3 2 Setting up the ground control system ATTACH THE ANTENNAS Not h...

Страница 25: ...a the USB C cable Figure 3 2 Assembly of the GCS POWER ON THE CONTROLLER To turn the controller on off press the power button once it will display the battery level on the LEDs Press it again and hold The controller will turn on the same sequence can be used to turn it off again POWER ON THE TABLET To turn on off the tablet Press and hold down its power button RUN THE COCKPIT APP The cockpit app i...

Страница 26: ... button of the drone will blink yellow Make sure the battery is correctly aligned then push the red handle in two motions until it is secured Figure 3 3 Battery insertion and connection Once the battery is plugged in ELIOS 3 will be in sleep mode DRONE WARNS THE USERS IF THE BATTERY LATCH IS OPEN After the flight the battery can be removed in reverse order ELIOS 3 User Guide Page 26 of 94 ...

Страница 27: ...ELIOS 3 User Manual 1 Unlock the battery 2 Remove the battery from the drone ELIOS 3 User Guide Page 27 of 94 ...

Страница 28: ... Press this button to switch on the drone before takeoff Figure 4 1 Power Button Pressing the power button will power up all the electronics and payloads on the drone which will needlessly drain the battery if done too long before take off We recommend turning on the drone shortly before flight Please be aware that the drone will automatically shut down after 5 minutes of inactivity unless you kee...

Страница 29: ... aircraft must be armed before takeoff Place the 3 position switch of the GCS on the C1 position ASSIST MODE To arm ELIOS 3 perform the following arming sequence in rapid succession 1 Place the left stick on the bottom right 2 Keeping the left stick down slide it to the bottom left 3 Slide back the left stick to the bottom right Figure 4 2 Arming sequence Once armed ELIOS 3 will power on its motor...

Страница 30: ...put 1 Left and right stick down and to the center Figure 4 3 Disarming sequence THE AIRCRAFT CAN ALSO BE DISARMED IN MID AIR RESULTING IN A FREE FALL IF PERFORMED AT MORE THAN 1M 3 3 FEET ABOVE GROUND THIS WILL SERIOUSLY DAMAGE THE AIRCRAFT 4 4 Aircraft controls ELIOS 3 orientation and flight direction are defined in relation to its inner frame ELIOS 3 User Guide Page 30 of 94 ...

Страница 31: ...ck up and down changes ELIOS 3 s thrust Up increases thrust Down decreases thrust In this mode the pilot has to give constant inputs to maintain the aircraft at the desired altitude Moving the left stick sideways controls the rotation yaw of the drone Left makes the aircraft rotate counterclockwise Right makes the aircraft rotate clockwise Centered ELIOS 3 maintains its orientation with a drift of...

Страница 32: ... the right stick left and right controls the bank angle of ELIOS 3 making the aircraft go to the left or the right Left makes the aircraft go to the left Right makes the aircraft go to the right Centered ELIOS 3 stays put IN ASSIST MODE THE DRONES SENSORS HELP IT STAY FIXED IN ONE PLACE IN ATTI MODE THE PILOT MUST MAKE CONTINUOUS INPUTS TO CORRECT THE DRIFT CAUSED BY SMALL TRIM ERRORS AND LOCAL AI...

Страница 33: ...drone will not automatically remain stationary in this mode and will constantly drift due to local wind and turbulence effects The flight control system continuously monitors the quality of the sensor data and automatically switches to ATTI when necessary Although the drone should always function with reliable stability it is ultimately the pilot s duty to assess whether the stabilization is funct...

Страница 34: ...ollision speed For this reason it is important to avoid high speed collisions when flying in SPORT ATTI mode as they might result in loss of or permanent damage to the aircraft CONTROLLING THE ELIOS 3 IN SPORT MODE IS DIFFICULT AND REQUIRES PROPER PILOT TRAINING 4 5 5 Sport mode Assist SPORT ASSIST The SPORT ASSIST mode is to be used when you are in need of increasing the speed of the drone but no...

Страница 35: ...button on the back right of the drone PILOT ASSIST OFF To navigate faster than in ASSIST SPORT from point A to B Or for advanced pilots who want full control ATTI MAN Manual Thrust switch For advanced pilots who fly in very confined spaces where the altitude control is compromised ASSIST SPORT Moving the 3 way switch to the right When wanting to navigate quicker than in ASSIST while flying in simi...

Страница 36: ...und Once on the ground the motors will be shut down after 30 seconds and the drone will remain in standby mode If at any time the communication link is re established flight may be resumed BATTERY LEVEL CRITICAL If the battery reaches a critical level ELIOS 3 will automatically enter emergency landing mode and the aircraft will slowly descend after hovering for 5 seconds The pilot is still able to...

Страница 37: ...n the left side of the remote control will allow you to set the payload tilt angle There is a small indent on the lever to indicate the neutral zero degree tilt camera position While flying you can set brightness parameters on the 4K optical camera The EV switch sets the camera s exposure value UP increases brightness DOWN decreases brightness The camera will automatically choose an optimal combin...

Страница 38: ...tically according to the pitch of the camera head to ensure optimal lighting while saving battery capacity and flight time ELIOS 3 has four separate LED panels Left inboard outboard panel Right inboard outboard panel The lighting system has 3 settings Normal all the panels are lit Dust proof light only the outboard panels are lit Oblique lighting left or right panels are lit offering improved dept...

Страница 39: ...ated at the back top right of the remote control OBLIQUE LIGHTING The outboard panels can also be lit individually to provide oblique lighting If the drone is positioned at a shallow angle to a surface while one of the outboard panels is individually lit then it will create shadows which greatly accentuate deformations and holes To use the Oblique Lighting you have to keep pressing the FN button l...

Страница 40: ...ELIOS 3 User Manual Figure 4 6 Drone shown with the no dust removal left Images captured with the dust removal right ELIOS 3 User Guide Page 40 of 94 ...

Страница 41: ...one and image captured with the oblique light not used the surface appears quite flat left Drone and image captured with the oblique light in use highlighting relief this case pitting and welding right ELIOS 3 User Guide Page 41 of 94 ...

Страница 42: ...measure needs to be on a flat surface perpendicular to the camera s optical axis The accuracy of the measurement is 10 of the measured length with a maximum of 5mm accuracy Thanks to its camera distance sensor ELIOS 3 is capable of measuring the size of a feature on a flat surface using Flyability s Inspector post processing software ELIOS 3 User Guide Page 42 of 94 ...

Страница 43: ...or which follows the camera s head pitch Using measurements from the distance sensor ELIOS 3 is able to fix its distance from a surface The distance is measured between the front of the camera and the nearest surface in the middle of the field of view Limitations ELIOS 3 User Guide Page 43 of 94 ...

Страница 44: ... as ELIOS 3 is armed and stops when ELIOS is disarmed provided that the CAM SD card has enough free space Video as well as still images are saved onto the CAM SD card 4 10 3 LiDAR recording LiDAR raw data is stored in a bag file in the OBC This data is needed for debugging and GeoSLAM integration The trajectory of the flight is saved in a csv file and the map is saved in an las file as well as in ...

Страница 45: ...IOS 3 User Manual A LOSS OF POWER DUE TO A CRASH OR BATTERY DISCONNECTION WHILE ELIOS 3 IS FLYING MAY CAUSE A LOSS OF THE VIDEO FILE BEING RECORDED ON THE CAMERA S SD CARD ELIOS 3 User Guide Page 45 of 94 ...

Страница 46: ...nd button LEDs These LEDs give information about the status of the transmitter They are located at the front of the drone where the power button is located and on the back of the drone Here is a description of what each color stands for GREEN LED The operation system is working properly RED LED There is an error Don t fly the drone ELIOS 3 User Guide Page 46 of 94 ...

Страница 47: ...ELIOS 3 User Manual BLUE LED The calibration is still on going YELLOW LED The turn off sequence has been initiated VIOLET LED The system is updating ELIOS 3 User Guide Page 47 of 94 ...

Страница 48: ...blet GET THE APPLICATION The Cockpit application is distributed as a standard Android application file apk which is available on our website Using the USB connection of your tablet copy the APK file to a place you can browse to using a file explorer on the tablet An alternate solution is to copy the file onto an SD card especially for Mac users ALLOW UNKNOWN SOURCES IN ANDROID Go to the settings s...

Страница 49: ...re details on that process MANUAL UPDATE Follow the steps noted in the Installing the application for the first time section First launch of Cockpit Upon a fresh install or unboxing of your Flyability aircraft steps that are specific to the first launch may be encountered Please be patient when the application starts for the first time Initialization of long standing components should take place T...

Страница 50: ...able to activate the USB tethering USB TETHERING Make sure to change the default USB configuration to have the USB tethering as your default USB mode To do so click on the Tablet Settings and then activate the Developer Options following the steps indicated in the above section and then scroll down on the right menu until you find the networking menu There you will find the Default USB configurati...

Страница 51: ...onger compatible see screenshot below for an example of this warning Please note that you should always update the drone firmware when updating the software and vice versa If not your drone will not function properly To upgrade the system you will have to connect to the Inspector 4 software ELIOS 3 User Guide Page 51 of 94 ...

Страница 52: ...ELIOS 3 User Manual Figure 6 1 Aircraft Firmware Update ELIOS 3 User Guide Page 52 of 94 ...

Страница 53: ...ser Manual 6 2 User interface Home screen Figure 6 2 Home Screen When starting the application the user arrives on the home screen The home screen contains the following elements ELIOS 3 User Guide Page 53 of 94 ...

Страница 54: ...d a hard hat while operating the aircraft The user MUST have read the aircraft user manual prior to using the system 4 CONNECTION STATUS Three icons are displayed at the bottom of the screen during the connection process From left to right these icons represent the tablet the remote controller and the drone The dotted lines represent the connection status between each component of the ELIOS 3 syst...

Страница 55: ...anual Figure 6 3 Fly Now Home Screen Main flight display The instrument panel can be shown once all connections are established and the application has received data from the aircraft ELIOS 3 User Guide Page 55 of 94 ...

Страница 56: ...ckpit 1 Ambient temperature 2 Signal strength 3 LiDAR 4 Remote controller battery charge 5 Aircraft battery charge 6 Aircraft battery voltage 7 Flight time 8 Uptime time elapsed since the battery is plugged in ELIOS 3 User Guide Page 56 of 94 ...

Страница 57: ...radio panel of the settings menu BATTERY REMAINING CHARGE AND VOLTAGE When the aircraft is not able to estimate its own percentage of battery charge left or N A is displayed instead In such situations you can only rely on the battery voltage and flight time to estimate the remaining flight time but this method is generally unreliable and should not be used in critical environments The battery char...

Страница 58: ...nformation is logged during the flight and can be used in the Inspector software for added situational awareness during post processing HEADING DRIFTS OVER TIME DEPENDING ON AIRCRAFT AND ENVIRONMENTAL CONDITIONS IT IS A NAVIGATIONAL AID NOT AN ACCURATE MEASUREMENT TOOL MAP The embedded LiDAR sensor constantly scans the drone s surroundings to build a high density point cloud also called a 3D map w...

Страница 59: ...kup purposes You can view the backup videos in Device Storage Flyability Cockpit Recordings LIGHTING PARAMETERS AND FRONTAL DISTANCE MEASUREMENT The LED lights display the status of the power level of the lighting system and which panels are lit Note that you cannot set the LEDs to full power until the aircraft takes off This is because the heat generated by the LEDs needs to be cooled down by the...

Страница 60: ...of the drone The camera can tilt 90 degrees up and 90 degrees down SETTINGS MENU The settings button opens the settings menu THERMAL CAMERA TARGET Available starting next November The frame shows the field of view of the thermal camera Only the objects inside this frame will get their thermal images recorded The frame can be changed and or hidden in the settings menu ELIOS 3 User Guide Page 60 of ...

Страница 61: ...ettings screen and go back to the main screen press the back button of the tablet or the close button in the top right corner of the screen The content of the settings is organized in multiple tabs Swipe the tabs horizontally to browse through the panels and tap on the tabs to view their contents Settings Figure 6 5 ELIOS 3 Settings ELIOS 3 User Guide Page 61 of 94 ...

Страница 62: ... allows you to decide which mode to use when flying the drone Mode 2 will be set by default The available modes are a Mode 1 b Mode 2 To switch from mode 1 to mode 2 please select mode 1 on the Remote Control Mapping control and vice versa to switch back to mode 2 ELIOS 3 User Guide Page 62 of 94 ...

Страница 63: ...e changing the settings shown here However you can use the information to quantitatively verify the signal quality in high risk environments 1 Air Unit This table lists the different metrics measured by the air unit 2 Ground unit This table lists the different metrics measured by the ground unit 3 Channel selection The radio system will select the channel with the least noise ELIOS 3 User Guide Pa...

Страница 64: ...onds to complete the pairing Battery panel Figure 6 7 ELIOS 3 Battery Panel This panel shows data about the current battery status of the ELIOS 3 System 1 Aircraft battery remaining charge and voltage 2 Uptime the elapsed time since the battery was plugged in 3 Battery firmware version and serial number ELIOS 3 User Guide Page 64 of 94 ...

Страница 65: ... here 5 Battery voltage current and temperature 6 Number of charge discharge cycles on the current battery 7 Internal resistance 8 Tablet battery charge 9 Controller battery charge Please refer to the aircraft and battery instructions for more details and limiting values for each of the above items ELIOS 3 User Guide Page 65 of 94 ...

Страница 66: ...ple viewer without needing to connect it to an actual remote controller Using this feature two people can monitor a flight while using a single remote controller Wi Fi streaming requires all devices to support Wi Fi Direct 1 List of detected Wi Fi direct devices used to connect to a streaming device when in the receiving role 2 Streaming devices search button starts a new search of devices around ...

Страница 67: ...the current device and makes it visible from other devices 5 Name of this Android device as listed in Wi Fi system options Refer to this name when searching the current device from another device in the receiving role Maintenance panel Figure 6 9 ELIOS 3 Wi Fi Streaming Panel The Maintenance panel gives an overview of the status of ELIOS 3 User Guide Page 67 of 94 ...

Страница 68: ...NDBY The sensor has been configured into a low power state where the sensor is on but not spinning ERROR Check error codes in the alerts list for more information UNCONFIGURED An error with factory calibration that requires a manual power cycle or reboot VIO UNKNOWN Status of the component is not yet known BOOTING Component is starting up OK Components are operating normally SHUTTING_DOWN Componen...

Страница 69: ...ELIOS 3 User Manual ELIOS 3 User Guide Page 69 of 94 ...

Страница 70: ...include the data listed here This information helps Flyability to troubleshoot the issue you are experiencing and expedites incident response time 1 Versions This is where you will find the current version for each of these items a Avionics version of connected aircraft b Camera firmware version of connected aircraft c Air unit version of connected aircraft ELIOS 3 User Guide Page 70 of 94 ...

Страница 71: ...5 Hardware identifier of connected aircraft 6 Hardware revision of connected aircraft 7 Statistics of the connected aircraft a Total flight time b Armings 8 Customer support information button shows support contact information 9 Privacy settings button opens the privacy settings window 10 User guide button ELIOS 3 User Guide Page 71 of 94 ...

Страница 72: ...ings screen contains settings related to privacy and data security 1 Send aircraft health data enables Flyability to receive periodic updates about aircraft flight time and prepare better maintenance procedures 2 Activate offline only mode disables all Internet related features of Cockpit ELIOS 3 User Guide Page 72 of 94 ...

Страница 73: ...comply with company policies Offline only mode disables all internet functions of Cockpit including 1 Software updates check 2 Sending aircraft health data to Flyability When using offline only mode you will need to actively check for software updates on your own to get them as they are available ELIOS 3 User Guide Page 73 of 94 ...

Страница 74: ... the onboard footage To review those videos 1 Open the file manager application on your Android device 2 Browse into Device Storage Flyability Cockpit Recordings Figure 6 12 ELIOS 3 Video Recordings 3 Find the video files corresponding to your previous flights Files are named by date and time of recording STN files accompany the videos and contain valuable debugging information for Flyability cust...

Страница 75: ...AL INJURY Warning types Multiple levels of importance are given to different warning messages which are expressed using different colors COLOR SEVERITY EXPLANATION Blue Information Advice for improving the user experience of the ELIOS system Provides recommended actions which are good for most cases but can be ignored depending on the pilot s skill level Yellow Warning Point that requires attentio...

Страница 76: ... for further help A03 LiDAR disconnection detected A LiDAR communication timeout has just happened Access the maintenance tab in the Cockpit app for further diagnosis Contact Flyability support for further help A04 Stability sensors damaged ASSIST stability performance diminished An issue with the VIO camera has just been detected We recommend you restart the drone If the problem persists you must...

Страница 77: ...eplace the battery with one at a normal ambient temperature typically 10 C 30 C 50 F 86 F One recommended way to keep batteries warm is by using a special LiPo safe bag with built in electric temperature control B07 Too warm battery The onboard system has evaluated the battery as risky Batteries with the same conditions can have critical issues during flight including loss of power during flight a...

Страница 78: ...propellers are in good condition tightly attached to the motors and each one is mounted to a motor with the correct direction of rotation A propeller may be broken loose or in the wrong place This error message can also signal a motor failure If you are confident that you have properly tightened the propellers and the motors are in their correct state try arming the aircraft again P03 Motors overh...

Страница 79: ...is full The aircraft is not able to record video anymore Empty the SD card to resume recording G02 Camera SD card error Error concerning camera SD card operation Can be caused by a corrupt card G03 Camera SD card missing Please insert an SD card in the CAM SD card slot to have your video footage saved G04 OBC storage getting low The OBC storage is getting low Free up 20GB to do a flight G05 OBC SS...

Страница 80: ...rror performance may be diminished Calibration communication error stability performance may be diminished I08 DSM calibration error performance may be diminished Calibration error stability performance may be diminished I09 DSM calibration file error performance may be diminished Calibration error stability performance may be diminished I10 DSM calibration SN mismatch performance may be diminishe...

Страница 81: ...ts L02 The LiDAR is too hot and stopped working LiDAR stopped working because it was too hot L03 LiDAR is getting hot The LiDAR is too hot We recommend you turn the drone off L04 The LiDAR is too hot Performance might be reduced LiDAR is too hot performance may be reduced L05 The LiDAR is too hot Performance is reduced Further heating will shut the LiDAR down LiDAR is too hot performance is reduce...

Страница 82: ...until it does so S07 OBC did not initialize properly The OBC logging system did not initialize properly and thus timed out Please wait until it restarts and properly initiates S08 OBC logging system failure OBC logging failure please restart the drone S09 Drone cannot be armed in current state The drone cannot be armed in the current state Please restart it Contact Flyability support if a problem ...

Страница 83: ... this pairing procedure There are no items needed for you to pair the controller to the drone Press the power button of the drone and keep it pushed in until it starts blinking blue Then pair the controller with Cockpit by putting it into pairing mode The Controller status indicator will blink blue and emit a beep sound when the Controller is ready to link ELIOS 3 User Guide Page 83 of 94 ...

Страница 84: ...d charger to charge the Controller The use of a non approved charger may result in battery damage and risk of fire While the controller can be charged while piloting the drone this is not a recommended practice since this may lead to the unit overheating How would you know that the RC is charged The 4 LEDS lights are white indicating that the RC is charged Figure 8 1 GCS charging ELIOS 3 User Guid...

Страница 85: ... green 3 Connect the battery pack to the charger The battery LEDs will show the progression of the charge The charger LED will turn red indicating that the charge is ongoing 4 The battery will be fully charged when the charger LED turns green again If the charger LED remains green upon connection it might mean that either 1 The battery is already fully charged Check the state of charge of the batt...

Страница 86: ... display a yellow LED Until the LED will stay yellow the battery is still outside the temperature range for the charge and therefore it won t charge 3 The battery is permanently damaged due to over discharging Please contact Flyability Professional Services at support flyability com ELIOS 3 User Guide Page 86 of 94 ...

Страница 87: ...use of water as this may damage the electronics 9 2 1 LED lights Take special care of the onboard lighting system Accumulated dust or other dirt on the LEDs surfaces will reduce the lighting capacity of ELIOS 3 9 2 2 Motors Pay special attention to the motors Dust or other particles may damage the motors if allowed to build up inside Use compressed air to remove all dust and particles from the mot...

Страница 88: ...that numbers and letters will be printed on the propellers ELIOS 3 is shipped with a dynamometric screwdriver which is pre set to the correct torque of 1 4Nm Using this tool eliminates the risk of overtightening the motor nuts and damaging the threaded motor shafts Remove the damaged propeller propellers with the appropriate tool i e the provided 8mm hex socket Change the propeller propellers maki...

Страница 89: ...nual Figure 9 1 Propeller marking To learn more about this topic please watch the related support video Support videos can be found here USE ONLY THE PROPELLERS PROVIDED BY FLYABILITY ELIOS 3 User Guide Page 89 of 94 ...

Страница 90: ...own the old motor Take a new motor and verify that the o ring is well in place Align the motor connector and the arm connector Push the motor in place Place the 3 motors screw with their washers Tighten the 3 screws keeping the motor free to move slightly Don t block the screws yet Place the centering tool through the duct on top of the motor shaft and push it against the motor rotor Wobble the mo...

Страница 91: ...ELIOS 3 User Manual ONLY USE FLYABILITY GENUINE REPLACEMENT PARTS To learn more about this topic please watch the related support video Support videos can be found here ELIOS 3 User Guide Page 91 of 94 ...

Страница 92: ...w to change a pentagon in the drone s cage When you need to replace a pentagon make sure to pick the right one and try to add it to the structure Then with a cutting plier cut the zip ties and remove the broken parts and zip ties After you have replaced the new part and zip ties tie them by hand Please keep in mind that the zip ties have to be placed from the inside of the cage in order for the he...

Страница 93: ...r of the connector while wiggling it to unplug Only one cable is connected on the outermost panels On the central near the camera panel you have two cables The one with the red ring must be connected to the connector closest to the camera Take the new LED panel Connect the cable or cables Slide the panel in Pay attention to the panel sliding above the plastic tabs and under the plastic frame Place...

Страница 94: ...dex Switzerland Email support flyability com Tel 41 21 311 55 00 Content subject to change Find the latest version on www flyability com FLYABILITY SA 41 21 311 55 00 INFO FLYABILITY COM EPFL INNOVATION PARK BLDG C 1015 LAUSANNE SWITZERLAND ...

Отзывы: