background image

X6655pr

-0720

8

Troubleshooting • Solución de problemas • Guide de dépannage 

 service.fisher-price.com

• 

Children can be harmed by small 

parts, sharp edges and sharp points 

in the vehicle’s unassembled state, 

or by electrical items. Care should 

be taken in unpacking and assembly 

of the vehicle. Children should not 

handle parts, including the battery, 

or help in assembly of  

the vehicle.

• 

Les petites pièces et les bords 

tranchants ou les extrémités 

pointues du véhicule non assemblé, 

ou encore les pièces électriques, 

peuvent blesser les enfants. 

Déballer et assembler le véhicule 

soigneusement. Ne pas laisser les 

enfants manipuler les pièces ou la 

batterie ni aider à l’assemblage  

du véhicule.

• 

Los niños se pueden lastimar 

con las piezas pequeñas y con 

los bordes y puntas filosas de las 

piezas individuales del vehículo 

desmontado, así como con piezas 

eléctricas. Tomar las debidas 

precauciones al sacar las piezas 

del vehículo y al montar el mismo. 

No permitir que los niños toquen 

ninguna pieza, incluyendo la batería, 

ni que ayuden con el montaje  

del vehículo.

   WARNING

   ADVERTENCIA

   AVERTISSEMENT

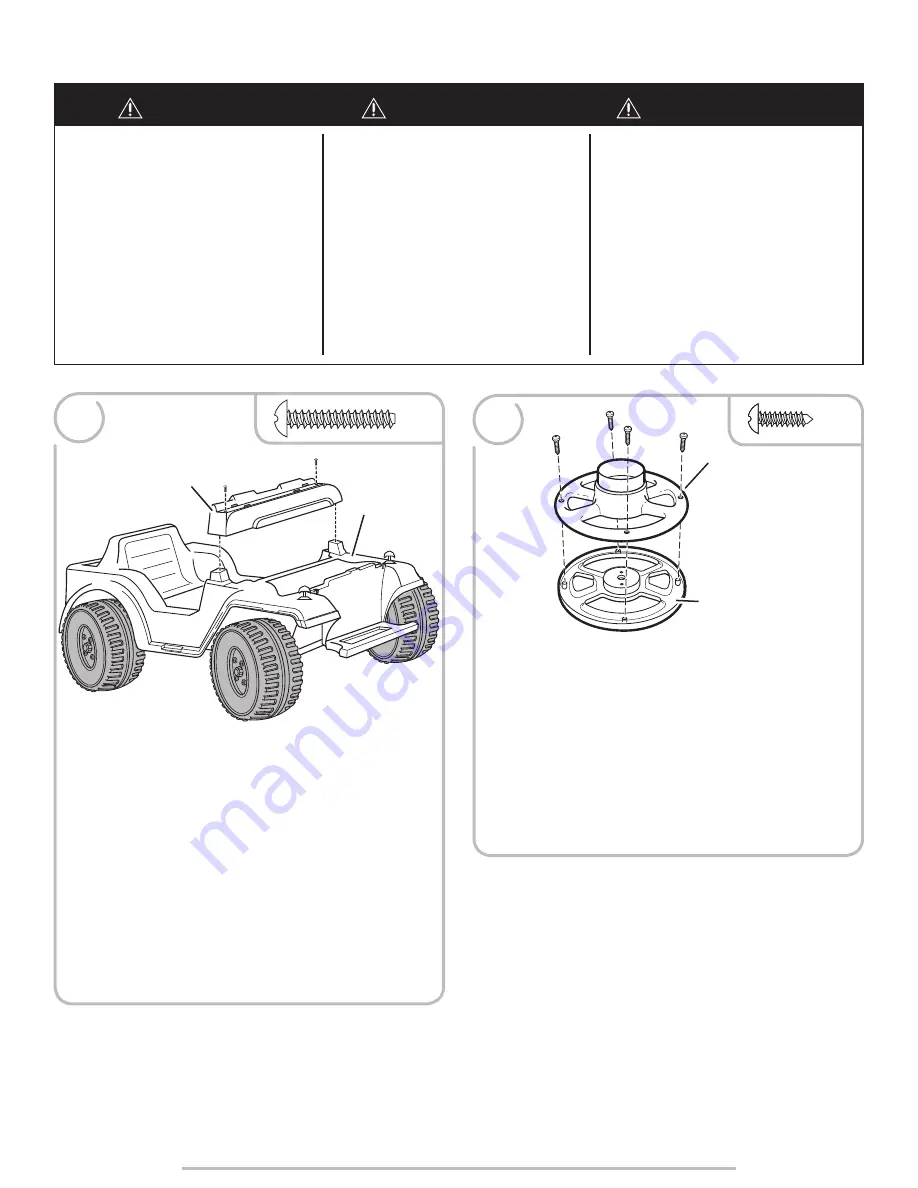
ASSEMBLY     MONTAJE     ASSEMBLAGE

1

Dash

Tablero

Tableau de bord

FRONT VIEW

VISTA DEL FRENTE

VUE AVANT

x2

Vehicle

Vehículo

Véhicule

•  Fit the dash onto the top of the vehicle.

•  Insert a #8 x 1" (2,5 cm) screw through the hole in each end of the dash. 

Tighten the screws.

•  Ajustar el tablero en la parte de arriba del vehículo.

•  Insertar un tornillo n° 8 x 2,5 cm en el orificio en cada extremo del 

tablero. Apretar los tornillos.

•  Fixer le tableau de bord sur le véhicule.

•  Insérer une vis n° 8 de 2,5 cm dans le trou à chaque extrémité de la 

colonne de direction. Serrer les vis.

2

Steering Wheel Top

Parte de arriba del volante

Partie supérieure du volant

Steering Wheel Bottom

Parte de abajo del volante

Partie inférieure du volant

•  Fit the top and bottom of the steering wheel together. Make sure both the 

holes and the spokes in the steering parts are aligned.

•  Insert four #6 x ½" (1,3 cm) screws into the holes into the bottom of the 

steering wheel and tighten.

•  Unir ambas partes del volante. Asegurarse de que tanto los orificios 

como los rayos del volante estén alineados.

•  Insertar cuatro tornillos n° 6 x 1,3 cm en los orificios de la parte de abajo 

del volante y apretarlos.

•  Assembler la partie supérieure et la partie inférieure du volant. S’assurer 

que les trous et les rayons du volant sont alignés.

•  Insérer quatre vis nº 6 de 1,3 cm dans les trous de la partie inférieure du 

volant et les serrer.

x4

Содержание Power wheels X6655

Страница 1: ...a i n i m p o r t a n t a t i o n 1 5 V x 3 A G 1 3 L R 4 4 a s s e m b l y r e q u i r e d e d t o o l P h i l l i p s s c r e w d r i v e r c l u d e d 6V 4 0 Ah 6V 4 0 Ah Adult assembly is required...

Страница 2: ...obrecargado o si las condiciones de manejo son muy severas Despu s de que un fusible se bloquea dejar de presionar el pedal y esperar 25 segundos antes de echar a andar el veh culo otra vez Para evita...

Страница 3: ...e areas must be away from swimming pools and other bodies of water to prevent drownings generally level to prevent tipovers away from steps steep inclines cars roads and alleys Riding rules Make sure...

Страница 4: ...da os o gasto en exceso no usar el cargador ni la bater a hasta que haya reemplazado la pieza da ada Nunca modificar el sistema el ctrico Las alteraciones podr an causar un incendio Usar solo una bate...

Страница 5: ...a bater a durante por lo menos 14 horas despu s de cada uso del veh culo No cargar la bater a m s de 30 horas El incumplimiento de estas instrucciones puede da ar la bater a y anular la garant a Antes...

Страница 6: ...ant standard Brancher le chargeur uniquement sur une prise murale Ne pas brancher le chargeur sur une prise situ e au plafond Une fois la batterie charg e d brancher le connecteur de la batterie de ce...

Страница 7: ...e de cada pieza con un pa o limpio y seco para eliminar cualquier suciedad o aceite No se muestra hoja de adhesivos S il manque des pi ces composer le 1 800 348 0751 Canada et tats Unis ou le 59 05 51...

Страница 8: ...eau de bord FRONT VIEW VISTA DEL FRENTE VUE AVANT x2 Vehicle Veh culo V hicule Fit the dash onto the top of the vehicle Insert a 8 x 1 2 5 cm screw through the hole in each end of the dash Tighten the...

Страница 9: ...ouverture ronde du tableau de bord S assurer que la colonne de direction passe entre les guides sous le v hicule ASSEMBLY MONTAJE ASSEMBLAGE INSIDE VIEW VISTA DESDE EL INTERIOR VUE DE L INT RIEUR 5 Lo...

Страница 10: ...rd Fit the tabs on the bottom of the instrument panel into the notches in the dash opening to the left side of the steering wheel Press near the top of the instrument panel to snap in place Ajustar la...

Страница 11: ...3 cm screws into the holes in the windshield assembly and tighten Ajustar el parabrisas en el armaz n Insertar cinco tornillos n 6 x 1 3 cm en los orificios de la unidad del parabrisas y apretarlos P...

Страница 12: ...Fit a traction band around a wheel Slide a slotted screwdriver under the traction band to push the traction band onto the ridge in the center of the wheel Hint If the traction band is difficult to fi...

Страница 13: ...eilleurs r sultats viter d apposer un autocollant plus d une fois sur le v hicule DECORATION DECORACI N D CORATION DASH VIEW RIGHT SIDE ACTIVITY PANEL VISTA DEL TABLERO LADO DERECHO PANEL DE ACTIVIDAD...

Страница 14: ...problemas Guide de d pannage service fisher price com FRONT RIGHT SIDE VISTA FRONTAL DERECHA C T AVANT DROIT FRONT LEFT SIDE VISTA FRONTAL IZQUIERDA C T GAUCHE AVANT 10 3 4 7 13 11 25 1 1 8 25 1 1 8 1...

Страница 15: ...tor del arn s del motor voltearlo e intentar otra vez No forzar el conector de la bater a en el conector del arn s del motor Brancher le connecteur de la batterie sur le connecteur du c ble du moteur...

Страница 16: ...los ni os en reas seguras Se recomienda que estas reas est n lejos de piscinas y otras reas con agua para evitar accidentes niveladas para evitar que el veh culo se voltee lejos de escalones pendient...

Страница 17: ...te No quemar la bater a de plomo cido La bater a podr a explotar o derramar l quido CONTIENT UNE BATTERIE AU PLOMB SCELL E CETTE BATTERIE DEVRA TRE RECYCL E La batterie doit tre recycl e ou jet e de f...

Страница 18: ...weather store the vehicle inside or under a protective cover Charge the battery at least once per month while your vehicle is not in regular use Avoid operating the vehicle in wet or snowy conditions...

Страница 19: ...s not extended This warranty gives you specific legal rights and you may also have other rights which may vary from jurisdiction to jurisdiction In order to qualify for this warranty your original sal...

Страница 20: ...os 10 y 11 Col Granada Delegaci n Miguel Hidalgo C P 11520 M xico D F R F C MME 920701 NB3 VENEZUELA Mattel de Venezuela C A RIF J301596439 Ave Mara C C Macaracuay Plaza Torre B Piso 8 Colinas de la C...

Отзывы: