background image

11

12

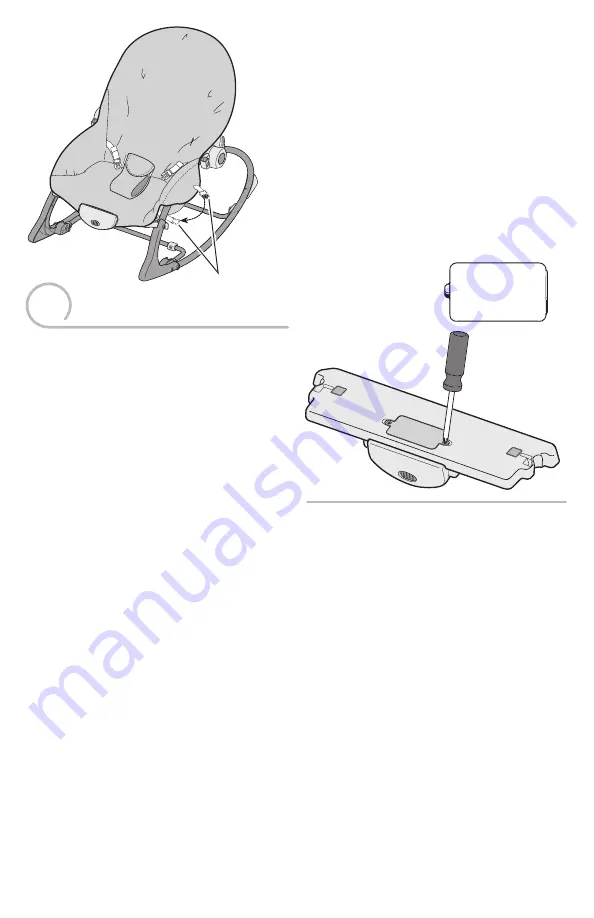
• Locate the battery compartment on the top of the 

vibrations unit.

• Loosen the screws in the battery compartment door. 

Lift to remove the battery compartment door.

• Insert one D (LR20) 

alkaline

 battery.

• Replace the battery compartment door and tighten 

the screws.

• If this product begins to operate erratically, you may 

need to reset the electronics. Slide the power switch 
off and then back on.

IMPORTANT! 

Low battery power causes this product 

to operate erratically: no vibrations and the product 
may not turn off. Remove and discard the battery and 
replace with a new D (LR20) 

alkaline

 battery.

• Localizar el compartimento de la pila en la parte de 

arriba de la unidad de vibraciones.

• Aflojar los tornillos de la tapa del compartimento de la 

pila. Levantar la tapa para retirarla.

• Introducir 1 pila 

alcalina

 D (LR20) x 1,5V.

• Cerrar la tapa del compartimento de la pila y apretar 

los tornillos.

• Si este producto no funciona correctamente, 

restablecer el circuito electrónico. Poner el interruptor 
de encendido en apagado y nuevamente en encendido.

¡IMPORTANTE!

 Si la pila está gastada, el producto no 

funcionará correctamente (sin vibraciones ni función 
de apagado). Sacar y desechar la pila y sustituirla por 
1 pila nueva 

alcalina

 D (LR20) x 1,5V.

Hint: 

We recommend using 

alkaline

 batteries for 

longer battery life.

Atención: 

se recomienda usar pilas 

alcalinas

 para una 

mayor duración.

Remarque : 

Il est recommandé d’utiliser des piles 

alcalines

 car elles durent plus longtemps.

Dica: 

Recomendamos a utilização de pilhas 

alcalinas


para um efeito mais duradouro.

• Fasten the buckles on each side of the pad around 

each side rail. 

Make sure you hear a "snap".

• Abrochar los cinturones en cada lado de la 

almohadilla alrededor de cada barandilla lateral. 

Asegurarse de oír un clic.

• Attacher les boucles, situées de chaque côté du 

coussin, autour de chaque montant latéral. 

S’assurer 

d’entendre un clic.

• Prenda as fivelas de cada lado do acolchoado ao 

redor de cada barra lateral. 

Certifique-se de ouvir 

um "clique".

Battery Installation

Colocación de las pilas

Installation des piles

Instalação das Pilhas

Pad Buckles
Hebillas de la almohadilla
Boucles du coussin
Fivelas da almofada

+ -

1,5V 

D (LR20)

Содержание BML88

Страница 1: ...pilas sin mercurio incluidas IMPORTANT Conserver ce mode d emploi pour s y r f rer en cas de besoin Lire attentivement ce mode d emploi avant d assembler et d utiliser le produit Assemblage par un ad...

Страница 2: ...ard Never use as a carrier or lift while child is seated Never use the toy bar as a handle Para evitar lesiones graves o la muerte Peligro de ca das no usar en superficies elevadas ya que el movimient...

Страница 3: ...haut de son corps pour rester assis sans se pencher vers l avant Ne jamais utiliser ce produit comme porte b b et ne jamais le soulever lorsque l enfant y est assis Ne jamais utiliser la barre jouets...

Страница 4: ...adas Utiliser la position inclin e si ge ber ant pour b b jusqu ce que l enfant soit capable de s asseoir sans aide environ 9 kg ou 20 lb Utiliser la position redress e si ge bascule pour tout petit u...

Страница 5: ...M5 x 50 mm 4 Vis M5 de 50 mm 4 Parafuso M5 x 50 mm 4 Shown Actual Size Se muestran a tama o real 2 Side Rails 2 barandillas laterales 2 montants lat raux 2 Barras laterais Kickstand Pie de apoyo B qui...

Страница 6: ...sition each side rail so that the button faces outward While pressing the tabs on the ends of the seat back tube insert it into the sockets in each side rail until the tabs snap into place Make sure y...

Страница 7: ...fit the side rails one way If a foot does not seem to fit remove it and assemble it to the other side rail Repeat this procedure to assemble the other foot to the other side rail Levantar la parte de...

Страница 8: ...mostrado Observa o a barra de apoio se encaixa de uma s maneira Se a montagem n o estiver encaixando vire a e tente novamente Insert the ends of the kickstand into the socket in each foot Insert a M5...

Страница 9: ...emidade da barra de apoio e barra lateral utilizando o contentor com trava Insert an M5 x 30 mm screw through the outside of each side rail and into the ends of the cross brace IMPORTANT Please follow...

Страница 10: ...uckle on the back of the pad to the buckle on the cross brace Make sure you hear a snap Abrochar el cintur n del dorso de la almohadilla al cintur n de la barra transversal Asegurarse de o r un clic A...

Страница 11: ...erruptor de encendido en apagado y nuevamente en encendido IMPORTANTE Si la pila est gastada el producto no funcionar correctamente sin vibraciones ni funci n de apagado Sacar y desechar la pila y sus...

Страница 12: ...uivalentes Piles LR44 ou quivalentes LR44 ou equivalente Aflojar los tornillos de la tapa del compartimento de pilas en la barra de juguetes Retirar la tapa Desechar las pilas gastadas apropiadamente...

Страница 13: ...quides peuvent s couler des piles et provoquer des br lures chimiques ou endommager le produit Pour viter que les piles ne coulent Ne pas m langer des piles us es avec des piles neuves ou diff rents t...

Страница 14: ...embargo no hay ninguna garant a de que no haya interferencia en una instalaci n particular Si este equipo llega a causar interferencia da ina a la recepci n de radio o televisi n lo cual puede ser ver...

Страница 15: ...a carrier or lift while child is seated Never use the toy bar as a handle Para evitar lesiones graves o la muerte Peligro de ca das no usar en superficies elevadas ya que el movimiento del ni o puede...

Страница 16: ...haut de son corps pour rester assis sans se pencher vers l avant Ne jamais utiliser ce produit comme porte b b et ne jamais le soulever lorsque l enfant y est assis Ne jamais utiliser la barre jouets...

Страница 17: ...le pressing the button on each side rail lower the seat back Posici n de la silla Vertical mientras presiona el bot n en cada barandilla lateral subir el respaldo Reclinada mientras presiona el bot n...

Страница 18: ...mit libre de la courroie abdominale dans le passant de fa on former une boucle A Agrandir la boucle en tirant sur son extr mit vers le passant Tirer sur l extr mit fixe de la courroie abdominale pour...

Страница 19: ...o est bien asegurado en la silla Poner el interruptor de encendido en encendido para vibraciones relajantes Poner el interruptor de encendido en apagado para apagar las vibraciones Jala el aro para o...

Страница 20: ...d Mississauga Ontario L5R 3W2 M XICO Importado y distribuido por Mattel de M xico S A de C V Miguel de Cervantes Saavedra No 193 Pisos 10 y 11 Col Granada Delegaci n Miguel Hidalgo C P 11520 M xico D...

Отзывы: