background image


XTP T FB 202 • SIS Configuration and Control

19

Error Responses

When the XTP T FB 202 receives an SIS command and determines that it is valid, it 
performs the command and sends the corresponding response to the host device. If the 
command is determined invalid or contains invalid parameters, the switcher returns an error 
response to the host. The error response codes are:

E01

 = Invalid input number

E12

 = Invalid port number

E06

 = Invalid switch attempt in this mode

E13

 = Invalid parameter

E10

 = Invalid command

E14

 = Not valid for this configuration

E11

 = Invalid preset number

E17

 = Invalid command for signal type

Using the Command and Response Tables for SIS Commands

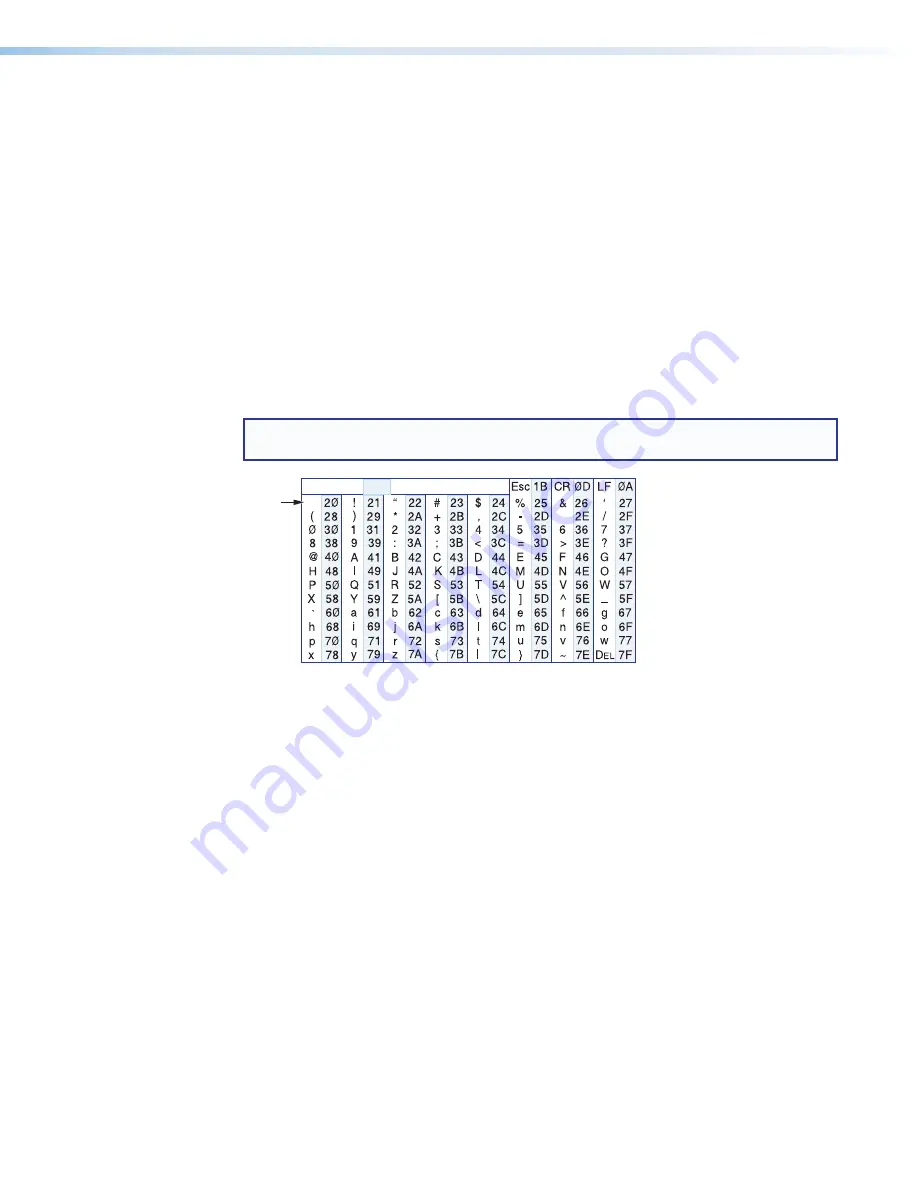
The command and response tables begin on page 21. Figure 21 shows the hexadecimal 
equivalent of ASCII characters used in the command and response tables.

NOTE:

  Upper- and lowercase text can be used interchangeably unless otherwise 

stated.

ASCII to Hex  Conversion Table

Space

Figure 21. 

ASCII to Hexadecimal Conversion

Symbol Definitions

]

= Carriage return and line feed

¦ 

or


}

= Carriage return with no line feed

= Space

E

 or W = Escape key

X2^

= EDID output resolution and refresh rate

See the 

table

 on page 20.

Содержание XTP T FB 202

Страница 1: ...User Guide XTP T FB 202 XTP Extender Two input Universal Floor Box Twisted Pair Transmitter 68 2292 01 Rev A 11 13 ...

Страница 2: ... de la presencia de voltaje peligroso sin aislar dentro del producto lo que puede representar un riesgo de descarga eléctrica ATENCIÓN Este símbolo cuando se utiliza en el producto avisa al usuario de la presencia de importantes instrucciones de uso y mantenimiento recogidas en la documentación proporcionada con el equipo Para obtener información sobre directrices de seguridad cumplimiento de norm...

Страница 3: ...ebsite Copyright 2013 Extron Electronics All rights reserved Trademarks All trademarks mentioned in this guide are the properties of their respective owners The following registered trademarks registered service marks SM and trademarks TM are the property of RGB Systems Inc or Extron Electronics Registered Trademarks AVTrac Cable Cubby CrossPoint eBUS EDID Manager EDID Minder Extron Flat Field Glo...

Страница 4: ...0000600 02 35 17 03 EX X1 X2 X2 X2 CE NOTE For commands and examples of computer or device responses mentioned in this guide the character 0 is used for the number zero and O represents the capital letter o Computer responses and directory paths that do not have variables are written in the font shown here Reply from 208 132 180 48 bytes 32 times 2ms TTL 32 C Program Files Extron Variables are wri...

Страница 5: ...eference Information 36 Updating Firmware with Firmware Loader 36 Downloading Extron Firmware Loader 36 Installing Firmware Loader 37 Downloading Firmware 38 Installing Firmware with Firmware Loader 39 Introduction 1 About this Guide 1 About the XTP T FB 202 1 Key Features 2 Installation 4 Installation Overview 4 Adapter Plates 5 Side Panel Connectors 7 Connectors Below the Adapter Plates 7 Connec...

Страница 6: ...XTP T FB 202 Contents vi ...

Страница 7: ...s a two input XTP transmitter that sends HDMI or digitized analog video audio bidirectional RS 232 and IR and Ethernet up to 330 feet 100 m over a single CAT 5e 6 and 7 CATx cable It is HDCP compliant and supports 1080p 60 Deep Color and 1920x1200 signals The XTP T FB 202 works with XTP Systems for signal distribution and long distance transmission between remote endpoints It is made specifically ...

Страница 8: ...able Inputs Include one HDMI input and one VGA input Computer video to 1920x1200 support including HDTV 1080p 60 Deep Color and 2K signals Supports digital signal transmission up to 330 feet over a single twisted pair cable maintaining superior image quality at the highest resolutions CAT 5e 6 and 7 compatible Optimized for use with common unshielded and shielded twisted pair cable types XTP syste...

Страница 9: ...bution of a single source signal to one or more displays Ethernet extension Centralized 10 100 Ethernet communication can be implemented via an Ethernet pass through port to reduce the amount of independent network drops required within a system Remote power capability To simplify integration the XTP T FB 202 can be powered by an XTP CrossPoint matrix switcher or an XTP Power Injector Multiple emb...

Страница 10: ... pull the cables through the floor box TIP Secure cables with clamps or ties to provide strain relief 4 Trim back and insulate shields with heat shrink ATTENTION To prevent short circuits the outer foil shield can be cut back to the point where the cable exits the cable clamp Both braided and foil shields should be connected to an equipment ground at the other end of the cable 5 Install the approp...

Страница 11: ...ctric CableLink Plus Modular 995244 Electraplan 995300 PUK 995300 NOTE The 995242 adapter plate is only used for position 2 of the Ackermann GB3 OBO Bettermann floor box 1 Determine the position in the floor box to install the XTP T FB 202 Each compatible floor box contains three positions to install devices see figure 2 NOTE For the MK Electric CableLink Plus Single Pan floor box do not use posit...

Страница 12: ...he floor box The MK Electric CableLink Plus Single Pan floor box does not have mounting slots Use a mounting screw to secure the large mounting hole of the 995243 adapter plate to the mounting hole of the floor box position see figure 4 MK Electric CableLink Plus Single Pan Floor Box 995243 995243 Figure 4 Installing 995243 Adapter Plates 3 Rotate the adapter plate down so the bottom flange rests ...

Страница 13: ...rs Below the Adapter Plates 1 0 A MAX SIG LINK XTP OUT G REMOTE RS 232 Rx Tx POWER 12V 1 0A MAX Side Panel c b a Figure 7 Side Panel Connectors Under the Adapter Plates a Remote RS 232 connector Connect a host device to the 3 5 mm 3 pole captive screw connector for serial control of the transmitter Wire the connector as shown in figure 8 Do not tin the wires Controlling Device Transmit Tx Receive ...

Страница 14: ...at uses XTP remote power should be routed outdoors see Remote power on page 16 c Power connector Connect an external power supply to the 3 5 mm 2 pole captive screw connector see Power Connection on page 15 The Power LED lights to indicate the device is receiving power NOTE The XTP T FB 202 can be powered remotely see Remote power on page 16 Connectors Above the Adapter Plates 1 0 A MAX SIG LINK X...

Страница 15: ...he following table shows the audio format that is sent over the XTP connection when a specific audio format is not specified Selected Video Input HDMI Embedded Audio Present Analog Audio Present Audio Sent Over XTP VGA N A Yes Analog audio VGA N A No No audio HDMI Yes No HDMI embedded audio HDMI Yes Yes HDMI embedded audio HDMI No Yes Analog audio HDMI No No No audio b RS 232 Over XTP port To pass...

Страница 16: ... box consider the mounting location and prepare the surface as necessary 1 If not already completed install the appropriate adapter plates in the desired position and mounting slots see Adapter Plates on page 5 2 Align the screw holes on the XTP T FB 202 with the screw holes on the adapter plates 3 Using the provided self threading screws and washers secure the XTP T FB 202 to the adapter plates s...

Страница 17: ...TP T FB 202 shown in Cablelink Single Pan floorbox assembly 995243 995243 Figure 13 Mounting the XTP T FB 202 into an MK Electric CableLink Plus Single Pan Floor Box ATTENTION Do not install the XTP T FB 202 in position 2 see figure 2 on page 5 MK Electric CableLink Plus Modular floor box PO WE R XT P T FB 20 2 VG A IN H D M I IN PW R H DM I VG A H D CP AU TO C LI P AU DI O IN LA N RE MO TE RS 23 ...

Страница 18: ...kIt Lacing Bracket to secure an HDMI cable to the HDMI connector as follows 3 3 1 2 4 5 Figure 16 Installing the LockIt Lacing Bracket 1 Plug the HDMI cable into the panel connection 2 Loosen the HDMI connection mounting screw from the panel enough to allow the LockIt lacing bracket to be placed over it The screw does not have to be removed 3 Place the LockIt lacing bracket on the screw and agains...

Страница 19: ...ctors for the best performance XTP DTP 24 1000 Non Plenum 1000 305 m spool 22 236 03 XTP DTP 24P 1000 Plenum 1000 305 m spool 22 235 03 XTP DTP 24 Plug Package of 10 101 005 02 If not using XTP DTP 24 cable at a minimum Extron recommends 24 AWG solid conductor STP cable with a minimum bandwidth of 400 MHz Terminate cables with shielded connectors to the TIA EIA T568B standard Limit the use of more...

Страница 20: ...ctor To transmit and receive IR signals connect a control device to the three rightmost poles G Tx and Rx The ground G pole is shared NOTE RS 232 and IR data can be transmitted or received simultaneously see figure 18 below for wiring considerations Tx Rx Pins Rx Tx RS 232 Rx Tx Tx Rx Rx Tx Custom IR Device RS 232 Device G G G IR Figure 18 Wiring the RS 232 and IR Over XTP Connector ATTENTION The ...

Страница 21: ...tron Use of an unauthorized power supply voids all regulatory compliance certification and may cause damage to the supply and the end product Unless otherwise stated the AC DC adapters are not suitable for use in air handling spaces or in wall cavities The installation must always be in accordance with the applicable provisions of National Electrical Code ANSI NFPA 70 article 75 and the Canadian E...

Страница 22: ... RE SE T LA N SIG LIN K XT P IN OVE R XT P OU TP UT S RE LA YS AC T LIN K SIG LIN K XT P IN XT P PW R XT P PW R 100 24 0V 50 60 Hz A MA X PO WE R X T P T F B 20 2 V G A IN H D M I IN H D M I V G A H D C P A U T O C L IP A U D IO IN L A N RE MO TE RS 23 2 G Rx Tx 12 V 1 0 A MA X CO NF IG RE SE T Tx Rx G Tx Rx O V E R X T P R S 2 32 IR XT P OU T Extron XTP T FB 202 XTP Transmitter Extron XTP R HDMI ...

Страница 23: ... user memory location select a pre defined EDID or use EDID from a display connected to a receiver EDID stored in the user memory location can come from the display connected to a receiver or a custom EDID imported through the XTP System Configuration Software NOTE In matrix applications EDID on the switcher is assigned by the matrix switcher using the XTP System Configuration Software Reset Modes...

Страница 24: ...t or the side panel RS 232 connector The protocol for the serial port is as follows 9600 baud no parity 8 data bits 1 stop bit no flow control SIS Programming Guide Host to Device and Device to Host Communication SIS commands consist of one or more characters per field No special characters are required to begin or end a command sequence When the XTP T FB 202 determines that a command is valid it ...

Страница 25: ...arameter E10 Invalid command E14 Not valid for this configuration E11 Invalid preset number E17 Invalid command for signal type Using the Command and Response Tables for SIS Commands The command and response tables begin on page 21 Figure 21 shows the hexadecimal equivalent of ASCII characters used in the command and response tables NOTE Upper and lowercase text can be used interchangeably unless ...

Страница 26: ...80x720 with 2 ch audio default for HDMI 60 HDMI 19 1280x768 50 DVI 5 1280x768 60 DVI 20 1280x800 50 DVI 6 1280x800 60 DVI 21 1280x1024 50 DVI 7 1280x1024 60 DVI 22 1360x768 50 DVI 8 1360x768 60 DVI 23 1366x768 50 DVI 9 1366x768 60 DVI 24 1400x1050 50 DVI 10 1400x1050 60 DVI 25 1440x900 50 DVI 11 1440x900 60 DVI 26 1600x1200 50 DVI 12 1600x1200 60 DVI 27 1680x1050 50 DVI 13 1680x1050 60 DVI 30 User...

Страница 27: ...ode Audio Configuration Commands Audio gain and attenuation NOTE Gain and attenuation commands are case sensitive Set gain X G AudX Set gain to X Set attenuation X g AudX Set attenuation to X Increment audio level G or g AudX Increase the audio level Decrement audio level G or g AudX Decrease the audio level View audio level G or g AudX View the audio level Audio input selection Set audio input fo...

Страница 28: ...el phase value Horizontal shift Set horizontal shift value EX1 HCTR HctrX1 Set horizontal location of first active pixel in active window Increment value E HCTR HctrX1 Increase the value Decrement value E HCTR HctrX1 Decrease the value View horizontal shift value EHCTR HctrX1 Show horizontal location of the first active pixel in active window Vertical shift Set vertical shift value EX1 VCTR VctrX1...

Страница 29: ...atus EEHDCP HdcpEX2 View the HDCP authorized device status Reset System reset EZXXX Zpx Reset unit to factory default Status View input signal presence 0LS FrqX1 1 X1 2 View the input signal presence of each input 1 VGA input 2 HDMI input Query HDCP input EIHDCP HdcpI0X2 View the HDCP input status of the HDMI input Query firmware version Q x xx View the firmware version Query full firmware version...

Страница 30: ...ftware is convenient user friendly control software for configuring an XTP system or individual XTP devices Installing the XTP System Configuration Software The program is available for download on the Extron website www extron com Figure 22 Extron Website Download Page 1 On the Extron website click the Download tab 2 From the left sidebar click the XTP System Configuration Software link 3 Click t...

Страница 31: ...nnections When opening the XTP System Configuration Software the Connections screen opens first This screen is used to establish communication with an XTP device via USB see Config port on page 10 Figure 23 Connections Screen 1 From the Connections screen select the USB radio button 2 Select the connected device to be controlled from the displayed list 3 Click the Connect button The Device Setting...

Страница 32: ...ice From the File menu select Disconnect The Connections screen opens NOTE If the device is already disconnected the Disconnect option is disabled until a device is connected Exit This option disconnects the receiver from the software and closes the application From the File menu select Exit The application closes Tools menu The Tools menu contains an option for updating firmware To access this me...

Страница 33: ...disconnect from the device Figure 26 Confirm Disconnect Dialog Box 2 Click the Yes button to disconnect from the device and continue with the firmware update process The Update Firmware dialog box opens Figure 27 Update Firmware Dialog Box 3 Click the Check network for updates icon to search the LAN or WAN for firmware files or click the Select file from computer icon to select a firmware file fro...

Страница 34: ...ftware including version number and copyright information Figure 29 About Dialog Box Example 1 From the Help menu select About the Software The About XTP dialog box opens 2 Click the Details button for more information 3 Click the OK button to close the dialog box Help This option opens the XTP System Configuration Software help file in a web browser From the Help menu select Help Extron Website T...

Страница 35: ...Screen AV Controls panel The AV Controls panel located on the left is used to selection an input and apply one time Auto Image to input 1 Auto Image Click the Auto Image button to start a one time Auto Image on input 1 Input selection Click an Input button to select an input As a new input is selected the summary within the panel changes to reflect the currently selected input NOTE The signal indi...

Страница 36: ...er there is a change in the input sync Auto Image attempts to size and center the input signal based on the aspect ratio setting Auto Memory Select the Auto Memory check box of input 1 to enable the Auto Memory Auto Memory recalls input and image settings for signals that have previously been applied When it is disabled the XTP T FB 202 treats every newly applied input as a new source HDCP authori...

Страница 37: ...d to the right of the corresponding field or click the Up and Down arrows Shift panel Shifting moves the position of an image To adjust the horizontal and vertical shift settings enter a value within the Min and Max values displayed to the right of the corresponding field or click the Up or Down arrows Input Presets panel Input presets save signal sampling and shift settings to be recalled later S...

Страница 38: ...lick the Up or Down arrow to adjust the analog input gain General tab Click the General tab to open the general screen It contains settings for executive mode auto switch mode and factory reset Figure 34 General Tab Auto input Switching section Auto input switching Click the Enable Auto Input Switching check box to enable auto switch mode Two settings are available for this mode Click the Priority...

Страница 39: ...al Information section Model Displays the device model Firmware version Displays the full firmware version Signal Information section Selected input Displays the input number of the currently selected input Auto input switching Displays the On or Off status of auto switch mode Signal present Displays the signal presence of all three inputs HDCP Displays the HDCP status of input 2 Audio Information...

Страница 40: ...y a blue green or yellow output display icon from the Favorites Connected Outputs or Available EDID pane 2 Select the check box of the connected input to the right of the Available EDID pane 3 Click the Assign button below the input area TIP Alternatively EDID can be assigned by dragging and dropping the desired EDID onto the input Import EDID 1 On the EDID Minder screen click the Add EDID to Libr...

Страница 41: ...lter or combination of filters 1 Select an EDID setting from one of the drop down lists of the associated filter The available EDID options that match the filter selection are displayed in the Available EDID pane 2 Repeat step 1 to apply more filters To clear the currently applied filters 1 Click the Clear button next to the filters All filters are reset Common timings This function automatically ...

Страница 42: ... Firmware with Firmware Loader To upload and update firmware for the XTP T FB 202 download the new firmware to a connected computer and upload the firmware with the Firmware Loader utility Downloading Extron Firmware Loader Figure 36 Locating Firmware Loader Software on the Extron Website 1 On the Extron website www extron com click the Download tab 2 On the left sidebar click the Software link ...

Страница 43: ...sponds with the program 5 Submit any required information to start the download Note where the file is saved Installing Firmware Loader 1 Once Firmware Loader has been downloaded run the exe file from the save location The installation wizard window opens 2 Follow the instructions on the Installation Wizard screens to install Firmware Loader on the computer ...

Страница 44: ...e XTP T FB 202 4 Ensure the available firmware version is a later version than the current one on the device NOTE The firmware release notes are a PDF file that provides details about the changes between different firmware versions The file can be downloaded from the same page as the firmware 5 Click the Download link to the right of the desired device 6 Submit any required information to start th...

Страница 45: ...nt connection method 6 Click the Connect button 7 Click the Browse button in the New File Firmware Optional section 8 On the Open dialog box navigate to the new firmware file which has an S19 extension and click the Open button ATTENTION Valid firmware files must have the file extension S19 A file with any other extension is not a firmware upgrade for this device and could cause the device to stop...

Страница 46: ...e Hanzeboulevard 10 3825 PH Amersfoort The Netherlands China Extron China 686 Ronghua Road Songjiang District Shanghai 201611 China Asia Extron Asia Pte Ltd 135 Joo Seng Road 04 01 PM Industrial Bldg Singapore 368363 Singapore Middle East Extron Middle East Dubai Airport Free Zone F12 PO Box 293666 United Arab Emirates Dubai This Limited Warranty does not apply if the fault has been caused by misu...

Отзывы: