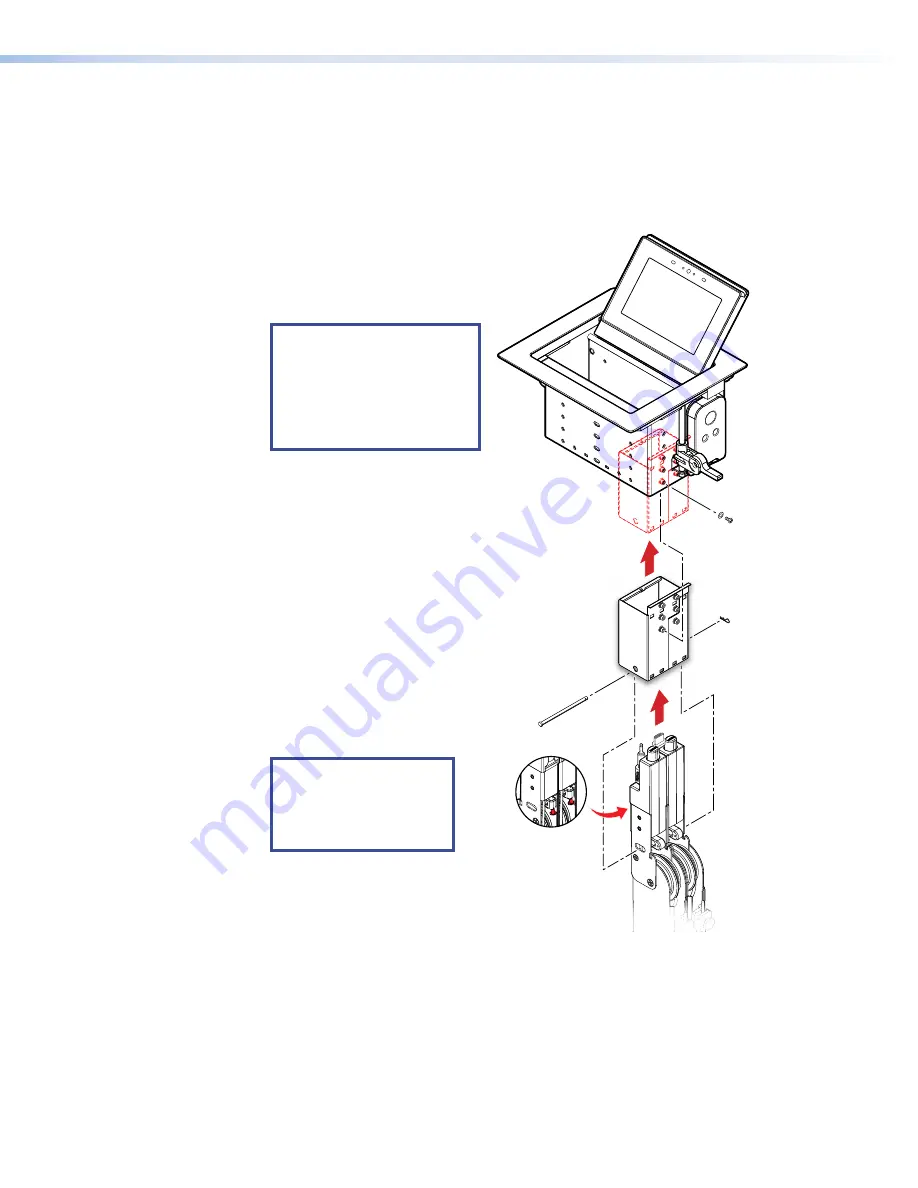
1.
Slide the bracket into the
enclosure from underneath (
1
).
Ensure the mounting holes on the
module are aligned with the holes
on the sides of the enclosure.
NOTE:
To avoid damage to
the touchscreen, the cable
connectors should not
touch the screen. Mount
the module at the lowest
possible level in the cable
cubby.
2.
Secure the bracket with the
provided #6-32 screws and
#6 star washers (
2
).
3.
Mount the TLP Pro 525C into
the table (see
4.
Insert the retractors into the
bracket from underneath the table
(
3
). Ensure the mounting slot in
the retractors is aligned with the
holes on the side of the bracket.
5.
Secure the retractors with the
included clevis pin (4).
6.
Secure the clevis pin with the
cotter pin.
NOTE:
Use a similar
procedure to mount up
to three retractors into a
Retractor triple bracket
module.
e
21-
525
-01
LF
21-
525
-01
LF
21-
526-
01L
F
21-52
6-01L
F
Insert Retractors into
the bracket.
Slide the bracket
into the enclosure
as shown
(either side).
1
3
4
Secure the bracket
with the included
screws and washers.
2
Secure the Retractors
with the included
mounting pin and clip
Secure the locking screw
on each Retractor.
Do not overtighten.
5
Figure 17.
Installing a 525C Module with Retractors in
the TLP Pro 525C
Installing a 525C module with Retractors
Figure 17 shows how to install a 525C module with optional retractors in the TLP Pro 525C
enclosure.
Extron recommends initially installing 525C bracket without Retractors and adding the Retractors
once the enclosure is mounted.
525C Modules must be installed at the ends of the enclosure (see figure 17).
TLP Pro 525C and 725C Series Touchpanels • Mounting
20


