Room Scheduling System • Room Agent Installation and Configuration
20
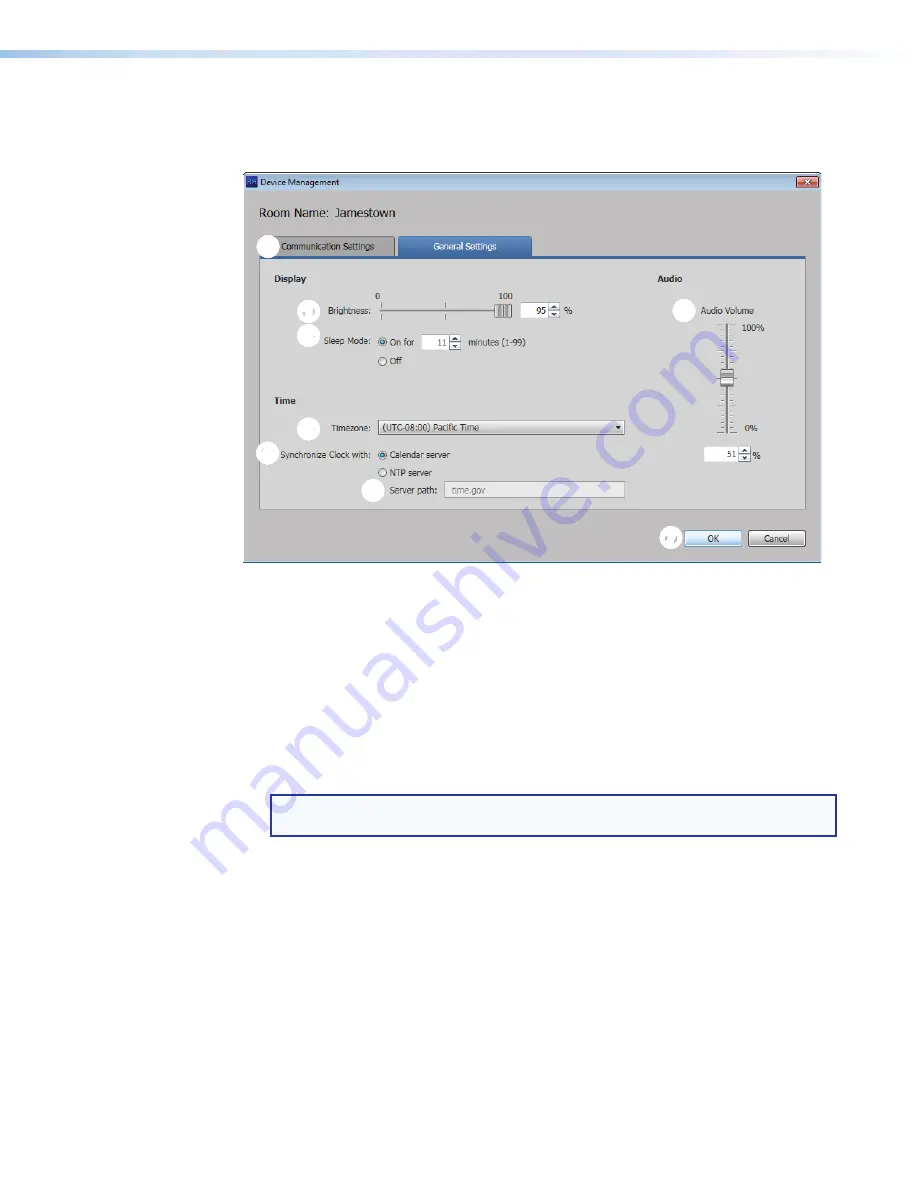
General Settings window
The
General
Settings
tab on the
Device
Management
window (see figure 16) provides a
set of tools for managing display, time, and audio settings of the connected panel.
6
6
6
6
6
6
6
6
6
6
7
7
7
7
7
7
7
7
7
7
8
8
8
8
8
8
8
8
8
8
2
2
2
2
2
2
2
2
2
2
3
3
3
3
3
3
3
3
3
3
4
4
4
4
4
4
4
4
4
4
5
5
5
5
5
5
5
5
5
5
1
1
1
1
1
1
1
1
1
1
Figure 16.
Device Management Window, General Settings
1
Display Brightness
— Set the panel illumination brightness, from
0
to
100
(percent)
using this fader control.
2
Display Sleep Mode
— Toggle Sleep mode
On
and
Off
by selecting the appropriate
radio button. If Sleep mode is
On
, use the
Minutes
field to specify between
1
and
99
minutes.
3
Timezone
— Use the drop-down list to select the appropriate time zone.
4
Synchronize Clock with
— Toggle the clock synchronization source between the
Calendar
server
and
NTP
(Network Time Protocol — a networking protocol for clock
synchronization between computer systems) by selecting the appropriate radio button.
NOTE:
If you select
NTP
, specify the path to the NTP server in the
Server
path:
field (
5
).
5
Server path:
(available only if NTP is selected in
4
) — Specify a path for the NTP
server.
6
Audio Volume
— Set the panel audio volume, from
0
to
100
(percent) using this fader
control.
Once you have made all desired changes available from the
General
Settings
tab, click
either the
OK
button (
7
, the
Device
Management
window closes) or the
Communication
Settings
tab (
8
, then communication settings are displayed, see
on the
previous page).
Содержание TLP Pro 520M
Страница 6: ...Room Scheduling System Contents vi ...


