


3 Create two MST instances.
a Go to the
Switching
>
Spanning Tree
>
MST
page.
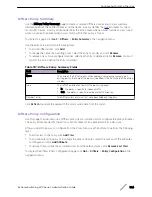
b From the MST page, click
Add
.
c In the MST ID field, enter 10.
d Associate MST ID 10 with VLAN 10 and assign a bridge priority of 16384.
e Click
Submit
.
f Repeat the steps to create an MST instance with an ID of 20.
4 Use similar procedures to associate MST instance 20 to VLAN 20 and assign it a bridge priority value
of 61440.
By using a lower priority for MST 20, MST 10 becomes the root bridge.
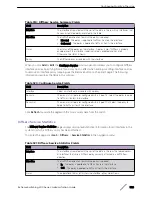
5 Force port 1/0/2 to be the root port for MST 20, which is the non-root bridge.
a Go to the
Switching
>
Spanning Tree
>
MST
page.
b From the MST ID menu, select 20.
c From the Interface menu, select 1/0/2.
d In the Port Priority field, enter 64.
e Click
Submit
.
Using the CLI to Configure MSTP
1 Create VLAN 10 and VLAN 20.
(Extreme 220) (Routing) #vlan database
vlan 10
vlan 20
exit
2 Enable spanning tree Globally
(Extreme 220) (Routing) #config
spanning-tree
3 Create MST instances 10 and 20.
spanning-tree mst instance 10
spanning-tree mst instance 20
4 Associate MST instance 10 to VLAN 10 and MST instance 20 to VLAN 20
spanning-tree mst vlan 10 10
spanning tree mst vlan 20 20
5 Change the name so that all the bridges that want to be part of the same region can form the
region.
spanning-tree configuration name broadcom
6 Make the MST ID 10 bridge the root bridge by lowering the priority.
spanning-tree mst priority 10 16384
7 Change the priority of MST ID 20 to ensure the other bridge is the root bridge.
spanning-tree mst priority 20 61440
8 Enable STP on interface 1/0/1
interface 1/0/1
spanning-tree port mode
exit
9 Enable STP on interface 1/0/2
interface 1/0/2
spanning-tree port mode
Configuration Examples
ExtremeSwitching 200 Series: Administration Guide
336


