background image

10

ENGLISH

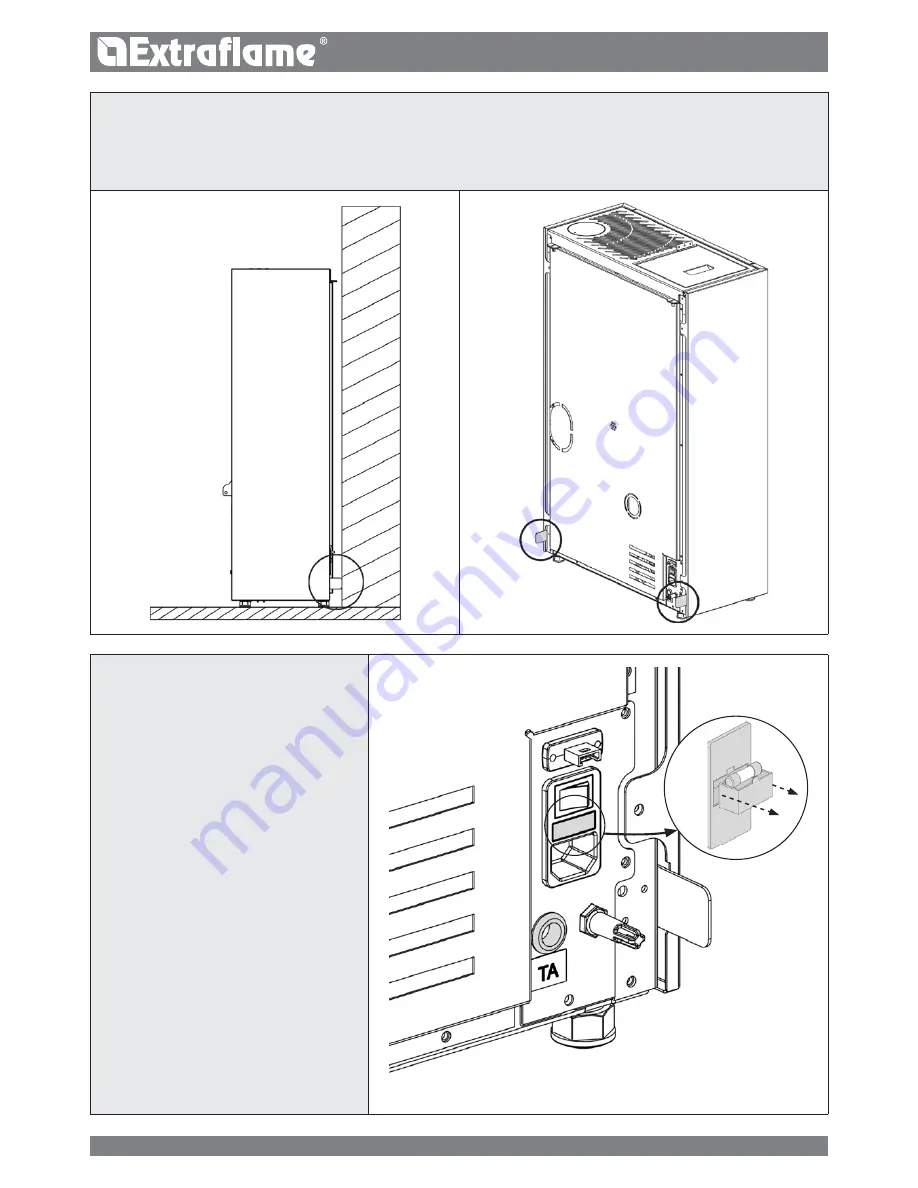
spACers 

There are two spacers located on the rear of the machine which determine the minimum distance any support behind the stove. 

The spacers must not be removed.

fuse

If there is no power supply to the stove, check the 

state of the fuse located in the box between the 

stove switch and the power cable connection.

Содержание LUISELLA

Страница 1: ...MADE IN ITALY design production LUISELLA 004276847 REV001 UK pellet stoves USER MANUAL...

Страница 2: ...2 ENGLISH...

Страница 3: ...2 stBY STAND BY 22 OPERATION with supplementary thermostat optional 22 DELT Delta T 22 res reset 23 Additional functions 23 FIRST LOAD 23 DELAY SWITCH OFF 23 Supplementary thermostat INSTALLATION opti...

Страница 4: ...ne faire tres attention aux composants en detail WARNUNG Bei der Handhabung der Maschine beachten Sie die Komponenten im Detail ATENCION Durante el desplazamiento de la ma quina tener mucho cuidado a...

Страница 5: ...OF AGE OR OLDER AND INDIVIDUALS WITH REDUCED PHYSICAL SENSORY OR MENTAL CAPACITIES OR WITHOUT EXPERIENCE OR THE NECESSARY KNOWLEDGE PROVIDED THAT THEY ARE SUPERVISED OR HAVE RECEIVED INSTRUCTIONS ON...

Страница 6: ...aste Do not use any flammable liquids for ignition During the filling phase do not put the bag of pellets to into contact with the product The majolicas aretop quality artisan products and as such can...

Страница 7: ...that the documentation has been provided and must keep it with a copy of the technical documentation relating to the installation For installation in a condominium prior approval from the condominium...

Страница 8: ...e base of the vertical section If the exhaust is not inserted in an existing flue a vertical section with a windproof end piece is required UNI 10683 The vertical duct can be inside or outside the bui...

Страница 9: ...j k d D Details of luisella A Access to combustion chamber E Pellet hopper pressurised closure I Combustive air input B Display F Room air outlet j Serial input C Spacer G Upper fumes exhaust K On Off...

Страница 10: ...of the machine which determine the minimum distance any support behind the stove The spacers must not be removed Fuse If there is no power supply to the stove check the state of the fuse located in th...

Страница 11: ...ans that you have 60 to close the hatch door and the pellet lid After 60 seconds when the stove ignites it will go to DEPR ALARM mode while during normal operation the stove will go to COOLING STAND B...

Страница 12: ...hs of seasoning the calorific value of pellets is 5 kWh kg Pellet density is 650kg m3 and the water content is equal to 8 of its weight For this reason they do not require seasoning in order to arrive...

Страница 13: ...Indicates the set temperature status LED on the stove is reaching the set temperature room temperature still lower than set temperature LED off the stove has reached the set temperature Indicates comm...

Страница 14: ...st be loaded with pellets The combustion chamber must be clean The burn pot must be completely free and clean Check the hermetic closure of the hoper fire door and ash drawer Check that the power cabl...

Страница 15: ...2 Power increase Increases operating power 3 Power decrease Decreases operating power 4 T increase Increases the set thermostat 5 T decrease Decreases the set thermostat J Ifthe remote control is swit...

Страница 16: ...d key 4 Press key 3 until SET appears and access with key 4 Press key 3 until DAY appears and access with key 4 Set the day using keys 4 and 5 and confirm with key 2 Press key 1 several times to exit...

Страница 17: ...inimum value If the contact is open request the stove works at the set power If the setting is on HOT set above 40 C the stove only works at the set power thus bypassing the external contact and the t...

Страница 18: ...the calibration of the volumetric weight of the pellet go from the factory value 0 to 1 2 3 as required Controls procedure Press and hold key 4 Press key 3 until EASY appears and access with key 4 Adj...

Страница 19: ...ratures and power without influencing the stove work status NB if overlapping time slots are set the stove will stay on until the latest switch off time prg 1 4 PROGRAMMING 1 4 Prg x allows you to set...

Страница 20: ...23 50 PRG2 start time Stop OFF 00 00 23 50 PRG2 stop time DAY1 DAY7 On off Enabling disabling days for PRG2 TEMP LOU 07 40 C HOT Set thermostat PRG2 Pow 1 5 Set power PRG2 prg3 ABIL On Off Enables dis...

Страница 21: ...3 1 02 00 23 00 08 00 16 30 t 22 18 2 1 21 ENGLISH Time slot 1 start 02 00 stop 23 00 power 3 set temp 22 C Time slot 2 start 08 00 stop 16 30 power 1 set temp 18 C stove operation Time slot Power Set...

Страница 22: ...with supplementary thermostat optional STBY function set to OFF FACTORY DEFAULT SETTING In the even the Stand by function is not activated OFF if the stove reaches the room temperature set on the sup...

Страница 23: ...o1h thestovewillautomatically switch off at 9 pm If you press and hold keys 2 4 at the same time the screen DELAY SWITCH OFF will appear alternating with the countdown this setting can only be configu...

Страница 24: ...water or water and neutral soap Failure to comply with the indications can damage the surfaces of the generator and cause the warranty to become null and void Cleaning the ceramic glass Never use abra...

Страница 25: ...ant compartment Vacuum the ash from the burn pot slot ignition plug pipe holder and combustion chamber Unblock all the holes in the burn pot using the poker supplied Re position the burn pot in its sl...

Страница 26: ...lder and combustion chamber Unblock all the holes in the burn pot using the poker supplied Release the central wall of the fireplace from the clamps by sliding it upwards B Remove the cast iron wall b...

Страница 27: ...urn pot partition A where combustion takes place physically and a flame guard B When cleaning and removing the burn pot remove the flame guard B by lifting it Perform the same operation in reverse ord...

Страница 28: ...warranty GASKETS pellet hopper lid DOOR ASH DRAWER AND BURN POT The gaskets guarantee the tightness of the stove and its consequent good functioning They must be controlled periodically They must be...

Страница 29: ...licone or gasket in the points indicated B Gaskets pellet hopper and door replace them and apply silicone where required C Combustion chamber and heat exchanger full cleaning including ignition plug p...

Страница 30: ...he points indicated B Gaskets pellet hopper and door replace them and apply silicone where required C Combustion chamber and heat exchanger full cleaning including ignition plug pipe D Hopper complete...

Страница 31: ...n indicates the presence of an alarm The alarm can only be reset if the fumes motor has stopped and 15 minutes have passed since the alarm was displayed by pressing key 1 for 3 seconds E00 Fumes motor...

Страница 32: ...bility to use the product and wrong maintenance by the consumer with respect to what is reported and recommended by the instructions manual of the product which is part of the sales contract this guar...

Страница 33: ...tlet pipes etc Please therefore avoid coming into contact with these parts without wearing suitable protective clothing or using appropriate measures such as heat protective gloves DO NOT use the prod...

Страница 34: ...34 ENGLISH...

Страница 35: ...35 ENGLISH...

Страница 36: ...ame it www lanordica extraflame com TO FIND THE SERVICE CENTRE NEAREST TO YOU CONTACT YOUR DEALER OR CONSULT THE SITE WWW LANORDICA EXTRAFLAME COM The manufacturer reserves the right to vary the chara...

Отзывы: