Maintenance
Cleaning the Foam and Paper Elements:
Foam Element:
Wash the foam element with water.
Important:
Replace the foam element if it is
torn or worn.
Paper Element:
1. Lightly tap the element on a flat surface to remove
dust and dirt.
2. Inspect the element for tears, an oily film, and
damage to the seal.
Important:
Do not clean the paper element
with pressurized air or liquids, such as
solvent, gas, or kerosene. Replace the paper
element if it is damaged or cannot be cleaned
thoroughly.
To learn more about the Exmark twin-cylinder engine
go to http://exmark.com/engines or scan the QR
code.
Figure 29
708cc Engine
Servicing the Air Cleaner–Kohler
Engine
Service Interval: Before each use or
daily—Check the air
cleaner for dirty, loose or
damaged parts.
Every 25 hours—Service
or replace the air cleaner
pre-cleaner (more often
under extremely dusty,
dirty conditions)(Kohler
engine).
Every 50 hours—Service
the air cleaner paper
element (more often
under extremely dusty,
dirty conditions)(Kohler
engine).
Every 100 hours—Replace
the air cleaner paper
element (more often
under extremely dusty,
dirty conditions)(Kohler
engine).
This engine is equipped with a replaceable, high
density paper air-cleaner element. Check the air
cleaner daily or before starting the engine. Check for
a buildup of dirt and debris around the air-cleaner
system. Keep this area clean. Also, check for loose or
damaged components. Replace all bent or damaged
air-cleaner components.
Note:
Operating the engine with loose or damaged
air-cleaner components could allow unfiltered air into
the engine, causing premature wear and failure.
Note:
Service the air cleaner more often under
extremely dusty, dirty conditions.
1. Park the machine on a level surface and disengage
the blade control switch.
2. Stop the machine and release the traction-control
pedal to place the machine in the neutral position,
engage parking brake, stop the engine, remove the
key, and wait for all moving parts to stop before
leaving the operating position.
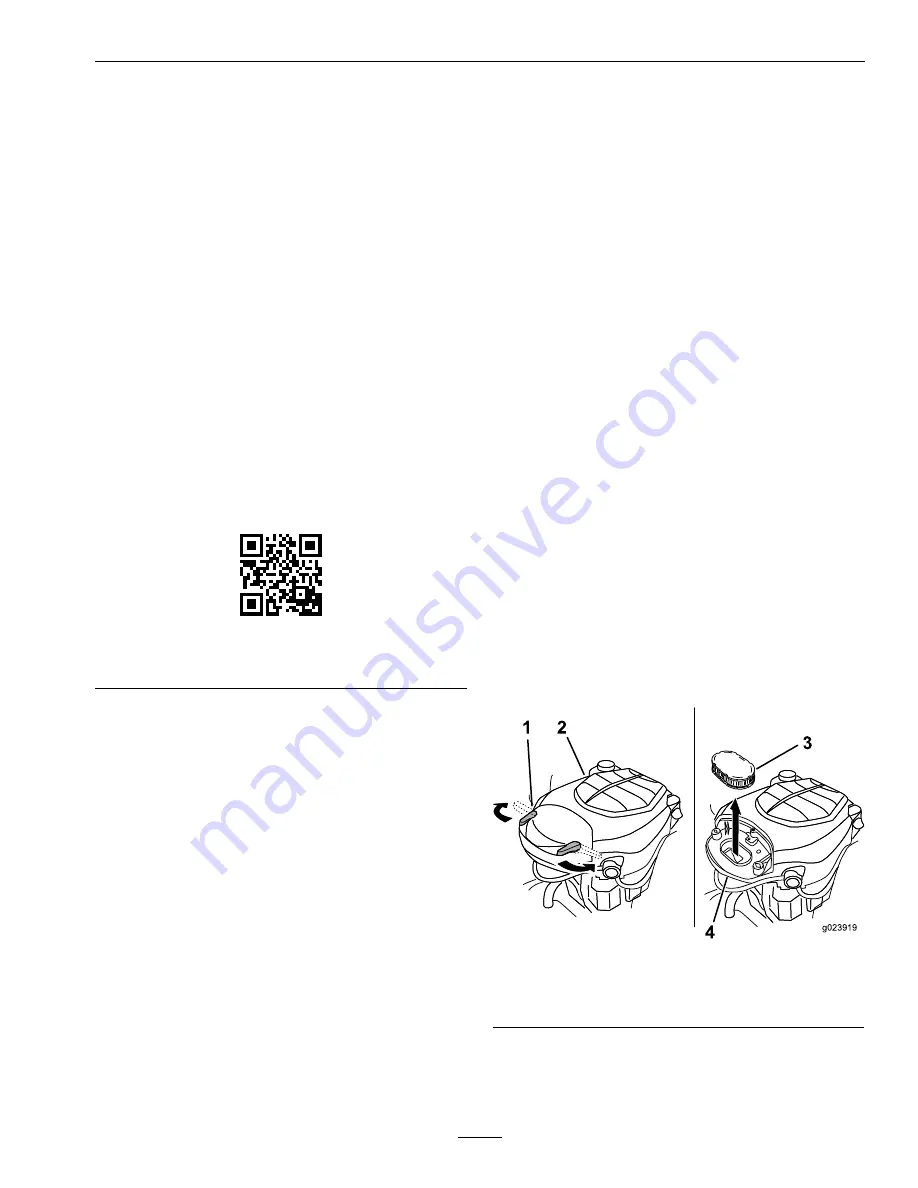
3. Rotate the latches outward.
4. Remove the cover to access the air-cleaner
element (see Figure 30).
g023919
1 2
3
4
Figure 30
1.
Air-cleaner latch
3.
Paper element
2.
Engine
4.
Air-cleaner base
5. Remove the pre-cleaner and paper element.
6. Remove the element, and gently tap the element
to dislodge dirt.
39
Содержание QSS708GEM42200
Страница 1: ...QUEST FRONT STEER For Serial Nos 315 000 000 Higher Part No 4502 392 Rev B ...
Страница 68: ...Schematics Schematics Electrical Diagram 68 ...
Страница 69: ...Schematics Electrical Logic Schematic 69 ...
Страница 71: ...Notes 71 ...
Страница 72: ...Notes 72 ...
Страница 73: ...Service Record Date Description of Work Done Service Done By 73 ...
Страница 74: ...74 ...


