background image

38

5.

Replace the ribbon, lower and lock the print head bracket in place.

6.

Close the cover.  The printer is ready for operation.

R

Re

ep

plla

ac

ce

e tth

he

e p

prriin

ntt h

he

ea

ad

The print head is a sensitive component of your equipment.  It determines the print quality, and its regu-
lar maintenance as well as the absence of dust in the immediate environment guarantee its longevity.

However, it can happen that this head needs to be replaced. Evolis has designed a unique device that
allows the user to proceed to this exchange without using any tools by simply following the instruc-
tions very carefully.

Before doing anything else, please contact your Evolis dealer in order to check with him whether it
is advisable to replace the print head.  If applicable, the dealer will furnish you with a replacement
print head.

During the printer warranty period, Evolis has put in place a program for
the replacement of defective print heads.  Your equipment is eligible for this program if:

You use only Evolis consumables (ribbons and maintenance products)

You have scrupulously complied with the equipment maintenance cycles

You work in a dust-free environment in accordance with technical specifications

You use flat cards without any rough areas that could damage the surface of the
print head

1.

Open the
printer cover.

2.

Shift the print
head bracket
into vertical
position then
remove the
print ribbon 
(in the print
module)

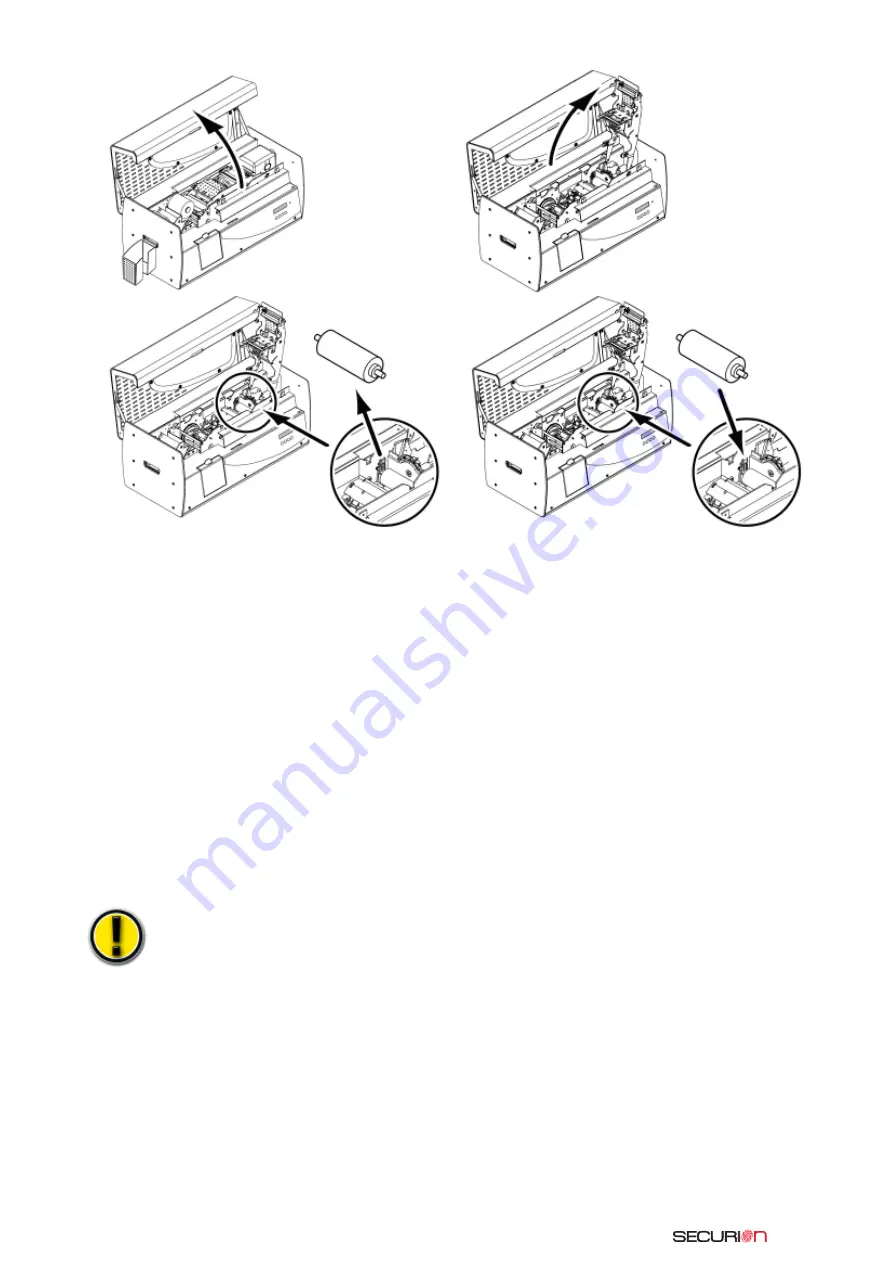
3.

Locate the cleaning roller
and release it from its seat

To replace the roller, proceed as follows:

4.

Install the new roller into the printer,
making sure that it is correctly positioned
in its seat


Содержание Unitech Securion

Страница 1: ...Securion 2010 08...

Страница 2: ...Securion User Guide part number KU08E Rev A0 Evolis Card Printer March 2007...

Страница 3: ...hysical harm to you or could result in physical damage to the hardware W Wa ar rr ra an nt ty y I In nf fo or rm ma at ti io on n Refer to the Warranty booklet enclosed with your Evolis printer for te...

Страница 4: ...etic encoding encoding of both contact and contactless smart cards The Evolis Genuine Product line of consumables linked to the printer was specifically developed and optimized to guarantee the highes...

Страница 5: ...lized cards 14 2 2 Setting of parameters Windows print driver 15 Installation of the print driver Manual installation of the driver Properties of the driver Printer menus 23 Discovering the printer me...

Страница 6: ...e print driver Troubleshooting 42 Free a card in the print unit Free a card in the lamination unit Free a card in the flipover unit Improve printing quality Assistance 46 Network of Evolis partners Lo...

Страница 7: ...ard encoding stage magnetic stripe contact or contactless chip personalization continues with printing on one or both sides of the card The printing process is completed by a lamination cycle that inv...

Страница 8: ...e located behind the printer 10 Power supply connector 11 USB computer connector 12 RJ45 Ethernet connector 13 DB9 connector s option 14 Power switch 15 Location of Kensingston type bolt You will also...

Страница 9: ...an original container specially designed to ensure that the product is protec ted against any risk of damage during shipment In the event of visible damage at the time of delivery do not hesitate to c...

Страница 10: ...r is turned on or if the LED is not green and or if it flashes this means that the installation was not done correctly or possibly that the printer is not operating properly Check the installation Pri...

Страница 11: ...Warranty document M Mo on no oc ch hr ro om me e o or r c co ol lo or r r ri ib bb bo on n To install a monochrome or color ribbon in the print module proceed as follows The ribbon is automatically po...

Страница 12: ...e bottom of the bracket Then make sure the film moves freely without creasing 3 Insert the two cores about 1 inch onto the brackets 2 If necessary carefully remove the existing film taking care not to...

Страница 13: ...would prevent the enco ding option from functioning In the most common procedure the cards are laminated after printing This operation requires that the card be heated to a high temperature which coul...

Страница 14: ...feeder frame or through the inside of the printing module when the print head bracket is open The Securion printer accepts card thickness between 0 25 mm 10 mil and 1 mm 40 mil The factory thickness s...

Страница 15: ...Rear face visible First card on top of the stack Ejection in the position of the card as it comes out of the lamination station The definition of this method is done through the Properties menu of the...

Страница 16: ...n the destruction of the card and of the film and in extreme cases can affect the station itself Be careful about defining the personalized parameters and do not hesitate to contact your Evolis dealer...

Страница 17: ...he Install Driver option to launch the setup program 5 Windows XP or 2003 platforms may require the Microsoft NET package to be installed Click OK to confirm and start this installation Confirm your w...

Страница 18: ...Step 2 accept the limited warranty conditions Step 3 select the communication port If you install your PC in USB mode you can choose to activate the Port Monitor an application that displays all opera...

Страница 19: ...tion port Wait until the setup wizard detects the communication port with your printer to carry on to the next step Step 5 replacing an existing driver This phase will occur only if an existing driver...

Страница 20: ...will actually get Step 7 install driver and end of process When the installation process is over print a test card to make sure your printer operates suitably You are now ready to use your printer If...

Страница 21: ...guide you in adjusting these parameters if applicable These printing parameters are accessible From the Start button located at the bottom left on the Windows task bar select Printers and Faxes Choose...

Страница 22: ...ds but office documentation will be sent to the Evolis printer To define your default printer proceed as follows Using the Start button at the bottom left of the Windows task bar select Printers and F...

Страница 23: ...ntering the different composition components Logo and illustration Identification photo Fixed and variable text Bar code etc E Ex xa am mp pl le e Please note that this example does not propose to ini...

Страница 24: ...ashing green diode Transfer of data with PC or printing in progress Fixed or flashing red diode posting of an alert or of an error message In the event of the intervention of the operator who activate...

Страница 25: ...K Serial Number Printer Type OK Type of Printer Pr Head ID OK Print head Identification Pr Firmware OK Printer firmware version Lam Firmware OK Laminator firmware version Next Cleaning OK xxxx cards t...

Страница 26: ...f No lamination Default TEMP C Display of temperature of the lamination station in Celsius SPEED Indicates the scrolling speed of the card in the lamination station Parameter set in the print driver O...

Страница 27: ...n LED Rated operation dialogue with the PC or work in progress Fixed red LED Non blocking operator alert work continues Flashing red LED Operator alert to incident work interrupted P Po or rt t M Mo o...

Страница 28: ...s s The alert messages in turn require operator intervention to resolve the cause of this alert They do not in any way block the proper completion of processing under way However we recommend that you...

Страница 29: ...nd replace it Otherwise release the film carefully by pulling it toward you Be careful not to damage the equipment by pulling violently Rewind part of the new film on the receiving roller the left han...

Страница 30: ...as detected a serious mechanical error Turn off your Securion printer and contact your dealer to get help Lamin temp error The lamination module has detected an overheating problem Turn off your Secur...

Страница 31: ...pressing OK 5 Scroll through the menu using the key until the TECH CARDS menu is displayed then confirm by pressing OK 6 The Auto Test option is displayed confirm by pressing OK to start printing the...

Страница 32: ...icated above you can simply identify the software version loaded into your printer thanks to the test card Firmware no You can also identify the version of the print driver installed as follows Go int...

Страница 33: ...cards pre saturated with 99 isopropyl alcohol Five 99 isopropyl based cotton swabs A dispenser box of 40 pre saturated cleaning wipes C Cl le ea an n t th he e c ca ar rd d f fe ee ed d m mo od du ul...

Страница 34: ...er until the click is heard 8 Lower the print head bracket and make sure it is locked 9 Go into the display men by pressing one of the keys 10 Select the CLEANING menu confirm by pressing OK then sele...

Страница 35: ...wai ting for a message to be displayed proceed as descri bed above 34 S Se er rv vi ic ce e t th he e c cl le ea an ni in ng g r ro ol ll le er r The function of the cleaning roller is to eliminate a...

Страница 36: ...r printer To prevent any damage to it Before cleaning the print head disconnect the printer from its power supply Comply with the cleaning cycles Never put the print head into contact with pointed and...

Страница 37: ...rds 2 Zero resetting of the rejected card counter to allow the printer to know the fill level of this box C Cl le ea an n t th he e p pr ri in nt t h he ea ad d i in n a ac cc co or rd da an nc ce e w...

Страница 38: ...nt certain elements are able to be exchanged by the user Moreover it is common in the computer world to do regular upgrades of the software components the firmware and the print drivers The following...

Страница 39: ...it is advisable to replace the print head If applicable the dealer will furnish you with a replacement print head During the printer warranty period Evolis has put in place a program for the replaceme...

Страница 40: ...connector linked to the cable without forcing the mechanism 3 Press down on the metal piece at the bottom as indicated in order to release the lugs of the holding forks then pull the lugs out from the...

Страница 41: ...004 00048 you must enter the command Pkn 179 004 00048 If the print head kit number is not entered correctly printer malfunctions can occur S St te ep p 4 4 C Cl le ea an ni in ng g t th he e p pr ri...

Страница 42: ...e 7 The printer restarts and the message Restarting appears followed by the message Ready The update is complete and your equipment is ready to personalize your cards Never interrupt the transfer betw...

Страница 43: ...t t When a card is jammed in the printing unit the message Mechanical error appears on the control panel display Work is interrupted Do not turn off the unit this would lead to a loss of the printing...

Страница 44: ...ination unit If the lamination unit is too hot turn off the printer and wait for the module to cool off it will take several hours Again try to free the card manually If despite all your attempts the...

Страница 45: ...ke sure the ribbon and the laminating film are correctly installed and that the printer head bracket is tight 4 Print a test card See the chapter Print and interpret a test card 5 Check the printer s...

Страница 46: ...n the configuration of the print driver Landscape or Portrait 2 Check the printer interface cable If some unusual characters print out make sure you are using the interface cable appropriate for your...

Страница 47: ...rred A description of the steps you have taken to solve the problem L Lo oo ok k f fo or r i in nf fo or rm ma at ti io on n o on n w ww ww w e ev vo ol li is s c co om m If you need additional techni...

Страница 48: ...mful interference in a residential installation This equipment generates uses and can radiate radio fre quency energy and if not installed and used in accordance with the instructions may cause harmfu...

Страница 49: ...ct box for 15 cards 0 76 mm or 30 mil Two line LCD display and a status LED Locking system to secure access to blank cards ribbons films and rejected cards Support for a Kensington locking system P Pr...

Страница 50: ...ximum of 100 000 inserted cards which ever comes first Subject to observance of specific conditions and use of Evolis genuine consumables Card types All PVC Composite PVC cards Card format ISO CR 80 I...

Страница 51: ...s G Ge en nu ui in ne e P Pr ro od du uc ct t c co on ns su um ma ab bl le es s Part Number Product Description Multi Panel Color Ribbons R3314 6 Panel Color Ribbon YMCKOK 200 cards roll R3013 5 Half...

Страница 52: ...actory on Securion Mag printers The writing and reading head is placed under the path of the cards and after the print head The encoding sequence of a card is still carried out before printing C Ca ar...

Страница 53: ...moulded in the card Never use a card with a glued magnetic track C Cl le ea an ni in ng g o of f t th he e m ma ag gn ne et ti ic c e en nc co od de er r The head of a magnetic encoder needs regular c...

Страница 54: ...rion Smart printers The Contact Station is positioned over the path of the cards and before the print head To contact the Station the chip card is placed under it and is pushed up The programming sequ...

Страница 55: ...on DB 9 Connector USB or Parallel Port External Coupler Serial Port USB A sequence of commands must be sent via the interface of the printer to insert a card in the prin ter and then place it under th...

Страница 56: ......

Отзывы: