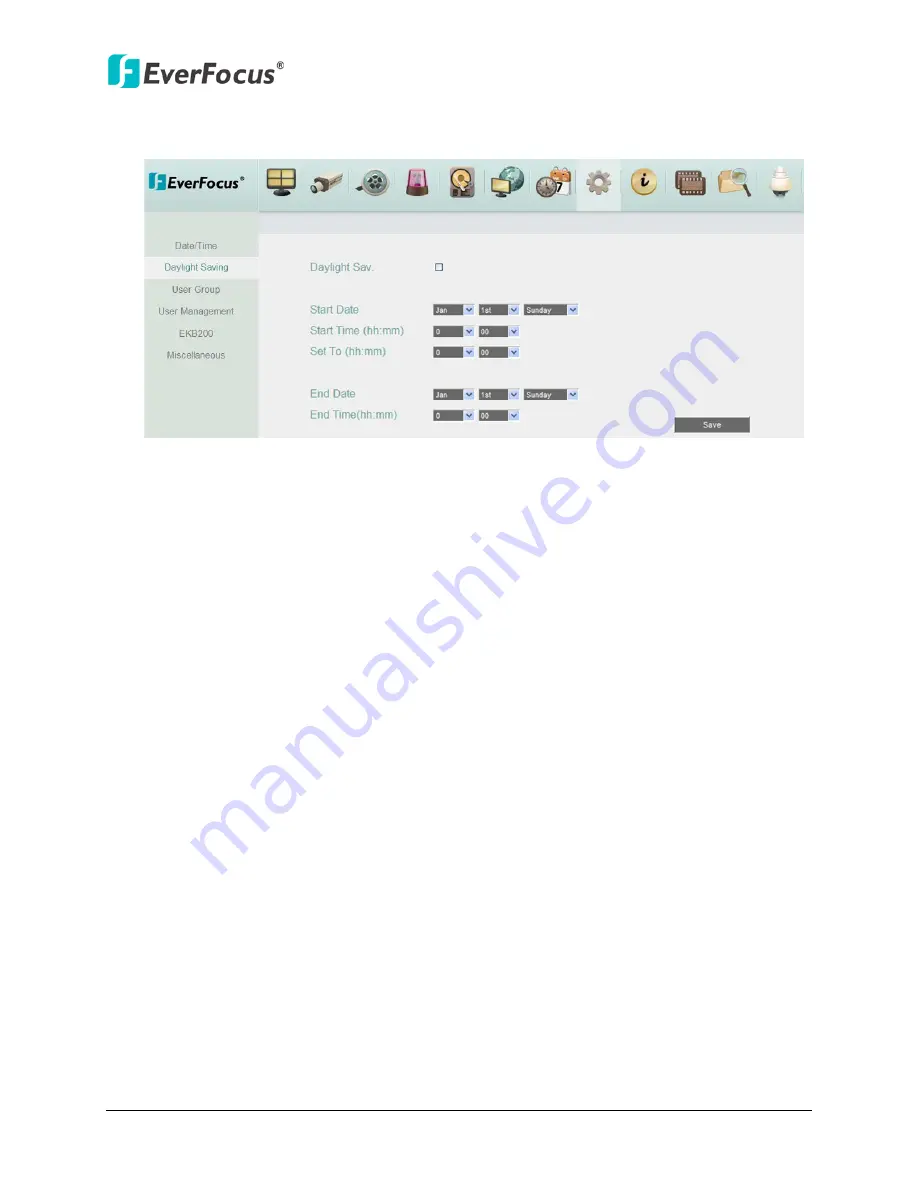
EverFocus NVR 8004X Скачать руководство пользователя страница 76


NVR8004X


69


4.7.2


Daylight Saving 

You can configure the settings for NVR to automatically adjust to daylight saving time. 


Figure 4-42 

Daylight Saving:

 Check the box to enable automatic daylight saving time (DST). 

Start Date:

 Set the start date for daylight saving time. 

Start Time (hh:mm):

 Set the time when daylight saving time begins. 

Set To (hh:mm):

 This is what the time will change to when daylight saving begins. For most 

regions, this will be one hour ahead of the “Start Time”. 

End Date:

 Set the end date for daylight saving time. 

End Time (hh:mm):

 Set the time when daylight saving time ends. 

The time change difference on the End Date will be the same as the difference between 
the Start Time and End Time entered for the Start Date (typically 1 hour as in the example 
shown). 


Содержание NVR 8004X

Страница 1: ...NVR 8004X 4CH 8CH 16CH Tower NVR with 4HDD Bays User s Manual Copyright EverFocus Electronics Corp Release Date July 2013 Notice This content is subject to be changed without notice...

Страница 2: ...verFocus Electronics Corporation Release Date July 2013 QuickTime is a registered trademark of the Apple Computer Inc Windows is a registered trademark of the Microsoft Corporation Linksys is a regist...

Страница 3: ...able parts inside Contact qualified service personnel for maintenance Handle the appliance with care Do not strike or shake as this may damage the appliance Do not expose the appliance to water or moi...

Страница 4: ...near a bath tub wash bowl kitchen sink or laundry tub in a wet basement near a swimming pool in an unprotected outdoor installation or any area which is classified as a wet location Servicing Do not...

Страница 5: ...on between the equipment and receiver Connect the equipment into an outlet on a circuit different from that to which the receiver is connected Consult the dealer or an experienced radio TV technician...

Страница 6: ...1 Router or LAN Connection 11 2 5 2 Direct High Speed Connection 14 2 5 3 One to One Connection 15 2 6 Checking the Dynamic IP Address 19 3 Remote Access to the NVR 22 3 1 Accessing the NVR 22 3 2 In...

Страница 7: ...Schedule 65 4 7 System Setting 68 4 7 1 Date Time 68 4 7 2 Daylight Saving 69 4 7 3 User Group 70 4 7 4 User Management 71 4 7 5 EKB200 74 4 7 6 Miscellaneous 76 4 8 System Information 77 4 8 1 Config...

Страница 8: ...ger range of supported event types and handling options in the database Suspicious activities and behaviors can be detected and responded to on a much more accurate and timely manner In addition EverF...

Страница 9: ...tack Support EverFocus of IP cameras and ONVIF IP cameras Support mobile client iOS and Android Support megapixel camera recording and H 264 compression format Server client architecture Support multi...

Страница 10: ...ntrol the PTZ camera connected to the NVR Please refer to 4 11 PTZ Note 1 Equipment configurations and supplied accessories vary by country Please consult your local EverFocus office or agents for mor...

Страница 11: ...ing EXT Indicates the NVR is connected to the external storage device or USB dongle LAN1 LAN2 Indicates the NVR is connected to the network HDD1 4 Indicates the internal HDD is activating but the LED...

Страница 12: ...onnecting to a dongle mouse or external storage device 4 USB2 0 Port The USB2 0 ports for connecting to a dongle mouse or external storage device 5 LAN2 Static IP Connects to the Network Please see 2...

Страница 13: ...tion 1 Make sure the NVR is power off and open the cover on the front panel of the NVR 2 Press the release latch and the locking arm pops up Release Latch Locking Arm Figure 2 1 3 Gently pull the lock...

Страница 14: ...5 HDD in the tray HDD Tray Figure 2 3 5 Secure the HDD with the supplied 4 screws to the tray a 3 5 HDD Figure 2 4 b 2 5 HDD Figure 2 5 6 Push the HDD tray into the drive bay of the NVR with the lock...

Страница 15: ...2 ST3500410SV 500GB SV35 5 SATA2 ST31000525SV 1TB SV35 5 SATA3 ST3500411SV 500GB SV35 5 SATA3 ST31000526SV 1TB SV35 SATA3 ST2000VX002 2TB Barracuda SATA3 ST500DM002 500GB Barracuda SATA3 ST1000DM003 1...

Страница 16: ...NVR 3 To manage the NVR over network connect the supplied standard RJ 45 cable from your network to LAN2 Static IP port Please see 4 5 1 LAN for more details 4 To connect IP cameras please use a hub...

Страница 17: ...e If you insert the Dongle while the NVR is on you need to reboot the NVR or else it cannot detect the added channels 2 4 Turning On Off the Power Before powering on the NVR please make sure the inter...

Страница 18: ...a router and allows multiple users on and off site to see the NVR on a LAN WAN Internet The NVR must be assigned an IP address that is compatible with its LAN By setting up port forwarding on the rou...

Страница 19: ...To let the router automatically assign an address Set the Network Type to DHCP Make sure to write down the IP address and the Gateway Exit from the Menu to save settings To manually assign an address...

Страница 20: ...r router Log into the router using a PC and open the following ports Ports to open 80 If your Internet service provider blocks port 80 you can change it to a different port in the NVR s Network Menu S...

Страница 21: ...ross over network cable for this application Once you have a straight through cable plug one end into the LAN port on the back of the recorder and the other into the high speed modem Log into the Ever...

Страница 22: ...ase remember you can not use a straight through network cable for this application Once you have a cross over cable plug one end into the LAN port on the back of the NVR and the other into the network...

Страница 23: ...NVR8004X 16 Go to Start Double click on Control Panel Figure 2 14 Click Network and Internet Connection Figure 2 15 Click Network Connections Figure 2 16...

Страница 24: ...2 17 Click on Internet Protocol TCP IP and then click Properties Figure 2 18 Select Use the following IP address Assign an IP address of 192 168 1 2 a Subnet Mask of 255 255 255 0 and a Default Gatew...

Страница 25: ...Figure 2 19 Select Use the following IP address Assign an IP address of 192 168 1 2 a Subnet Mask of 255 255 255 0 and a Default Gateway of 192 168 1 1 and then click OK Restart both of the computer...

Страница 26: ...s com tools cfm Please connect the NVR in the same LAN of your computer 1 Install and then start the IPU program The following dialog box appears Figure 2 20 2 IPU will automatically search the IP dev...

Страница 27: ...e the settings Figure 2 22 Note Most networks uses DHCP to assign IP address if you are unsure of your network settings please consult your network administrators for configuration details 6 To access...

Страница 28: ...s Viewer application Figure 2 24 10 You may need to turn User Account Control off if you still can t see the Remote Live View 11 On the computer click Start Control Panel System and Security Action Ce...

Страница 29: ...e IP address Local connection http IP address from the NVR s Network Menu IP port used e g http 192 168 1 163 2468 Internet connection http IP address given by your Internet Service Provider IP port u...

Страница 30: ...Always trust content from this publisher box and click the Run button to run the EverFocus Viewer application Figure 3 2 5 You may need to turn User Account Control off if you still can t see the Rem...

Страница 31: ...leted connect the NVR s IP address again and the yellow bar may pop up on the top of the window Please click it to run the JAVA application 4 If there is an alert dialog popping up please go to the Co...

Страница 32: ...y be too high If so go to Section 3 3 2 Enabling ActiveX Controls 1 You may also prompt to install the MSXML file Please right click the yellow bar and select Run Add on Figure 3 6 2 Install the MSXML...

Страница 33: ...if you DO NOT see the image Figure 3 6 popping up when you first connect to the NVR 1 At the top of the Internet Explorer Window click on Tools and then select Internet Options Figure 3 9 2 Click the...

Страница 34: ...Automatic prompting for ActiveX controls Binary and script behaviors Display video and animation on a webpage that does not use external media player IE7 only Run ActiveX controls and plug ins Script...

Страница 35: ...to reload the page Figure 3 12 7 You may need to run the EverFocusViewer application when prompted to do so Figure 3 13 8 The login page will show up Type in the user name and password and click Login...

Страница 36: ...pshot Click the Speaker button to transfer audio to the client side from NVR if there is a speaker on the PC and a microphone and preamp attached to the NVR and audio recording is enabled on the NVR C...

Страница 37: ...ra settings Please refer to 4 1 Camera 3 Record Click to configure the record settings Please refer to 4 2 Record 4 Event Click to configure the alarm event settings Please refer to 4 3 Event 5 Hard D...

Страница 38: ...arch and add cameras in the same network Figure 4 3 To search cameras 1 Click the Search button 2 The system will list all the currently available cameras under the Camera List To add cameras 1 Click...

Страница 39: ...nel Select a channel number to add this camera to that channel Protocol The data transmission protocol Brand The brand of the camera Model The model type of the camera Auto Detection After entering th...

Страница 40: ...g The frame rate is limited by the maximum total recording capacity of the NVR as allocated across all the installed cameras Event Frame Rate Select a frame rate per second FPS for continuous recordin...

Страница 41: ...modify the cameras in the Camera List Figure 4 6 Add Click the button to add camera manually To add the cameras please see 4 1 2 Basic Setting Delete Click button to delete the camera Modify Click bu...

Страница 42: ...mera and stop recording Mask Channel Check the box to mask the camera s live view on the screen but the recording function is still on Channel Number Select a desired channel for configuration Device...

Страница 43: ...he live image This function allows users to monitor vertically oriented areas such as hallway corridors and aisles It s recommended to select a 16 9 View Size e g 1920x1080 1024x768 to achieve the bes...

Страница 44: ...1 Camera before configuring the PTZ settings PTZ Control Pad Click the direction buttons to force the camera to turn into that direction Click to stop thet current action such as Auto Pan Tour or Pat...

Страница 45: ...t up a title for this preset position in the Title field Click Apply to save the title name or click Cancel to cancel the current changes 4 Click Set to save the current position as the Preset Number...

Страница 46: ...speed from the Speed drop down list for controlling the direction buttons Adjust zoom focus and Iris if necessary 2 Click the Set Left Position button to save the current position as the Left Positio...

Страница 47: ...ition as the Auto Tracking Start Point Note If the user did not set up a start point or the start point is disabled the camera will go back to track monitor the initial point instead of the Auto Track...

Страница 48: ...t in the camera s field of view Then the camera will track the new object without changing zoom ratio Zoom out and look for a new object The camera will zoom out at the current position immediately fo...

Страница 49: ...ick the Set button to start the 90 second configuration period Use the direction zoom focus Iris buttons to move the camera in the desired sequence 4 Click the Complete button again to end the configu...

Страница 50: ...tep 3 to 5 to configure up to 16 positions for Tour No 1 7 To configure another Tour sequences select a number from the Tour No drop down list and follow Step 3 to 6 to configure up to 16 positions fo...

Страница 51: ...ification see 4 3 3 Other Schedule Record Check the box to record by the schedule Please see 4 6 3 Schedule for more details Auto Erase Video The hard disk will automatically erase video after it has...

Страница 52: ...to log data Email Notify Check the box to send email notification when a Disconect event is detected Email operation requires valid email entered in the Email setup menu see 4 5 2 Email Network Alarm...

Страница 53: ...Alarm Check the box to send out a network alarm to a client PC when motion occurs This feature works with EverFocus CMS software You will need to configure the Alarm Server for the NVR to send network...

Страница 54: ...ag a rectangle with your mouse from bottom to top lower right to upper left 5 Follow Step 3 to set up multiple motion areas if necessary 6 Sets up the Sensitivity Min Area and Motion Delay for the mot...

Страница 55: ...HD temperature is over the Temp Warning Limit Email operation requires valid email entered in the Email setup menu see 4 5 2 Email Network Alarm Check the box to send out a network alarm to a client P...

Страница 56: ...ed to configure the Alarm Server for the NVR to send network alarms to the client PC see 4 5 5 Alarm Server 4 3 3 3 Disk Full Figure 4 21 Log Check the box to record alarm events to log data Email Not...

Страница 57: ...wer Loss Figure 4 23 Log Check the box to record alarm events to log data Email Notify Check the box to send email notification when power has been restored Email operation requires valid email entere...

Страница 58: ...NVR8004X 51 4 3 3 6 Network Loss Figure 4 24 Log Check the box to record alarm events to log data...

Страница 59: ...tart Shows the earliest recording time of the NVR Record Time End Shows the latest or most current time on the NVR Disk Select a disk number Health Status Displays the current status of the selected d...

Страница 60: ...larm Current Lock Displays the current percentage of the locked event recordings in the hard disk If the amount of locked event recordings has reached the maximum lock percentage the NVR will be unabl...

Страница 61: ...drop down list Lan 1 port can be configured for using DHCP or Static IP network connection type while Lan 2 can be set up for using Static IP or PPPoE Install Check the box to enable the network conne...

Страница 62: ...ful tool for determining the network settings if you set up your NVR in this manner its IP address may change at different times for different reasons particularly after a power failure If the IP addr...

Страница 63: ...t ISPs BLOCK traffic using port 80 from reaching the average site If you only plan to view your NVR on a LAN you can use port 80 and don t have to concern yourself with DDNS or routers However if you...

Страница 64: ...ypted by SSL User Name Input the login user name if the SMTP server requires authentication Password Input the password if the SMTP server requires authentication Sender Email Input the e mail address...

Страница 65: ...e of checking if the IP address assigned by DHCP Server has changed Once the IP is changed the NVR will automatically update the information to the DDNS to ensure it is always available for remote acc...

Страница 66: ...the desired name for the NVR Note that the name of the NVR cannot include a space or a dot period or any special characters particularly Note 1 It is not necessary to append the HTTP port number to t...

Страница 67: ...op down list 4 Enter the host name in the Host Name field Note that the name of the NVR cannot include a space or a dot period or any special characters particularly _ 5 Enter the User Name Password o...

Страница 68: ...pload either the recordings or snapshots please see 4 3 2 Motion Figure 4 32 FTP Server Enter the IP address or the host name of the FTP server Port Enter the port number for the FTP server Default is...

Страница 69: ...to up to 3 addresses Protocol Select the protocol type for alarm transmission Note the protocol selected here should match the protocol set up for the CMS alarm server UDP User Datagram Protocol TCP T...

Страница 70: ...ay start time Nighttime schedule ends when Daytime begins Daytime End Select a weekday end time Nighttime schedule ends when Daytime ends Record Type Select a recording type for each time period Disab...

Страница 71: ...selected group above Disabled Select to disable the Holiday Others recording schedule One time Select this option and then set up the specific date and year in the Details field The NVR will start rec...

Страница 72: ...y Hol Other Oth Sunday Sun Monday Mon Tuesday Tue Wednesday Wed Thursday Thu Friday Fri or Saturday Sat Time 0 23 The numbers represent the 24 hours of a day Time Bar The time bar uses three different...

Страница 73: ...h number on it of any section Every time the user clicks the first block of a section the color switches from gray pink blue green 3 Repeat the above steps to configure the record modes You can config...

Страница 74: ...All deselects all days Click OK to copy the settings or Cancel to exit without copying Figure 4 39 Apply to Cameras This button can be used to copy schedules to other cameras Select which cameras you...

Страница 75: ...VR to adjust to when updating from the time server NTP Select Disable Enable for NTP time synchronization NTP Server Displays the time server address that the NVR uses for time synchronization Require...

Страница 76: ...Set the time when daylight saving time begins Set To hh mm This is what the time will change to when daylight saving begins For most regions this will be one hour ahead of the Start Time End Date Set...

Страница 77: ...ser Management setting page see 4 7 4 User Management For example if this box under the Operator level has been checked any user with the Operator privilege can go to the User Management setting page...

Страница 78: ...n to copy the settings of an existing user account to a new user account Edit Click the button to edit the settings of an existing user account Add Click the button to add a new user Delete Click the...

Страница 79: ...keyboard and input the desired user name User Group Select a user group access level Status Select to enable or disable the user account Password Input the password Confirm Enter the same password aga...

Страница 80: ...NVR8004X 73 Figure 4 46...

Страница 81: ...cluding Preset Position Auto Pan Tour and Pattern please refer to 4 1 4 2 PTZ Figure 4 47 The control keys on the EKB200 Figure 4 48 After connecting the EKB200 keyboard to the NVR and configuring the...

Страница 82: ...y to stop running the Tour number specified in the Value column Pattern Run Press this key to start running the Pattern number specified in the Value column Pattern Stop Press this key to stop running...

Страница 83: ...rrent firmware version of the NVR Firmware Upgrade Click Browse to choose the firmware file and click Upgrade to upgrade the latest firmware Configurations Load Factory Default Click to restore the NV...

Страница 84: ...version Model Displays the model name of the NVR Web Version Display the web version S N Display the serial number of the NVR LAN IP 1 IP 2 Displays the IP address of LAN 1 LAN 2 set up in the Network...

Страница 85: ...to set up the start end date Start Time End Time Click to bring up the on screen clock to set up the start end time Log Type Select the desired log types View Log Click to bring up the Log List shown...

Страница 86: ...t Date Time Click to bring up the on screen keyboard clock to select the start date time End Date Time Click to bring up the on screen keyboard clock to select the end date time Data Size Shows the si...

Страница 87: ...1 5 10 15 20 30 or 60 minutes and click Apply For example if you set up 60 minutes for the Archive Interval the NVR will archive the recordings 60 minutes ago from the current time to the storage dev...

Страница 88: ...eft side of the Search menu select Time Search or Event Search to enter to the setup menu Figure 4 55 4 10 1 Time Search Figure 4 56 Start Date Click to bring up the on screen keyboard to select the d...

Страница 89: ...lick to bring up the on screen clock to select the start end time Camera Select the desired cameras to be searched Event Select an event type to be searched Search Click to start searching The search...

Страница 90: ...mera to the desired direction and angle click the Direction buttons 3 To zoom in out the camera view click the Zoom buttons 4 To adjust the camera focus click the Focus buttons 5 To adjust the Iris op...

Страница 91: ...e Go button 13 To remove a pre configured Tour if supported by the camera a Click the Tour button b Click the desired Tour number c Click the Delete button Click C to clear the entered number in the N...

Страница 92: ...340 Recording Recording Performance Support 1 3M 2M 3M and above IP cameras General performance up to 480fps at 2M pixel Up to 5M per channel Total bit rate 100Mbps Recording Format MPEG 4 M JPEG H 26...

Страница 93: ...French Russian Portuguese Brazil Dutch ONVIF ONVIF 2 0 Profile S Regulatory CE FCC Remote Client System Minimum Requirement Operating System Windows XP 32 bit Win7 32 and 64 bit CPU Intel Core 2 Duo 2...

Страница 94: ...e LAN For example one computer on a network could have an IP address of 192 168 1 127 You should never give two or more devices the same exact IP address but the first three octets of an IP address is...

Страница 95: ...he lower end of the range such as 80 for HTTP Ports are similar to doors and windows of your house with port 80 acting as the front door If these are not open you could not enter the house This is the...

Страница 96: ...P address ______________ A Static IP address means you use the same IP address every time you connect to the Internet With a static IP address other Internet users always know the address of your loca...

Страница 97: ...on A direct modem connection uses a standard network cable to connect the modem directly to a computer or in this case a modem to the NVR This type of connection only covers single port modems For a c...

Страница 98: ...he Web based Utility launch a web browser and type the Router s IP address typically 192 168 1 1 in the address bar Then press Enter A password request page will appear Non Windows XP users will see a...

Страница 99: ...r of the range under Start and the ending number under End Protocol Enter the protocol used for this application either TCP or UDP or Both IP Address For each application enter the IP Address of the P...

Страница 100: ...If you need additional technical support on this router you must call D Link Whenever you want to configure your network or the DI 624 you can access the Configuration Menu by opening a web browser a...

Страница 101: ...ort number that the service uses on the LAN Local Area Network Public Port The port number that the services uses on the WAN Wide Area Network Schedule The time period the virtual server will be activ...

Страница 102: ...9 www everfocus co jp info everfocus co jp EverFocus Europe UK Unit 12 Spitfire Business Park Hawker Road Croydon Surrey CR0 4WD UK TEL 44 20 8649 9757 44 845 430 9999 FAX 44 20 8649 9907 www everfocu...

Отзывы: