EverFocus ETN Series Скачать руководство пользователя страница 53


ETN2160/2260/2560


47


7.4


Storage 

Only the original Administrator “

user1

” or “

admin

” can access to and configure the Storage setting page. 

SD card inserted in the camera can be used as a NAS server.   

Note:

 You need to check the 

Save at SD card

 box in the

 The Response Mode

 in 

7.3.2 The record type

 to 

be able to use this function. 
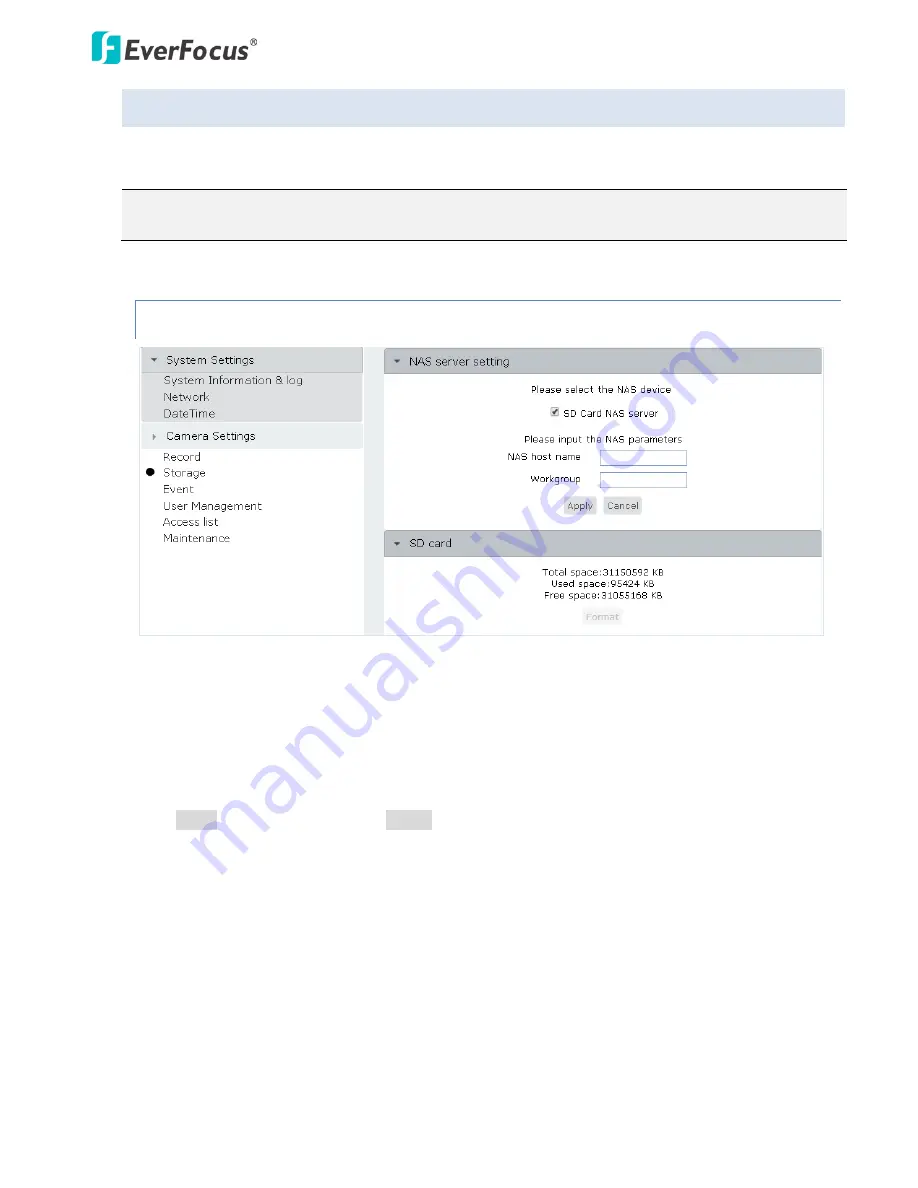


7.4.1


NAS Server Setting 


NAS Server Setting


SD Card NAS server

: Check the box to enable the NAS server function of the SD card. 

NAS host name

: Enter a SD card NAS host name. Please enter only English letters; numbers and other 

language characters are not supported. The maximum length is 15 digits. 

Workgroup

: Enter a workgroup name of the SD card NAS server. The maximum length is 15 digits. 

 
Click 

Apply

 to apply the changes or 

Cancel

 to cancel the changes and return to the previous settings.


Содержание ETN Series

Страница 1: ...ETN Series Mini P T Dome IP Camera Auto Tracking Easy Installation Micro SD Card Night Vision User s Manual Copyright EverFocus Electronics Corp Release Date October 2013...

Страница 2: ...of this manual may be reproduced or transmitted in any form or by any means without written permission of the EverFocus Electronics Corporation EverFocus 12F No 79 Sec 1 Shin Tai Wu Road Hsi Chih Tai...

Страница 3: ...ccur in a particular installation If this equipment does cause harmful interference to radio or television reception which can be determined by turning the equipment off and on the user is encouraged...

Страница 4: ...e electric shock or in extreme cases fire 6 Cleaning For cameras with interchangeable lenses do not touch the surface of the sensor directly with the hands Use lens tissue or a cotton tipped applicato...

Страница 5: ...ng up the Preset Points 22 5 6 Switching Streams 23 5 7 PTZ Control Panel 23 6 Playback 25 6 1 Local Playback 25 6 2 Remote Playback 25 7 Settings 27 7 1 System Settings 27 7 1 1 System Information Lo...

Страница 6: ...e 47 7 4 1 NAS Server Setting 47 7 4 2 SD Card 48 7 5 Event 50 7 5 1 Application Setting 50 7 5 2 Schedule Mode 51 7 5 3 Trigger Mode 51 7 5 4 Media Mode 53 7 5 5 Response Mode 55 7 6 User Management...

Страница 7: ...over the network or by connecting the camera to a 12 VDC power supply Since the ETN series conforms to ONVIF PSIA for compatibility with other network video devices it interoperates with a wide variet...

Страница 8: ...Reset Button Resets all configurations to the factory default settings 5 Micro SD SDHC Slot For inserting a micro SD SDHC card 6 LEDs 19 IR LEDs for infrared illumination in night vision applications...

Страница 9: ...Range function Extended IR range of up to 10 meters with 19 IR LEDs Dual streams from H 264 MJPEG or MPEG4 H 264 up to 30 fps at 1280 x 800 of video resolution ETN2160 H 264 up to 30 fps at 1920 x 10...

Страница 10: ...Note 1 Equipment configurations and supplied accessories vary by country Please consult your local EverFocus office or agents for more information Please also keep the shipping carton for possible fut...

Страница 11: ...teps below to mount the camera to the wall ceiling 1 Screw the Base Plate onto the bottom of the camera using the supplied Short Screws Camera Base Base Plate 2 Attach the Mounting Plate to the wall c...

Страница 12: ...Anchors Wall Ceiling Long Screws Mounting Plate 4 Thread the cables from the side cut of the camera or through the wall a To thread the cables through the wall ceiling 1 Drill a hole on the upper lef...

Страница 13: ...de cut of the camera 1 Remove the camera cover by pressing the Release Button Break the Plastic Cut and then pull it out Release Button Plastic Cut 2 Run the cable through the side cut of the camera c...

Страница 14: ...D SDHC Card Slot 6 Connect the network and power cables to the camera 7 Place the dome cover back by aligning the Cut Out with the Release Button Press the dome cover for it to snap into place A click...

Страница 15: ...me Bracket Top Cover Bracket Plate 2 Drill two small holes on the wall and insert the supplied two Anchors into the holes Drill another hole on the wall only if you wish to run the cables through the...

Страница 16: ...ugh the hole of the Bracket Plate and then screw the Mounting Plate to the Bracket Plate using the supplied three Short Screws Mounting Plate Bracket Plate 5 Slide the camera into the Mounting Plate a...

Страница 17: ...ETN2160 2260 2560 11 7 Thread the cables from the side cut or through the hole on the wall Through the wall Along the wall 8 Put the Top Cover back to the Dome Bracket...

Страница 18: ...ng the IP Utility IPU software included in the software CD Please connect the IP camera in the same LAN of your computer 1 Install and then start the IPU program the following IPU window appears The I...

Страница 19: ...ank You window appears lower right image To access camera live view click the Launch eZ IP Connect button To change video standard see 7 2 1 1 Camera Setting Note 1 You might be required to download A...

Страница 20: ...era will displayed Login Note 9 The default user ID is user1 or admin and the default password is 11111111 10 If you select more than one camera that has the same user ID password you will be able to...

Страница 21: ...w the steps below 1 On the computer click Start Control Panel System and Security Action Center click Change User Account Control Settings the User Account Control Settings window appears Adjust the s...

Страница 22: ...ols field select Prompt In the Include local directory path when uploading files to a server field select Enable Click OK 4 In the Internet Options window click the Advanced tab and then disable Enabl...

Страница 23: ...is running If you don t see the wheel spinning click the Advanced tab in the Internet Options window and then enable Play animations in webpages Click OK C For Windows 8 and above systems to enable th...

Страница 24: ...and off site to see the IP camera on a LAN WAN Internet The camera must be assigned an IP address that is compatible with its LAN By setting up port forwarding on the router you can remotely access th...

Страница 25: ...s this connection may require that you use DDNS for a reliable connection Please refer to 7 1 2 3 DDNS Setting Cat 5 Straight Through Cable High speed modem Internet One to One Connection Directly fro...

Страница 26: ...e View Window The Web User Interface is designed with two styles Dark and Light You can switch between the two styles by clicking the UI Style Switch button on the upper left corner of the Live View w...

Страница 27: ...IE to enable the recording function see C in 5 2 Settings for Microsoft Internet Explorer Audio Click to play the camera audio through the computer s speakers You can slide the bar to adjust the volu...

Страница 28: ...esired location b Using the Live View PT Control Move your mouse over the Live View window and then click to force the camera to aim the clicked location as the center of the image Repeat this action...

Страница 29: ...tching function on the Live View window Click the Streaming icon on the Live View window the following switching buttons appears 1 Select a connection type by clicking the Remote or Local button 2 Sel...

Страница 30: ...to start stop the Patrol function The button will turn grey when the function is enabled Click the button again to disable the function Note that to enable the Patrol function you have to set up the...

Страница 31: ...l be saved in MPEG4 format You can use any players supporting MPEG4 format to play back the recordings The default recording path is at C Record To change the recording path please refer to 7 3 3 Clie...

Страница 32: ...ard recordings see 7 4 2 SD Card 3 Access to the SD card NAS server folder a Enter the IP address of the IP camera or the NAS host name refer to 7 4 1 NAS Server Setting in the Address Bar of a folder...

Страница 33: ...ton on the Live View window to enter the camera settings page To go back to the Live View window click the Home button 7 1 System Settings 7 1 1 System Information Log 7 1 1 1 System Information You c...

Страница 34: ...parameters information can be displayed on this page 7 1 1 4 Remote Log Setting You can enable disable uploading log data to the remote server RFC 3164 compliant To upload log data to the FTP select E...

Страница 35: ...ETN2160 2260 2560 29 7 1 1 5 Current Log The current log data is displayed on this page You can click the Export to HTML button to save the log data to the desired storage location...

Страница 36: ...r more real time audio and video streams However some packets may be lost due to network burst traffic and images may be obscured TCP The TCP protocol guarantees the complete delivery of streaming dat...

Страница 37: ...e camera use an automatically assigned dynamic IP address This address can change under certain circumstances For instance when the camera s network switch hub has to be rebooted Do not assign to the...

Страница 38: ...port forwarding to enable the UPnP function Promoted by the UPnP Forum Universal Plug and Play the UPnP is a networking architecture providing compatibility among networked devices listed in the netwo...

Страница 39: ...e router s network Please try using a PC located outside of your router s network RTSP Stream Access Names You can transmit the audio video stream from the IP camera using the RTSP Real Time Streaming...

Страница 40: ...ote access Before enabling the following DDNS function users should have applied for a host name from the DDS service provider s website We support two DDNS server providers which you can see on the d...

Страница 41: ...ou can also obtain a free host name if you select ip discovery com 1 Type a desired host name and your e mail address 2 Click the Apply button to obtain the free host name 3 Click the Register button...

Страница 42: ...cel to cancel the changes and return to the previous settings 7 1 3 3 Time Setting Set up the time for the camera Click Apply to apply the changes or Cancel to cancel the changes and return to the pre...

Страница 43: ...th color images or Black and white with black and white images Video orientation Check Flip to vertically rotate the video or Mirror to horizontally rotate the video Environment Select Indoor if the c...

Страница 44: ...s in the image and its tolerance as offset Gain Adjust the sliders to control the max and min gain value respectively Normally the min value is set to 1x for better image quality Click Preview to prev...

Страница 45: ...f the IR LED Low lux mode This function will improve the video quality when the environment is under low lux Select Turn on Turn off to enable disable the function Use the slider to adjust the value 7...

Страница 46: ...am 1 From remote Stream 2 From local Stream 2 From remote Please select the video codec Select a video codec for the selected stream The options include H 264 MJPEG and MPEG4 Please select the video s...

Страница 47: ...ings Note that checking the add time and date on the picture stream will also display the Camera Name on the live view video recordings and snapshot To change Camera Name please refer to 7 8 1 General...

Страница 48: ...ge Click the Apply button to apply the setting Set the auto pan range manually Select to manually set up the Auto Pan range Adjust the slider to set up the left and right position Click the Apply butt...

Страница 49: ...d its total used available space If you select Store at NAS in the The Response Mode setting option see 7 3 2 The Response Type this page will shows the NAS storage information as below If you select...

Страница 50: ...ecording Week day Enter a desired start end time and select desired week days for recording Schedule date Select a desired start end day and enter a desired start end time for recording Record Paramet...

Страница 51: ...r Cancel to cancel the changes and return to the previous settings Store at SD Card Select this option you are able to use the SD card NAS server function but only the Administrator account user1 or a...

Страница 52: ...recording files The default recording directory is C Record File Name Prefix Enter the name for the recording files Add date and time suffix to file name Check the box if you want to add the date and...

Страница 53: ...use this function 7 4 1 NAS Server Setting NAS Server Setting SD Card NAS server Check the box to enable the NAS server function of the SD card NAS host name Enter a SD card NAS host name Please ente...

Страница 54: ...to format the SD card Note Once you select the Store at SD card in The Response Mode setting option refer to 7 3 2 The Record Type the SD card will not be able to be formatted and the Format button w...

Страница 55: ...IP address of the IP camera or the NAS host name refer to 7 4 1 NAS Server Setting in the Address Bar of a folder such as 192 168 10 10 or storage 2 Enter the user account and the password to access t...

Страница 56: ...e users when an event occurs You can also set up a schedule to automatically record the videos when an event occurs Note You need to disable the schedule record please refer to 7 3 2 The Record Type t...

Страница 57: ...ery day Enter a desired start end time for everyday recording Week day Enter a desired start end time and select desired week days for recording Schedule date Select a desired start end day and enter...

Страница 58: ...p the motion sensitivity for the grids The larger the number the higher the sensitivity 3 Detect next event after __ second s Enter the time for the camera to detect the next event after the configure...

Страница 59: ...e name Type a file name for the video clips The maximum length is 20 digits Check Add date and time suffix to file name or Enable cyclic recording in the below field if you want to apply the functions...

Страница 60: ...xed by the system which is set up with H 264 and 640x480 resolution and cannot be configured Snapshot prefix file name Enter a name for the snapshot files The maximum length is 20 digits Add date and...

Страница 61: ...2160 2260 2560 55 7 5 5 Response Mode You can select multiple response modes for the camera to transmit the above selected media mode System log Snapshot Recording Message for notification or backup u...

Страница 62: ...o FTP Check the box if you want the camera to upload the system logs snapshots or recordings to the FTP server FTP server address Enter the IP address or the host name of the FTP server FTP server por...

Страница 63: ...urn to the previous settings 7 6 User Management This setting page is for the system administrator to set up its password and manage users 7 6 1 Security Setting The Administrator only the original ad...

Страница 64: ...he maximum length of the user name is 49 digits The Administrator has full privilege to use and configure all the settings The Operator can operate all the functions on the live view page and can acce...

Страница 65: ...dify the existing user Click the Update a existing user button and you can modify the user s access level password on the following page Please check the Change Password box first To delete the existi...

Страница 66: ...s Check Enable to display and configure the following settings Filter Type Select Allow to allow the IP address configured below to access the camera Select Deny to deny the IP addresses configured be...

Страница 67: ...ETN2160 2260 2560 61 7 7 2 Filter information The added IP address filter list will be shown on this page Click Delete address to delete the added IP address respectively...

Страница 68: ...aracters are not supported Please turn on or turn off led indicator The red LED indicates the camera is powered while the blue LED indicates the camera is connected to the network You can select to tu...

Страница 69: ...Setting check the Administrator password box and click Restore You can also check both of the boxes to restore the all settings except the selected two settings Restore Click to restore all settings t...

Страница 70: ...s if the settings are changed and there is unexpected behavior Upload To load a previously saved configuration click the Choose File button to locate the saved configuration file see above and then cl...

Страница 71: ...e Please select a language Select the language to be displayed on the Web interface of the IP camera The default language is English Click Apply to apply the changes or Cancel to cancel the changes an...

Страница 72: ...ly search the IP devices connected in the LAN 2 Log in the camera by checking the desired model and then click the Log in icon The Log in dialog box appears 3 Type the Username and Password Click the...

Страница 73: ...omputer The IPU will automatically upgrade the firmware and the count down status appears Once the process of firmware upgrade and camera rebooting is complete the Status will leave a blank column Not...

Страница 74: ...ion Detection Notification E mail notification IR Distance 10 m 33 ft IR LED Quantity 19 Lens Lens Type Fixed IRIS Focal Length 4 mm Aperture F2 0 True Day Night Yes Video Video Compression H 264 MPEG...

Страница 75: ...slot The camera only supports Micro SD SDHC card up to 32GB in size LAN PoE Cable RJ 45 Power Cable DC Jack 12 VDC power input Camera Angle Adjustment Pan 100 100 Tilt 20 90 General Power Source 12 VD...

Страница 76: ...op up When these error messages pop up follow the steps below to fix the problem 1 To enter the Registry Editor of your computer Click Start and type regedit in the Search Program and Files field 2 Cl...

Страница 77: ...he KeepAlive Timeout Dword by following the path HKEY_CURRENT_USER Sofware Microsoft Windows CurrentVersion Internet Settings 4 Double click KeepAlive Timeout and this window appears 5 Change the Valu...

Страница 78: ...3 5625 8189 www everfocus co jp info everfocus co jp EverFocus Europe UK Unit 12 Spitfire Business Park Hawker Road Croydon Surrey CR0 4WD UK TEL 44 20 8649 9757 44 845 430 9999 FAX 44 20 8649 9907 ww...

Отзывы: