background image


EPN4220d/4220di 

44 


7.3


Network 

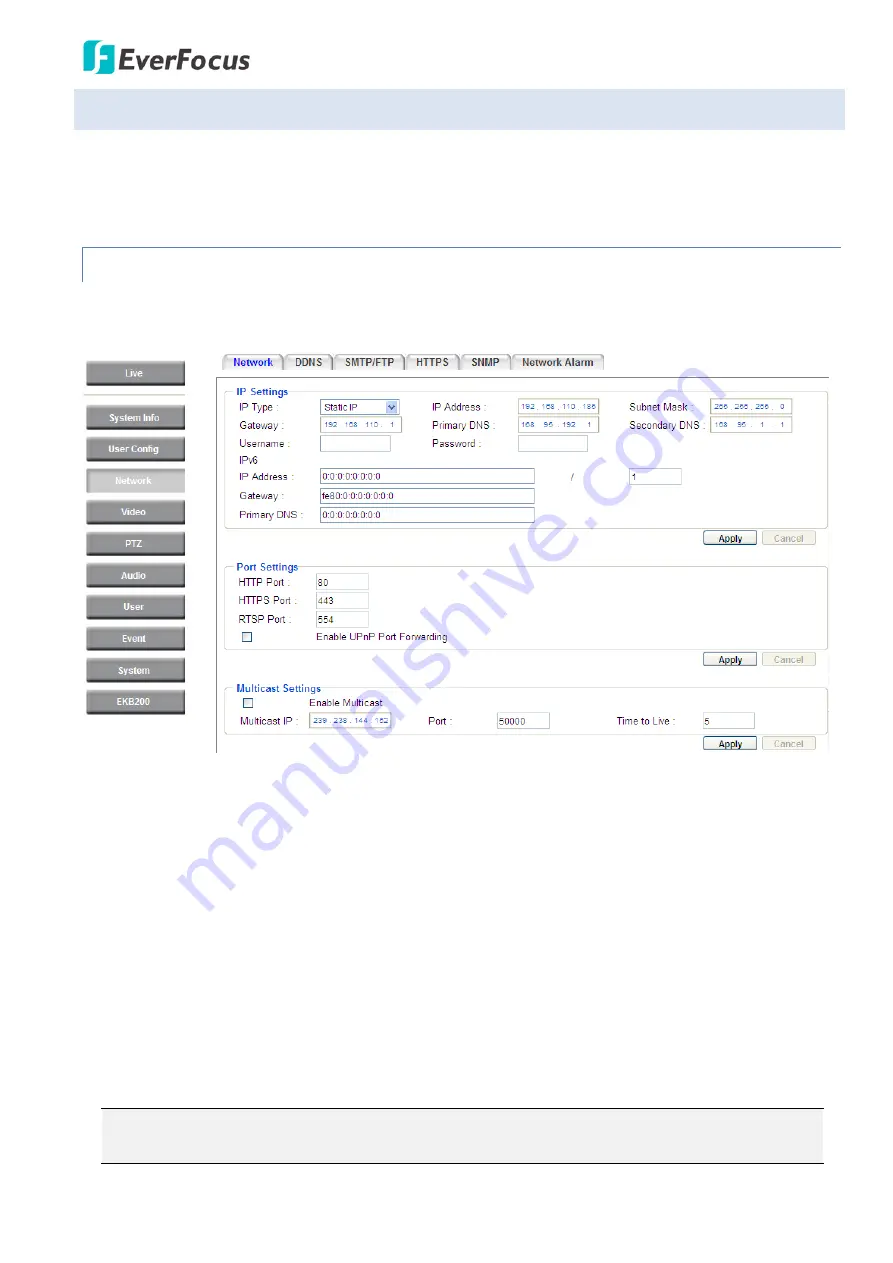
This page covers network-related settings, including Network, DDNS, SMTP/FTP, HTTPS, SNMP, and 
Network Alarm.   


7.3.1


Network 

The following information is required to configure the network settings. Contact your network 
administrator or your internet service provider to get the info. 


IP Settings


IP Type: 

Refer to the network administrator for these settings of the server. 

Default: 

DHCP 


DHCP:

 This setting lets the system use an automatically assigned (dynamic) IP address. This address 

can change under certain circumstances. For instance, when the camera’s network switch/hub has 
to be rebooted. Do not assign to the DHCP server the same IP addresses used for the other network 
cameras and PCs with unique IP addresses.   


Static IP:

 The user can manually set the Static IP address. This type of address is stable and cannot 

change, but the user has to make sure there are no address conflicts with other network-connected 
devices.   


PPPoE:

 This is a DSL-connection application. The ISP will ask the user to input a username and 

password. Contact your ISP for these details.


Note:

 If PPPoE is selected as the IP type, the supplied IP Utility program will not be able to 

detect the device.


Содержание EPN Series

Страница 1: ...EPN Series IP Speed Dome EPN4220d 4220di User s Manual Copyright EverFocus Electronics Corp Release Date January 2016 ...

Страница 2: ...of this manual may be reproduced or transmitted in any form or by any means without written permission of the EverFocus Electronics Corporation EverFocus 12F No 79 Sec 1 Shin Tai Wu Road Hsi Chih New Taipei City Taiwan TEL 886 2 2698 2334 FAX 886 2 2698 3943 www everfocus com tw January 2016 ...

Страница 3: ...ccur in a particular installation If this equipment does cause harmful interference to radio or television reception which can be determined by turning the equipment off and on the user is encouraged to try to correct the interference by one or more of the following measures Reorient or relocate the receiving antenna Increase the separation between the equipment and receiver Connect the equipment ...

Страница 4: ...or in extreme cases fire 6 Cleaning For cameras with interchangeable lenses do not touch the surface of the sensor directly with the hands Use lens tissue or a cotton tipped applicator and ethanol to clean the sensor and the camera lens Use a damp soft cloth to remove any dirt from the camera body Please do not use complex solvents corrosive or abrasive agents for cleaning of any part of the camer...

Страница 5: ... 5 3 Wall Mount Installation 15 3 5 4 Ceiling Mount Installation 18 4 Accessing the User Interface 22 4 1 Checking the Dynamic IP Address 22 4 2 Settings for Microsoft Internet Explorer 25 4 3 Connecting the Camera to the Network 27 5 Live View Window 29 5 1 PTZ Control Window 33 6 Playback 35 6 1 Remote Playback Using Playback Page 35 6 2 Setting Up the Playback Function 37 6 2 1 Preparing the Mi...

Страница 6: ...nformation 79 7 7 2 IP Address Filter 81 7 8 Event 82 7 8 1 Event Settings 82 7 8 2 Motion Detection 86 7 8 3 Tamper Detection 87 7 8 4 Alarm I O 87 7 8 5 Schedule 88 7 9 System 89 7 9 1 Date Time 89 7 9 2 Daylight Saving 90 7 9 3 SD Card 91 7 9 4 Maintenance 92 7 10 EKB200 94 8 Upgrading Firmware Using IP Utility 96 9 Specifications 98 10 Troubleshooting 101 Appendix 104 A Working in Conjunction ...

Страница 7: ...esigned for reducing the noises in the images allowing the camera to better distinguish between real motion and image noise and thus results in a possibility to store more video evidence on the connected storage devices A built in micro SDHC card slot is also provided You can power the camera by connecting the camera to a 24 VAC power supply or a PoE switch Since the EPN series IP speed dome confo...

Страница 8: ...namic Range WDR Digital Slow Shutter DSS Built in Dynamic Noise Reduction DNR Privacy Zone Masking Excellent position accuracy of 0 1 degree From super slow 0 01 sec to very fast 360 sec pan tilt speed IP66 rated housings for all outdoor models Maximum of 192 preset positions available Supports directional virtual compass for easy operation Programmable auto pan 16 tours 4 patterns 2 priority alar...

Страница 9: ...ntrol the speed dome camera through fisheye camera Web UI This technology not only obtains advantages from both types of cameras but also creates new value for wide area surveillance without compromising the optimal image quality For more details about the eZ Tracker function please refer to the EFN Series Fisheye Camera User s Manual Fisheye Window Speed Dome Window ...

Страница 10: ...or x 6 Screw x 6 Box 2 Camera main body with a tool packet Tool packet Glove x 1 pair Desiccant pack x 3 Power terminal block x 1 Box 3 Outer housing Small Box Power adapter Software CD x 1 Quick Installation Guide x 1 Note 1 Equipment configurations and supplied accessories vary by country Please consult your local EverFocus office or agents for more information Please also keep the shipping cart...

Страница 11: ... mount adapter Used for installing a wall mount bracket to a pole indoors or outdoors Indoor ceiling pendant mount bracket Used for installing a speed dome against a ceiling Outdoor sunshield Indoor recessed mount bracket Wall mount bracket Indoor concrete ceiling mount adapter Used for attaching a speed dome to a concrete ceiling EKB500 RS 485 Keyboard EKB200 USB controller keyboard ...

Страница 12: ...ble BNC Connects to a DVR or monitor 5 Audio Out Green Connects to the speakers See Note below 6 Audio In Blue Connects to the microphones See Note below 7 LAN PoE Connects to a 10 100 Ethernet or PoE Note For details on working in conjunction with EverFocus EKB500 keyboard please refer to Appendix A Note that the audio in out cables feature line 3 5mm jack TRS Be sure to prepare speakers micropho...

Страница 13: ...used to develop applications for alarm input and output motion detection PTZ control or a variety of other functions CON3 1 2 3 4 5 6 7 8 9 10 11 12 Pin Assignment No Functions No Functions 1 GND 8 Alarm In 1 GND 2 Alarm Out B NO 9 Alarm In 3 COM 10 Alarm In 2 GND 4 NC 11 Alarm In 5 Alarm Out A NO 12 GND 6 COM 7 NC ...

Страница 14: ...uld be handled by a qualified service agent and should be complied with all local regulations Service personnel should check potential problem such as surfaces strength surface materials falling objects outer breaches building vibration and other similar conditions Check for all necessary materials and ensure that the selected installation location is suitable for the camera Bracket base Bracket T...

Страница 15: ...amera 3 5 2 1 Replacing the Desiccant Bags 1 On the Top Housing slightly press the black plastic socket backward and lift up the base board 2 Remove the desiccant bags from the top housing 3 Stick the supplied 3 new desiccant bags inside the top housing Note Ensure Not to place the desiccant bags under the position of the fan 4 Insert the base board into the black plastic socket The base board sho...

Страница 16: ...e micro SD card slot 3 Screw back the black housing 3 5 2 3 Restoring to Factory Default There are two ways to restore all of the camera s settings to factory default values 1 Click the Default button on the Maintenance settings page please refer to 7 9 4 Maintenance 2 Press the Reset Button on the camera main body shown as below Press the Rest Button to restore to factory default ...

Страница 17: ...r when setting up the DIP Switch The new values will only take effect after restarting the camera DIP Switch Camera Main Body ID Address The ID address of the camera should be set to correspond properly with the control device such as a keyboard The eight switches on the right correspond with the binary code of the ID address allowing up to 256 ID addresses 0 255 to be set up Please refer to the s...

Страница 18: ...ch Address Switch Address Switch Address Switch Address Switch Address Switch Address ON 1 2 3 4 5 6 7 8 Switch Address 65 ON 1 2 3 4 5 6 7 8 66 ON 1 2 3 4 5 6 7 8 67 ON 1 2 3 4 5 6 7 8 68 ON 1 2 3 4 5 6 7 8 69 ON 1 2 3 4 5 6 7 8 70 ON 1 2 3 4 5 6 7 8 71 ON 1 2 3 4 5 6 7 8 72 ON 1 2 3 4 5 6 7 8 73 ON 1 2 3 4 5 6 7 8 74 ON 1 2 3 4 5 6 7 8 75 ON 1 2 3 4 5 6 7 8 76 ON 1 2 3 4 5 6 7 8 Switch Address 7...

Страница 19: ...5 6 7 8 191 Switch Address Switch Address Switch Address Switch Address Switch Address Switch Address ON 1 2 3 4 5 6 7 8 Switch Address 193 ON 1 2 3 4 5 6 7 8 194 ON 1 2 3 4 5 6 7 8 195 ON 1 2 3 4 5 6 7 8 196 ON 1 2 3 4 5 6 7 8 197 ON 1 2 3 4 5 6 7 8 198 ON 1 2 3 4 5 6 7 8 199 ON 1 2 3 4 5 6 7 8 200 ON 1 2 3 4 5 6 7 8 201 ON 1 2 3 4 5 6 7 8 202 ON 1 2 3 4 5 6 7 8 203 ON 1 2 3 4 5 6 7 8 204 ON 1 2 ...

Страница 20: ...ng EVF Pelco D Pelco P A Type and Panasonic The default protocol is EVF DIP Switch Sticker on the Camera Main Body Note If you switch the three protocol switches to ON the camera will enter a self test mode Baud Rate The fourth and fifth switches on the left are used to set the baud rate transmission speed Please refer to the sticker on the camera main body for setting up the baud rate The default...

Страница 21: ...bracket base plate and then drill a through wall hole for inserting the camera cables You can optionally drill a second through wall hole to separate cable feeding see Step 4 3 Attach the waterproof silicon pad to the bracket base plate for waterproofing 4 Feed the camera s cables through the conduit in the wall mount bracket Waterproof silicon pad Bracket base plate Wall Mount Bracket ...

Страница 22: ...en through the holes of the bracket base plate Note 1 Related connectors may be required and prepared on your own for using the extension cables of the related devices 2 Microphones with external power supplies are required 6 Screw the bracket base to the wall using the 4 screws 7 Screw the wall mount bracket to the bracket base using the 4 long screws ...

Страница 23: ...ing lines up with the red triangle on the outside of the main body Push the main body upward into the top housing until the orange catches on both sides click into position Top Housing Main Body Note 1 To release the main body press the two orange release buttons on both sides Make sure you are holding the main body firmly otherwise it will fall down 2 To protect the glass dome from getting dirty ...

Страница 24: ...it via any IP network 3 5 4 Ceiling Mount Installation It is required to use the optional Indoor Recessed Mount Bracket and Surface Ring to attach the camera to the ceiling for supporting the camera s weight Make sure the ceiling is strong enough to easily support the weight of the bracket and the camera 1 Replace the desiccant bags inside the top housing See 3 5 2 1 Replacing the Desiccant Bags 2...

Страница 25: ... from the indoor recessed mount bracket 4 Place and then screw the camera s top housing on the top disk of the indoor recessed mount bracket by using the 3 short screws Top Disk 5 Use a cable or other mechanism to hang the indoor recessed mount bracket on the ceiling ...

Страница 26: ...ure the red triangle on the inside of the top housing lines up with the red triangle on the outside of the main body Push the main body upward into the top housing until the orange catches on both sides click into position Top Housing Main Body Note 1 To release the main body press the two orange release buttons on both sides Make sure you are holding the main body firmly otherwise it will fall do...

Страница 27: ...ng it clockwise 10 Slide the surface ring to the fillister and slightly turn it until it is firmly fixed Note When you turn on the power the camera will enter self inspection mode and run a self testing program Once this is complete you will be able to operate it via any IP network ...

Страница 28: ... using the IP Utility IPU software included in the software CD or from the Website of EverFocus click here to download Please connect the IP camera in the same LAN of your computer 1 Save IP Utility Setup AutoRun exe in your computer Double click the exe file and follow the on screen instructions Check Run IPUtility exe and click the Finish button the IP Utility will be launched to search the IP d...

Страница 29: ...eX Prompt on Internet Explorer some settings have to be complete Please refer to 5 2 Settings for Microsoft Internet Explorer in the User s Manual 4 To optionally configure the Machine Name IP Address IP Type or Port Number using the IPU a Log in the camera by checking the desired model and then click the Log in icon The Log in dialog box appears b Type the Username and Password Click the OK butto...

Страница 30: ...ork administrators for configuration details To set up a static IP Select Static from IP Type drop down list and set up the desired IP Address for example 172 17 0 145 Please also set up the Subnet Mask and Gateway Click the Apply Changes button to apply and save the settings To show the Subnet Mask and Gateway items on the title bar right click the title bar to display the Customize Columns windo...

Страница 31: ... the steps below 1 On the computer click Start Control Panel System and Security Action Center click Change User Account Control Settings the User Account Control Settings window appears Adjust the slide bar to Never Notify and then click OK Restart your computer if requested 2 Open the Internet Explore click Tools Internet Options Security Tab Custom Level the Security Settings windows appears ...

Страница 32: ...ols field select Prompt In the Include local directory path when uploading files to a server field select Enable Click OK 4 In the Internet Options window click the Advanced tab and then disable Enable memory protection to help mitigate online attacks Click OK ...

Страница 33: ...s on and off site to see the IP camera on a LAN WAN Internet The camera must be assigned an IP address that is compatible with its LAN By setting up port forwarding on the router you can remotely access the cameras from outside of the LAN via the Internet To remotely access the Web interface of the IP camera please refer to 7 3 2 DDNS To set up port forwarding please consult the manual of the rout...

Страница 34: ...ddress this connection may require that you use DDNS for a reliable connection Please refer to 7 3 2 DDNS Cat 5 Straight Through Cable High speed modem Internet One to One Connection Directly from PC to IP Camera You can connect directly without using a switch router or modem However only the PC connected to the camera will be able to view the IP camera You will also have to manually assign a comp...

Страница 35: ...2 Click the button to play the recorded data directly from the on camera Micro SD SDHC card For this function to become active you have to insert a Micro SD SDHC card in the Micro SD SDHC card slot on the rear panel of the camera see 7 9 3 SD Card For the tested card brands please refer to Appendix B 3 Click the button to enter the Settings page which includes 10 submenus System Info User Config N...

Страница 36: ...e source video stream and recording format see Video Recording Settings in 7 4 1 Multi Streaming Note For Microsoft IE10 and above users some settings have to be complete to enable this function see B Snapshot Record error message in 10 Troubleshooting 8 Snapshot Click the Snapshot button to take a snapshot By default the snapshot will be saved at C EverFocus To change the location see Export Fold...

Страница 37: ... camera view Direction Controls There are two kinds of direction control icons triangle circle and triangle rectangle When your mouse cursor turns into click and hold the mouse will force the camera to turn in that direction at a faster speed When your mouse cursor turns into click and hold the mouse will force the camera to turn in that direction at a slower speed Focus Controls When your mouse c...

Страница 38: ...u see 7 8 Event Reset Alarm Click the Reset Alarm button to reset the alarm output remotely 12 Status Display info line that can be placed above video box or at bottom of page This shows the name of the camera that is currently active or being configured current date time and current frame rate You can activate these info displays in the Settings User Config page see 7 2 1 Live View Config 13 Even...

Страница 39: ...tons To force the camera to turn to the preconfigured preset position click the Preset button select a Preset number and then click the Go button Note To use this function you have to set a preset position on the PTZ Settings page See 7 5 PTZ The following is a list of fixed preset numbers for the actions Preset Action 33 Flip command Pans the dome drive 180 degrees 34 Pan zero command Directs the...

Страница 40: ...o 4 Patterns can be configured Note To use this function you have to set up a pattern on the PTZ Settings page See 7 5 PTZ To move the camera in a preconfigured sequence consists of a selection of Patterns and Preset Positions click the Tour button select a tour number and then click the Go button Note To use this function you have to set up at least one tour on the PTZ Settings page See 7 5 PTZ T...

Страница 41: ...igned as a quick way to check recent recordings that were triggered by Events that were configured to Record to SD Card in the Settings Event Event Settings page see 7 8 1 Event Settings Note The Playback page is only accessible once the on camera SD card is inserted and active Please refer to Appendix B for the tested card brands 6 1 Remote Playback Using Playback Page On the Live View Window cli...

Страница 42: ...ighlight it its details will be displayed in the File Information area You can now click Play to play that specific file Pause Click this button to pause the playback Stop Click this button to stop the playback Recording List Filename This area will display a list of search results recording files and folders Folders named with the recorded date will be displayed first Click on the folder and clic...

Страница 43: ...ithin seconds see section 6 2 2 below the grey letters should turn white IF NOT do the following 1 From the Live page click Settings System SD Card If no card has been inserted yet the Remove button should be faded indicating that no card is being detected If a card is inserted and the Remove button is still faded pull the card out and re insert it 2 Slide the card into the slot until it clicks in...

Страница 44: ...ual time marker For instance if you can get your hand in front of the camera s lens get ready to count down on your fingers 12 Click the Trigger Event button and slowly count down on your fingers in front of the lens if you are able to do so if not try to find visual cues on the view screen that will help you to mark the moment you pushed the trigger The recording period will be as long as the buf...

Страница 45: ...escriptions 1 Snapshot Click to take and save a snapshot 2 Load File Click to load the recordings for playing back 3 Convert ARV to AVI Convert the recording from ARV format to AVI format 4 Playback Time Display the playback time 5 Total Time of Recording Display the total time of the recording 6 Stop Click to stop playing the recording 7 Step Reverse Click to display the previous frame 8 Play Cli...

Страница 46: ...ser Config Network Video Audio User Event and System Click the Live button can go back to the Live View Window 7 1 System Info The System Information and System Log can be checked on this page Click the top tab of the one you want to see 7 1 1 Information Click the Information tab the following dialog box appears These values cannot be changed on this page and are for reference only ...

Страница 47: ...ence number date time and event messages of the log event will be displayed in the System Log field The log will display the last 256 log events Click the Export button to export the system log event list into a txt file and select the location where the exported log file will be saved to ...

Страница 48: ...m transmission RTP over TCP The RTSP protocol uses TCP for camera data stream transmission RTP over HTTP The RTSP protocol uses HTTP for camera data stream transmission Text Settings Check the boxes to display the information on the Live View Window The information will only be displayed on the Live View Window and will not be displayed on the live view video images nor snapshots To change the for...

Страница 49: ...ng file exceeds the time you set the system will create a new file to save that data to Overwrite Select ON for overwriting recording snapshot file when the disk storage capacity is full The user can set the storage capacity limitation in the in sentence field in the gray box below the Overwrite setting If the remaining hard disk capacity is less than ____ MB 50 2000 system will stop recording or ...

Страница 50: ...s address can change under certain circumstances For instance when the camera s network switch hub has to be rebooted Do not assign to the DHCP server the same IP addresses used for the other network cameras and PCs with unique IP addresses Static IP The user can manually set the Static IP address This type of address is stable and cannot change but the user has to make sure there are no address c...

Страница 51: ... port numbers Check the Enable UPnP Port Forwarding box to enable the UPnP function Click Apply to save the settings Promoted by the UPnP Forum Universal Plug and Play the UPnP is a networking architecture providing compatibility among networked devices listed in the networked device table Enable the UPnP function means you can directly connect the cameras listed in the networked device table by c...

Страница 52: ...m for the simplicity of setting up your IP cameras DDNS Settings Enable Check this box to enable the DDNS function Service ISP You can either apply for a host name from EverFocus or other DDNS server providers If you choose the EverFocus DDNS server you can obtain a free host name from EverFocus by following the steps below From EverFocus To obtain a free host name from EverFocus type a desired ho...

Страница 53: ... access to the IP camera This function is available on most routers in the market and is often known as Port Forwarding To set up Port Forwarding please consult the manual of the router 2 In certain router models it is possible that you will not be able to access the camera using DDNS while inside the router s network Please try using a PC located outside of your router s network Default Ports on ...

Страница 54: ...dresses via SMTP Note that to enable e mail notification function you have to check the Send Mail Notification item on the Event dialog box see 7 8 1 Event Settings SMTP Server Enter the IP address or the host name of the SMTP server used to send e mails SMTP Port Enter the port number for SMTP The default is 25 Authentication Check this box if the SMTP server requires authentication user password...

Страница 55: ...his box to enable the SSL function Enable this function means you can access the camera through the SSL protocol that provides communication security over the Internet Send Test Email Click the Test button to send a testing email to the assigned address Click Apply to apply the changes or Cancel to cancel the changes and return to the previous settings Set FTP Server The settings relating to the F...

Страница 56: ...ding path User Name Set FTP User s name Password Set FTP password PASV mode Check to enable Passive mode Passive mode is normally enabled If a connection cannot be established uncheck PASV Mode Test FTP Server Click the Test button to send a testing file to the assigned FTP server Click Apply to apply the changes or Cancel to cancel the changes and return to the previous settings ...

Страница 57: ...reate and install a certificate Create Self Signed Certificate and Create Certificate Request Create Self Signed Certificate Please note that even though self signed certificates are free and offer some protection true security is only implemented after the installation of a signed certificate issued by a certificate authority 1 Click the Create Self Signed Certificate button the following dialog ...

Страница 58: ...he address from http to https in the address bar and press Enter on the keyboard Some Security Alert dialogs will pop up Click OK or Yes to enable HTTPS Create Certificate Request You can apply for an official certificate from an issuing Certificate Authority 1 Click the Create Certificate Request button the following dialog appears 2 Type the required Certificate information and then click the Ap...

Страница 59: ...EM format and paste it to the certificate request field on the Web page of the 3rd party certification authority such as Symantec VeriSign Wait for the certificate authority to issue an SSL TLS certificate and then download the issued certificate on your computer 6 In the Install Signed Certificate field click the Browse button to search for the issued certificate and then click the Upload button ...

Страница 60: ...her of the Enable buttons to enable either of the two Make your changes as desired Click on the Trap Address field to enter the digits if required 7 3 6 Network Alarm This function works with EverFocus s CMS software e g the Power Video Plus For the setting details please refer to the CMS network alarm protocol ...

Страница 61: ... the number of streams and the quality and resolution of the streams but keep the frame rate at its maximum Enable This option is only for enabling the stream for live view see Video Stream in 5 Live View Window Stream 1 is always enabled for live view To enable Stream 2 and or Stream 3 for Live View check the Enable box Format Select the encoding format H 264 or MJPEG Resolution Select the most s...

Страница 62: ... configure the stream settings in the Stream Settings field above Click Apply to apply the changes or Cancel to cancel the changes and return to the previous settings Time Stamp Settings You can select the Date Time format position and add the setting to the streaming Click Apply to apply the changes or Cancel to cancel the changes and return to the previous settings ...

Страница 63: ...riority Select this option to manually set up the shutter speed The Iris value is automatically set up by default To set up the shutter speed click the Advanced tab and select a value from the Shutter drop down list Manual Select this option to manually set up the Shutter Manual and AGC Manual values BLC Back Light Compensation BLC is used to make the subject appear clearer when it is set against ...

Страница 64: ...n correct blocked up shadows and blown out highlights in accordance with the intensity difference Mode 2 This is the Exposure Ratio Mode which allows you to further adjust the Exposure Ratio shutter speed in the field below Mode 3 This is the Histogram Mode which uses a histogram to correct blocked up shadows and blown out highlights D N Mode Auto Select to let the camera automatically switch to N...

Страница 65: ...EPN4220d 4220di 59 7 4 3 Advanced ...

Страница 66: ...er speed By default the Auto Exposure is set to Auto AES Iris Priority Select this option to manually set up the Iris value and turn off the Shutter Speed ALC Shutter Priority Select this option to manually set up the shutter speed The Iris value is automatically set up by default Fix Use this configuration option if you have special requirements for the exposure setting It allows you to specify t...

Страница 67: ...lance Settings Select the mode that delivers the best quality image for the camera s light environment You can click the Push button on the right side to instruct the camera to the selected mode This is like a semi automatic way to adjust the White Balance mode to suit the user Mode Auto Select to let the camera automatically adjust the White Balance In the Auto mode the camera computes the white ...

Страница 68: ...ture sensitive images B W Select to view the video images in black and white Sharpness Select the sharpness level of the image A low sharpness level will deliver a softer less detailed image A high level will deliver a sharp highly detailed image High Sensitivity Select ON OFF to enable disable the high sensitivity function Gamma Select the Gamma value for the video quality of the monitor Chroma S...

Страница 69: ...ROI settings page To set up an ROI region 1 Select an ROI number from the ROI No drop down list 2 Click the Add button the mouse cursor will turn into a pen when you move it over the live image on the left 3 Move the cursor to the position where you want the ROI rectangle to start and then click Move the cursor to the position diagonally opposing corner where you want the ROI rectangle to end and ...

Страница 70: ...g models Mode Select Color to make the masks appear as colored rectangles on the screen Select B W to make the masks appear as gray rectangles on the screen Select Mosaic to make the masks appear as mosaic effect rectangles on the screen Level Select the color of the masks if you selected Color Mode Select the level of grayness of the masks if you selected B W Mode Select the level of small middle...

Страница 71: ...ing the direction buttons Adjust zoom focus and Iris if necessary 5 To adjust the height width of the privacy mask click the buttons 6 Follow Step 2 to 5 to set up another Privacy Mask 7 Click Apply to apply the settings If you select a Privacy Mask number that has been configured these buttons will be activated meaning that you can test edit or delete the configured Privacy Mask settings To apply...

Страница 72: ...ick the Program button to bring up the Preset panel see steps below Freeze Picture Select ON to freeze the live view during the camera moves among the preset positions the camera will start displaying the live view once arrived at a preset position Select OFF to disable the function and the camera will keep displaying the live view during the process of moving from one preset position to another T...

Страница 73: ...eset No drop down list to select a number Or click on the number in the Page field to select a preset number To activate the Preset function on the Live View window click the Open button in the PTZ Control field to display the PTZ Control window Click the Preset button click on the numeric buttons to select a preset number and then click the Go button The selected preset position should be display...

Страница 74: ...on and then click the Set button next to Set Right Pos 5 Select Off from the Endless Mode drop down list 6 Enter a speed at which the camera will move during the Auto Pan sequence 7 Enter a dwell time for the Left and Right positions the time that the camera will pause at each position 8 Click Apply to apply the settings To activate the configured Auto Pan function on the Live View window click th...

Страница 75: ...fter a Pattern sequence 6 Enter a speed at which the camera will move to the Preset position or first point of the Pattern sequence 7 Follow Step 3 to 6 to configure up to 16 positions for Tour No 1 8 To configure another Tour sequences select a number from the Tour No drop down list and follow Step Step 3 to 6 to configure up to 16 positions for the selected Tour number 9 Click Apply to apply the...

Страница 76: ... the configuration for the entered Pattern No Click Go to view test the configured Pattern sequence To activate the Pattern function on the Live View window click the Open button in the PTZ Control field to display the PTZ Control window Click the Pattern button click on the numeric buttons to select a Pattern number and then click the Go button The camera will move to the positions in the Pattern...

Страница 77: ...UR1 PAT 1 Pattern 1 AUTOPAN and PREV MODE Auto Flip Select ON to tilt the camera by 180 using the direction controls on the PTZ Control window Owing to the mechanical design the camera will tilt 90 first and then the camera will flip by 180 degrees after that go down to 180 see image below Select OFF to disable the Auto Flip function and the camera will be tilted by 90 180 0 180 ...

Страница 78: ... the camera to move to a certain position or to move in a setup sequence Area Setting You can configure up to eight zones on the camera view To set up a zone 1 Click the Program button the following panel appears 2 Select a Zone number from the Zone drop down list 3 Type a name for the selected Zone in the Title field ...

Страница 79: ...ction that you want to set as the camera s North position 0 on the horizontal axis 2 Click the Set button to turn that horizontal direction into the camera s North 3 Click the Default button if you want to reset to the camera s default North position OSD Display Settings Select ON OFF to enable disable displaying the following selected items on the camera view Directions Checking this box will dis...

Страница 80: ... in 5 Live View Window Note To best perform the Auto Tracking function it is recommended to mount the PTZ camera over 4 meters above the ground and to install it with a certain degree of depression angle Auto Tracking Settings Click ON OFF to enable disable the Auto Tracking function The Auto Tracking function lets the camera automatically track moving objects of a specified size that appears in t...

Страница 81: ...n is to indicate the position of the Start Point Note If the user did not set up a start point or the start point is disabled the camera will go back to track monitor the initial point instead of the Auto Tracking Start Point once the tracked object exits in the camera s field of view Pan Tilt Limits Check the box if you want to create a zone where the camera will track the movement inside the zon...

Страница 82: ...ime Mask Check the box to enable the following Time Mask functions Zoom Control on Tracking The camera has two zoom control modes while tracking Keep current zoom ratio the current zoom ratio will stay fixed during the tracking process Multi step zoom function the zoom ratio will change according to the distance of the object against the camera When the object is moving further away the camera wil...

Страница 83: ...ng to the Start Point 0 is returning to Start Point without any waiting Resume from manual stop The function is used to set up the Auto Tracking restart time 0 600 seconds If user manually operates the PTZ function during auto tracking process the auto tracking function will stop When the manual operation ceases the camera will resume to Auto Tracking Start Point after a given period of time Setti...

Страница 84: ...al speaker if you have connected such a speaker to its audio output cable Check the Enable Audio box to enable the camera s audio function and then adjust the audio input volume Note that the camera provides a line in out 3 5mm jack TRS therefore TRS speakers microphones with a built in amplifier and external power supply are required Click Apply to apply the changes or Cancel to cancel the change...

Страница 85: ...Confirm field 3 Select an authority level for the user account from the Authority drop down list Supervisor Administrator The only difference between a supervisor and administrator is that a supervisor can edit an administrator s account and password but an administrator cannot edit the supervisor s account and password Multiple administrators can be configured but there can be only one supervisor...

Страница 86: ...not have access to the User Event and System pages Guest The lowest level of access which only allows the user access to the Live View page 4 Select Active or Disable from the Status drop down list to active or disable the user account 5 Click On in the SD Card Playback field to allow the user to access the SD card playback function 6 Click OK 7 Click Apply to save all the settings ...

Страница 87: ... network in the Denied List and enter the exceptions in the Allowed List To set up the IP Address Filter 1 Select Denied List Click the Add button the following dialog box appears 2 Select an IP type from the IP Type drop down list 3 Select a network rule from the Rule drop down list type the IP address and click OK Single Type a single IP address in the IP Address field below Network Type the IP ...

Страница 88: ...occurs or an alarm is triggered You can also set up a schedule to automatically record the videos when an event occurs or an alarm is triggered 7 8 1 Event Settings You can create a total of ten event or alarm settings page in the Event List Up to 10 events can be configured Event List Click the Add button and the following Event Configuration Window appears ...

Страница 89: ... be specified below reaction s when Auto Tracking events occur Fan Failure Select this option to trigger the to be specified below reaction s when Fan Failure events occur Enable This Event Select to activate the event Enable Re trigger Click to set a minimum time after the event is triggered before the event can be triggered again Enable Pre trigger Buffer Click if you want the Event reaction as ...

Страница 90: ...d and configured Note The recording will only be as long as the combined Pre and Post trigger Buffers and for as long as the event trigger is happening e g a motion is detected so make sure you enable at least one of these buffers especially the Post trigger Buffer Network Alarm Check this box if you want the camera to send a network alarm signal when the event occurs to the CMS servers configured...

Страница 91: ...t of footage length of time after the event trigger moment that will be included in an event triggered video recording if that buffer and video recording has been enabled in the Event Configuration Window Click Apply to apply the changes or Cancel to cancel the changes and return to the previous settings ...

Страница 92: ...nt your detection rectangle to end and then click The rectangular area with the selected color will appear This block will be an area inside which the camera will detect motion If you want to create another detection area use one of the other three palette colors Each color denotes a different detection area Only one block per color is allowed As the number of colors suggests you can configure up ...

Страница 93: ...en a tampering event moved covered up or out of focus has been detected and the duration reached the setup time the camera will trigger the event 7 8 4 Alarm I O Use this page to set the type of trigger input and the type of output contact for each of the camera s two configurable alarm channels ...

Страница 94: ...ctivated Schedule Recording events and keep all the other activated events active Schedule Recording Click this button to make every hour block you click on blue A blue block represents a Schedule Recording only block which represents an hour when the camera will deactivate all other preconfigured activated events and keep only the preconfigured activated Schedule Recording events active Event Sch...

Страница 95: ...he IP Utility software which is included in the software CD Set Time Zone Set the time zone of the camera s location Set Date Time Manually Set the date time here if you won t be using an NTP server to update the date time see below Set Date Time Sync Enter the Network Time Protocol server if applicable The camera s time will be automatically adjusted by synchronizing with the NTP server Click App...

Страница 96: ...aving Click Enable Daylight Saving to enable this schedule and select the dates when the region s daylight saving period begins and ends Click Apply to apply the changes or Cancel to cancel the changes and return to the previous settings ...

Страница 97: ... entered in the FTP Repository Settings see 7 3 3 SMTP FTP Event Recording Select to send the impending storage shortage text notification to the checked locations in the Notification Over field see 7 8 1 Event Settings Overwrite Click ON if you want the card to start writing over recorded footage when its memory is full Click OFF if you want the card to stop recording new footage when its memory ...

Страница 98: ...reconfigured Save Load Configuration Server Save To make a backup file of the machine s current configurations press Save to save all the configurations to a config file This will enable the user to reload these configuration settings if the settings are changed and there is unexpected behavior Load To load a previously saved configuration press the Browse button to locate the saved config file se...

Страница 99: ...upgrade file Click Upgrade to install the new firmware Note 1 Do not disconnect power to the unit during the upgrade sequence The unit will reboot automatically after the upgrade has completed 1 5 minutes 2 During the upgrade process all event recording actions will be stopped Event recording actions will resume after the camera is rebooted 3 If the File Error Please re login warning message appea...

Страница 100: ...ction Select an item from the drop down list to define the function for each key on the keyboard Set Preset You can use the joystick on the keyboard to select a position and then press this key to save the position as the Preset Position Goto Preset Press this key to let the camera go to the Preset Position number specified in the Value column Goto Home Press this key and the camera will go to the...

Страница 101: ...g crosshairs on the screen Use the joystick on the keyboard to select the desired tracking object and press this key again to save the selection Toggle Full Screen Press this key to toggle between the full screen and current screen Value Type in the number for the selected Action item For example selecting Goto Preset from the Action drop down list and typing in 2 in the Value column represents th...

Страница 102: ...camera by checking the desired model and then click the Log in icon The Log in dialog box appears 3 Type the Username and Password Click the OK button the Login status displays Note 1 The default user ID is user1 and the default password is 11111111 2 If you select more than one camera that has the same user ID password you will be able to log in several cameras at once 3 Up to 10 cameras can be s...

Страница 103: ...4 Click the Upgrade Firmware button a browsing window appears 5 Select the firmware file evb and then click Open The IPU will automatically upgrade the firmware The camera will reboot once the upgrade process is complete ...

Страница 104: ...ital Zoom 12x Angle of View H 54 1 W to 2 9 T Day Night Yes with removable IR cut filter Video Video Compression H 264 MJPEG Picture Resolution 1920 x 1080 1280 x 720 1024 x 768 720 x 576 720 x 480 704 x 576 704 x 480 640 x 480 352 x 288 352 x 240 320 x 240 Frame Rate 1 30 fps NTSC 1 25 fps PAL Video Test Output 1Vp p 75ohm Audio Audio Streaming Two way audio Audio Compression G 711 Audio Input Ou...

Страница 105: ...ted Protocols HTTP TCP IP FTP SMTP DHCP DNS DDNS NTP Bandwidth control Min 64 k Byte sec adjustable Alarm 2 in 2 out triggered by intelligent event and external input Other Function Focus Control One Push Auto Manual Iris Control Auto Manual True Day Night Yes Auto DAY NIGHT Auto Gain Control Yes Auto Manual Backlight Compensation Yes OFF ON Wide Dynamic Range Yes OFF ON Dynamic Noise Reduction Ye...

Страница 106: ...EPN4220d 4220di 100 Weather Resistant IP66 for outdoor models Dimensions W x H 180 x 280 mm 7 1 x 11 in outdoor 159 x 230 mm 6 3 x 9 1 in indoor Weight Approx 3 0 kg 6 62 lbs ...

Страница 107: ...op up A When these error messages pop up follow the steps below to fix the problem 1 To enter the Registry Editor of your computer Click Start and type regedit in the Search Program and Files field 2 Click the Enter button the Registry Editor window appears ...

Страница 108: ...he KeepAlive Timeout Dword by following the path HKEY_CURRENT_USER Sofware Microsoft Windows CurrentVersion Internet Settings 4 Double click KeepAlive Timeout and this window appears 5 Change the Value data to 480000 and click OK ...

Страница 109: ...For Microsoft IE10 and above users you may have the above error message pop up when you click the Snapshot or Record buttons on the Live View window You can simply solve this problem by setting up your Microsoft Internet Explorer to Run as administrator ...

Страница 110: ...White Black Yellow Green RS 485 RS 485 EPN Series 1 EPN Series 32 RS 485 RS 485 EKB500 Press preset numbers on the keyboard and then press the Position key to force the camera to turn to the preconfigured preset position The following is a list of fixed preset numbers for the actions Preset Action 33 Flip command Pans the dome drive 180 degrees 34 Pan zero command Directs the dome drive to the fac...

Страница 111: ...ed to work with EverFocus IP camera Brand ADATA Kingston Samsung SanDisk Transcend Card Capacity 64 GB 64 GB 64 GB 64 GB 64 GB Card Rate Level Class 10 Class 10 Class 10 Class 10 Class 10 ADATA Premier microSDHC SDXC UHS I Class10 Kingston MicroSDXC UHS I Class10 64GB Samsung MicroSDXC 64GB UHS I SanDisk Ultra microSDXC UHS I card Transcend MicroSDXC Class 10 UHS I memory card 300x ...

Страница 112: ...rk the router switch must support multicast function Switch Router Router IP Camera Switch Multicast Streaming To enable the Multicast Function 1 Complete the installation of the IP cameras routers switches and computers refer to diagram above 2 Install VLC and Wireshark in your computer Click VLC and Wireshark to download 3 Access to the Web UI of the IP camera to enable the Multicast function Cl...

Страница 113: ...220di 107 4 Go to the setting page of the router switch to enable the Multicast function Here we use a D Link DIR655 router and EverFocus 24 port switch for example 5 The Multicast function setup is now complete ...

Страница 114: ... 3F Kuramochi Building II 2 2 3 Koto Bashi Sumida Ku Tokyo 130 0022 Japan TEL 81 3 5625 8188 FAX 81 3 5625 8189 www everfocus co jp info everfocus co jp Your EverFocus product is designed and manufactured with high quality materials and components which can be recycled and reused This symbol means that electrical and electronic equipment at their end of life should be disposed of separately from y...

Отзывы: