background image

R290 User’s Guide

15

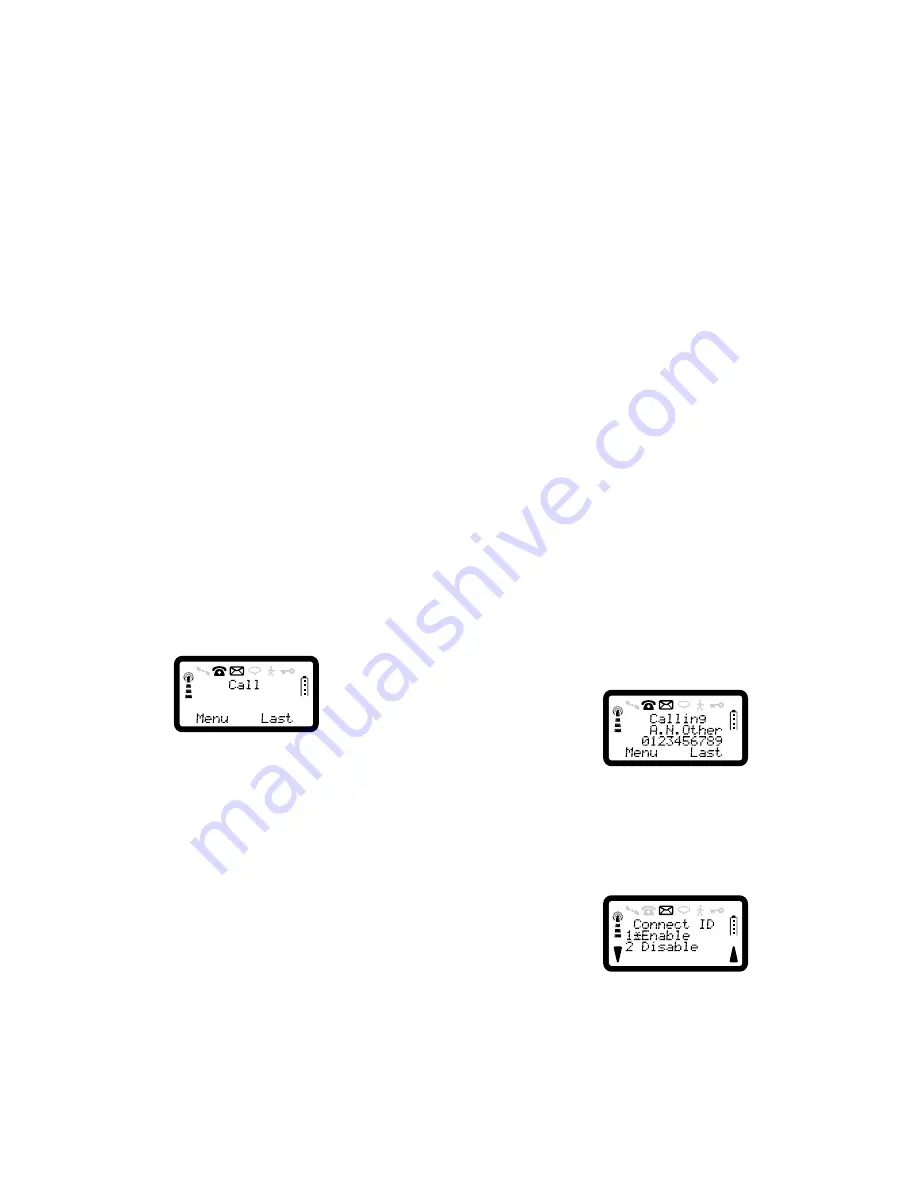
Receiving a Call

When you receive a call, the phone rings and the indicator light on the top 
of the phone blinks green rapidly. The display appears similar to:

Answering a Call

Press

 YES

 to answer the call. When the call is finished, press 

NO

.

Rejecting a Call

Press 

NO

 when the phone rings. If the caller’s network supports it, the 

caller will hear a busy tone.

Unanswered Calls

If you have been unable to answer, the number of unanswered calls will 
be shown in the display, for example ‘Calls: 2’, until you press 

CLR

. To 

answer the calls, see “To dial the last 10 numbers dialled, received or 
missed” on page 19.

Putting a Call on Hold

If you are engaged in a call, you can put it on hold by pressing 

YES

. This 

mutes the microphone so that you can have a private conversion without 
the person at the other end hearing. To take the call off hold, press 

YES


again.

Calling Line Identification (CLI)

The Calling Line Identification service (sometimes known as Caller ID) 
shows the caller’s phone number when you receive a call (you have to 
order this service). If the caller’s name is stored in your phone book, the 
name is displayed instead of the number.

Showing Your Phone Number

If you subscribe to normally withhold your number when calling, you can 
show the number on a particular call.

1. Press 

SOFT LEFT

1

1

4

 to enter Connect ID menu.

2. Press 

YES

 to enable Connect ID.

3. Enter the number you wish to call.

If you subscribe to normally show your number when calling, you can 
hide your number on a particular call.

1. Enter the number you wish to call.
2. Press 

SOFT LEFT

1

1

4

.

3. Press 

2

 to Disable Connect ID.

Содержание SATELLITE R290

Страница 1: ...Ericsson R290 Satellite Mobile Phone for the Globalstar GSM Network 8VHU V XLGH EN LZT 123 4717 PA4 ...

Страница 2: ...ated by typographical errors inaccuracies of current information or improvements to programs and or equipment may be made by Ericsson Mobile Communications UK Limited at any time and without notice Such changes will however be incorporated into new editions of this manual All rights reserved Ericsson Mobile Communications UK Limited 1999 Publication number EN LZT 123 4717 PA4 Printed in Sweden INN...

Страница 3: ...ove the antenna yourself If your phone s antenna is damaged please take it to a Certified Service Partner Unauthorised antenna modifications or attachments could damage the phone and may violate the appropriate regulations causing loss of performance and radio frequency RF energy above the recommended limits Efficient Phone Operation To enjoy optimum performance with minimum power consumption plea...

Страница 4: ... not place objects including either installed or portable wireless equipment in the area over the air bag or in the air bag deployment area If in vehicle wireless equipment is improperly installed and the air bag inflates serious injury could result Electronic Devices Most modern electronic equipment for example equipment in hospitals and cars is shielded from RF energy However certain electronic ...

Страница 5: ...e phone since it contains small parts that could become detached and create a choking hazard Emergency Calls IMPORTANT This phone like any mobile phone operates using radio signals cellular satellite and landline networks as well as user programmed functions which cannot guarantee connection under all conditions Therefore you should never rely solely upon any mobile phone for essential communicati...

Страница 6: ...o assist in the recycling of rechargeable batteries Many areas require recycling of rechargeable batteries In the U S call 1 800 822 8837 to find out how to recycle your battery Outside the U S contact your local retailer for recycling instructions Please note Some of the services mentioned in this manual are not supported by all networks or by all service agreements This also applies to the Inter...

Страница 7: ...a Call on Hold 15 Calling Line Identification CLI 15 Showing Your Phone Number 15 Handling Two Calls 16 Useful Information while Talking 17 Changing Volume while Talking 17 To Mute or Unmute the Microphone 17 Using Phone as Scratch Pad 17 Sending Tone Signals 17 Checking Time or Cost of Calls 17 To Change the Ring Volume 18 To Change Key Tone Volume 18 To Redial the Last Dialled Number 18 Missed C...

Страница 8: ...7 Fixed Dialled Number Store 37 Voice Mail 37 Protecting Your Phone 38 About Locks 38 Keypad Lock 38 Phone Lock PIN 39 Unblocking with Personal Unblocking Key PUK 40 Card Lock SIM PIN 41 Controlling Your Calls 42 Call Divert 42 Call Waiting 44 Call Waiting In Call Menu 46 Dealing with Multiple Calls 46 Conference Calls 47 Call Barring 50 Sending And Receiving Text Messages 54 Receiving a Message 5...

Страница 9: ... seamless dependable network with consistent high quality phone transmission worldwide Your phone is designed to roam remote areas of the world with you whether you are travelling for international business for pleasure or in an emergency situation Your phone will be a valuable communication tool whether you are a vacationer on holiday a world business traveller or a member of a geological survey ...

Страница 10: ...service provider and your Phone Book information among other things NOTE If a single mode SIM is inserted the phone will not work unless it is set to operate in that mode i e GSM only or Satellite only see Mode Switch on page 11 Your PIN Your operator will provide you with a security code or Personal Identity Number PIN when you receive your SIM card This number allows you to access the network Th...

Страница 11: ...R290 User s Guide 3 The Phone ...

Страница 12: ...0 uses the smaller card Many networks provide a credit card size card with a small SIM card that you can remove Operating Without a SIM Card When operating in GSM mode you can make emergency calls on your R290 phone without a SIM card by dialling 112 or an alternate emergency number see Making an Emergency Call on page 14 This service is not supported by all network operators You cannot access sat...

Страница 13: ...but there may be enough power to turn on the phone Attaching the Battery to the Phone 1 Place the battery on the back of the phone as shown 2 Press the battery forward and press down on the rear of battery until you hear a click Removing the Battery Make sure that the phone is turned off before removing the battery then 1 Press the battery release button 2 Lift the battery up and away from the pho...

Страница 14: ...taching it again 3 Connect the other end of the charger cable to the phone The flash symbol on the plug must face up If a charger is attached but the phone is turned off the message Charging Battery Only is displayed The battery starts charging as soon as you attach the charger Charging is indicated by the following 1 The battery meter in the display is continuously filled and emptied 2 The indica...

Страница 15: ...isplay the indicator light on top of the phone starts blinking red Low Battery Alarm When the battery has discharged the low battery alarm sounds several times before the phone automatically shuts off You might be able to turn the phone on again but you will not be able to make or receive any calls until the battery is being charged or replaced with a charged one The Antenna Your phone is equipped...

Страница 16: ...el than needed and shorten talk and stand by times Turning On the Phone 1 Press and hold down the PWR key until the display turns on 2 Enter your SIM PIN 4 to 8 digits 3 Press YES If you entered your PIN correctly you will receive a welcome message The display will illuminate and the POWER ON TONE will be played A greeting message will appear on the screen This message can be personalised see Gree...

Страница 17: ...with the SOFT LEFT and SOFT RIGHT keys 4 Pressing the number on the keypad will take you to that function in the menu Terms Used Key Name and Function du Navigation Keys Soft Left Soft Right Press right or left to activate menu mode and scroll through menus YES key Answers a call selects a menu or function or sends a call when digits are displayed NO key Ends a call backs up one level and or leave...

Страница 18: ...rogress 3 Flashes for unread message steady when message read 4 Voice mail in box 5 Phone is Roaming 6 Keylock is active 7 Battery strength indicator four bars full battery no bars low battery 8 Scroll arrows indicate function of SOFT LEFT SOFT RIGHT keys 9 1 Indicates menu function available from keypad 10 Signal strength indicator Four bars high signal strength No bars low or no signal ...

Страница 19: ...ons on locking unlocking the keys Set Language English is the default language in your phones display In phones with more than one language available you may change the language see Language on page 35 Network Settings You will need to set defaults for the networks you will use before you use your phone for the first time see Selecting a Network on page 12 Mode Switch To switch network mode from s...

Страница 20: ...r of the preferred modes gives an acknowledgment followed by Selection Effective Only After Power Up Switch the phone OFF then ON to activate the mode Searching for a Network The message on the screen will be Searching For Networks This search can take place manually or automatically but will be automatic the first time that you power the phone on A one shot network search may also be performed Th...

Страница 21: ...ery level indicator and the network details i e the country code and network code for the selected network If the country and network codes are recognised by the phone they are converted to names to help you identify the network An example of the stand by display is shown You may now make a call answer a call or access any of the advanced features available with the phone If normal calls cannot be...

Страница 22: ...loyed in the correct position for making a call see Deploying the Antenna on page 7 Ensure the satellite antenna is kept vertical when in use It is adjustable for left or right handed operation and has a third position for use on a flat surface outdoors This position is for use with a hands free kit or mobile office It is not necessary to deploy the antenna when making a GSM call The GSM antenna i...

Страница 23: ...ressing YES This mutes the microphone so that you can have a private conversion without the person at the other end hearing To take the call off hold press YES again Calling Line Identification CLI The Calling Line Identification service sometimes known as Caller ID shows the caller s phone number when you receive a call you have to order this service If the caller s name is stored in your phone b...

Страница 24: ...d the current call The display shows Retrieve and you hear two beeps 2 Press YES within three seconds to return to the held call If you do not press YES within three seconds the held call is automatically ended Making a Second Call while a Call Is in Progress Enter the second phone number and press YES The first call is put on hold and the display shows a message 1 On Hold Receiving a Third Call I...

Страница 25: ...SOFT RIGHT key during the call to mute or unmute the microphone When muting is on the earpiece and alerter is still active together with the In call Menu stores and scratch pad Using Phone as Scratch Pad 1 Enter a phone number on the keypad while talking When you end the call the number remains in the display 2 Press YES to call the number shown in the display Sending Tone Signals During a call yo...

Страница 26: ...lled Number With the phone in the stand by state and no number displayed press SOFT RIGHT to display and dial the last number called Press NO to finish the call Using Auto Redial If auto redial is enabled from the Call Set Up Busy Numbers Menu and your attempt to make a call was unsuccessful because the receiver was busy or unobtainable the message Auto Redial will be displayed and the number will...

Страница 27: ...ers If the selected store is empty the message Store Empty will be displayed before returning to stand by When a number is being displayed you can use it to initiate a call by pressing YES Refer to Last Number Stores on page 24 for a detailed explanation of the Dialled Received and Missed stores Missed Calls If you do not answer a call the phone indicates a missed call by displaying a Called Calle...

Страница 28: ... the two is you can remove the SIM Card and use all those telephone numbers in other phones while the phone s memory always stays the same no matter which SIM Card is inserted You can store up to 99 phone numbers in the phone memory The number of phone numbers you can store on your SIM Card is SIM Card dependent International Numbers If you intend to use your phone book both at home and abroad you...

Страница 29: ...telephone number If you enter more than eleven digits in the telephone number the remainder will not be displayed and a diamond character will be shown to the left of the display 6 Press SOFT LEFT to move to the next line 7 Enter the store number you want for example 003 and press YES To store your number on the SIM card enter a number between 1 and 100 To store your number in the phone enter a nu...

Страница 30: ...manner Holding the CLR key will delete the whole line Table 2 Lower Case Mode Number of Key presses Key 1 2 3 4 5 6 7 8 9 10 1 2 a b c ä å à æ 3 d e f é è 4 g h i ì 5 j k l 6 m n o ñ ö ø ò 7 p q r s ß 8 t u v ü ù 9 w x y z 0 Table 3 Numeric Mode Number of Key presses Key 1 2 3 4 5 6 7 8 9 10 1 1 2 2 3 3 4 4 5 5 6 6 7 7 8 8 9 9 0 0 Table 4 Greek Mode Number of Key presses Key 1 2 3 4 5 6 7 8 9 10 1...

Страница 31: ...ther MEM or YES To recall by the store number move to the Store line and enter the one or two digit number followed by MEM or YES Alternatively precede the number with one or two zeros to make a 3 digit number and the contents will be recalled automatically An example of the display is If there are up and down arrows on the screen you can scroll through the telephone stores by using the SOFT LEFT ...

Страница 32: ...res The three stores Dialled Received and Missed can be accessed using the SOFT RIGHT key in stand by Only one store may be accessed at any one time To change the store hold down SOFT RIGHT for at least half a second The display will be To select the Dialled store press either 1 or move the cursor to this option and press YES To select the Received store press either 2 or move the cursor to this o...

Страница 33: ...n numbers When the Received store is active the last number can be recalled by pressing SOFT RIGHT The display will be Discrete presses of SOFT RIGHT will scroll through the list of received numbers The Missed Store The Last Number Missed store holds up to ten numbers When the Missed store is active the last number can be recalled by pressing SOFT RIGHT The display will be Discrete presses of SOFT...

Страница 34: ...confirmation message will be displayed before the phone returns to the Call Setup Menu If the DTMF tones have been disabled and you need to send DTMF tones during a call you can enable them using the In call Menu When enabled any numerical key press including and will cause DTMF tones to be signalled across the network One Touch Dialling You can use the one touch dialling function by pressing and ...

Страница 35: ... it is entered incorrectly three times you will not be able to reset the time and cost counters The message Timer Reset Disabled will be given and you will not be able to reset the counters until the phone PIN has been entered correctly If you are using a Phase 2 SIM you may be required to enter the Super PIN When you have entered this press YES A confirmation message of Request Accepted will be d...

Страница 36: ...as been accepted the message Request Accepted will be given before the phone returns to the stand by display If the unit time and cost have been set up and if Advice of Charge has been subscribed to it will be used in preference If you are only subscribed to Advice of Charge Charging AOCC but the network you are using does not support it you will not be able to make chargeable calls If the maximum...

Страница 37: ...limit is reached you will be warned that you have approximately 30 seconds of talk time left by the RADIO PATH NOT AVAILABLE TONE being given and the message Cost Limit Approaching being displayed When the maximum cost limit is reached the message Cost Limit Reached will be displayed and the call terminated The message Cost Limit Reached or Chargeable Incoming Call will then be displayed on the sc...

Страница 38: ...e units supplied by the Advice of Charge Information AOCI and or Advice of Charge Charging AOCC Personalizing Your Phone Busy Numbers This menu allows you to select the action the phone will take if you dial a number that is busy or unobtainable The auto redial feature permits a telephone number to be redialled if the call does not connect at the first attempt If your subscription supports the GSM...

Страница 39: ... can make up to 5 CCBS requests this is network dependent To Complete a CCBS Call When the phone receives a CCBS recall the number is displayed on screen similar to below If the user was in a menu then the menu is exited Press YES to complete the CCBS call Press NO to return to stand by and cancel the CCBS request If you do not press a key for 15 seconds then the display returns to stand by and ca...

Страница 40: ... 3 Press 3 for Escalating Ring Volume 4 To enable the escalating ring volume press 1 or YES To disable it press 2 A confirmation message will be displayed before returning to the Call Setup menu Caller ID To access the Caller ID menu 1 Press SOFT LEFT 1 1 to enter Call Setup menu 2 Press 3 to show Caller ID menu 3 To enable Caller ID press 1 or YES To disable it press 2 NOTE If the calling number ...

Страница 41: ...fter you enter your PIN when you first turn on the phone You can change the text as follows 1 Press SOFT LEFT 1 3 to enter Greetings Menu 2 Press CLR to clear message 3 Press YES to confirm 4 Enter the first letter of the greeting up to four lines by pressing the appropriate numeric key as many times as required To change the character set to lower case press the SOFT RIGHT key see Table Lower Cas...

Страница 42: ...n in brackets 3 Enter two digits for current year and press YES 4 Enter two digits for current month and press YES 5 Enter two digits for current day and press YES A confirmation message Date updated will be displayed before the phone returns to the Call Setup menu Clock Mode 1 Press SOFT LEFT 1 4 to enter the Clock menu 2 Press 3 to set Clock Mode current mode is shown with asterix 3 Press 1 to s...

Страница 43: ...firmation message Clock Synchronised will be displayed Language The phone supports 12 languages for all display messages The user has the option to select any one of these languages as desired When the phone is first used following factory initialisation language selection is set to automatic Consequently the language will be selected automatically according to the SIM Language Mode To access the ...

Страница 44: ...g Backlight Operation 1 Press SOFT LEFT 1 to enter Setup menu 2 Press 6 to show Power Save menu 3 Press 1 to select the backlight operation 4 Press 1 to permanently switch on the backlight Press 2 to switch it off Press 3 to switch off the backlight automatically after a period of inactivity NOTE If you select automatic backlighting you will be prompted to enter the required period of inactivity n...

Страница 45: ...vailable if you are using a Phase 2 SIM card which supports fixed dialling 1 Press SOFT LEFT then 1 then 7 to enter Fixed Numbers menu 2 Press 1 or YES to enable the Fixed Dial Stores or 2 to disable it You may be prompted to enter the SUPER PIN Enter it if you do not have this you can get it from your service provider If this is entered incorrectly three times the phone will give the message Supe...

Страница 46: ...t About Locks Your phone has three types of locks Keypad lock does not protect in case of theft Phone lock Card lock SIM The card and phone locks are found in the Security menu and you find the keypad lock in the Keylock menu Keypad Lock You can lock the keypad so that unintentional key actions have no effect if the phone is turned on when you are carrying it in a handbag or pocket The keypad rema...

Страница 47: ...the keypad The display will show Press 7 or YES to unlock the keypad Phone Lock PIN The phone lock protects the phone against unauthorized use of the phone if there is a theft The phone lock is not activated when you buy the phone Upon purchase the phone Personal Identification Number PIN will be set to 0000 If the phone PIN is enabled when you switch on the phone the message Phone PIN Enabled wil...

Страница 48: ... Enter the old PIN digits and press YES The display will now show Enter New Phone PIN 3 Enter the new PIN digits and press YES The PIN must be 4 digits long 4 Enter the new PIN digits again to confirm and press YES The display will show New Phone PIN Accepted before returning to the Setup Menu NOTE If you enter the old PIN incorrectly the message Phone PIN Error will be shown If it is entered inco...

Страница 49: ...nu To change the SIM PIN You can only change the SIM PIN when it is enabled 1 Press YES from the Phone PIN Options Menu to enter a new PIN The display will show the message Enter Old SIM PIN 2 Enter the old PIN digits and press YES The display will show Enter New SIM PIN 3 Enter the new PIN digits and press YES You may enter between 4 and 8 digits The display will then show the message Confirm New...

Страница 50: ...n the message SIM PIN Disable Not Allowed Controlling Your Calls This section deals with controlling your calls by diverting placing in call wait or barring Call Divert If call barring is already set you may be unable to divert calls using the call divert feature The network may send a request rejected message if you try to use this feature when call barring is set To Review the Call Divert Status...

Страница 51: ...and by display The display will not change until NO is pressed To Setup Call Divert 1 Press SOFT LEFT 5 to enter Advanced menu 2 Press 1 for Divert menu 3 Press 2 for Set 4 Press 1 or YES to divert all calls 2 to divert a call when the phone is engaged 3 to divert incoming calls if you are not available 4 to divert incoming calls when the phone is switched off 5 Select the basic service group for ...

Страница 52: ...he phone is switched off 5 Select the basic service group for which the call diversion is to be cancelled The display will show 6 Press 1 for All Calls 2 for Voice Only 3 for Data Only or 4 for Fax Only 7 The display will show the message Please Wait and then Request Accepted will be displayed The RADIO ACKNOWLEDGEMENT TONE will be played through the earpiece The phone will then return to the stan...

Страница 53: ...nter Advanced menu 2 Press 2 for Call Wait menu 3 Press 2 for Set 4 Press 1 or YES to call wait all calls 2 to call wait a call when the phone is engaged 3 to call wait incoming calls if you are not available 4 to call wait incoming calls when the phone is switched off 5 Select the basic service group for which the Call Wait is to be set The display will show 6 Press 1 for All Calls 2 for Voice On...

Страница 54: ...d it it will time out and go away Dealing with Multiple Calls Placing a Second Call and holding the Current Call If you are engaged in a call and wish to make or accept a second call without losing the original call enter the number you wish to dial and press YES at any time If the network accepts the request The number which you entered will be dialled and the current call will be put on hold The...

Страница 55: ...come active The RADIO PATH NOT AVAILABLE TONE will be played and the display will replace the message Call On Hold with Connected Conference Calls Call conferencing is a network subscription option that allows you to merge an active and a held call to form a single multi connection call containing up to five remote parties Once a conference call has been established remote parties can be added dis...

Страница 56: ...s the state of the call this is either Connected On Hold Call Held or Hung Up If On Hold is displayed the remote party has placed the call on hold If Call Held is displayed you have placed the conference call on hold If Hung Up is displayed the remote party has hung up and the network has not terminated the call but suspended it instead You can scroll through the call list using the SOFT keys and ...

Страница 57: ...ence Member Placed Call On Hold will be displayed for four seconds before the display returns to the updated Call List If a remote party terminates their call you will hear the normal call ending tone and the call ending message will be displayed in the normal way The message Call X Ended will then be displayed where X is the call number 1 5 of the remote party that terminated their call The call ...

Страница 58: ...Data Calls Barred Except Home Country Internat l Fax Calls Barred Except Home Country If more than one restriction is set you can scroll through the messages one by one using the SOFT keys Alternatively the network may respond with a notification message for an unsupported service 5 If you had pressed 2 the following messages would display No Incoming Call Restrictions All Incoming Services Barred...

Страница 59: ...r Set 4 Press 1 or YES to set Outgoing Call Bar the display will show the options 5 Press a number to select the Call Bar option required The display will show 6 Press 1 for All Calls 2 for Voice Only 3 for Data Only 4 for Fax Only or 5 for Messages 7 Enter network password and press YES If you do not have the password contact your service provider for it The display will show the message Request ...

Страница 60: ...played on the screen To Cancel Outgoing Call Barring 1 Press SOFT LEFT 5 to enter Advanced menu 2 Press 3 for Call Bar menu 3 Press 3 for Cancel the display will show the options 4 Press 1 or YES to Cancel Outgoing Call Bar The display will show 5 Press 1 for All Calls 2 for Voice Only 3 for Data Only 4 for Fax Only or 5 for Messages 6 Enter network password and press YES If you do not have the pa...

Страница 61: ...creen To Change the Network Password for Call Barring 1 Press SOFT LEFT 5 to enter Advanced menu 2 Press 3 for Call Bar menu 3 Press 4 for Password the display will show 4 Enter the old network password and press YES 5 Enter the new network password and press YES 6 Enter the new network password again to confirm and press YES If the new password and its confirmation do not match the message Passwo...

Страница 62: ...er s manual Receiving a Message When a message is received provided that your GSM phone is switched on the message is automatically stored on your SIM The announcement Message and flashing icon appear on the display and the phone s alerter emits the message alert tone If you are engaged in a call the message alert tone is heard in the earpiece and the Message Icon will be displayed If your phone i...

Страница 63: ... Repeated Message If you wish to read the next or previous message press or The display will jump to the top of the relevant message To exit the message and return to the stand by display press and hold NO Saving and Dialling a Number Received in a Message 1 Scroll through the message until the telephone number is displayed 2 Press and hold MEM to store the number If more than one number is shown ...

Страница 64: ...e or to disabled A confirmation message is displayed before your phone returns to the stand by display In a call the tones are produced once only to avoid disrupting the call Press NO to exit without changing the current setting NOTE When the message alerter tones are suppressed the tones heard through the earpiece during a call will not be affected Clearing Messages Automatically The memory space...

Страница 65: ... disable the immediate display of priority messages as they arrive A confirmation message will be displayed before your phone returns to the stand by display Press NO to exit without changing the current setting Sending a Message You can create a message by editing a copy of an existing message by entering a completely new message by selecting one of five Built in messages or by replying to or for...

Страница 66: ...vice centre validity or type information press and hold CLR Delete Message is displayed Press YES to delete the text Press NO to return to the message text You can recall a phone number from memory by pressing MEM to gain access to the abbreviated dialled number stores in memory locate the required number in the normal way and then press YES to insert it in the message When you have entered the me...

Страница 67: ... from an Existing Message 1 Press SOFT LEFT 3 to enter Messages menu 2 Press 2 to show the Originate menu 3 Press 1 or YES to display the Create Message Menu 4 Press 2 to display the first three lines of an old message that you originated and stored in memory Use the and keys to scroll through the other messages stored in memory Use the SOFT keys to scroll through the current message s contents 5 ...

Страница 68: ...ate menu 3 Press 2 to display the interrupted message in the state you left it You can now continue editing the message as before To Delete a Message 1 Press SOFT LEFT 3 to enter Messages menu 2 Press 2 to show the Originate menu 3 Press 3 to display the first three lines of the first message that you stored in memory 4 Use the and keys to scroll through the other messages stored in memory You can...

Страница 69: ...e Parameter Defaults 1 Press SOFT LEFT 3 to enter Messages menu 2 Press 2 to show the Originate menu 3 Press 6 to display the Defaults Menu The display will show 4 Select an option or press NO to return to the Originate Message Menu 5 Enter values for the default destination address service centre address validity period and message type When each value is entered to your satisfaction press YES to...

Страница 70: ...hanged after the original purchase of the product from the dealer 2 If Ericsson repairs or replaces the Product the repaired or replaced Product shall be warranted for the remaining time of the original warranty period or for ninety 90 days from the date of repair whichever is longer Repair or replacement may be via functionally equivalent reconditioned units Replaced faulty parts or components wi...

Страница 71: ... 5 576 662 5 638 412 5 107 225 5 469 115 5 577 022 5 640 414 5 109 390 5 475 870 5 577 025 5 642 398 5 228 054 5 479 475 5 581 575 5 644 591 5 257 283 5 485 486 5 588 043 5 644 596 5 265 119 5 487 175 5 590 069 5 646 991 5 267 261 5 490 165 5 590 406 5 652 599 5 267 262 5 497 395 5 590 408 5 654 979 5 283 536 5 499 280 5 592 481 5 655 220 5 289 527 5 504 773 5 592 548 5 657 420 5 307 405 5 506 865...

Страница 72: ...ment and are prohibited The Ericsson Policy is one of continuous development and consequently the information contained within this publication may vary in detail All specifications and accessories are subject to change without prior notice Some operational features described may not be available with early software releases ...

Страница 73: ... CLR 9 Conference 47 Connect ID 32 Cost of Calls 17 Create a Message 59 D Delete a Message 60 Deleting a Message 55 Deploying 7 E Edit a Number 23 Emergency Call 14 Ending a Call 14 Enter 9 Enter Message Text 58 F Forward a Received Message 60 G Greetings 33 H Handling Two Calls 16 Holding the Phone 14 I Incoming Call Barring 51 Indicators 10 Inserting 4 International Call 14 K Key Tone Volume 18 ...

Страница 74: ...ll a Telephone Number 23 Receiving a Call 15 Receiving a Message 54 Redial 18 Rejecting a Call 15 Reply to a Received Message 60 Ring Tone 31 Ring Volume 18 31 S Scratch Pad 17 Scroll 9 Searching 12 Select 9 Select the Message Type 59 Selecting 12 Sending a Message 57 Sending DTMF Tones 26 Set Date 34 Set Time 34 Short Message Service 54 SIM 2 41 Soft 9 Speed Dialling 20 Store a Name and a Number ...

Отзывы: