background image

e

Select  

Point  Correction

,  and  then  press  the  [

]   button.

Point Correction

Select the point number (

3x3

5x5

9x9

17x17

),

and then make the Point Correction setting.

Pattern Color

Select the color of the grid when performing
corrections.

Reset

Resets all corrections for 

Point Correction

 to their

default values.

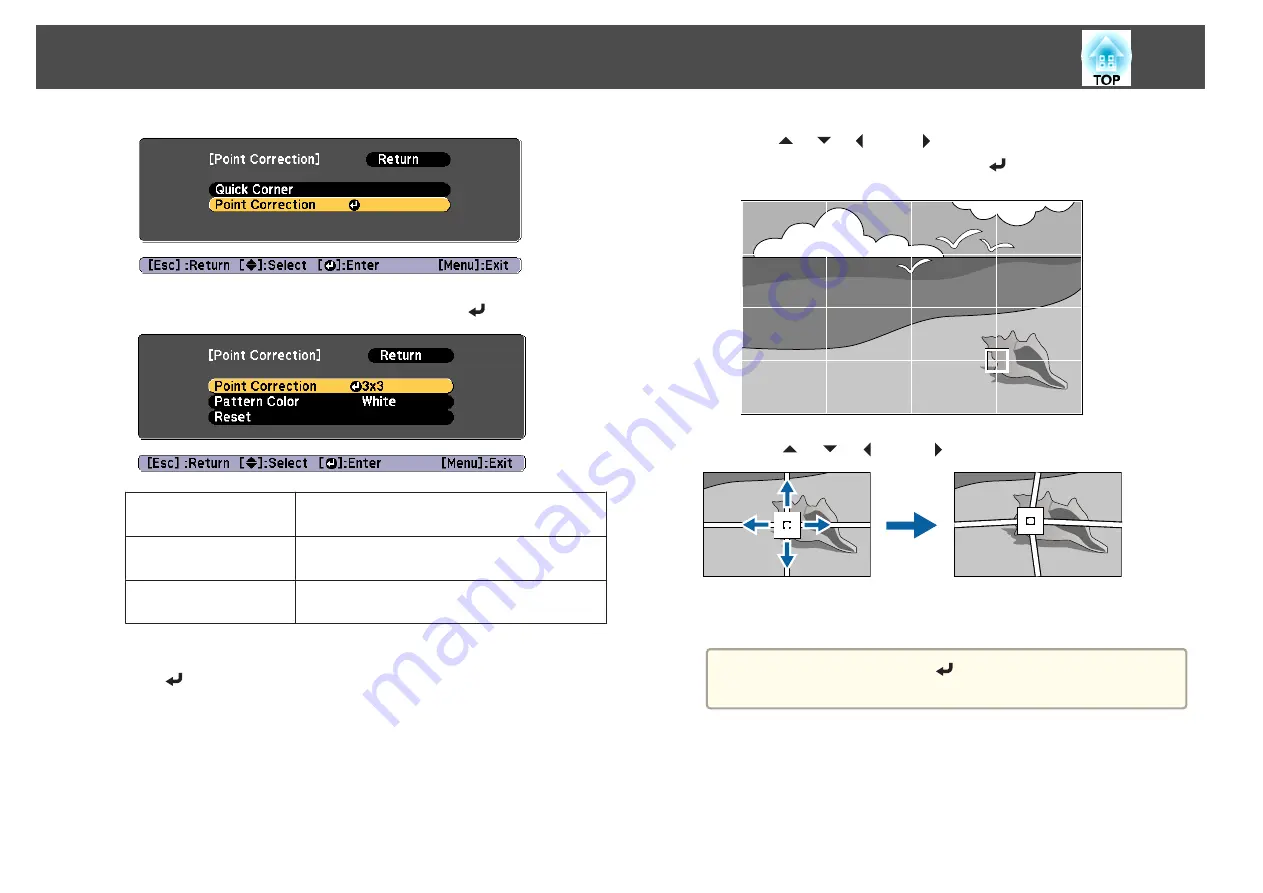
f

Select  the  point  number  (

3x3

,  

5x5

,  

9x9

,   or  

17x17

),  and  then  press

the  [

]   button.

g

Use  the  [

],  [

],  [

],  and  [

]  buttons  to  move  to  the  point  you

want  to  correct,  and  then  press  the  [

]  button.

h

Use  the  [

],  [

],  [

],  and  [

]  buttons  to  correct  distortion.

To  continue  to  correct  another  point,  press  the  [Esc]  button  to
return  to  the  previous  screen,  then  repeat  the  steps  7  and  8.

a

Each  time  you  press  the  [

]  button,  you  can  show  or  hide  the

image   and   the   grid.

i

To  complete  the  corrections,  press  the  [Menu]  button.

Adjusting Projected Images

66

Содержание EB-L25000U

Страница 1: ...User s Guide ...

Страница 2: ...amage due to incorrect handling General information indications Attention Indicates procedures which may result in damage or injury if sufficient care is not taken a Indicates additional information and points which may be useful to know regarding a topic s Indicates a page where detailed information regarding a topic can be found g Indicates that an explanation of the underlined word or words in ...

Страница 3: ...place flammable objects in front of the lens If you set the schedule to turn on the projector automatically any flammable objects placed in front of the lens could cause a fire Do not tie the power cord and other connection cables together Otherwise it could cause a fire Only use the specified power supply voltage Otherwise it could cause a fire or electric shock Warning Be careful when handling t...

Страница 4: ... laser beam is being used make sure it is installed so that the laser beam does not hit the surface of the projection lens When using at an altitude that exceeds 1 500 m set High Altitude Mode to On s Extended Operation High Altitude Mode p 125 You may need dedicated installation mounts to tilt and install the projector Contact a professional and prepare the mount Plan so that the mount does not f...

Страница 5: ... at a distance using the remote control make sure there is no one looking into the lens During projection do not block the light from the projector with the lens cover removable or a book and so on If the light from the projector is blocked the area on which the light shines becomes hot which could cause it to melt burn or start a fire Also the lens may get hot due to the reflected light which cou...

Страница 6: ...he LCD panel The LCD panel may contain pixels that are missing or appear bright all the time This is not a sign of an error Whenahigh poweredlaserbeamsthroughthesurfaceoftheprojection lens it can cause a malfunction in the LCD panel If the laser can beam through the surface of the projection lens block the laser beam with non permeable or incombustible aluminum foil or metal plates such as iron to...

Страница 7: ...ating light source Eye injury may result This is a class A product In a domestic environment this product may cause radio interference in which case the user may be required to take adequate measures Caution This projector is a Class 1 laser product that complies with the IEC60825 1 international standard for lasers Do not disassemble the projector when disposing of it Dispose according to your lo...

Страница 8: ...carried by one person At least four people are needed to unpack or carry the projector Attention Prepare the following before carrying the projector Check the Transport and Installation Handbook for more information Turn off the power to the projector and disconnect all cables When moving nearby without having to pack up the projector install the lens cap on the lens unit When packing up and trans...

Страница 9: ...e projector ID 37 Checking the projector ID 37 Setting the remote control ID 38 Setting the Time 38 Other Settings 40 Settings related to basic operations 40 Settings related to display 40 Connecting Equipment 42 Connecting a Computer 42 Connecting Image Sources 43 Connecting to an External Monitor 45 Connecting a LAN Cable 46 Connecting an HDBaseT Transmitter 47 Installing the Wireless LAN Unit 4...

Страница 10: ... Simultaneously Split Screen 97 Input Sources for Split Screen Projection 97 Operating procedures 97 Restrictions during split screen projection 100 Hiding the Image Temporarily Shutter 100 Freezing the Image Freeze 101 Saving a User s Logo 101 Memory Function 103 Saving Loading Erasing Resetting the Memory 103 Scheduling Function 105 Saving an Event 105 Setting an Event 105 Checking an Event 106 ...

Страница 11: ...ages are fuzzy out of focus or distorted 166 Interference or distortion appear in images 166 The image is truncated large or small theaspectis not suitable or the image has been reversed 167 Image colors are not right 167 Images appear dark 168 Automatic adjustments are not performed correctly 169 Problems when Projection Starts 169 The projector does not turn on 169 Other Problems 170 The remote ...

Страница 12: ...l definitions 200 Optional Accessories and Consumables 205 Optional Accessories 205 Consumables 205 Screen Size and Projection Distance 206 Projection Distance List 206 ELPLR05 206 ELPLU05 207 ELPLW07 207 ELPLM12 208 ELPLM13 209 ELPLM14 209 ELPLL09 210 ELPLL10 211 Adjustment Range for Projected Images 212 H V Keystone 212 Curved Surface 212 Corner Wall 214 Supported Monitor Displays 217 Supported ...

Страница 13: ...Introduction This chapter explains the names for each part ...

Страница 14: ...5 Caution When moving the projector do not hold the lens replacement cover The lens replacement cover may be removed and the projector may fall which could cause an injury D Projection lens Images are projected through here Warning Do not look into the lens while projecting This could cause damage to eyesight due to the power ful light emitted Caution Whenshiftingthelens donotputyourhandsnear thel...

Страница 15: ... indicate the status of the projector s Reading the Indicators p 148 Rear side Name Function A Air exhaust vent Exhaust vent for air used to cool the projector internally Caution While projecting do not put your face or hands near the air exhaust vent and do not place objects that may become warped or damaged by heat near the air exhaust vent Hot air from the air exhaust vent could cause burns war...

Страница 16: ...Interface Name Function A BNC port For analog RGB signals from a computer and component video signals from other video sources B Computer port For analog RGB signals from a computer and component video signals from other video sources C Monitor Out port Outputs to an external monitor the analog signal from the computer connected to the Computer port or the BNC port You cannot output signals input ...

Страница 17: ...omputers K Cable holder Insert the supplied cable clamp here to prevent the HDMI cable from falling out L DVI D port Inputs the computer DVI D signals M HDBaseT port Connects a LAN cable to the optional HDBaseT Transmitter s Connecting an HDBaseT Transmitter p 47 s Optional Accessories p 205 The projector supports Art Net When using Art Net to controltheprojector setArt NettoOnfromtheNetwork menu ...

Страница 18: ...pts and enters the current selection and moves to the next level s Using the Configuration Menu p 116 L buttons Press to adjust focus zoom and lens shift s Adjusting the Position of the Projected Image Lens Shift p 31 s Adjusting the Image Size p 33 s Correcting the Focus p 34 If pressed when the Configuration menu or the Help screen is displayed menu items and setting values are selected s Using ...

Страница 19: ...gs Menu p 123 E Aspect button Each time the button is pressed the aspect mode changes s Changing the Aspect Ratio of the Projected Image p 71 F Auto button If pressed while projecting analog RGB signals from the Computer port or the BNC port you can automatically optimize Tracking Sync and Position G Freeze button Images are paused or unpaused s Freezing the Image Freeze p 101 H Default button Ena...

Страница 20: ...e Function Q ID button Hold down this button and press the numeric buttons to select the ID for the projector you want to operate using the remote control s ID Settings p 37 R ID switch Usethisswitchtoenable On disable Off IDsettingsfor the remote control s ID Settings p 37 S Remote port Connects the optional remote control cable set and outputs signals from the remote control s Optional Accessori...

Страница 21: ...pressing one of the buttons on the remote control Operation Set Reverse the projected image vertically Switch the Projection between Front and Front Ceiling s Changing the direction of the image projection mode p 27 Hold down the Shutter button for more than five seconds Selecting the password security settings s Managing Users Password Protection p 109 Hold down the Freeze button for more thanfiv...

Страница 22: ...Attention Make sure you read the following manual before handling the batteries s Safety Instructions a Remove the battery cover While pushing the battery compartment cover catch lift the cover up b Replace the old batteries with new batteries Caution Check the positions of the and marks inside the battery holder to ensure the batteries are inserted the correct way If the batteries are not used co...

Страница 23: ...ontrol cable set when you use multiple units of this projector in the same place or when there are obstacles around the remote receiver s Optional Accessories p 205 a When the remote control cable is plugged into the Remote port the remote receiver on the projector is disabled You can also connect the optional HDBaseT transmitter and remote control with the cable to control the projector s Connect...

Страница 24: ...Preparing the Projector This chapter explains how to install the projector and connect projection sources ...

Страница 25: ...n quality deteriorates a The projector supports lens with the following model numbers ELPLR05 ELPLU05 ELPLW07 ELPLM12 ELPLM13 ELPLM14 ELPLL09 ELPLL10 a While pressing the tabs on both sides of the lens replacement cover pull it towards you to remove it b Turn the lock lever counterclockwise c Insert the lens unit straight so that the protruding points on the lens fit through the holes 2 points at ...

Страница 26: ...nished the lens returns to the position before calibration was performed Attention If the message Lens Calibration failed is displayed stop using the projector remove the power plug from the electrical outlet and contact your local dealer or the nearest address provided in the Epson Projector Contact List s Epson Projector Contact List a If you attach a lens unit that is the same as the previous o...

Страница 27: ...ource turns off when the lens is removed Attach the lens and then press the button to turn it back on a While pressing the tabs on both sides of the lens replacement cover pull it towards you to remove it b While holding the lens unit firmly turn the lock lever counterclockwise until it is unlocked c Pull the lens unit straight out Installation Settings Changing the direction of the image projecti...

Страница 28: ...ction Button to On so that the and buttons on the control panel operate in the correct direction s Extended Operation Advanced Inv Direction Button p 125 Screen Settings Set the Screen Type according to the aspect ratio of the screen being used The area where the image is displayed matches the shape of the screen a The setting for the Screen Type at the time of purchase is 16 10 a Press the Menu b...

Страница 29: ... while projecting s Using the Configuration Menu p 116 b Select Display from Extended c Select Screen Position from Screen d Use the and buttons to adjust the position of the image You can check the current display position by using the background test pattern e Press the Menu button to finish making settings a When the Screen Type is set to 16 10 the Screen Position cannot be adjusted Displaying ...

Страница 30: ... Advanced Gamma 1 s p 74 RGBCMY s p 73 Reset Set Geometry Correction s p 55 Brightness Settings Extended Display 2 Color Calibration Multi Projection 3 s p 83 1 Except for custom settings of gamma 2 Except for Screen Panel Alignment and Color Uniformity 3 Except for Black Level Scale Color Uniformity and Color Adjustment a To set menu items that cannot be set while the test pattern is being displa...

Страница 31: ...zontal and vertical maximum values When using the ELPLR05 A Center of lens B Projected image when the lens position is moved to the home position C Maximum motion range V x 15 When the horizontal direction is at the maximum value the image cannot be moved vertically When using the ELPLU05 ELPLL09 ELPLL10 A Center of lens B Projected image when the lens position is moved to the home position C Maxi...

Страница 32: ...g We recommend setting the focus zoom and lens shift at least 20 minutes after you start the projection because images are not stable right after turning on the projector The image will be clearest when the lens position is moved to the home position If you hold down the Lens Shift button on the remote control or the control panel for at least three seconds the lens position moves to the home posi...

Страница 33: ...tton to finish the adjustment Adjusting the Image Size a This is not available for the ELPLR05 a Press the Zoom button on the control panel b Press the buttons to adjust The displayed screen may differ depending on your lens c Press the Esc button to finish the adjustment a You can also use the Zoom buttons on the remote control to adjust the size of the image Installing the Projector 33 ...

Страница 34: ...g from several projectors and there is a difference in brightness we recommend displaying the grayscale test pattern and adjusting the focus If the focus is not correct even after adjusting the focus hold down the Default button on the remote control for about three seconds to perform lens calibration When lens calibration is complete adjust the focus again Correcting Distortion Image Warping When...

Страница 35: ...lues You can register a lens position whose lens shift zoom focus and distortion was adjusted in memory and load it when necessary You can register up to 10 values a If you did not calibrate your lens a message is displayed when you save a memory Select Yes to calibrate the lens The lens position when a memory is loaded may not completely match the lens position when the memory was saved If there ...

Страница 36: ...memory When you select a memory name and press the button the settings are saved Erase Memory Erases the registered memory When you select a memory name and press the button a message is displayed Select Yes and then press the button to erase the selected memory Rename Memory Changes the memory name Select the memory name you want to change and then press the button Enter the memory name using the...

Страница 37: ... the operating range of the remote control s Remote control operating range p 23 IDs are ignored when the projector ID is set to Off or the remote control ID is set to 0 If you use Epson Web Control you can operate a specific projector from a mobile device s Changing Settings Using a Web Browser Epson Web Control p 188 Set the projector ID a Press the Menu button while projecting s Using the Confi...

Страница 38: ...ult value ID0 Setting the Time You can set the time for the projector The set time is used for the schedule function s Scheduling Function p 105 a When you turn on the projector for the first time the message Do you want to set the time is displayed When you select Yes the screen from step 4 is displayed When Schedule Protection is set to On in Password Protection settings related to the date and ...

Страница 39: ...d daylight saving time DST Start Set the date and time to start the daylight saving time DST End Set the date and time to end the daylight saving time Set The settings made in Daylight Saving Time are applied Internet Time Submenu Function Internet Time Setto Ontoupdatethetimeautomaticallythrough an Internet time server Internet Time Server Input the IP address for an Internet time server Set The ...

Страница 40: ...xtended Display OSD Rotation p 125 To prevent the display of menus messages or warnings on the screen Each time you press the On Screen button on the remote control menus or messages and so on are shown or hidden While menus are hidden you cannot operate the Configuration menu except switching the color mode and input source To disable the display of the message on the projection screen when switc...

Страница 41: ...gistered the EPSON logo is displayed Display Background Set the screen display with no image signal input Default value Blue s Extended Display Display Background p 125 Startup Screen Set whether or not On Off to display the user logo when the projector is turned on Default value On s Extended Display Startup Screen p 125 Installing the Projector 41 ...

Страница 42: ...ble Connect the computer s display output port to the projector s Computer port B When using a commercially available 5BNC cable Connect the computer s display output port to the projector s BNC port C When using a commercially available HDMI cable Connect the HDMI port on the computer to the projector s HDMI port D When using a commercially available DVI D cable Connect the DVI D port on the comp...

Страница 43: ...omputer port B When using a commercially available component video cable RCA and a BNC RCA adapter Connect the component output port on the video equipment to the projector s BNC port R Cr Pr G Y B Cb Pb C When using a commercially available BNC video cable SDI input Connect the SDI port on the image source to the projector s SDI input port D When using a commercially available HDMI cable Connect ...

Страница 44: ...o the projector it could cause a malfunction If the orientation or shape of the plug differs do not try to force it in The device could be damaged or could malfunction a If the source you want to connect to has an unusually shaped port use the cable supplied with the device or an optional cable to connect to the projector Connecting Equipment 44 ...

Страница 45: ... monitor to the Monitor Out SDI port on the projector Monitor Out D Sub Monitor Out SDI SDI IN a Make the following settings to output image even when the projector is in standby mode Set A V Output to Always On s Extended A V Settings A V Output p 125 Set Standby Mode to Communication On s Extended Standby Mode p 125 The Monitor Out port to which external monitors are connected can output analog ...

Страница 46: ...r s LAN port with a commercially available 100BASE TX or 10BASE T LAN cable By connecting a computer to the projector over a network you can project images and check the status of the projector LAN a To prevent malfunctions use a category 5 or higher shielded LAN cable Connecting Equipment 46 ...

Страница 47: ...e LAN cable make sure you turn off the power for the projector and the HDBaseT Transmitter When performing Ethernet communication or serial communication or when using the wired remote control via HDBaseT port set Control Communications to On from the Configuration menu s Extended HDBaseT Control Communications p 125 Note that when Control Communications is set to On the projector s LAN port RS 23...

Страница 48: ...it port cover c Install the Wireless LAN unit d Install the wireless LAN unit port cover e Tighten the screw for the wireless LAN unit port cover You can make wireless LAN connection settings in the Wireless LAN menu from the Configuration menu s Network Network Configuration Wireless LAN p 131 Connecting Equipment 48 ...

Страница 49: ...Basic Usage This chapter explains how to project and adjust images ...

Страница 50: ... warms up Once the projector is warmed up the status indicator stops flashing and turns blue If the image is not projected try the following Turn on the connected computer or video equipment When using a laptop computer change the screen output of the computer Insert media such as a DVD and play it back Press the Search button on the remote control to detect the input source Press the button for t...

Страница 51: ...wer cord is plugged in note that the projector turns on automatically in cases such as recovery from a power outage s Extended Operation Direct Power On p 125 If an image signal from the source selected in Auto Power On is input the projector automatically turns on s Extended Operation Auto Power On p 125 Turning On the Projector 51 ...

Страница 52: ...used continuously for more than 24 hours or when direct shutdown is used regularly set Light Source Calibration using the scheduling function to adjust the light source periodically s Scheduling Function p 105 a Press the t button on the control panel or the remote control The shutdown confirmation screen is displayed b Press the t button again To cancel press any other button After the buzzer bee...

Страница 53: ...re connected repeatedly press the Search button until the target image is projected When your video equipment is connected start playback before beginning this operation a You can make settings so that images are projected from the same input port the next time the projector is turned on s Extended Operation Startup Source Search p 125 The following screen is displayed while no image signals are i...

Страница 54: ...get image from the remote control or by pressing the following buttons on the control panel The following shows the input ports for each button Remote control Control panel Input Port D Changes to images from a computer connected via the network Projecting Images 54 ...

Страница 55: ...ion that occurs when projecting on a curved surface and adjust the amount of expansion and contraction s Curved Surface p 58 Corner Wall This allows you to correct distortion that occurs when projecting on a surface with right angles such as a square pillar or the corner of a room and adjust the amount of expansion and contraction s Corner Wall p 62 Point Correction Corrects slight distortion whic...

Страница 56: ...ings using Memory in Geometry Correction and load them when needed s Memory Function p 103 H V Keystone This allows you to correct distortion in the horizontal and vertical directions independently Use the following to check the adjustment range for the image s H V Keystone p 212 a Press the Menu button while projecting b Select Geometry Correction from Settings c Select H V Keystone and then pres...

Страница 57: ...s the Menu button a You cannot combine with other correction methods Quick Corner This allows you to correct each of the four corners of the projected image independently a Press the Menu button while projecting b Select Geometry Correction from Settings c Select Quick Corner and then press the button If this setting is changed the image may be distorted is displayed press the button again d Use t...

Страница 58: ...s needed to adjust any remaining corners g To complete the corrections press the Menu button Curved Surface This allows you to correct distortion that occurs when projecting on a curved surface and adjust the amount of expansion and contraction Face the projector directly opposing the screen with the lens position moved to the home position s Adjusting the Position of the Projected Image Lens Shif...

Страница 59: ...projecting b Select Geometry Correction from Settings c Select Curved Surface and then press the button If this setting is changed the image may be distorted is displayed press the button d Select Curved Surface and then press the button e Select Correct Shape and then press the button Adjusting Projected Images 59 ...

Страница 60: ...s to reset the result of Curved Surface g Use the and buttons to adjust the shape If the triangle in the direction you are adjusting the shape turns gray as shown in the screenshot below you cannot adjust the shape any further in that direction h Press the Esc button to return to the previous screen i Repeat steps from 6 to 8 as needed to adjust any remaining parts If the image expands or contract...

Страница 61: ...ress The selected standard line is displayed in flashing orange and white l Adjust the linearity Correct it so that the distance between lines is equal When pressing the button When Horizontal Linearity is selected When Vertical Linearity is selected When pressing the button When Horizontal Linearity is selected When Vertical Linearity is selected m To complete the corrections press the Menu butto...

Страница 62: ...stment is performed the focus may not be uniform even after making adjustments If 4K Enhancement is enabled a message is displayed Select Yes to disable 4K Enhancement s Image Image Enhancement 4K Enhancement p 119 Use the following to check the adjustment range for the image s Corner Wall p 214 a Press the Menu button while projecting b Select Geometry Correction from Settings c Select Corner Wal...

Страница 63: ...g Horizontal Corner as an example g Press the Esc button to display the screen from step 5 Select Correct Shape and then press the button h Adjust the position of the projector and the lens shift so that the line in the center of the screen matches the corner the point where the two surfaces meet s Adjusting the Position of the Projected Image Lens Shift p 31 a Each time you press the button you c...

Страница 64: ... a If the Esc button is pressed for approximately two seconds the confirm default reset screen is displayed Select Yes to reset the result of Corner Wall j Press the buttons to adjust the shape If the message Cannot adjust any further is displayed while adjusting you cannot adjust the shape any further in the direction indicated by the gray triangle k Repeat steps 9 and 10 as needed to adjust any ...

Страница 65: ...tep 4 s Quick Corner p 57 s Point Correction p 65 Point Correction Divides the projected image by the grid and corrects the distortion by moving the point of intersection from side to side and up and down a You can make corrections by 0 5 pixels in each direction up to a maximum of 32 pixels If 4K Enhancement is enabled a message is displayed Select Yes to disable 4K Enhancement s Image Image Enha...

Страница 66: ...values f Select the point number 3x3 5x5 9x9 or 17x17 and then press the button g Use the and buttons to move to the point you want to correct and then press the button h Use the and buttons to correct distortion To continue to correct another point press the Esc button to return to the previous screen then repeat the steps 7 and 8 a Each time you press the button you can show or hide the image an...

Страница 67: ...d images Cinema Ideal for enjoying movies sRGB Ideal for projecting a faithful reproduction of the original DICOM SIM Ideal for projecting X ray photographs and other medical images However the projector is not a medical device and cannot be used for medical diagnosis Multi Projection Ideal for projecting from multiple projectors Each time you press the Color Mode button on the remote control the ...

Страница 68: ...ess is available e When Light Source Mode is set to Customized select Brightness Level and then use the buttons to set the brightness f To maintain a fixed brightness select Constant Brightness and set it to On a When Constant Brightness is set to On you cannot change the settings for Light Source Mode and Brightness Level When you want to change these settings set Constant Brightness to Off When ...

Страница 69: ...tness Level and usage time The following shows the relationship between Brightness Level and usage time Make settings according to your desired usage time and the brightness of the projected image When Constant Brightness is set to Off Brightness Level Standard usage time Approximate time until light source brightness is reduced by half A B Illustration 100 20 000 hours 90 36 000 hours 80 41 000 h...

Страница 70: ...r beyond the standard constant time when Constant Brightness is set to On you cannot set a higher Brightness Level even if you set Constant Brightness to Off Setting the Amount of Light for the Projected Image By automatically setting the luminance according to the brightness of the displayed image it lets you enjoy deep and rich images a Dynamic Contrast can only be set when the Color Mode is set...

Страница 71: ... of theprojectedscreenwhileretainingtheaspectratio Areas that exceed the edges of the projected screen are not projected V Zoom Projects by enlarging the input image to the full height of theprojectedscreenwhileretainingtheaspectratio Areas that exceed the edges of the projected screen are not projected Native Projects to the center of the projected screen at the resolution of the input image Area...

Страница 72: ... signal Screen type setting 16 9 Aspect Ratio of Input Signal 16 10 16 9 4 3 Auto or Normal Aspect Ratio of Input Signal 16 10 16 9 4 3 Full H Zoom V Zoom Native The image may differ depending on the resolution of the input signal Screen type setting 4 3 Aspect Ratio of Input Signal 16 10 16 9 4 3 Auto or Normal 4 3 16 9 Adjusting Projected Images 72 ...

Страница 73: ... Hue tint Saturation vividness and Brightness of the six axes R red G green B blue C cyan M magenta and Y yellow according to your preferences a Press the Menu button while projecting b Select Advanced from Image and then press the button c Select RGBCMY and then press the button d Use the buttons to select the color you want to adjust and then press the button e Use the buttons to select the item...

Страница 74: ...ting a still picture Gamma cannot be adjusted correctly by using movies Select and adjust the correction value a Press the Menu button while projecting b Select Advanced from Image and then press the button c Select Gamma and then press the button d Use the buttons to select the correction value and then use the button to confirm the selection When a larger value is selected the dark areas of imag...

Страница 75: ...here you want to adjust the brightness and adjust only the selected tone a Press the Menu button while projecting b Select Advanced from Image and then press the button c Select Gamma and then press the button d Select Customized and confirm using the button e Select Adjust it from the image and confirm using the button f Move the cursor on the projected image to the part where you want to change ...

Страница 76: ...ns to select the tone that you want to change and then use the buttons to make the adjustments When you have finished making changes confirm by using the button If you use the buttons to select the tone that you want to change the image flashes and you can check the tone area of the adjustment target g When Do you want to continue adjusting the setting is displayed select Yes or No To adjust anoth...

Страница 77: ...l or High Set to Off if noise occurs after setting them d Press the Menu button to finish making settings Adjusting Image Resolution Image Enhancement You can adjust the resolution of the image using Image Enhancement to reproduce a clear image with an emphatic texture and material feel a Press the Menu button while projecting Adjusting Projected Images 77 ...

Страница 78: ...his projector Full HD If a signal with a resolution of 1080i 1080p WUXGA or higher is input 4K Enhancement is enabled WUXGA If a signal with a resolution that exceeds WUXGA is input 4K Enhancement is enabled To project a high resolution movie you can project a high definition image by using this setting with Image Preset Mode a To project from multiple projectors select Off to unify each image Off...

Страница 79: ...hancement is enabled and disabled c Press the Esc button to return to the previous screen Noise Reduction You can smooth out rough images for softer image quality when inputting progressive signals or progressive interlace signals a You cannot set Noise Reduction in the following situations When Image Processing is set to Fast 2 When 4K Enhancement is enabled When a signal with a resolution that e...

Страница 80: ...n press the button b Use the buttons to select the item and then use the buttons to make the adjustments Fine Line Adjust If this parameter is set to a positive value details such as hair or fabric patterns will be enhanced Soft Focus Detail If this parameter is set to a positive value the outline background and the other main parts of the objects in the image will be enhanced to show them clearly...

Страница 81: ...he more the contrast is enhanced Range The larger the value the wider the range of detail enhancement becomes a Depending on the image a highlight may be noticeable at the border between colors If this bothers you set a smaller value c Press the Esc button to return to the previous screen Adjusting Projected Images 81 ...

Страница 82: ...Useful Functions This section describes the Multi Projection Split Screen Memory Schedule and Security functions ...

Страница 83: ...e arrangement for all projectors Tiling and adjustments for the images Screen Matching are performed automatically using the projector set as the master projector Advance preparation 1 Connect to the network Connect all projectors to a network hub using LAN cables SettheDHCPtoOnforallprojectors orcheckthatIPaddresseshavebeen assigned s Network Network Configuration Wired LAN IP Settings p 134 2 Se...

Страница 84: ...Size p 33 2 Adjust the orientation and position of the image s Installation Settings p 27 s Adjusting the Position of the Projected Image Lens Shift p 31 3 Fine tune the focus and distortion of the image s Correcting the Focus p 34 s Point Correction p 65 Combining multiple projected images 1 Set the arrangement of the images s Performing tiling manually p 86 2 Adjust the edges of the images s Edg...

Страница 85: ...button d Select the projectors that will be used for tiling and then press the button 1 Select the projectors you want to use to enter a checkmark Select Refresh to update the list Select Sort to sort the projector order 2 Select Set and then press the button e Select Tiling and then press the button f Select Tiling Select Auto and then press the Esc button g Select Location Setup and then press t...

Страница 86: ...ally After tiling is complete you can set each projector with one remote control Select the projector ID for the projector you want to set with the remote control You can check the projector ID in Tiling Location Info s Setting the remote control ID p 38 Performing tiling manually Manually arrange the images being projected for each projector a Press the Menu button while projecting b Select Multi...

Страница 87: ...e following screen is displayed Submenu Function Edge Blending Set to On to activate Edge Blending Set to Off when not projecting from multiple projectors Top Edge Bottom Edge Left Edge Right Edge Blending Set to On to activate Edge Blending towards your settings and the blend range will be shaded Blend Start Position Displays blending start position as a red line and adjusts at the level of one p...

Страница 88: ... 1 1 Select Left Edge and then press the button 2 Select Blending and then press the button 3 Select On and then press the button 4 Press the Esc button 5 In BlendStartPosition align the blending start position with the edge 2 of the image 6 Press the Esc button 7 In Blend Range adjust the range 3 to be shaded The value for when the overlapped range and the guide are in the same position is the be...

Страница 89: ...ge Right Edge Left Edge setting the Black Level is returned to its default value s Edge Blending p 87 When auto adjustment starts for Screen Matching the settings for Color Adjustment are automatically adjusted s Automatically correct the brightness and tint for multiple projectors p 93 a Select Black Level from Multi Projection and then press the button b Select Color Adjustment and then press th...

Страница 90: ...djust so that 3 aligns with 2 d Adjust the black tone and brightness e Repeat steps 3 and 4 as needed to adjust any remaining parts f To complete the adjustment press the Menu button Area Correction If there are areas where the color does not match after adjusting the Black Level adjust individually in Area Correction a Select Black Level from Area Correction and then press the button b Select Sta...

Страница 91: ...ge d Press the button to confirm the selection The points where you want to set the range for adjustment are displayed You can change the number of points displayed on one side in Points on the screen from step 8 e Use the buttons to adjust the boundary line positions and then press the button f Press the buttons to select the point you want to move and then press the button The selected point is ...

Страница 92: ...s and then making adjustments Perform the following on the master projector before starting adjustments Set the Color Mode to Multi Projection with the remote control s Color Mode button Press the Shutter button on the remote control to release the shutter function Adjust the following items on the Image menu as necessary Brightness Contrast Color Saturation Tint White Balance Advanced s Image Men...

Страница 93: ...ment is performed using the camera built into the front of the projector Do not block the camera or the projected images The time necessary for auto adjustment varies according to the location and number of projectors and can take up to approximately 17 minutes Settings are auto adjusted for Brightness Settings and Black Level Color Adjustment only After making automatic adjustments Color Uniformi...

Страница 94: ...n is displayed Half of the overlapped area is displayed in black so that it is easy to check the edge of the image Adjustment Level There are eight levels from white through gray and up to black You can adjust each level individually Red Green Blue Adjusts the tone for each color Brightness Adjusts the image brightness a Whenever the button is pressed the screen changes between the projected image...

Страница 95: ...cale in Signal c Select Scale and then press the button d Turn on Scale 1 Select Scale and then press the button 2 Select Auto or Manual and then press the button Auto Automatically adjusts the clipped area according to the adjustment values in Edge Blending and Tiling You do not need to perform any steps after step 6 Manual Allows you to adjust the clipped area manually 3 Press the Esc button to ...

Страница 96: ...image horizontally and vertically at the same time Scale Vertically Enlarges or reduces an image vertically Scale Horizontally Enlarges or reduces an image horizontally g The image is clipped and adjusted 1 Select Clip Adjustment and then press the button If you select Clip Range the range and coordinates of the image that the projector will project is displayed 2 Use the and buttons to scroll the...

Страница 97: ... are listed below Left Screen Right Screen HDMI HDBa seT DVI D SDI Com puter BNC LAN HDMI HDBaseT DVI D SDI Computer BNC LAN a Signals that exceed WUXGA are not supported If 4K Enhancement is enabled a message is displayed Select Yes to disable 4K Enhancement s Image Image Enhancement 4K Enhancement p 119 Operating procedures Projecting on a split screen a Press the Menu button while projecting b ...

Страница 98: ...wing procedure s Automatically Detecting Input Signals and Changing the Projected Image Source Search p 53 s Switching to the Target Image p 54 f Select Execute and then press the button To switch the source during split screen projection start the procedure from step 2 Switching the left and right screens Use the following procedure to switch the projected images displayed on the left and right s...

Страница 99: ...pear as shown below after setting the screen size Equal Larger Left Larger Right a You cannot enlarge both the left screen and right screen images at the same time When one image is enlarged the other image is reduced Depending on the video signals that are input the images on the left and right may not appear to be the same size even if Equal is set Ending the split screen Perform one of the foll...

Страница 100: ...he image on the right screen the default values for the Image menu are applied However the settings for the image projected on the left screen are applied to the image on the right screen for Color Mode Color Temp and Super resolution Dynamic Contrast and Frame Interpolation are not available Hiding the Image Temporarily Shutter You can switch off the image on the screen when you want to focus the...

Страница 101: ...t possible to resume projection from the point where the Shutter function was activated Freezing the Image Freeze When Freeze is activated on moving images the frozen image continues to project on the screen so you can project a moving image one frame at a time like a still photo Also you can perform operations such as changing between files during presentations from a computer without projecting ...

Страница 102: ... button the screen size may change depending on the signal to match the actual resolution of the image signal d Move the box to select the part of the image to use as the User s Logo You can perform the same operations from the projector s control panel a You can save at 400x300 dots in size e When you press the button and the message Select this image is displayed select Yes f Select the zoom fac...

Страница 103: ...following menu items are saved in the memory You can register up to 10 values Top Menu Submenu Image All setting items Signal Scale Set Brightness Settings Extended Edge Blending Black Level Color Matching Lens Position Registers the position of the lens adjusted using lens shift zoom focus and distortion You can register up to 10 values s Registering and Loading Lens Adjustment Values p 35 Geomet...

Страница 104: ...y name you want to change and then press the button Enter the memory name using the soft keyboard s Soft keyboard operations p 130 When you have finished move the cursor over Finish and then press the button Function Explanation Reset Memory Resets the name and settings of a saved memory To reset all memories saved in Memory Lens Position andGeometryCorrection useResetAll Memories s Reset Reset Al...

Страница 105: ... d Set the schedule Submenu Name Function Event Settings Select an operation of the projector when the event isexecuted SelectNoChangeforitemsthatyoudo not want to change when the event occurs You can set the following item operations Schedule Power Source Light Source Mode Shutter Light Source Calibration Extended Schedule Color Calibration Screen Matching Date Time Settings Set the date day of t...

Страница 106: ...Schedule event You cannot set other events before the following times Five minutes before or after executing a Color Calibration event Five minutes before and 30 minutes after executing a Screen Matching event Checking an Event This section explains how to check a Schedule event a Press the Menu button while projecting b Select Schedule Settings from Extended The indicator turns on when an event i...

Страница 107: ...ing an Event a Press the Menu button while projecting s Using the Configuration Menu p 116 b Select Schedule Settings from Extended c Use the buttons to highlight the date containing the event you want to edit d Highlight the event you want to edit and then press the Esc button e Edit the event Submenu Name Function On Disabled Enable or disable the selected event Scheduling Function 107 ...

Страница 108: ...tes the selected event Add New Saves a new event Select Save and then press the button to complete the registration f Select Setup complete and then select Yes to finish editing a To delete all registered events select Schedule Reset and then select Yes Select Setup complete and then select Yes to delete the events Scheduling Function 108 ...

Страница 109: ...ing to how the projector is being used Power On Protection When Power On Protection is On you need to enter a preset password after the projector is plugged in and turned on this also applies to Direct Power On If the correct password is not entered projection does not start User s Logo Protection Even if someone tries to change the User s Logo set by the owner of the projector it cannot be change...

Страница 110: ...0 Change this to your own desired password If you select No the screen displayed in step 2 is displayed again 3 While holding down the Num button enter a four digit number using the numeric buttons The number entered is displayed as When you enter the fourth digit the confirmation screen is displayed 4 Re enter the password Password accepted is displayed If you enter the password incorrectly a mes...

Страница 111: ...at events or shows when you want to deactivate all buttons during projection or at schools when you want to limit button operation Lens Lock This function deactivates all buttons on the remote control related to the lens operation to prevent improper lens adjustment after it is properly adjusted Remote control button lock This function deactivates buttons except for main buttons needed for basic r...

Страница 112: ...hold down the button on the control panel for about seven seconds a message is displayed and the lock is released Lens Lock This function locks the following buttons on the remote control related to the lens operation Set the Lens Lock to On in the Configuration menu s Settings Lock Setting Lens Lock p 123 Remote control button lock This function locks the following buttons on the remote control S...

Страница 113: ... theft security devices Security slot The security slot is compatible with the Microsaver Security System manufactured by Kensington See the following for more details on the Microsaver Security System s http www kensington com Handles A commercially available theft prevention wire lock can be passed through the installation point to secure the projector to a desk or pillar Installing the wire loc...

Страница 114: ...Security Functions 114 ...

Страница 115: ...Configuration Menu This chapter explains how to use the Configuration menu and its functions ...

Страница 116: ...enu for the available buttons and their operations a Display the Configuration menu screen b Select a top menu item c Select a submenu item d Change settings a When Default Reset is displayed on the guide under the menu pressing the Default button on the remote control returns the settings being adjusted to their default values e Press the Menu button to finish making settings Using the Configurat...

Страница 117: ... Setup On Off Top Menu Name Submenu Name Items or Setting Values Overscan Auto Off 4 and 8 Blanking Top Bottom Left and Right Advanced Video Range Input Signal Image Processing Scale Scale Scale Mode Scale Vertically Scale Horizontally Clip Adjustment Clip Range Settings menu s p 123 Geometry Correction Off H V Keystone Quick Corner Curved Surface Corner Wall Point Correction Memory Split Screen L...

Страница 118: ...t Signal Resolution Refresh Rate Sync Info Status Serial Number Lens Type Event ID HDBaseT Signal Level Light Source Info Light Source Hours Estimated Remains Version Main Video2 Status Monitor Top Menu Name Submenu Name Items or Setting Values Status Information Status Information Source Signal Information Network Wired Network Wireless Maintenance Version Reset Menu s p 137 Reset All Memories Re...

Страница 119: ... LAN AMX Device Discovery On Off Crestron RoomView On Off Control4 SDDP On Off Art Net Art Net Net Sub Net Universe Start Channel Message Broadcasting On Off Image Menu Settable items vary depending on the image signal and source currently being projected Setting details are saved for each color mode s Automatically Detecting Input Signals and Changing the Projected Image Source Search p 53 Submen...

Страница 120: ... Resolution Image Enhancement p 77 4K Enhancement You can project at a doubled resolution Image Preset Mode You can select the optimal setting according to the projected image from five presets prepared in advance Noise Reduction 1 2 6 You can smooth out the roughness in progressive images MPEG Noise Reduction 1 2 You can reduce dot and block noise that occurs in outlines when projecting MPEG movi...

Страница 121: ... details are saved for each image signal Submenu Function Resolution Only available when an analog RGB computer signal is being input Set to Auto to automatically identify the resolution of the input signal If images are not projected correctly when set to Auto for example if some of the image is missing set to Wide for wide screens or set to Normal for 4 3 or 5 4 screens depending on the connecte...

Страница 122: ...ernedaboutmisadjustedblacklevelsor blown out highlights in the image Input Signal Select an input signal from the Computer port or BNC port If set to Auto the input signal is set automatically according to the connected equipment If colors do not appear correctly when set to Auto select the appropriate signal according to the connected equipment Image Processing Changes settings for image processi...

Страница 123: ...rojecting on a surface with right angles Point Correction Divides the projected image into a grid and corrects the distortion by moving the selected point of intersection from side to side and up and down Memory You can save the adjustment value of the geometry correction and load it when needed s Memory Function p 103 Split Screen You can split the screen into two screens s Projecting Two Images ...

Страница 124: ...is indicates the amount of time for which constant brightness can be maintained s Guide to Estimated Remains p 69 Remote Receiver You can limit the reception of the operation signal from the remote control When set to Off you cannot perform any operations from the remote control If you want to make operations from the remote control hold down the Menu button on the remote control for at least 15 s...

Страница 125: ...f it is set to Off you can turn off the power simply by pressing the t button once Air Filter Notice You can set whether or not On Off to enable Air Filter Notice When this is set to On and a clog in the air filter is detected the message is displayed on the screen Screen This is unavailable when projecting images from a computer over a network Set the aspect ratio and position of the projected sc...

Страница 126: ...h Altitude Mode Set to On when using the projector above an altitude of 1 500 m Startup Source Search Set to On to automatically detect an image signal from another source and project the image when there is no image signal from the current source Auto Power On If it is set to Computer or BNC the projector is turned on when the signals are received from the Computer port or BNC port even when the ...

Страница 127: ...rove the image AC Voltage Monitoring When this is set to On and the projector is turned off by any method other than pressing the power button including direct shutdown a power supply voltage warning message is displayed the next time the projector turns on If you are using direct shutdown set this to Off Date Time Make system time settings for the projector s Setting the Time p 38 Lens Calibratio...

Страница 128: ...bmenu Function Multi Projection Make settings when projecting from multiple projectors s Multi Projection Function p 83 Projector ID Set the ID from 1 to 30 Off indicates that no ID is set s ID Settings p 37 Projector Grouping When using multiple projectors to project one image select the projectors being used Tiling Set the number of split screens and positions of each projected image s Tiling p ...

Страница 129: ...ings related to user s logo You can make changes after setting User s Logo Protection to Off s Managing Users Password Protection p 109 Network Menu When Network Protection is set to On in Password Protection a message is displayed and the network settings cannot be changed Set Network Protection to Off and then configure the network s Setting Password Protection p 109 Submenu Function Wireless Mo...

Страница 130: ...menu Cancel Continues displaying the Network menu Soft keyboard operations The Network menu contains items that require input of alphanumerics during setup In this case the following software keyboard is displayed Use buttons to move the cursor to the desired key and then press the button to enter the selected character Enter figures by holding down the Num button on the remote control and pressin...

Страница 131: ...rd for authentication to use when making settings and controlling the projector using Web Control in Epson Web Control You can enter up to eight single byte alphanumeric characters and spaces cannot be used The default user name is EPSONWEB and the default password is admin s Changing Settings Using a Web Browser Epson Web Control p 188 Projector Key word When set to On you have to enter the keywo...

Страница 132: ...ovided for the wireless LAN system in which the projector participates enter the SSID You can enter up to 32 single byte alphanumeric characters Submenu Function Security Select the security type according to the wireless LAN settings When setting security follow the instructions of your network administrator Passphrase EnterapassphraseusedtoconnecttothenetworkwhenSecurity is set to WPA2 PSK or WP...

Страница 133: ...s play To prevent the IP address from being displayed on the LAN Standby screen set this to Off Type of security When the optional wireless LAN unit is attached and being used in Advanced connection mode it is strongly recommended that you set security WPA is an encryption standard that improves the security for wireless networks The projector supports TKIP and AES encryption methods WPA also incl...

Страница 134: ... for the projector You can enter a number from 0 to 255 in each field of the address However the following Gateway Addressg cannot be used 0 0 0 0 127 x x x 224 0 0 0 to 255 255 255 255 where x is a number from 0 to 255 Submenu Function IP Address Dis play To prevent the IP address from being displayed on the LAN Standby screen set this to Off Notifications menu When this is set you receive an ema...

Страница 135: ...esses cannot be used 127 x x x 224 0 0 0to255 255 255 255 wherexisanumberfrom 0 to 255 Community Name SetthecommunitynameofSNMP Youcanenterupto32single bytealphanumeric characters Spacesandsymbolsotherthan cannot be used Others menu Submenu Function Priority Gateway For the priority gateway select either Wired or Wireless AMX Device Dis covery When you want to allow the projector to be detected by...

Страница 136: ...settings To reset all of the Network settings select Yes Info Menu Display Only Lets you check the status of the image signals being projected and the status of the projector Items that can be displayed vary depending on the source currently being projected Submenu Function Projector Info Total Op Time Displays the projector s cumulative operating time Operation Hours Displays the operation time a...

Страница 137: ...mains When Constant Brightness is set to On this displays the amount of time for which the brightness of the light source can be maintained Version Main Video2 Status Monitor Displays the projector s firmware version information Status Information Displays the projector s status s Reading Status Monitor p 154 Submenu Function Voltage Warning Info Displays a warning regarding the power voltage The ...

Страница 138: ... the adjustments you made may change By using the batch setup function the registered User s Logo is set for the other projectors Do not register confidential information and so on as the User s Logo Caution Performing batch setup is the customers responsibility If batch setup fails due to a power failure communication error and so on the customer is responsible for any repair costs incurred Setup...

Страница 139: ...hange the file name in any other way the projector may not be able to recognize the file correctly You can only use single byte characters for the file name c While holding down the Esc button turn on the main power switch When the projector s indicators turn on as follows release the Esc button Power supply Status Laser Temp Blue On Blue On Orange On Orange On When all of the indicators start fla...

Страница 140: ...the projector s wireless LAN unit port a When the USB flash drive contains 1 to 3 types of batch setup files the file is reflected to the projector with the same model number If there are multiple files for a projector with the same model number the settings may not be reflected correctly When there are four or more types of batch setup files on the USB flash drive the settings may not be reflecte...

Страница 141: ...Do not disconnect the power cord from the projector or turn off the main power switch while the settings are being written If power is not being supplied the projector may not startup correctly Do not disconnect the USB flash drive from the projector while the settings are being written If the USB flash drive is disconnected the projector may not start correctly d When writing completes normally t...

Страница 142: ... OS X 10 5 3 or later Saving settings to a computer a Turn off the main power switch while the power cord is connected to the projector and check that all of the projector s indicators turn off b Connect the computer s USB port to the projector s Service port with a USB cable c While holding down the Esc button turn on the main power switch Batch Setup 142 ...

Страница 143: ...text after PJCONFDATA If you change the file name the projector may not be able to recognize the file correctly e Perform Remove USB device on your computer and then disconnect the USB cable a When using OS X perform Remove EPSON_PJ The projector enters standby status Reflecting saved settings to other projectors a Turn off the main power switch while the power cord is connected to the projector a...

Страница 144: ...emovable disk a Do not copy any files or folders other than the batch setup file to the removable disk e Perform Remove USB device on your computer and then disconnect the USB cable a When using OS X perform Remove EPSON_PJ When all of the indicators start flashing the settings are being written Caution Do not disconnect the power cord from the projector or turn off the main power switch while the...

Страница 145: ...flash drive unplug and then plug in the projector s power cord and then try again Power Blue flashing fast Status Blue flashing fast Laser Orange flashing fast Temp Orange flashing fast Writing the settings may have failed and an error may have occurred in the projector s firmware Stop using the projector remove the power plug from the electrical outlet and contact your local dealerorthe nearestad...

Страница 146: ...Troubleshooting This chapter explains how to identify problems and what to do if a problem is found ...

Страница 147: ...Help to a User Button s Settings User Button p 123 a Press the User button to which Help was assigned The Help screen is displayed b Select a menu item c Confirm the selection Questions and solutions are displayed as shown on the screen below Press the Menu button to exit Help a See the following if the Help function does not provide a solution to the problem s Reading the Indicators p 148 Using t...

Страница 148: ...ff Off Standby condition Powerisbeingsuppliedtotheprojector Inthisstatus youcanstartprojectingbypressingthe button on the remote control or control panel Sometimes when the power cord is unplugged the power indicator remains lit for a short period but this is not a fault Network monitor ing status The projector is being monitored and controlled over a network when Standby Mode is set to Communicat...

Страница 149: ...This is the status immediately after turning off the power In this status all buttons are disabled Blue Flashing Off Off Off Off Preparing Network monitoring Preparing to monitor and control this projector over a network During network monitoring preparation all button operations are disabled Blue On Blue On Blue Flashing Off Off Shutter is active The Shutter function is activated Reading the Indi...

Страница 150: ...d in the Epson Projector Contact List s Epson Projector Contact List Fan Error Sensor Error Off Blue Flashing Off Orange On Off High Temp Error Overheating Thelightsourceturnsoffautomaticallyandprojectionstops Waitforaboutfive minutes After about five minutes the projector switches to standby mode so check the following two points Checkthat theairfilter andairexhaustventsareclear andthattheproject...

Страница 151: ...ecking the points above stop using the projector removethepowerplugfromtheelectricaloutlet andcontactyourlocaldealeror the nearest address provided in the Epson Projector Contact List s Epson Projector Contact List Airflow Error Off Blue Flashing Orange On Orange On Off Lens Shift Error Stop using the projector remove the power plug from the electrical outlet and contact your local dealer or the n...

Страница 152: ...tatus varies Status varies Orange On Low Air Flow This is not an error However projection stops automatically if the airflow falls any further The air filter is clogged Clean or replace the air filter is displayed Check the following points Checkthat theairfilter andairexhaustventsareclear andthattheprojectoris not positioned against a wall If the air filter is clogged turn off the power remove th...

Страница 153: ...cators or messages regarding air filter notice are displayed only when Air Filter Notice is set to On in the Configuration menu s Extended Display Air Filter Notice p 125 Cleaning Filter a See the following if the projector is not operating properly even though the indicators are all showing normal s Problem Solving p 163 If the indicators are in a state not shown in this table stop using the proj...

Страница 154: ...the button on the control panel There are eight display categories for the status monitor and each time you press the buttons the category switches in the following order You can check the items and information of each category by using the buttons a The status monitor turns on in the following situations When one button is pressed on the control panel When an error or a warning occurs When adjust...

Страница 155: ...r and light source Version Projector s firmware version A Displays the item name s Explanations of the Display Content p 157 B Information about the items Display when error or warning occurs When a problem has occurred in the projector the following is displayed When an error occurs When a warning occurs Temp Warning If the problem is cleared or one of the buttons is pressed the display returns t...

Страница 156: ...ess the button to display the following screen c Press the buttons to adjust the contrast d Press the button to display the following screen e Press the buttons to set the lighting time for the back light The default is set to 30sec 30 seconds You can set from Off light is off 10 60sec 30min 30 minutes and Always Always On Reading Status Monitor 156 ...

Страница 157: ... in cool down status Temp Error A high temp error has occurred Fan Error A fan error has occurred Sensor Error A sensor error has occurred Internal Error An internal error has occurred Airflow Error A filter airflow error has occurred Temp Warning A high temp warning has occurred Internal Warning A warning about the internal system has occurred Airflow Decline A low air flow error has occurred Cle...

Страница 158: ...lays the usage environment temperature as a value Temp Level Displays the usage environment temperature in five levels AC Voltage Displays warnings and errors that have occurred when AC Voltage Monitoring is set to On Laser Status On Displays the operating status of the light source Off Source Source HDMI Displays the source name for the connected equipment currently being projected HDBaseT DVI D ...

Страница 159: ...urrent input signal Sync Polarity H Posi V Posi Displays the Sync polarity H Posi V Nega H Nega V Posi H Nega V Nega Sync Mode Composite Sync Displays the sync type Separate Sync Sync On Green Detected Mode Displays the discriminant resolution of the current input signal Video Level Auto Normal Displays the video level of the projector Auto Expanded Normal Expanded a Items displayed for source var...

Страница 160: ...nce the input source is determined HDCP Status Non HDCP Displays the HDCP status Passed Failed HDCP Ver Displays the HDCP version AVI Info VIC Displays the VIC information AVI of the current input signal AVI InfoChecksum OK Displays the checksum result for AVI NG Signal Mode HDMI Displays the signal mode DVI Pixel Encoding RGB Displays the color space information AVI of the current input signal YU...

Страница 161: ...e Displays the projector name used to identify the projector when connected to a network Connection Mode Quick Displays the connection mode to use when connecting the projector and a computer over a wireless LAN Advanced SSID Display On Displays the SSID display settings Off IP Display On Displays the IP address display settings Off SSID Displays the SSID IP Address Displays the IP address DHCP On...

Страница 162: ...tion time of the projector Laser Op Time Displays the laser operating time for each setting in Light Source Mode Version Serial No Displays the projector s serial number Main Displays the projector s firmware version information Video2 Sub Sub2 HDBaseT Status Monitor Reading Status Monitor 162 ...

Страница 163: ... or small the aspect ratio is not suitable or the image has been reversed Only part of the image is displayed the height and width ratios of the image are not correct or the image may appear reversed from top to bottom or left to right sp 167 Image colors are not right The whole image appears purplish or greenish images are black white or colors appear dull sp 167 Images appear dark sp 168 Automat...

Страница 164: ...played in full screen Only during network connection When Windows Media Center is displayed at full screen you cannot project using a network connection Reduce the screen size Is an application using the Windows DirectX function displayed Only during network connection Applications using the Windows DirectX function may not display images correctly Moving images are not displayed Check Remedy Is t...

Страница 165: ...pressing the Search button s Automatically Detecting Input Signals and Changing the Projected Image Source Search p 53 Is the power for the computer or video source turned on Turn the power on for the equipment Are the image signals being output to the projector Only when projecting images from a laptop computer or a computer with a built in LCD screen If the image signals are only being output to...

Страница 166: ...red for projection are securely connected s Connecting Equipment p 42 Is an extension cable being used If an extension cable is used electrical interference may affect the signals Use the cables supplied with the projector to check if the cables you are using may be causing the problem Is the correct resolution selected Only when projecting computer images Set the computer so that the signals bein...

Страница 167: ...e Auto button on the remote control or the button on the control panel to adjust the position You can also adjust the position from the Configuration menu s Signal Position p 121 Is the computer set for dual display Only when projecting computer images IfdualdisplayisactivatedintheDisplayPropertiesofthecomputer sControlPanel onlyabouthalfoftheimageonthe computer screen is projected To display the ...

Страница 168: ...correctly Adjust the Color Saturation and Tint settings from the Configuration menu s Image Color Saturation Tint p 119 Is the brightness of the room appropriate Iftheroomisdarkerthanwhentheautoadjustmentwasperformed thetintoftheprojectedimagesmaynotbedisplayed correctly Make the room darker and then perform auto adjustment again s Screen Matching p 92 s Color Calibration p 182 Images appear dark ...

Страница 169: ... brightness of the surroundings appropriate If a powerful spotlight or natural light shines into the area during auto adjustment the brightness of the surroundings changes and auto adjustment does not operate correctly Make sure the brightness of the surroundings does not change Is the blending width 15 to 45 If the blending width in Edge Blending is 15 or less or 45 or more the Screen Matching fu...

Страница 170: ...tion to the left is performed when Direct Power On is set to On the power may not turn back on Press the button to turn on the power Is the ID switch on the remote control set to On When the switch is set to On you can use the remote control to operate only a projector with a matching ID Set the ID switch to Off s Setting the remote control ID p 38 Other Problems The remote control does not work C...

Страница 171: ...lock is set buttons except for those needed for basic remote control operations are deactivated Hold down the button to cancel the remote control button lock s Remote control button lock p 112 Cannot control correctly using Art Net Check Remedy While controlling the projector using Art Net did you operate the projector using the remote control or control panel While controlling the projector using...

Страница 172: ...Is Standby Mode set to Communication On To use the Mail Notification function when the projector is in standby set Communication On in Standby Mode from the Configuration menu s Extended Standby Mode p 125 Is power being supplied to the projector Check that your electrical outlet or power source is functioning correctly Is the Mail Notification function set correctly in the Configuration menu An e...

Страница 173: ...tem error occurred in the projector Restart the projector 0891 Cannot find an access point with the same SSID Set the computer the access point and the projector to the same SSID 0892 The WPA WPA2 authentication type does not match Check that the wireless LAN security settings are correct s Network Wireless LAN p 131 0893 The TKIP AES encryption types do not match 0894 Communication was disconnect...

Страница 174: ...Maintenance This chapter provides information on maintenance procedures to ensure the best level of performance from the projector for a long time to come ...

Страница 175: ...ammable gas to remove dust and lint from the lens The projector may catch fire due to the high internal temperature Attention Do not rub the lens with harsh materials or subject the lens to shocks as it can easily become damaged Cleaning the Air Filter When the following message is displayed and the filter indicator flashes orange clean the air filter and the air intake vent Time to clean the air ...

Страница 176: ...the sides see the following illustration This explanation uses the air filter on the front as an example a After you turn off the projector s power and the confirmation buzzer beeps disconnect the power cord b Remove the air filter cover screw c Open the air filter cover Cleaning 176 ...

Страница 177: ...out e With the front the side with tabs of the air filter facing down tap the air filter four or five times to shake off the dust Turn it over and tap the other side in the same way Attention If the air filter is hit too hard it may become unusable due to deformities and cracks f Remove any dust remaining on the air filter by using a vacuum cleaner from the front side g Replace the air filter Pres...

Страница 178: ...filter s Replacing the Air Filter p 179 It is recommended that you clean the air filter every 20 000 hours Clean it more often than this if using the projector in a particularly dusty environment The indicators or messages regarding Air Filter Notice are displayed only when Air Filter Notice is set to On from the Configuration menu s Extended Display Air Filter Notice p 125 Cleaning 178 ...

Страница 179: ...he projector in smoky and dusty environments replace the air filter every 24 hours How to replace the air filter This projector has one air filter on the front and two on the sides This explanation uses the air filter on the front as an example a After you turn off the projector s power and the confirmation buzzer beeps disconnect the power cord b Remove the air filter cover screw c Open the air f...

Страница 180: ...r at the side is attached to a cord to prevent it from falling d Remove the air filter Grip the tab of the air filter and pull it straight out e Install the new air filter Press until it clicks into place f Close the air filter cover g Tighten the air filter cover screw Replacing Consumables 180 ...

Страница 181: ...a Dispose of used air filters properly in accordance with your local regulations Material of the frame part Polypropylene Material of the filter part Paper Replacing Consumables 181 ...

Страница 182: ...t is performed using the camera built into the front of the projector Do not block the camera or the projected images Auto adjustment takes approximately one minute and 30 seconds After making automatic adjustments Color Uniformity and Color Matching are returned to their defaults By using the scheduling function you can automatically adjust the color for the whole screen at the time you set s Sch...

Страница 183: ...Extended c Select Panel Alignment and then press the button d Enable Panel Alignment 1 Select Panel Alignment and then press the button 2 Select On and then press the button 3 Press the Esc button to return to the previous screen e Select the color you want to adjust 1 Select Select Color and then press the button 2 Select R red or B blue and then press the button 3 Press the Esc button to return ...

Страница 184: ...justment starts All four corners are adjusted in order starting at the top left a The image may become distorted while adjusting The image is restored once adjustments are complete h Use the and buttons to make adjustments and then press the button to move to the next adjustment point i When you have adjusted all four corners select Exit and then press the button If you feel you still need to make...

Страница 185: ...rmity and then press the button e Set to On and then press the Esc button f Select Adjustment Level and then press the button g Use the buttons to set the adjustment level h Press the Esc button to return to the previous screen i Select Start Adjustments and then press the button j Select the area you want to adjust and then press the button Adjust the outer areas first and then adjust the whole s...

Страница 186: ...m To complete the adjustment press the Menu button Image Maintenance 186 ...

Страница 187: ...Appendix ...

Страница 188: ...tions remotely Also you can operate a specific projector when using multiple projectors Use Internet Explorer 9 0 or later as the Web browser Use Safari for OS X a If you set Standby Mode to Communication On you can use the Web browser to make settings and perform control even if the projector is in standby mode when the power is off s Extended Standby Mode p 125 Displaying the Epson Web Control S...

Страница 189: ...ypes of user names and passwords are available Remote The user name is EPSONREMOTE and the default password is guest Web Control The user name is EPSONWEB and the default password is admin You cannot change the user name You can change the password in the Network menu from the Configuration menu s Network Basic Remote Password Web Control Password p 131 You must enter the user name for Web Control...

Страница 190: ... Returns to the previous menu level in the Configuration menu F Displays information on using the OSD Control Pad a Items in the Configuration menu that cannot be set in Epson Web Control are listed below Settings Menu User Button Extended menu Display Message Position Extended Menu User s Logo Extended menu Operation Advanced BNC Sync Termination HDMI DDC Buffer DVI D DDC Buffer Lens Type Extende...

Страница 191: ...r ELPLR05 A Move the slider to adjust the zoom B Press the buttons to adjust the zoom Lens Shift Operation Screen A Displays the position of the image as a blue square When you move the image position a red square is displayed at the destination B Displays the vertical image position You can directly specify the position by tapping it and entering a number C Moves the image position up down left o...

Страница 192: ...rases a memory E Changes a memory name Status Information Screen You can check the projector s status See the following for display details s Reading Status Monitor p 154 A Moves to the Home screen B Displays the item name C Displays the status of each item D Selects a category from the following Status Information Source Signal Information Network Wired Network Wireless Maintenance Version Voltag...

Страница 193: ...andby Mode p 125 Reading error notification mail When the Mail Notification function is set to On and a problem or warning occurs in the projector the following email will be sent Sender The email address set in From Subject EPSON Projector Line 1 The projector name where the problem has occurred Line 2 The IP address set for the projector where the problem has occurred Line 3 and on Details of th...

Страница 194: ... power ON command is transmitted to the projector the power turns on and it enters warm up mode When the projector s power has turned on a colon 3Ah is returned When a command is input the projector executes the command and returns a and then accepts the next command If the command being processed terminates abnormally an error message is output and a is returned The main contents are listed below...

Страница 195: ...ector control protocols The projector complies with the PJLink Class1 standard established by the JBMIA You need to make network settings before you can use PJLink See the following for more information on network settings s Network Menu p 129 It complies with all commands except for the following commands defined by PJLink Class1 and agreement was confirmed by the PJLink standard adaptability ver...

Страница 196: ...stem to communicate with the help desk and to send emergency messages See the following Web site for details http www crestron com getroomview This manual describes how to perform operations on your computer using a Web browser a You can only enter single byte alphanumeric characters and symbols The following functions cannot be used while using Crestron RoomView s Changing Settings Using a Web Br...

Страница 197: ...ts the difference between light and shade in the images Brightness Adjusts the image brightness Color Adjusts the color saturation for the images Sharpness Adjusts the image sharpness Zoom Click the z button to enlarge the image without changing the projection size Click the x button to reduce an image that was enlarged with the z button D The buttons perform the same operations as the buttons on ...

Страница 198: ...tab on the operation window You can use this window to change settings in the projector that is currently connected A Crestron Control Make settings for Crestron central controllers B Projector The following items can be set Item Function Projector Name Enter a name to differentiate the projector that is currently connected from other projectors on the network The name can contain up to 15 single ...

Страница 199: ...to opentheToolswindow Thenamecancontainupto26 single byte alphanumeric characters Confirm Enter the same password as you entered in New Password If the passwords are not the same an error is displayed Send Click this button to confirm the changes made to the Admin Password D User Password Select theEnabled check boxtorequire apasswordto opentheoperationwindow on the computer The following items ca...

Страница 200: ...ion Parameters Default Operation Content 1 Adjusting light Dimming 0 100 0 255 0 Sets the image brightness 2 Shutter control Shutter Closed 0 63 128 Enables disables Shutter Non operational 64 191 Shutter Open 192 255 3 Switch source Non operational 0 7 0 Changes to the specified source HDMI 8 15 Non operational 16 23 HDBaseT 24 31 DVI D 32 39 Non operational 40 47 SDI 48 55 Computer 56 63 Non ope...

Страница 201: ... 159 lens adjustment Movement Small 160 191 Movement Me dium 192 223 Movement Large 224 255 6 Vertical lens shift lens adjustment Movement Large 0 31 128 Performs vertical lens shift using the amount of movement specified Movement Me dium 32 63 Movement Small 64 95 Non operational 96 159 lens adjustment Movement Small 160 191 Movement Me dium 192 223 Movement Large 224 255 7 Electronic zoom lens a...

Страница 202: ...adjustment Movement Small 160 191 Movement Me dium 192 223 Movement Large 224 255 9 Electronic distortion lens adjustment Movement Large 0 31 128 Performs electronic distortion using the amount of movement specified Movement Me dium 32 63 Movement Small 64 95 Non operational 96 159 lens adjustment Movement Small 160 191 Movement Me dium 192 223 Movement Large 224 255 10 Load lens memory Non operat...

Страница 203: ...or off Non operational 64 191 Power on 192 255 12 Geometry correction Off 0 15 255 Performs geometry correction Horizontal vertical distortion Keystone 16 31 Quick Corner 32 47 Point Correction 48 63 Curved Surface 64 79 Corner Wall 80 95 Load geometry correction memory 1 96 111 Loads a geometry correction memory Load geometry correction memory 2 112 127 Load geometry correction memory 3 128 143 N...

Страница 204: ...control or control panel settings made by the DMX controller or application software may not be applied to the projector correctly When you want to apply all the channel controls to the projector set Channel 13 to Cannot control then set it back to Can control Monitoring and Controlling 204 ...

Страница 205: ... An extension cable for when the computer cable being used is too short Component video cable ELPKC19 3 m for mini D Sub 15 pin RCA male 3 Use to connect a Component Videog source Remote control cable set ELPKC28 10 m 2 piece set Use this to guarantee operation from the remote control from a distance Wireless mouse receiver ELPST16 Use this to use the projector s remote control to control the mous...

Страница 206: ... to 75 200 406x305 296 to 296 205 to 100 250 508x381 373 to 373 256 to 125 883 1794x1346 1342 to 1342 904 to 442 Unit cm 16 9 Screen Size A B Minimum Wide to Maximum Tele Vertical Lens Shift Top to Bottom 100 221x125 129 to 129 86 to 38 120 266x149 157 to 157 103 to 46 150 332x187 198 to 198 129 to 58 200 443x249 268 to 268 172 to 77 250 553x311 337 to 337 215 to 96 972 2152x1210 1341 to 1341 836 ...

Страница 207: ... 17 150 332x187 298 to 362 208 to 21 200 443x249 400 to 485 277 to 28 250 553x311 502 to 608 347 to 35 972 2152x1210 1975 to 2385 1348 to 137 Unit cm 16 10 Screen Size A B Minimum Wide to Maximum Tele Vertical Lens Shift Top to Bottom 100 215x135 191 to 232 142 to 7 120 258x162 231 to 280 170 to 8 150 323x202 290 to 352 212 to 11 200 431x269 389 to 472 283 to 14 250 538x337 488 to 591 354 to 18 10...

Страница 208: ...ttom 90 183x137 375 to 509 158 to 21 4 3 Screen Size A B Minimum Wide to Maximum Tele Vertical Lens Shift Top to Bottom 100 203x152 418 to 567 175 to 23 120 244x183 504 to 683 211 to 28 150 305x229 634 to 857 263 to 35 200 406x305 849 to 1146 351 to 46 250 508x381 1065 to 1436 439 to 58 883 1794x1346 3793 to 5102 1549 to 203 Unit cm 16 9 Screen Size A B Minimum Wide to Maximum Tele Vertical Lens S...

Страница 209: ... to 42 200 443x249 1009 to 1534 305 to 56 250 553x311 1265 to 1922 381 to 70 16 9 Screen Size A B Minimum Wide to Maximum Tele Vertical Lens Shift Top to Bottom 972 2152x1210 4970 to 7519 1481 to 270 Unit cm 16 10 Screen Size A B Minimum Wide to Maximum Tele Vertical Lens Shift Top to Bottom 100 215x135 482 to 738 155 to 20 120 258x162 582 to 889 186 to 24 150 323x202 731 to 1115 232 to 30 200 431...

Страница 210: ...m 90 183x137 1073 to 1602 144 to 7 4 3 Screen Size A B Minimum Wide to Maximum Tele Vertical Lens Shift Top to Bottom 100 203x152 1187 to 1776 160 to 8 120 244x183 1416 to 2122 192 to 10 150 305x229 1759 to 2642 241 to 12 200 406x305 2330 to 3508 321 to 16 250 508x381 2902 to 4373 401 to 20 883 1794x1346 10139 to 15337 1416 to 70 Unit cm 16 9 Screen Size A B Minimum Wide to Maximum Tele Vertical L...

Страница 211: ...reen Size A B Minimum Wide to Maximum Tele Vertical Lens Shift Top to Bottom 100 221x125 1574 to 2346 139 to 14 120 266x149 1875 to 2801 166 to 17 150 332x187 2326 to 3485 208 to 21 200 443x249 3078 to 4623 277 to 28 250 553x311 3830 to 5762 347 to 35 16 9 Screen Size A B Minimum Wide to Maximum Tele Vertical Lens Shift Top to Bottom 972 2152x1210 14687 to 22204 1348 to 137 Unit cm 16 10 Screen Si...

Страница 212: ...s for R L in the illustration Approximate value when projecting at maximum zoom Horizontally curved surface concave L R A Screen B Center of the circle of which the curved surface is an arc L Projection distance R Radius of the circle of which the curved surface is an arc Top view Lens type Vertical lens shift Home position Side view Vertical lens shift Top Side view ELPLR05 0 47 0 47 ELPLU05 0 38...

Страница 213: ...45 0 48 ELPLM13 0 32 0 33 ELPLM14 0 19 0 20 ELPLL09 0 14 0 14 ELPLL10 0 10 0 10 Vertically curved surface concave L R A Screen B Center of the circle of which the curved surface is an arc L Projection distance R Radius of the circle of which the curved surface is an arc Side view Lens type Vertical lens shift Home position Side view Vertical lens shift Top Side view ELPLR05 0 38 0 39 ELPLU05 0 30 ...

Страница 214: ...ELPLL10 0 06 0 07 Corner Wall s Corner Wall p 62 The α in the figure is the maximum angle in which the projector can move See the table below for detailed values Approximate value when projecting at maximum zoom Concave horizontal corner correction correction to bilateral symmetry by using corners as the center line Ș A Screen α Angle of possible projector motion Top view Lens type Vertical lens s...

Страница 215: ... 12 ELPLM12 17 16 ELPLM13 19 19 ELPLM14 23 23 ELPLL09 24 24 ELPLL10 26 26 Concave vertical corner correction correction to horizontal symmetry by using corners as the center line Ș A Screen α Angle of possible projector motion Side view Lens type Vertical lens shift Home position Ș Side view Vertical lens shift Top Ș Side view ELPLR05 33 24 ELPLU05 32 11 ELPLW07 31 13 ELPLM12 28 14 ELPLM13 26 15 E...

Страница 216: ...line Ș A Screen α Angle of possible projector motion Side view Lens type Vertical lens shift Home position Ș Side view Vertical lens shift Top Ș Side view ELPLR05 8 2 ELPLU05 15 ELPLW07 18 3 ELPLM12 21 9 ELPLM13 22 13 ELPLM14 22 16 ELPLL09 22 19 ELPLL10 22 20 Adjustment Range for Projected Images 216 ...

Страница 217: ...Only compatible when VESA CVT RB Reduced Blanking signal is input Even when signals other than those mentioned above are input it is likely that the image can be projected However not all functions may be supported Component video Signal Refresh Rate Hz Resolution Dots SDTV 480i 60 720x480 SDTV 576i 50 720x576 SDTV 480p 60 720x480 SDTV 576p 50 720x576 HDTV 720p 50 60 1280x720 HDTV 1080i 50 60 1920...

Страница 218: ...ng signal is input 2 Only for HDMI and HDBaseT input 3 Only when compatible YPbPr 4 2 0 signals are being input Input signals from SDI input port Signal Refresh Rate Hz Resolution Dots Mode Color differ ence signals Num ber of Bits Level SDTV 480i 59 94 720x480 SD SDI YPbPr 4 2 2 10 bits SDTV 576i 50 720x576 HDTV 720p 50 59 94 60 1280x720 HD SDI HDTV 1080i 50 59 94 60 1920x1080 HDTV 1080p 23 98 24...

Страница 219: ...ght source output power 1 670 W Wavelength 450 to 460 nm Light source life expectancy 3 Approximately 20 000 hours Light Source Mode Normal Quiet Approximately 30 000 hours Light Source Mode Extended Power supply 200 240V AC 10 50 60Hz 12 3 A Power con sumption 200 240V Rated power consumption 2 160 W Standby power consumption Communication On 2 5 W Standby power consumption Communication Off 0 39...

Страница 220: ... until brightness of the light source is reduced by half 4 If the surrounding temperature gets too high the brightness of the light source dims gradually Approximately 40 C at an altitude of 0 to 1500 m and approximately 35 C at an altitude of 1 501 to 3 048 m however this may vary depending on the surroundings and so on If the maximum operating temperature is exceeded the projector may turn off a...

Страница 221: ...terference when the equipment is operated in a commercial environment This equipment generates uses and can radiate radio frequency energy and if not installed and used in accordance with the instruction manual may cause harmful interference to radio communications Operation of this equipment in a residential area is likely to cause harmful interference in which case the user will be required to c...

Страница 222: ...790 395 146 299 378 5 A Center of lens 860 475 738 754 633 936 646 710 Units mm Appearance 222 ...

Страница 223: ... the Control4 Web site for more details URL http www control4 com DHCP AnabbreviationofDynamicHostConfigurationProtocol thisprotocolautomaticallyassignsanIPAddressgtoequipmentconnectedtoanetwork DICOM An acronym for Digital Imaging and Communications in Medicine An international standard that defines image standards and a communications protocol for medical images Gateway Address This is a server ...

Страница 224: ...ated so that colors that are reproduced by video equipment can be handled easily by computeroperatingsystems OS andtheInternet IftheconnectedsourcehasansRGBmode setboththeprojectorandtheconnectedsignalsource to sRGB Subnet Mask This is a numerical value that defines the number of bits used for the network address on a divided network subnet from the IP address Sync Thesignalsoutputfromcomputershav...

Страница 225: ...d the actual projector may differ Restriction of Use When this product is used for applications requiring high reliability safety such as transportation devices related to aviation rail marine automotive etc disaster prevention devices various safety devices etc or functional precision devices etc you should use this product only after giving consideration to including fail safes and redundancies ...

Страница 226: ...n or is already registered in Japan the United States of America and other countries and areas WPA and WPA2 are registered trademarks of the Wi Fi Alliance QR Code is a registered trademark of DENSO WAVE INCORPORATED Crestron and Crestron RoomView are registered trademarks of Crestron Electronics Inc Art Net Designed by and Copyright Artistic Licence Holdings Ltd Extron and XTP are registered trad...

Страница 227: ...y may be connected No Symbol mark Approved standards Meaning I IEC60417 No 5001B Battery general On battery powered equipment To identify a device for instance a cover for the battery compartment or the connector terminals J IEC60417 No 5002 Positioning of cell To identify the battery holder itself and to identify the positioning of the cell s inside the battery holder K IEC60417 No 5019 Protectiv...

Страница 228: ...tor T ISO3864 IEC60825 1 Caution laser radiation To indicate the equipment has a laser radiation part U ISO 3864 Disassembly prohibition To indicate a risk of injury such as electric shock if the equipment is disassembled V Never look into the lens while the LED for lighting is on W IEC60417 No 5266 Standby partial standby Toindicatethatpartof theequipmentis in the ready status X ISO3864 IEC60417 ...

Страница 229: ...7 Control4 SDDP 135 Corner Wall 62 Crestron RoomView 135 196 D Date Time 127 DHCP 133 134 DICOM SIM 67 Direct Power On 126 Display 125 Display Background 125 Distance 206 Dynamic 67 Dynamic Contrast 120 E EasyMP Monitor 188 Edge Blending 87 128 Epson Web Control 188 Esc 18 ESC VP21 194 Event ID 137 Extended menu 125 Extron XTP 128 F Feet 16 Filter Indicator 148 Focus 18 Freeze 101 Front 126 Front ...

Страница 230: ...on 126 Projection lens 25 Projector 50 52 Projector ID 37 Projector keyword 131 Projector Name 131 Q Quick Corner 123 R Reading mail 193 Rear 126 Refresh Rate 136 Remote control 19 Remote control button lock 112 Remote control ID 38 Remote port 17 Remote receiver 14 Replacing batteries 22 Reset All 137 Reset Memory 137 Reset menu 137 Resolution 121 136 RoomView 196 RS 232C port 16 S Scale 122 128 ...

Страница 231: ...Sync 121 T Test Pattern 18 29 124 Tint 119 Tracking 121 Trap IP Address 1 2 135 U User Button 124 User s Logo 101 User s Logo Protection 109 W Web browser 188 Web Control Password 131 White Balance 120 Wired LAN menu 134 Wireless LAN menu 131 Z Zoom 18 Index 231 ...

Отзывы: