background image

Top Menu Name

Submenu Name

Items or Setting Values

IP Address Display

On and Off

Security menu

s


p.140

Security

Off, WPA2-PSK, and
WPA/WPA2-PSK

Passphrase

-

Wired LAN menu

s


p.141

IP Settings

DHCP, IP Address, Subnet Mask,
and Gateway Address

IP Address Display

On and Off

Mail menu

s


p.142

Mail Notification

On and Off

SMTP Server

-

Port Number

-

Address 1 Setting, Ad‐
dress 2 Setting, and Ad‐
dress 3 Setting

-

Others menu

s


p.143

SNMP

On and Off

Trap IP Address 1 and
Trap IP Address 2

-

Priority Gateway

Wired LAN and Wireless LAN

AMX Device Discovery On and Off

Crestron RoomView

On and Off

Bonjour

On and Off

Message Broadcasting

On and Off

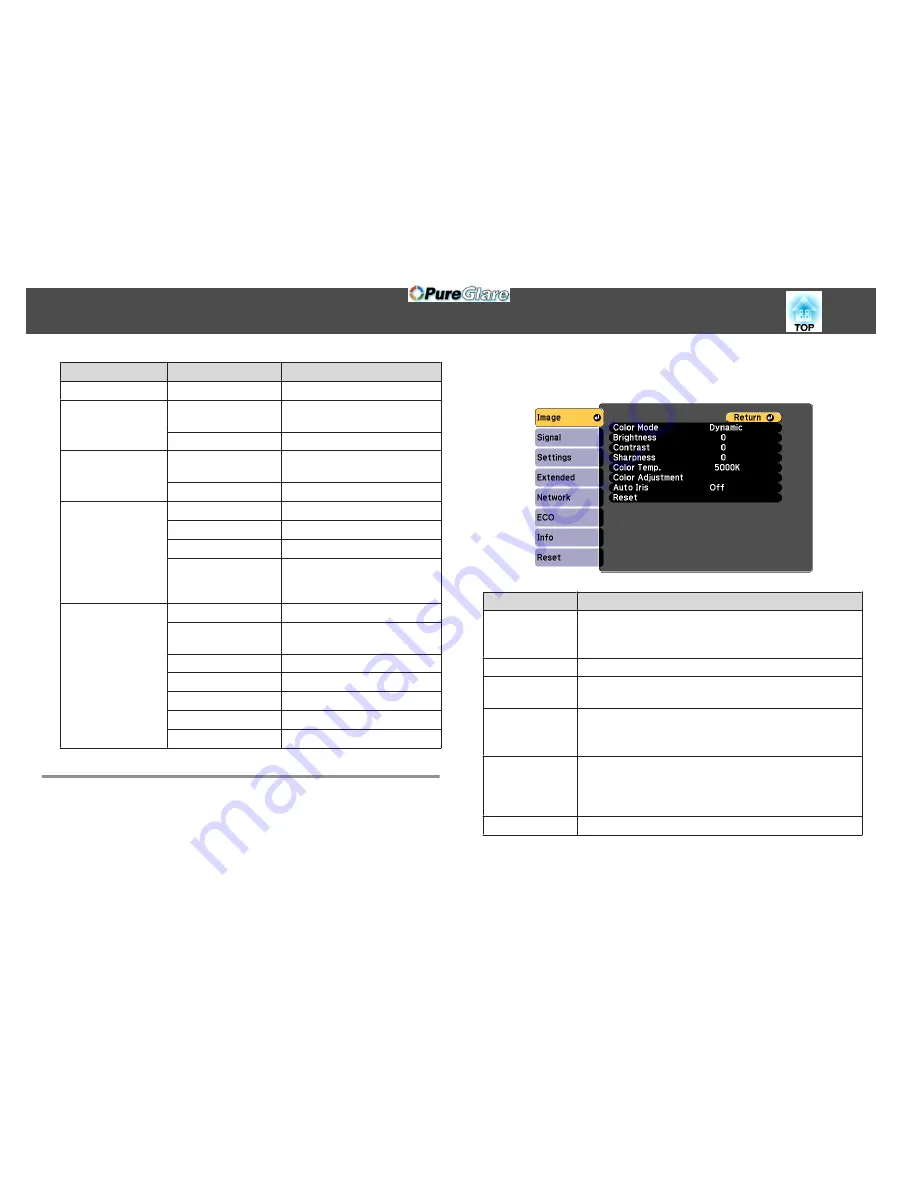
Image Menu

Settable  items  vary  depending  on  the  image  signal  and  source  currently
being  projected.  Setting  details  are  saved  for  each  image  signal.

s

 "Automatically  Detect  Input  Signals  and  Change  the  Projected  Image

(Source  Search)"  

p.46

Sub-menu

Function

Color Mode

You can select the quality of the image to suit your surroundings.

s

 "Selecting the Projection Quality (Selecting Color Mode)"

p.60

Brightness

You can adjust the image brightness.

Contrast

You can adjust the difference between light and dark in the
images.

Color Saturation

(Adjustment is only possible when component video or
composite video images are being input.)
You can adjust the color saturation for the images.

Tint

(Adjustment is possible when component video signals are being
input. Composite video and S-video input signals can only be
adjusted when they are NTSC video signals.)
You can adjust the image tint.

Sharpness

You can adjust the image sharpness.

List of Functions

128

http://www.pureglare.com.au

Содержание EB-570

Страница 1: ...User s Guide http www pureglare com au ...

Страница 2: ...incorrect handling General information indications Attention Indicates procedures which may result in damage or injury if sufficient care is not taken a Indicates additional information and points which may be useful to know regarding a topic s Indicates a page where detailed information regarding a topic can be found g Indicates that an explanation of the underlined word or words in front of this...

Страница 3: ...ly 27 Setting up the Touch Unit EB 595Wi only 28 Connecting Equipment 29 Connecting a Computer 29 Connecting a Smartphone or Tablet Device 31 Connecting Image Sources 32 Connecting USB Devices 35 Connecting a Microphone 37 Connecting External Equipment 38 Connecting a LAN Cable 40 Installing the Optional Wireless LAN Unit 41 Connecting Multiple Projectors EB 595Wi EB 585Wi EB 575Wi only 42 Basic U...

Страница 4: ...en 86 Switching the Interactive Mode 86 Annotation Mode and Whiteboard Mode Toolbars 87 Selecting Line Width and Color 88 Selecting Whiteboard Templates 89 Projector Control Toolbar 89 Selecting Network Device Display from the Projector Control Toolbar 90 Using the Interactive Features over a Network 92 Precautions When Connecting to a Projector on a Different Subnet 92 Windows Pen Input and Ink T...

Страница 5: ...AN Menu 141 Mail Menu 142 Others Menu 143 Reset Menu 144 ECO Menu 144 Info Menu Display only 145 Reset Menu 146 Performing Batch Setup for Multiple Projectors 147 Troubleshooting Using the Help 149 Problem Solving 150 Reading the Indicators 150 When the Indicators Provide No Help 154 Problems Relating to Images 155 No Images Appear 155 Moving Images Are Not Displayed only the Moving Image Portion ...

Страница 6: ...r 168 About Event ID 169 Maintenance Cleaning 171 Cleaning the Projector s Surface 171 Cleaning the Projection Window 171 Cleaning the Obstacle Sensor 171 Cleaning the Air Filter 172 Replacing Consumables 175 Replacing the Lamp 175 Lamp Replacement Period 175 How to Replace the Lamp 176 Resetting the Lamp Hours 179 Replacing the Air Filter 179 Air Filter Replacement Period 179 How to Replace the A...

Страница 7: ...Introduction This chapter explains the projector s features and the part names http www pureglare com au ...

Страница 8: ...jection from a Short Distance You can project large images from a short distance without having to move the projector away from the screen By mounting the projector on a ceiling or wall you can minimize shadows cast on the screen even when you are standing near it and avoid being dazzled by the projected light s Screen Size and Projection Distance p 185 Connecting to a Network and Projecting Image...

Страница 9: ...can wirelessly project data from the device You can download Epson iProjectionforfree from the App Store or from Google play Any fees incurred when communicating with the App Store or Google play are the responsibility of the customer Enhanced Security Functions Password Protect to restrict and manage users By setting a password you can restrict who can use the projector s Managing Users Password ...

Страница 10: ...s Optional Accessories p 184 Projector Features 10 http www pureglare com au ...

Страница 11: ...jecting do not put your face or hands near the air exhaust vent and do not place objects that may become warped or damaged by heat near the vent Hot air from the air exhaust vent could cause burns warping or accidents to occur E Cable cover fixing screws Screws to fix the cable cover in place F Cable cover Loosen the two screws and open the cover when connecting cables for external devices or inst...

Страница 12: ...ndow Projects images Warning Do not look into the projection window while projecting Do not place any objects or put your hand near the projection window It could cause burns fire or the object to warp because this area rea ches a high temperature due tothe concentrated projection light G Security slot The security slot is compatible with the Microsaver Security System manufactured by Kensington s...

Страница 13: ...s the projector to a computer via the supplied USB cable to use the interactive pen as a mouse EB 595Wi EB 585Wi EB 575Wi only s Controlling Computer Features from a Projected Screen Computer Interactive Mode p 68 F LAN port Connects a LAN cable to connect to a network G Monitor Out Computer2 input ports WhenMonitorOutPortissettoMonitorOutfromthe Configuration menu analog RGB signals input from th...

Страница 14: ...TouchUnitconnectioncabletothe Touch Unit P USB A port Connectsa USB memory device or a digitalcamera and projects images in PC Free s Projecting Images Stored on a USB Storage Device PC Free p 97 Connects the optional Document Camera Q RS 232C port When controlling the projectorfrom acomputer connect it to the computer with an RS 232C cable This port is for control use and should not normally be u...

Страница 15: ...g plate when mounting on a wall s Installation Guide s Optional Accessories p 184 E Illumination sensor Detects the brightness of the surroundings and automatically adjusts the brightness of the screen Set Brightness Control to Auto from the Configuration menu s ECO Brightness Control p 144 F Front foot fixing point Attachthefootwithaspacerwhenusingtheprojectorona surface such as a desk Only model...

Страница 16: ...25 s Using the Help p 149 E Help button Displays and closes the help screen which shows you how to deal with problems if they occur s Using the Help p 149 F Esc button Stops the current function If pressed when the Configuration menu is displayed it moves to the previous menu level s Using the Configuration Menu p 125 G Tele Wide buttons Adjuststhesizeoftheprojectionscreen Press the Tele button to...

Страница 17: ...utton to enter numbers in Network settings from the Configuration menu E Auto button If pressed while projecting analog RGB signals from Computer1 port or Computer2 port you can automatically optimize Tracking Sync and Position F Aspect button Each time the button is pressed the aspect mode changes s Changing the Aspect Ratio of the Projected Image p 61 G Num button Hold down this button and press...

Страница 18: ...uto Calibration For EB 585W EB 580 EB 575W EB 570 Power Consumption Name Function L Page buttons ChangespagesinfilessuchasPowerPointfileswhenusing the following projection methods When using the Wireless Mouse function s Using the Remote Control to Operate the Mouse Pointer Wireless Mouse p 104 When using USB Display s Projecting with USB Display p 48 When connecting to a network When projecting i...

Страница 19: ...ough the following images USB Display Images from the device connected to the USB A port Z Source Search button Switches to the image from the input port where video signals are being input s Automatically Detect Input Signals and Change the Projected Image Source Search p 46 a Remote control light emitting area Outputs remote control signals Replacing the Remote Control Batteries If the remote co...

Страница 20: ...to the product c Reattach the battery cover Press the battery cover until it clicks into place Remote Control Operating Range Interactive Pen EB 595Wi EB 585Wi EB 575Wi only There are two types of interactive pens with different colored bottom sections You cannot use interactive pens with the same colored bottom sections at the same time s Optional Accessories p 184 Part Names and Functions 20 htt...

Страница 21: ...ing Press the button to perform a right click operation while using the pen as a mouse D Attachment for optional strap or cord Allows you to attach a commercially available strap E Battery cover Open this cover when replacing the battery s Replacing the Battery for the Interactive Pen p 21 a The interactive pen turns off automatically after 20 minutes of inactivity To use the pen again tap the pen...

Страница 22: ... inserted the correct way If the batteries are not used correctly they could explode or leak causing a fire injury or damage to the product c Replace the battery cover Press the battery cover until it clicks into place Replacing the Tip of the Interactive Pen Replace the tip of the interactive pen when it is worn s Optional Accessories p 184 a Turn the tip of the pen to remove it b Turn the new ti...

Страница 23: ... Function A Dial cover Remove to use the adjustment dials B TCH port Connects the projector to the Touch Unit with the Touch Unit connection cable C Security slot The security slot is compatible with the Microsaver Security System manufactured by Kensington D Adjustment dials Performs angle adjustments E Indicator Lit when the Touch Unit is turned on F Screw holes for installation The screw holes ...

Страница 24: ...gnetic storage media such as magnetic cards or precision electronic devices such as computers digital watches or cell phones Data could be corrupted or a malfunction could occur When installing the Touch Unit on a magnetic surface be careful not to trap your fingers or any other part of your body between the magnet and the installation surface Attention Do not connect the Touch Unit to any devices...

Страница 25: ...Preparing the Projector This chapter explains how to install the projector and connect projection sources http www pureglare com au ...

Страница 26: ...l temperature could rise and cause a fire Do not use the projector in a location subject to combustible or explosive gas The projector may catch fire because of the high temperature of the lamp inside the projector a We recommend using a smooth board type screen without any unevenness If the projection screen is uneven there may be distortions in the projected image Distortions may occur in the pr...

Страница 27: ...eceiver the projection screen the projector itself or the rear of the projector Do not install the projector in direct sunlight through a window This could cause the interactive features to malfunction Install the projector so that the Easy Interactive Function receiver is not too close to fluorescent lights If the surrounding area is too bright the interactive features may not operate correctly I...

Страница 28: ...Extended Easy Interactive Function Advanced Sync of Projectors p 135 Setting up the Touch Unit EB 595Wi only When using the Touch Unit install the projector using one of the following methods The Touch Unit cannot be used if another installation method is used Mount the projector on a wall or suspend it from a ceiling and project images from in front of the screen when suspending the projector fro...

Страница 29: ...er by connecting the computer s audio output port to the projector s Audio1 or Audio2 port using a commercially available audio cable C When using the supplied or a commercially available USB cable Connect the computer s USB port to the projector s USB B port Audio from the computer is output from the projector with the projected image D When using a commercially available HDMI cable Connect the c...

Страница 30: ...er connecting the cable select the input port you connected to from HDMI1 Audio Output or HDMI2 Audio Output from the Configuration menu s Extended A V Settings HDMI1 Audio Output HDMI2 Audio Output p 132 You can use a USB cable to connect the projector to a computer to project images from the computer This function is called USB Display s Projecting with USB Display p 48 When projecting a compute...

Страница 31: ...ll devices Make sure the connection cable supports the MHL standards If you connect a cable that does not support the MHL standards the smartphone or tablet device may become hot leak or explode If you connect using a commercially available MHL HDMI conversion adapter charging the smartphone or tablet device may not work or you may not be able to perform operations from the projector s remote cont...

Страница 32: ...ally available video cable You can output audio from the projector s speaker by connecting the audio output port on the image source to the projector s Audio port using a commercially available audio cable C D When using the optional component video cable s Optional Accessories and Consumables p 184 Connect the component output port on the image source to the projector s Computer1 or Computer2 por...

Страница 33: ... connecting If the input source is on when you connect it to the projector it could cause a malfunction If the orientation or shape of the plug differs do not try to force it in The device could be damaged or could malfunction Connecting Equipment 33 http www pureglare com au ...

Страница 34: ...ially available audio cable to the Audio Input port After connecting the cable select the Audio Input port you connected to from HDMI1 Audio Output or HDMI2 Audio Output from the Configuration menu s Extended A V Settings HDMI1 Audio Output HDMI2 Audio Output p 132 If the source you want to connect to has an unusually shaped port use the cable supplied with the device or an optional cable to conne...

Страница 35: ...ing PC Free s Projecting Images Stored on a USB Storage Device PC Free p 97 If the Document Camera is connected while projecting images from another input port press the USB button on the remote control or the Source Search button on the control panel to switch to images from the Document Camera s Automatically Detect Input Signals and Change the Projected Image Source Search p 46 a While projecti...

Страница 36: ...ard disk Connect a digital camera or hard disk to the projector using a USB cable supplied with or specified for use with the device Use a USB cable less than 3 m in length If the cable exceeds 3 m PC Free may not function correctly Removing USB Devices After finishing projecting remove USB devices from the projector For devices such as digital cameras or hard disks turn off the device and then re...

Страница 37: ... if the microphone audio is difficult to hear or if it is too loud resulting in a crackling sound s Settings Mic Input Level p 131 Make the following settings to output audio from a microphone when the projector is off Set Standby Mode to Communication On Set A V Output to Always On s ECO Standby Mode p 144 s Extended A V Settings A V Output p 132 Connecting Equipment 37 http www pureglare com au ...

Страница 38: ...n external monitor Connect the external monitor to the projector s Monitor Out port using the cable supplied with the external monitor B When outputting audio to an external speaker Connect the external speaker to the projector s Audio Out port using a commercially available audio cable Connecting Equipment 38 http www pureglare com au ...

Страница 39: ...put p 132 Only analog RGB signals from the Computer1 port can be output to an external monitor You cannot output signals input from other ports or component video signals Setting gauges for functions such as Keystone Configuration menu or Help screens are not output to the external monitor Content drawn using the interactive features is not displayed on an external monitor EB 595Wi EB 585Wi EB 575...

Страница 40: ...t with a commercially available 100BASE TX or 10BASE T LAN cable By connecting a computer to the projector over a network you can project images and check the status of the projector a To prevent malfunctions use a category 5 or higher shielded LAN cable Connecting Equipment 40 http www pureglare com au ...

Страница 41: ...onal Wireless LAN Unit a Remove both of the cable cover fixing screws to open the cable cover b Connect the Wireless LAN unit to the wireless LAN unit installation section Connecting Equipment 41 http www pureglare com au ...

Страница 42: ...jector Interactive pen operations are stabilized by linking the projectors using cables In Out The SYNC port has an IN and OUT socket When you connect one end of the remote control cable set to an IN socket connect the other end to an OUT socket After connecting the cables set Sync of Projectors to Wired from the Configuration menu s Extended Easy Interactive Function Advanced Sync of Projectors p...

Страница 43: ... support cable connection set Wired Sync Mode to Mode 2 from the Configuration menu s Extended Easy Interactive Function Advanced Wired Sync Mode p 135 If you do not have the optional remote control cable set change the Distance of Projectors setting from the Configuration menu s Extended Easy Interactive Function Advanced Distance of Projectors p 135 Connecting Equipment 43 http www pureglare com...

Страница 44: ...Basic Usage This chapter explains how to project and adjust images http www pureglare com au ...

Страница 45: ...king into the lens Take particular care when there are children present d Turn on the computer e Change the computer s screen output When using a laptop computer you need to change the screen output from the computer Hold down the Fn key function key and press the b key a The method for changing differs depending on the computer being used See the documentation supplied with the computer Press the...

Страница 46: ...ource Search Press the Source Search button to project images from the port currently receiving an image Using Remote Control Using the Control Panel When two or more image sources are connected press the Source Search button until the target image is projected When your video equipment is connected start playback before beginning this operation Projecting Images 46 http www pureglare com au ...

Страница 47: ...ote control Remote control A Each time the button is pressed it cycles through the images being input from the following sources Computer1 port Computer2 port B Each time the button is pressed it cycles through the images being input from the following sources S Video port Video port HDMI1 MHL port HDMI2 port C Each time the button is pressed it cycles through the images being input from the follo...

Страница 48: ...ional 32 and 64 bit Home Premium 32 and 64 bit Home Basic 32 bit Starter 32 bit Windows 8 Windows 8 32 and 64 bit Windows 8 Pro 32 and 64 bit Windows 8 Enterprise 32 and 64 bit Windows 8 1 Windows 8 1 32 and 64 bit Windows 8 1 Pro 32 and 64 bit Windows 8 1 Enterprise 32 and 64 bit CPU Mobile Pentium III 1 2 GHz or faster Recommended Pentium M 1 6 GHz or faster Amount of Mem ory 256 MB or more Reco...

Страница 49: ... automatically For Windows Vista Windows 7 Windows 8 Windows 8 1 When the dialog box is displayed click run EMP_UDSE EXE b When the License Agreement screen is displayed click Agree c Computer images are projected It may take a while for computer images to be projected Until the computer images are projected leave the equipment as is and do not disconnect the USB cable or turn off the power of the...

Страница 50: ...the Finder double click EPSON PJ_UD USB Display Installer on your computer If nothing is projected for some reason click the USB Display icon in the Dock If there is no USB Display icon on the Dock double click USB Display in the application folder If you select Exit from the USB Display icon on the Dock USB Display does not start automatically when you connect the USB cable Uninstalling For Windo...

Страница 51: ...d Follow the on screen instructions to uninstall For OS X a Double click Applications USB Display Tool b Run USB Display Uninstaller Projecting Images 51 http www pureglare com au ...

Страница 52: ...e distortion You can use H V Keystone to correct the projected image under the following conditions Correction angle Approx 3 right and left Approx 3 up and down a Press the w or v buttons on the control panel during projection to display the Keystone screen a When you press the w v buttons on the control panel the correction method screen set in the Configuration menu is displayed When you want t...

Страница 53: ... V Keystone from the Configuration menu s Settings Keystone H V Keystone p 131 Quick Corner This allows you to manually correct each of the four corners of the projected image separately a Press the Menu button while projecting s Using the Configuration Menu p 125 Using Remote Control Using the Control Panel b Select Keystone from Settings Adjusting Projected Images 53 http www pureglare com au ...

Страница 54: ... button the screen shown in step 4 is displayed If the message Cannot adjust any further is displayed while adjusting you cannot adjust the shape any further in the direction indicated by the gray triangle f Repeat procedures 4 and 5 as needed to adjust any remaining corners g Press the Menu button to finish making corrections a If the Esc button is held down for about two seconds while the corner...

Страница 55: ...or Keystone s Adjusting the Image Size p 55 s Correcting Keystone Distortion p 52 The Image Shift screen is displayed after you have made adjustments b Adjust the projection position using the and buttons on the remote control or the w v Wide and Tele buttons on the control panel Using Remote Control Using the control panel You can shift the image diagonally by pressing any pair of adjacent and bu...

Страница 56: ...nly Extend the feet You can adjust the vertical position of the image by tilting the projector up to 1 5 a The larger the angle of tilt the harder it becomes to focus Install the projector so that it only needs to be tilted at a small angle Raising the Height of the Image A You can raise the height of the image by extending the rear feet B Retract the rear feet to return the image to its original ...

Страница 57: ...tion Menu p 125 Using Remote Control Using the Control Panel b Select Pattern from Settings c Select Test Pattern and then press the Enter button When projecting images on a 4 3 screen using a wide screen projector set Pattern Type to Pattern 5 and select Pattern Display s Settings Pattern Pattern Type p 131 Adjusting Projected Images 57 http www pureglare com au ...

Страница 58: ...d Open the air filter cover e Focus to the center bottom of the projected screen Move the focus lever to adjust the focus Adjusting Projected Images 58 http www pureglare com au ...

Страница 59: ... using one of the following methods Press the Volume buttons on the remote control to adjust the volume a Decreases the volume b Increases the volume Remote control Adjust the volume from the Configuration menu s Settings Volume p 131 Caution Do not start when the volume is set too high A sudden increase in volume may cause loss of hearing Always lower the volume before powering off so that you ca...

Страница 60: ...olor standard Blackboard Even if you are projecting onto a blackboard greenboard this setting gives your images a natural tint just like when projecting onto a screen Whiteboard Ideal for making presentations using a whiteboard 1 This selection is only available when the input signal is RGB or when the source is USB Display USB or LAN 2 This selection is only available when the input signal is com...

Страница 61: ...al currently being projected Changing Methods Each time you press the Aspect button on the remote control the aspect mode name is displayed on the screen and the aspect ratio changes Remote control a You can set the aspect ratio from the Configuration menu s Signal Aspect p 129 Changing the Aspect Mode EB 595Wi EB 585Wi EB 585W EB 575Wi EB 575W only Projecting Images from Video Equipment or from t...

Страница 62: ...al XGA 1024X768 4 3 WXGA 1280X800 16 10 Normal Aspect mode Input Signal XGA 1024X768 4 3 WXGA 1280X800 16 10 16 9 Full Zoom Native a If parts of the image are missing set the Resolution setting to Wide or Normal from the Configuration menu according to the size of the computer panel s Signal Resolution p 129 Adjusting Projected Images 62 http www pureglare com au ...

Страница 63: ...on is pressed the aspect mode changes in the order Auto 4 3 and 16 9 Example 1080p signal input resolution 1920x1080 aspect ratio 16 9 A Auto B 4 3 C 16 9 Projecting Images from a Computer Each time the Aspect button is pressed the aspect mode changes in the order Normal 4 3 and 16 9 The following shows projection examples for each aspect mode Aspect mode Input Signal XGA 1024X768 4 3 WXGA 1280X80...

Страница 64: ...Using the Interactive Features EB 595Wi EB 585Wi EB 575Wi only Follow the instructions in these sections to use the interactive features http www pureglare com au ...

Страница 65: ...s to content projected from a computer tablet document camera or other source This helps you emphasize projected information or include additional notes for more effective lessons or presentations In whiteboard mode you can use interactive pens or your finger to write on the projected whiteboard You do not need to use a computer or install any additional software to use the built in whiteboard dra...

Страница 66: ...a computer tablet video device or other source and add notes to your projected content using the interactive pens or your finger EB 595Wi You can use both pens at the same time You can also use both pens and your finger at the same time EB 595Wi a Turn on the projector b Make sure you have calibrated the first time you use your projector s Pen Calibration p 74 s Calibrating for Touch Operations wi...

Страница 67: ...ase board You can use both pens at the same time You can also use both pens and your finger at the same time EB 595Wi a Turn on the projector b Make sure you have calibrated the first time you use your projector s Pen Calibration p 74 s Calibrating for Touch Operations with Your Finger p 82 c Hold an interactive pen close to the projected screen or tap the projected screen using your finger d Tap ...

Страница 68: ...ur computer must use one of the following operating systems to use the computer interactive mode Windows Windows XP Service Pack 2 and Service Pack 3 Professional 32 bit Home Edition 32 bit Tablet PC Edition 32 bit Windows Vista Service Pack 2 Ultimate 32 bit Enterprise 32 bit Business 32 bit Home Premium 32 bit Home Basic 32 bit Windows 7 Service Pack 1 Ultimate 32 and 64 bit Enterprise 32 and 64...

Страница 69: ...t use interactive features with that display You cannot write or draw across multiple screens To use computer interactive mode over a network you need to install EasyMP Network Projection version 2 85 or later for Windows or 2 83 or later for OS X or Quick Wireless version 1 32 or later a If you are using OS X install the Easy Interactive Driver on your computer the first time you use the interact...

Страница 70: ...Mouse or One User Mouse For EB 595Wi Select one of the following according to the operating system of the connected computer Windows XP or earlier Select Mode 1 Windows Vista Windows 7 Windows 8 and OS X Select Mode 2 Linux Select Mode 3 j Press the Enter button and press the Menu button to exit the projector s configuration menu k Make sure you have calibrated the first time you use your projecto...

Страница 71: ...with the Screen p 86 s Using the Interactive Features over a Network p 92 a You can also control the projector from the projected screen by using the projector control toolbar displayed on the screen Tap the or icon if the projector control toolbar is not displayed You can move the and toolbar tabs up and down and the or toolbar tab right and left You can also do the following in computer interact...

Страница 72: ... computer to use computer interactive mode a You may have already installed Easy Interactive Tools using the Easy Install option which also installs Easy Interactive Driver See the Easy Interactive Tools Operation Guide in the Document CD ROM for details a Turn on your computer b Insert the EPSON Projector Software for Easy Interactive Function CD into the computer You see the EPSON window c Doubl...

Страница 73: ...en s Interactive Pen EB 595Wi EB 585Wi EB 575Wi only p 20 Attention Do not use interactive pens with wet hands or in locations where the pens may get wet The interactive pens are not waterproof Keep the projector and projection screen out of direct sunlight or the interactive features may not work a The pens turn off automatically after 20 minutes of inactivity To turn a pen back on tap the pen ti...

Страница 74: ...g p 135 To make a long press of the pen act as a right click select the following settings in the Easy Interactive Function setting in the projector s Extended menu Set the Pen Operation Mode setting to Two Users Mouse or One User Mouse EB 585Wi EB 575Wi Set the Pen Operation Mode setting to Mode 1 or Mode 3 EB 595Wi Set the Enable Right Click setting to On Pen Calibration Calibration coordinates ...

Страница 75: ...a computer for Auto Calibration a Press the Menu button select the Extended menu and press the Enter button b Select the Easy Interactive Function setting and press the Enter button c Select Auto Calibration and press the Enter button The following screen appears Using the Interactive Pens 75 http www pureglare com au ...

Страница 76: ...ly The cursor location and pen position should match after calibration If not you may need to calibrate manually Calibrating Manually If the cursor location and pen position do not match after auto calibration you can calibrate manually a Press the Menu button select the Extended menu and press the Enter button b Select the Easy Interactive Function setting and press the Enter button c Select Manu...

Страница 77: ...ft corner of your projected image f Touch the center of the circle with the tip of the pen The circle disappears and you see another circle below the first one a For the most accurate calibration make sure you touch the center of the circle g Touch the center of the next circle then repeat When you get to the bottom of the column the next circle appears at the top of a new column Using the Interac...

Страница 78: ...f you connect a different computer or adjust the computer s resolution If you notice that the pen position is incorrect when you operate your computer from the projected screen computer interactive mode you can adjust the pen area manually a Manual adjustment is not available when projecting from a LAN source a Switch to computer interactive mode if necessary s Using Computer Interactive Mode p 68...

Страница 79: ...use pointer moves toward the top left corner g When the mouse pointer stops at the top left corner of the image touch the tip of the pointer with the pen The mouse pointer moves toward the bottom right corner h When the mouse pointer stops at the bottom right corner of the image touch the tip of the pointer with the pen Using the Interactive Pens 79 http www pureglare com au ...

Страница 80: ...small children when using touch operations with their fingers Do not allow the laser light emitted from the Touch Unit to pass through or be reflected by any optical object such as a magnifying glass or mirror Continued use may result in fire or accidents and also cause injury Unplug the projector from the outlet and refer all repairs to qualified service personnel if any problems occur with the p...

Страница 81: ...le adjustment for the Touch Unit Calibrate the system for touch operations See the Installation Guide for details s Installation Guide The Touch Unit turns on and is ready for touch operation with your finger when you turn on the projector a Positioning discrepancies may occur depending on the angle of or the direction you point your finger Touch operations with your finger may not work properly w...

Страница 82: ...ser window use gestures such as flicks Write or draw on the projection surface in annotation mode and whiteboard mode To select a projected item such as an icon tap the projection surface with your finger To draw on the projected screen for the first time after turning on the projector select a pen in the toolbar and tap the projection surface with your finger If you do not do this your finger wor...

Страница 83: ...ng after doing any of the following Calibrating the system for use with the pen automatically or manually Performing angle adjustments for the Touch Unit Performing Keystone correction Adjusting the image size Using the Image Shift feature Changing the projector position a Press the Menu button select the Extended menu and press the Enter button b Select the Easy Interactive Function setting and p...

Страница 84: ...f the circle with your finger until the circle disappears and the another circle appears then release it a For the most accurate calibration make sure you touch the center of the circle Do not touch with anything else except the tip of your finger h Touch the center of the next circle with your finger then repeat When you get to the bottom of the column the next circle appears at the top of a new ...

Страница 85: ...annot go back by two dots To cancel touch calibration hold down the Esc button for two seconds It may take several seconds after all of the dots have disappeared until touch calibration is complete i Continue until all of the circles disappear Using Your Finger for Interactive Touch Operations EB 595Wi only 85 http www pureglare com au ...

Страница 86: ...n also change the interactive mode by doing the following Pressing the Pen Mode button on the remote control Switching to PC Free Annotation or PC Interactive in the Pen Mode setting on the projector s Extended menu s Extended Easy Interactive Function Pen Mode p 135 You can switch to computer interactive mode when you project the computer screen You cannot switch to computer interactive mode when...

Страница 87: ...do Selects a white or black background or one of four patterns whiteboard mode only s Selecting Whiteboard Templates p 89 Writes or draws free form lines with custom pen Select the icon to change custom pen color and width s Selecting Line Width and Color p 88 Writes or draws free form lines with a transparent highlighter pen Select the icon to change highlighter pen color and width s Selecting Li...

Страница 88: ...ine width and color you want to use for the Pen or Highlighter tools a As you hover over the color palette the name of the color is displayed at the bottom of the palette You can change the shade of the color palette using the Color Palette setting in the projector s Extended menu s Extended Easy Interactive Function General Advanced Color Palette p 135 c Select the or tool then use the pen or you...

Страница 89: ...Projection you can also use the toolbar to select the network device from which you want to project Turns off the projector Changes the image source using the displayed list To close the image source list select the icon at the bottom of the list Zooms into and out of the image using the scale or the and icons in the displayed list You can do the following The image can be enlarged to between 1 to...

Страница 90: ...ser connected using the EasyMP Multi PC Projection software with the moderator feature enabled See the EasyMP Multi PC Projection Operation Guide for details about the moderator feature s EasyMP Multi PC Projection Operation Guide a Select the icon on the projector control toolbar and then select Participant List from the image source list b Select the user name for the device you want to project ...

Страница 91: ...is turned off temporarily Change the settings using the projector s configuration menu Project an image using EasyMP Multi PC Projection or Epson iProjection You see the selected user s screen image When you change the user repeat these steps a You cannot access the user selection screen when connecting to multiple projectors by using EasyMP Multi PC Projection and projecting the same image mirror...

Страница 92: ...uter interactive mode over a network you cannot change the Pen Mode setting using the remote control or from the projector s Extended menu The icon is also not available You cannot change the Pen Operation Mode setting from the projector s Extended menu You can connect up to four projectors at one time using EasyMP Network Projection When connected to multiple projectors computer interactive mode ...

Страница 93: ...nd IP VPN you can connect to the network projector remotely when you meet the above requirements When bandwidth management is applied for communications between locations and EasyMP Network Projection goes over the controlled bandwidth you may not be able to connect to the projector at remote locations a Epson does not guarantee the connection to the projector on a different subnet using EasyMP Ne...

Страница 94: ... you want to use the pen input and Ink features in Windows 8 1 Windows 8 Windows 7 or Windows Vista you need to adjust the pen settings in the projector s Extended menu a Press the Menu button select the Extended menu and press the Enter button b Select the Easy Interactive Function setting and press the Enter button c Select the Pen Operation Mode setting and press the Enter button d Select one o...

Страница 95: ...s Touch Keyboard Select the keyboard icon on the screen then select the pen icon To open the Tablet PC input panel in Windows 7 or Windows Vista select All Programs Accessories Tablet PC Tablet PC Input Panel You can write in the box using the pen or your finger EB 595Wi then select from a variety of options to edit and convert the text To add Ink annotations in Microsoft Office applications selec...

Страница 96: ...Useful Functions This chapter explains useful functions for giving presentations and so on and the security functions http www pureglare com au ...

Страница 97: ...rly if the compression ratio is too high bmp Cannot project images with a resolution greater than 1280x800 gif Cannot project images with a resolution greater than 1280x800 Cannot project animated GIFs png Cannot project images with a resolution greater than 1280x800 Type File Type Ex tension Notes avi Motion JPEG Cannot project images with a resolution greater than 1280 x 720 You can only playbac...

Страница 98: ... shown in the following table Icon File Icon File JPEG files BMP files GIF files PNG files AVI Motion JPEG files When it cannot be displayed as a thumbnail it is displayed as an icon a You can also insert a memory card into a USB card reader and then connect the reader to the projector However some commercially available USB card readers may not be compatible with the projector If the following sc...

Страница 99: ... opening the folder position the cursor on Back to Top and press the Enter button Rotating Images You can rotate the played images in 90 increments The rotating function is also available during PC Free a Play images or run PC Free b While projecting press the or button Stopping PC Free To close PC Free disconnect the USB device from the USB port on the projector For devices such as digital camera...

Страница 100: ...Use the following procedure to run Slideshow a To change files automatically when you run PC Free set Screen Switching Time from Option to anything other than No The default setting is 3 Seconds s Image File Display Settings and Slideshow Operation Settings p 101 a Start PC Free The file list screen is displayed s Starting PC Free p 98 b Use the and buttons to position the cursor on the folder you...

Страница 101: ...nd Slideshow Operation Settings You can set the file display order and Slideshow operations on the Option screen a Select Option at the bottom of the file list screen and then press the Enter button b When the following Option screen is displayed set each of the items Enable the settings by positioning the cursor on the target item and pressing the Enter button The following table shows the detail...

Страница 102: ...turned on You can select the screen displayed when the A V Mute button is pressed from the Configuration menu s Extended Display A V Mute p 132 When A V mute is enabled with the A V Mute button A V Mute Timer activates and the power is automatically turned off after approximately 30 minutes If you do not want to enable A V Mute Timer set A V Mute Timer to Off s ECO A V Mute Timer p 144 The lamp is...

Страница 103: ...er icon on the projected image and helps you draw attention to the area you are talking about a Display the Pointer Each time you press the Pointer button the pointer appears or disappears Remote control b Move the Pointer icon Remote control When any pair of adjacent or buttons are pressed at the same time the pointer can be moved diagonally a You can select the shape of the pointer icon from the...

Страница 104: ...button Reduces images that have been enlarged Esc button Cancels E Zoom a The enlargement ratio appears on the screen The selected area can be enlarged to between 1 to 4 times in 25 incremental steps During enlarged projection press the and buttons to scroll the image Using the Remote Control to Operate the Mouse Pointer Wireless Mouse You can control the computer s mouse pointer from the projecto...

Страница 105: ...the computer with the supplied or a commercially available USB cable s Connecting a Computer p 29 c Change the source to one of the following USB Display Computer1 Computer2 HDMI1 HDMI2 s Switching to the Target Image Using the Remote Control p 47 Once set the mouse pointer can be controlled as follows Moving the mouse pointer buttons Moves the mouse pointer Mouse clicks Esc button Right click Ent...

Страница 106: ...n the page up or down function is available Saving a User s Logo You can save the image that is currently being projected as a User s Logo You can use the registered user s logo as a display when projection starts or no image signal is being input s Extended Display p 132 a Once a User s Logo has been saved the logo cannot be returned to the factory default If the content of the Configuration menu...

Страница 107: ... message Choose this image as the User s Logo is displayed select Yes a When you press the Enter button on the remote control or the control panel the screen size may change depending on the signal to match the actual resolution of the image signal d Move the box to select the part of the image to use as the User s Logo You can perform the same operations from the projector s control panel Remote ...

Страница 108: ...tterns registered to the projector such as ruled lines and grid patterns s Settings Pattern Pattern Type p 131 You can also save the image that is currently being projected as a User Pattern a When a User Pattern is saved the previous User Pattern is erased a Project the image you want to use as the User Pattern and then press the Menu button s Using the Configuration Menu p 125 Using Remote Contr...

Страница 109: ...ted image as the User Pattern is displayed select Yes e When you press the button the message Do you save this image as the User Pattern is displayed Select Yes The image is saved After the image has been saved the message The User Pattern setting is complete is displayed a Once a User Pattern has been saved User Pattern cannot be returned to the factory default Projection Functions 109 http www p...

Страница 110: ...e kinds of Password Protect settings can be made according to how the projector is being used Power On Protection When Power On Protection is On you need to enter a preset password after the projector is plugged in and turned on this also applies to Direct Power On When the correct password is entered projection starts User s Logo Protection Even if someone tries to change the User s Logo set by t...

Страница 111: ...then press the Enter button The default password is set to 0000 Change this to your own desired Password If you select No the screen displayed in step 2 is displayed again 3 While holding down the Num button enter a four digit number using the numeric buttons The number entered is displayed as When you enter the fourth digit the confirmation screen is displayed Remote control 4 Re enter the passwo...

Страница 112: ...s not accept any more Password entries The projector s operation will be locked Contact Epson as described in your documentation s Epson Projector Contact List Restricting Operation Control Panel Lock Do one of the following to lock the operation buttons on the control panel Full Lock All of the buttons on the control panel are locked You cannot perform any operations from the control panel includ...

Страница 113: ... Security slot The security slot is compatible with the Microsaver Security System manufactured by Kensington See the following for more details on the Microsaver Security System s http www kensington com Security cable installation point A commercially available theft prevention wire lock can be passed through the installation point to secure the projector to a desk or pillar Do not pass drop pre...

Страница 114: ... computer connected to the projector on a network you can set the projector s functions and control the projector This function allows you to perform setup and control operations remotely In addition since you can use the computer s keyboard entering characters required for the setup is easier Use Microsoft Internet Explorer 8 0 or later as the Web browser Use Safari for OS X a If you set Standby ...

Страница 115: ...wser and press the Enter key on the computer s keyboard The Web Control screen is displayed When Web Control Password is set from the Configuration menu the password entry screen is displayed c Enter the User ID and Password and then press the Enter key on your computer s keyboard The User ID is EPSONWEB The default password is admin When the correct user ID and password are entered the Web contro...

Страница 116: ...USB Display p 48 When connecting to a network When projecting images using PC Free pressing these buttons displays the previous next image file G Source Search button Switches to the image from the input port where video signals are being input s Automatically Detect Input Signals and Change the Projected Image Source Search p 46 H LAN button Switches to the image from the network connected device...

Страница 117: ...tor where the problem occurred Line 2 The IP address set for the projector where the problem has occurred Line 3 and on Details of the problem The details of the problem are listed line by line The main message contents are listed below Internal error Fan related error Sensor error Lamp timer failure Lamp out Internal temperature error High speed cooling in progress Lamp replacement notification N...

Страница 118: ...e projector executes the command and returns a and then accepts the next command If the command being processed terminates abnormally an error message is output and a is returned The main contents are listed below Item Command Power ON OFF On PWR ON Off PWR OFF Signal selection Computer1 Auto SOURCE 1F RGB SOURCE 11 Component SOURCE 14 Item Command Computer2 Auto SOURCE 2F RGB SOURCE 21 Component ...

Страница 119: ...s The projector complies with the PJLink Class1 standard established by the JBMIA You need to make network settings before you can use PJLink See the following for more information on network settings s Network Menu p 136 It complies with all commands except for the following commands defined by PJLink Class1 and agreement was confirmed by the PJLink standard adaptability verification URL http pjl...

Страница 120: ...View Server Edition provided by Crestron to monitor devices in the system to communicate with the help desk and to send emergency messages See the following Web site for details http www crestron com getroomview This manual describes how to perform operations on your computer using a Web browser a You can only enter single byte alphanumeric characters and symbols The following functions cannot be ...

Страница 121: ...n perform the following operations when you click the buttons To display buttons that are not shown on the screen click c or d to scroll left or right Button Function Freeze Pauses or resumes image playback s Freezing the Image Freeze p 102 Contrast You can adjust the difference between light and dark in the images Brightness You can adjust the image brightness Color You can adjust the color satur...

Страница 122: ...ys information on the projector that is currently connected Tools Changes settings in the projector that is currently connected See the next section Using the Tools Window The following window is displayed when you click the Tools tab on the operation window You can use this window to change settings in the projector that is currently connected A Crestron Control Make settings for Crestron central...

Страница 123: ...opentheToolswindow Thenamecancontainupto26 single byte alphanumeric characters Confirm Enter the same password as you entered in New Password If the passwords are not the same an error is displayed Send Click this button to confirm the changes made to the Admin Password D User Password Select theEnabled check boxtorequire apasswordto opentheoperationwindow on the computer The following items can b...

Страница 124: ...Configuration Menu This chapter explains how to use the Configuration menu and its functions http www pureglare com au ...

Страница 125: ...rm the same operations from the control panel Check the guide under the menu for the available buttons and their operations a Display the Configuration menu screen b Select a top menu item c Select a submenu item d Change settings e Press the Menu button to finish making settings Using the Configuration Menu 125 http www pureglare com au ...

Страница 126: ... and Component Top Menu Name Submenu Name Items or Setting Values Video Signal Auto NTSC NTSC4 43 PAL M PAL N PAL PAL60 and SECAM Aspect Normal Auto 4 3 16 9 Full Zoom and Native Overscan Auto Off 4 and 8 Image Processing Fine Fast Settings menu s p 131 Keystone H V Keystone and Quick Corner Zoom 0 Wide to 40 Tele Image Shift Control Panel Lock Full Lock Partial Lock and Off Pointer Shape Pointer ...

Страница 127: ... and Off Standby Mode Communication On and Communication Off ECO Display On and Off Info menu s p 145 Lamp Hours Source Input Signal Resolution Top Menu Name Submenu Name Items or Setting Values Video Signal Refresh Rate Sync Info Status Serial Number Version Event ID Reset menu s p 146 Reset All Reset Lamp Hours The number of supported languages differs depending on the region where the projector...

Страница 128: ...nd source currently being projected Setting details are saved for each image signal s Automatically Detect Input Signals and Change the Projected Image Source Search p 46 Sub menu Function Color Mode You can select the quality of the image to suit your surroundings s Selecting the Projection Quality Selecting Color Mode p 60 Brightness You can adjust the image brightness Contrast You can adjust th...

Страница 129: ...e menu to their default settings See the following to return all menu items to their default settings s Reset Menu p 146 Signal Menu Settable items vary depending on the image signal and source currently being projected Setting details are saved for each image signal You cannot make settings on the Signal menu when the source is USB Display USB or LAN s Automatically Detect Input Signals and Chang...

Страница 130: ... If set to Auto the input signal is set automatically according to the connected equipment If colors do not appear correctly when set to Auto select the appropriate signal according to the connected equipment Sub menu Function Video Signal You can select the input signal from the S Video port or the Video port If set to Auto video signals are recognized automatically If interference appears in the...

Страница 131: ...ne When Mic Input Level is turned down to 0 no microphone audio is output from the speaker When the microphone input level is raised the audio from the connected device becomes quieter When the microphone input level is lowered the audio from the connected device becomes louder Remote Receiver You can limit the reception of the operation signal from the remote control When set to Off you cannot pe...

Страница 132: ...justments and keystone correction can be performed To cancel the Test Pattern press the Esc button on the remote control or the control panel Attention If a pattern is displayed for a long time a residual image may be visible in projected images Sub menu Function Reset YoucanresetalladjustmentvaluesintheSettingsmenutotheir default settings except for Zoom User Button and Image Shift See the follow...

Страница 133: ...e is Bottom The icon is hidden when set to Off User s Logo 1 You can change the user s logo that is displayed as a background during Display Background A V Mute and so on s Saving a User s Logo p 106 Sub menu Function Projection Select from one of the following projection methods depending on how the projector is installed Front Front Upside Down Rear and Rear Upside Down You can change the Projec...

Страница 134: ... mode USB Display and Wireless Mouse functions are not available USB Display Easy Interactive Function Allows you to use the interactive features to operate computers computer interactive mode and USB Display The Wireless Mouse function is not available Wireless Mouse USB Display Allows you to use the Wireless Mouse function and USB Display You cannot use the interactive features to operate comput...

Страница 135: ...erations according to the distance between the projectors If interactive pen operations are unstable try another mode The standard distance set for Mode 1 is 2 m Sync of Projectors When using multiple projectors in the same room select the method for controlling the interactive pen interference When set to Infrared default only infrared is used to synchronize Set to Wired when connecting the proje...

Страница 136: ...number of users for the interactive pen Two Users Mouse default One User Mouse Allows you to perform mouse operations using the interactive pen One User Pen The pen input and Ink features are available in Windows 8 1 Windows 8 Windows 7 and Windows Vista Enable Right Click Only available when Pen Operation Mode is set to Mode 1 Mode 3 or Two Users Mouse or One User Mouse When this is set to On a l...

Страница 137: ...hanging Settings Using a Web Browser Web Control p 114 Contact your network administrator for details on network settings Notes on Operating the Network Menu Selecting from the top menu and sub menus and changing selected items is the same as making operations from the Configuration menu When done make sure you go to the Setup complete menu and select one of Yes No or Cancel When you select Yes or...

Страница 138: ... menu Function Projector Name Displays the projector name used to identify the projector when connected to a network When editing you can enter up to 16 single byte alphanumeric characters Thefollowingsymbols cannotbeused PJLink Password Set a password to use when you access the projector using compatible PJLink software You can enter up to 32 single byte alphanumeric characters symbols cannot be ...

Страница 139: ...jector becomes an easy access point When set to Off the network is created in Ad hoc modeg If you select Advanced the connection is established in infrastructure modeg through the access point installed See the following manual for details on Connection Mode s EasyMP Network Projection Operation Guide s EasyMP Multi PC Projection Operation Guide Channel This can only be set if Connection Mode is s...

Страница 140: ...5 where x is a number from 0 to 255 SSID Display Toprevent theSSIDgfrombeingdisplayedontheLANStandby screen set this to Off IP Address Dis play To prevent the IP addressg from being displayed on the LAN Standby screen set this to Off Security Menu Sub menu Function Security Select the security type from the items that are displayed When setting security follow the instructions from the administrat...

Страница 141: ...ed to the following addresses DHCPg Set to On to configure the networkusing DHCP If this is set to On you cannot set any more addresses IP Addressg You can input the IP address assigned to the projector You can input a number from 0 to 255 in each field of the address However thefollowingIPaddressescannot beused 0 0 0 0 127 x x x 224 0 0 0 to 255 255 255 255 where x is a number from 0 to 255 Subne...

Страница 142: ...255 wherexisanumberfrom 0 to 255 Sub menu Function Port Number You can input the port number for the SMTP server The default value is 25 You can input numbers between 1 to 65535 Address 1 Set ting Address 2 Setting Address 3 Setting You can input the email address of the destination to send the notification email to You can register up to three destinations You can enter up to 32 single byte alpha...

Страница 143: ... projector is connected to a network set this to On to allow the projector to be detected by AMX Device Discoveryg Set this to Off if you are not connected to an environment controlled by a controller from AMX or AMX Device Discovery Sub menu Function Crestron Room View Set this to On only when monitoring or controlling the projector over the network using Crestron RoomView Otherwise set this to O...

Страница 144: ... the lamp brightness to one of two settings Select ECO if the images being projected are too bright such as when projecting images in a dark room or onto a small screen When ECO is selected power consumption during projection decreases and fan rotation noise is reduced When Auto is set the surrounding brightness is detected by the illumination sensor and the lamp s brightness is automatically adju...

Страница 145: ... Standby Mode If you set Communication On you can perform the following operations even if the projector is in standby mode Monitor and control the projector from a computer over the network Output audio and images to an external device only when A V Output is set to Always On Output microphone audio from the projector s speaker only when A V Output is set to Always On ECO Display WhensettoOn when...

Страница 146: ...ector It may be needed if service is required Version Displays the projector s firmware version information Serial Number Displays the projector s serial number Event ID Displays the application error log s About Event ID p 169 The cumulative use time is displayed as 0H for the first 10 hours 10 hours and above is displayed as 10H 11H and so on Reset Menu Sub menu Function Reset All Youcanresetall...

Страница 147: ...ctors batch setup function Use one of the following methods Setup using a USB memory Setup by connecting the computer and projector with a USB cable Setup using EasyMP Network Updater For more details see the Installation Guide s Installation Guide Performing Batch Setup for Multiple Projectors 147 http www pureglare com au ...

Страница 148: ...Troubleshooting This chapter describes how to identify problems and what to do if a problem is found http www pureglare com au ...

Страница 149: ... Control Using the Control Panel b Select a menu item Using Remote Control Using the Control Panel c Confirm the selection Using Remote Control Using the Control Panel Questions and solutions are displayed as shown on the screen below Press the Help button to exit the Help a See the following if the Help function does not provide a solution to the problem s Problem Solving p 150 Using the Help 149...

Страница 150: ...hen the Indicators Provide No Help p 154 Reading the Indicators The projector is provided with the following four indicators The color and lit status of the indicators shows the status of the projector A Power indicator Indicates the projector s status B Status indicator Indicates the projector s status C Lamp indicator Indicates the projection lamp status Problem Solving 150 http www pureglare co...

Страница 151: ...ttons are disabled Blue Lit Blue Lit Normal status The projector is projecting See the following table for the status of indicators and how to resolve the problems If all indicators are off check that the power cord is connected correctly and that the power is being supplied normally Sometimes when the power cord is unplugged the t power indicator remains lit for a short period but this is not a f...

Страница 152: ...g Orange Lit Off Lamp Error Lamp Failure Check the following two points Take out the lamp and check whether it is cracked s Replacing the Lamp p 175 Clean the air filter s Cleaning the Air Filter p 172 If the lamp is not cracked Reinstall the lamp and plug in the power cord Iftheerrorcontinues Stopusingtheprojector removethepowerplugfromtheelectricaloutlet and contact your local dealer or the near...

Страница 153: ...nge Lit Obstacle Detection Error A beep sounds and the message For safety purposes remove any obstacles blocking the lens is displayed The projector will turn off automatically if no action is taken Check the following two points Check that there are no obstacles interfering with the projection window Remove any obstacles Clean the obstacle sensor if there is no obstacle s Cleaning the Obstacle Se...

Страница 154: ...ppear dull s p 160 Images appear dark s p 160 Problems when Projection Starts The projector does not turn on s p 161 Problems with the Interactive Features Cannot draw on the projected screen s p 161 Cannot operate a computer from the projected screen after connecting to the computer s p 162 The message An error occurred in the Easy Interactive Function is displayed s p 162 Computer s mouse does n...

Страница 155: ...ojecting images from a video source Change the setting according to the signal for the connected equipment s Signal Video Signal p 129 Is the USB cable connected correctly Only when projecting USB Display Check that the USB cable is connected correctly Reconnect it if it is not connected or not connected properly Is Windows Media Center displayed in full screen Only when projecting using USB Displ...

Страница 156: ...ormed for a specified length of time while no image signal is being input When A V Mute Timer is set to On If approximately 30 minutes has passed since the A V mute was enabled To prevent the projector from switching off automatically make sure each setting is set to Off s ECO Sleep Mode A V Mute Timer p 144 Is the computer in power saving mode If the computer is in power saving mode and no operat...

Страница 157: ... accessory monitor If the connection is made while the power of the projector or computer is already turned on the Fn key Function key thatchangesthecomputer simagesignaltoexternaloutputmaynotwork Turntheprojectorandcomputeroffandthen back on again s Getting Ready to Project p 45 s Computer s documentation Is the computer in power saving mode If the computer is in power saving mode and no operatio...

Страница 158: ...t all the cables required for projection are securely connected s Connecting Equipment p 29 Is an extension cable being used If an extension cable is used electrical interference may affect the signals Use the cables supplied with the projector to check if the cables you are using may be causing the problem Is the correct resolution selected Only when projecting computer images Set the computer so...

Страница 159: ...rol or the Enter button on the control panel to adjust the position You can also adjust the position from the Configuration menu s Signal Position p 129 Is the computer set for dual display Only when projecting computer images IfdualdisplayisactivatedintheDisplayPropertiesofthecomputer sControlPanel onlyabouthalfoftheimageonthe computer screen is projected To display the entire image on the comput...

Страница 160: ...age Color Adjustment p 128 Are the color saturation and tint adjusted correctly Only when projecting images from a video source Adjust the Color Saturation and Tint settings from the Configuration menu s Image Color Saturation Tint p 128 Images Appear Dark Check Remedy Is the image brightness set correctly Adjust the Brightness and Power Consumption settings from the Configuration menu s Image Bri...

Страница 161: ...ct List s Epson Projector Contact List Is the Control Panel Lock set to Full Lock Press the t power button on the remote control If you do not want to use Control Panel Lock change the setting to Off s Settings Control Panel Lock p 131 Is remote control operation restricted Check the Remote Receiver from the Configuration menu s Settings Remote Receiver p 131 Problems with the Interactive Features...

Страница 162: ... set correctly ForEB 595Wi Whenusinginteractivepensoryourfingerasyouwoulduseamouse setthePenOperationModefrom the Configuration menu according to the operating system of the connected computer For EB 585Wi EB 575Wi When using interactive pens as you would use a mouse set the PenOperationMode to Two Users Mouse or One User Mouse from the Configuration menu s Extended Easy Interactive Function Pen O...

Страница 163: ...attery s Replacing the Battery for the Interactive Pen p 21 The surrounding area is too bright Do not allow strong light to shine on the projected screen or the projector s Easy Interactive Function receiver Has pen calibration been performed correctly Make sure you perform pen calibration when using the interactive pen for the first time so that the projector recognizes the position of the pen co...

Страница 164: ...Touch Unit Setup Angle Adjustment p 135 s Installation Guide Has the system been calibrated for touch operations If the position you touch and the position touched on the screen do not match perform Touch Calibration from the Configuration menu s Calibrating for Touch Operations with Your Finger p 82 Are there any pen trays interactive pens or whiteboard erasers within 2 cm around the projection s...

Страница 165: ...may not be received correctly if the projector is too close to the screen Setup within the recommended projection distance s Screen Size and Projection Distance p 185 The interactive pen is disabled due to unstable conditions in the surrounding area such as a light source that is emitting infrared rays Move the projector or turn off the interfering device such as a light source that is emitting in...

Страница 166: ...tput settings from the Configuration menu s Extended A V Settings p 132 No Sound Can Be Heard from the Microphone Check Remedy Is the microphone connected correctly Disconnect the cable from the Microphone Mic port and then reconnect the cable s Connecting a Microphone p 37 Is the microphone input volume turned down too low Adjust the microphone input volume so that sound can be heard s Settings M...

Страница 167: ...been inserted in the wrong direction Insert new batteries in the correct direction s Replacing the Remote Control Batteries p 19 I Want to Change the Language for Messages and Menus Check Remedy Change the language setting Adjust the Language setting from the Configuration menu s Extended Language p 132 Mail Is Not Received even if an Error Occurs with the Projector Check Remedy Is Standby Mode se...

Страница 168: ...u Check if it is set correctly s Mail Menu p 142 Cannot Change Settings Using a Web Browser Check Remedy Are the user ID and password correct Enter EPSONWEB as the user ID This cannot be changed Enter the user ID even if the password setting is disabled Enter the password you set in Web Control Password The default password is admin Problem Solving 168 http www pureglare com au ...

Страница 169: ...rror occurred in the projector Restart the projector 0891 Cannot find an access point with the same SSID Set the computer the access point and the projector to the same SSID 0892 The WPA WPA2 authentication type does not match Check that the wireless LAN security settings are correct s Security p 140 0893 The WEP TKIP AES encryption type does not match 0894 Communication was disconnected because t...

Страница 170: ...Maintenance This chapter provides information on maintenance procedures to ensure the best level of performance from the projector for a long time to come http www pureglare com au ...

Страница 171: ...he Projection Window Use a commercially available cloth for cleaning glasses to gently wipe the projection window Warning Do not use sprays that contain flammable gas to remove dirt and dust from the lens The projector may catch fire because of the high temperature of the lamp inside the projector Attention Do not rub the lens with harsh materials or subject the lens to shocks as it can easily bec...

Страница 172: ...erature of the projector to rise leading to a malfunction or early deterioration of optical parts Clean the air filter immediately when the message is displayed Do not rinse the air filter in water Do not use detergents or solvents When using a brush for cleaning use one with long soft bristles and brush it lightly If it is brushed too strongly dust will be ground into the air filter and cannot be...

Страница 173: ...p the tab in the center of the air filter and pull the air filter straight out d Remove any dust remaining on the air filter by using a vacuum cleaner from the front e Replace the air filter Cleaning 173 http www pureglare com au ...

Страница 174: ... to replace the air filter Replace it with a new air filter s Replacing the Air Filter p 179 It is recommended that you clean these parts at least once every three months Clean them more often than this if using the projector in a particularly dusty environment Cleaning 174 http www pureglare com au ...

Страница 175: ...message is displayed It is time to replace your lamp Please contact your Epson projector reseller or visit www epson com to purchase The message is displayed for 30 seconds The power indicator is flashing blue and the lamp indicator is flashing orange The projected image gets darker or starts to deteriorate Replacing Consumables 175 http www pureglare com au ...

Страница 176: ...safety Any damage or malfunction caused by the use of non genuine lamps may not be covered by Epson s warranty a We recommend that you clean the air filter whenever you replace the lamp s Cleaning the Air Filter p 172 How to Replace the Lamp The lamp can be replaced even when the projector is suspended from a wall or ceiling Warning When replacing the lamp because it has stopped working there is a...

Страница 177: ...h the new lamp unit or a cross head screwdriver Slide the lamp cover straight forward and remove it a When the projector is mounted on a wall or suspended from a ceiling and you need to replace the lamp remove the lamp cover carefully and support it with your hand to prevent it from falling c Loosen the two lamp fixing screws Replacing Consumables 177 http www pureglare com au ...

Страница 178: ... local dealer for further advice s Epson Projector Contact List e Install the new lamp Insert the new lamp along the guide rail in the correct direction so that it fits in place push in firmly and then press the handle down Tighten the two lamp fixing screws Replacing Consumables 178 http www pureglare com au ...

Страница 179: ...y you when it is time to replace the lamp After replacing the lamp make sure you reset the lamp hours from the Configuration menu s Reset Menu p 146 a Only reset the lamp hours after the lamp has been replaced Otherwise the lamp replacement period will not be indicated correctly Replacing the Air Filter Air Filter Replacement Period If the message is displayed frequently even though the air filter...

Страница 180: ... cover Press the tabs on the air filter cover and open the cover c Remove the air filter Grip the tab in the center of the air filter and pull the air filter straight out Replacing Consumables 180 http www pureglare com au ...

Страница 181: ...d Install the new air filter e Close the air filter cover Replacing Consumables 181 http www pureglare com au ...

Страница 182: ...se of used air filters properly in accordance with your local regulations Material of the frame part Polypropylene Material of the filter part Polypropylene Replacing Consumables 182 http www pureglare com au ...

Страница 183: ...Appendix http www pureglare com au ...

Страница 184: ...t ELPMB23 Use when installing the projector on a ceiling Attachment plate ELPPT06 Use when attaching the ceiling mount to the projector Easy Interactive Pen ELPPN04A ELPPN04B Pens for the interactive features You cannot use interactive pens with the same model number at the same time Interactive Pen Extension ELPPE01 Attach to the interactive pen to extend the pen and use it as a pointer Replaceme...

Страница 185: ...he screen when placing on a surface such as a desk Unit cm 16 10 Screen Size A B C Minimum Wide to Maximum Tele Minimum Wide Minimum Wide 60 129x81 34 8 47 9 9 89 8 70 151x94 41 56 2 11 7 105 9 80 172x108 47 2 60 14 4 122 90 194x121 53 4 60 17 138 2 100 215x135 59 6 60 19 7 154 3 Unit cm 4 3 Screen Size A B C Minimum Wide to Maximum Tele Minimum Wide Minimum Wide 53 108x81 34 8 47 9 9 89 8 60 122x...

Страница 186: ...ojector and the bottom of the screen when placing on a surface such as a desk C The distance between the projector and the bottom of the screen when mounting on a wall or ceiling or installing vertically The distance between the projector and the top of the screen when placing on a surface such as a desk Unit cm 4 3 Screen Size A B C Minimum Wide to Maximum Tele Minimum Wide Minimum Wide 56 114x85...

Страница 187: ...aximum Tele Minimum Wide Minimum Wide 52 115x65 35 3 48 5 17 7 82 5 60 133x75 41 1 56 3 21 5 96 2 70 155x87 48 3 60 26 3 113 4 80 177x100 55 6 60 31 130 6 85 188x106 59 2 60 33 4 139 2 Screen Size and Projection Distance 187 http www pureglare com au ...

Страница 188: ...152x870 1 EB 595Wi EB 585Wi EB 585W EB 575Wi EB 575W only 2 Only compatible when Wide is selected as the Resolution from the Configuration menu Images may also be projected when signals other than the above are input However some functions may be limited Component Video Signal Refresh Rate Hz Resolution dots SDTV 480i 60 720x480 SDTV 576i 50 720x576 SDTV 480p 60 720x480 SDTV 576p 50 720x576 HDTV 7...

Страница 189: ...80p 60 720x480 SDTV 576i 576p 50 720x576 HDTV 720p 50 60 1280x720 HDTV 1080i 50 60 1920x1080 HDTV 1080p 24 30 50 60 1920x1080 EB 595Wi EB 585Wi EB 585W EB 575Wi EB 575W only MHL Input Signal Signal Refresh Rate Hz Resolution dots VGA 60 640x480 SDTV 480i 480p 60 720x480 SDTV 576i 576p 50 720x576 HDTV 720p 50 60 1280x720 HDTV 1080i 50 60 1920x1080 HDTV 1080p 24 30 1920x1080 Supported Monitor Displa...

Страница 190: ...40V AC 10 50 60Hz 3 8 1 7A Power con sumption 100 to 120 V area Operating 376 W Standby power consumption Communication On 4 3 W Standby power consumption Communication Off 0 33 W 220 to 240 V area Operating 358 W Standby power consumption Communication On 4 3 W Standby power consumption Communication Off 0 44 W Operating altitude Altitude 0 to 3 000 m Operating temperature 5 to 35 C No condensati...

Страница 191: ...cation Off 0 33 W Operating 376 W Standby power consumption Communication On 4 3 W Standby power consumption Communication Off 0 33 W Operating 333 W Standby power consumption Communication On 4 3 W Standby power consumption Communication Off 0 33 W 220 to 240 V area Operating 318 W Standby power consumption Communication On 4 3 W Standby power consumption Communication Off 0 44 W Operating 358 W ...

Страница 192: ...i pin jack Audio Out port 1 Stereo mini pin jack HDMI1 MHL input port 1 HDMI Audio is only supported by PCM HDMI2 port 1 HDMI Audio is only supported by PCM USB A port 1 USB connector Type A USB B port 1 USB connector Type B USB port for Wireless LAN unit 1 USB connector Type A LAN port 1 RJ 45 RS 232C port 1 Mini D Sub 9 pin male SYNC port 2 Stereo mini pin jack Supports USB 2 0 However the opera...

Страница 193: ...ed for IT power distribution system with phase to phase voltage 230V Angle of tilt If you use the projector tilted at an angle of more than 3 it could be damaged and cause an accident Specifications 193 http www pureglare com au ...

Страница 194: ...rotection against harmful interference in a residential installation This equipment generates uses and can radiate radio frequency energy and if not installed and used in accordance with the instructions may cause harmful interference to radio communications However there is no guarantee that interference will not occur in a particular installation If this equipment does cause interference to radi...

Страница 195: ...e FCC Rules Operation is subject to the following two conditions 1 this device may not cause harmful interference and 2 this device must accept any interference received including interference that may cause undesired operation Specifications 195 http www pureglare com au ...

Страница 196: ...Units mm Appearance 196 http www pureglare com au ...

Страница 197: ...Without feet With feet Units mm Appearance 197 http www pureglare com au ...

Страница 198: ...s is a server router for communicating across a network subnet divided according to subnet maskg HDCP HDCP is an abbreviation for High bandwidth Digital Content Protection It is used to prevent illegal copying and protect copyrights by encrypting digital signals sent over DVI and HDMI ports Because the HDMI port on this projector supports HDCP it can project digital images protected by HDCP techno...

Страница 199: ... for the network address on a divided network subnet from the IP address SVGA A screen size standard with a resolution of 800 horizontal x 600 vertical dots S Video A method that separates the video signal into a luminance component Y and a color component C SXGA A screen size standard with a resolution of 1 280 horizontal x 1 024 vertical dots Sync Thesignalsoutputfromcomputershaveaspecificfreque...

Страница 200: ...cision devices etc you should use this product only after giving consideration to including fail safes and redundancies into your design to maintain safety and total system reliability Because this product was not intended for use in applications requiring extremely high reliability safety such as aerospace equipment main communication equipment nuclear power control equipment or medical equipment...

Страница 201: ...d LLC in the United States and or other countries PJLink trademark is a trademark applied for registration or is already registered in Japan the United States of America and other countries and areas Crestron and Crestron RoomView are registered trademarks of Crestron Electronics Inc Other product names used herein are also for identification purposes only and may be trademarks of their respective...

Отзывы: