


Setup & Operation 5. Motion Range
58
E2C Rev.6
5.2.
1
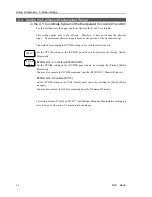
Setting the Mechanical Stops of Joints #
1
and #2
Both Joints #1 and #2 have threaded holes in the positions corresponding to the angle for
the mechanical stop settings. Tighten the bolts in holes corresponding to the angle that
you want to set.
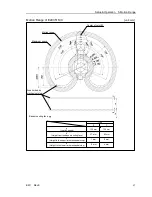
The following figures show the positions of the threaded holes for the mechanical stop
settings of Joints #1/#2 and the setting angles (pulse value).
Joint #
1
(º: degree)
E2C25
1
*
(Table Top)
+90
°
(
1
63840 pulse) (standard)
-
90
°
(0 pulse) (standard)
+0
°
(8
1
920 pulse)
Mechanical stop of Joint #
1
(standard)
Mechanical stop for 0
°
-
0
°
(8
1
920 pulse)
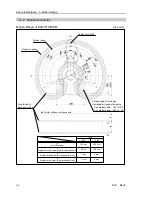
E2C35
1
*
(Table Top)
E2C35
1
*M
(Multiple Mountings)
+
11
0
°
(
1
82045 pulse) (standard)
-
11
0
°
(
-
1
8205 pulse) (standard)
+0
°
(8
1
920 pulse)
Mechanical stop of Joint #
1
(standard)
Mechanical stop for 0
°
-
0
°
(8
1
920 pulse)
+
11
0
°
(
1
82045 pulse) (standard)
-
11
0
°
(
-
1
8205 pulse) (standard)
+0
°
(8
1
920 pulse)
Mechanical stop for 0
°
-
0
°
(8
1
920 pulse)
Содержание E2C Series
Страница 1: ...SCARA ROBOT E2C series MANIPULATOR MANUAL Rev 6 EM069R1409F ...
Страница 2: ...MANIPULATOR MANUAL E2C series Rev 6 ...
Страница 8: ...vi E2C Rev 6 ...
Страница 14: ......
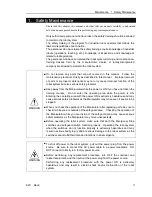
Страница 81: ...Maintenance This volume contains maintenance procedures with safety precautions for E2C series Manipulators ...
Страница 82: ......
Страница 92: ...Maintenance 2 General Maintenance 80 E2C Rev 6 ...
Страница 118: ...Maintenance 4 Replacing the Cable Unit 106 E2C Rev 6 ...
Страница 194: ...Maintenance 11 Replacing the Signal Relay Board 182 E2C Rev 6 ...


