


Maintenance 5. Replacing the Motors (Joint #3)
118
E2C Rev.6
Installation
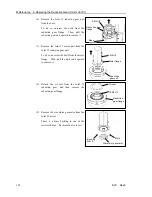
(1) Remove the pulley from the brake.
The rotor hub is held to the brake by its
magnet. When removing the pulley, slide
it out perpendicularly from the shaft to
prevent damage to the leaf spring on the
rotor hub.
Leaf spring
Brake
Pulley
Rotor hub
Remove this way
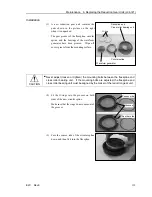
(2) For the brake clearance adjustment, hold
the gap gauge on the brake, and then
mount the pulley over the gauge.
The screw hole of the pulley must be
located in the position shown in the figure
on the right.
The gap gauge (0.15 mm) is attached to the
inside of the arm bottom cover for storage.
Gap gauge for
adjusting brake
clearance
Screw holes
of the pulley
Brake
Rotor hub
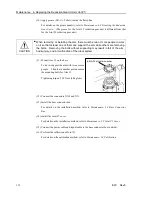
(3) Place the Joint #3 motor on the motor
plate.
The motor cables of the Joint #3 motor and
the flat face of the motor shaft must be
oriented in the direction shown in the
figure on the right.
2-M4
×
8
Motor plate
Flat
(4) Secure the pulley to the motor shaft of the
Joint #3 motor.
To do so, tighten one of the setscrews to
the flat face of the motor shaft until the
screw just touches the surface. Insert a
bushing into the other setscrew hole to
prevent damage to the motor shaft. Then,
tighten both setscrews.
Bushing
Pulley
M4
×
8
Flat point
Setscrew
(Round
chamfer
side)
M4
×
8
Flat point
setscrew
(Flat side)
(5) After the pulley is secured, pull out the gap gauge.
(6) Fasten the brake cables to the Joint #3 motor with a wire tie.
Make sure that the brake cables do not touch the pulleys when installing the Joint #3
motor unit to Arm #2.
)
NOTE
Содержание E2C Series
Страница 1: ...SCARA ROBOT E2C series MANIPULATOR MANUAL Rev 6 EM069R1409F ...
Страница 2: ...MANIPULATOR MANUAL E2C series Rev 6 ...
Страница 8: ...vi E2C Rev 6 ...
Страница 14: ......
Страница 81: ...Maintenance This volume contains maintenance procedures with safety precautions for E2C series Manipulators ...
Страница 82: ......
Страница 92: ...Maintenance 2 General Maintenance 80 E2C Rev 6 ...
Страница 118: ...Maintenance 4 Replacing the Cable Unit 106 E2C Rev 6 ...
Страница 194: ...Maintenance 11 Replacing the Signal Relay Board 182 E2C Rev 6 ...


